Accelerator includes an integration to support Amazon Elastic Compute Cloud (EC2). This integration lets you configure the Cluster Manager to use Amazon EC2 to spin up agents on demand.
Configuring Agents to Run on Amazon EC2
Prerequisites
The Cluster Manager includes an Amazon EC2 cloud provider integration, which you must select in the Cluster Manager web UI before builds can spin up agents on Amazon EC2. Setting up the Cluster Manager to make this cloud provider available for selection requires that you log into Amazon EC2 instances and install the Cluster Manager and agents on them. To do so, you must first create an Amazon EC2 key pair and set up Amazon EC2 security groups.
Creating an Amazon EC2 Key Pair
To use SSH to log in to Amazon EC2 to install the Cluster Manager and agents on Amazon EC2 instances, you must first log in to https://aws.amazon.com/ and create an Amazon EC2 key pair. This opens up the SSH port for login.
For details about creating an Amazon EC2 key pair, see the Amazon EC2 Key Pairs or Using Key Pairs web pages. Save the private key file that you create using those instructions ( <file_name>.pem ) to a safe place.
Setting Up Amazon EC2 Security Groups
Connecting to instances that have mounted Amazon EFS file systems requires that you create Amazon EC2 security groups. For Accelerator, you must create at least two security groups—one for the Cluster Manager and another for the agents. A third security group is optional for a separate eMake machine as explained below.
For details about creating and working with security groups, see the Creating Security Groups web page. Following are instructions for creating the specific security groups and settings that Accelerator requires.
-
Create a security group for the Cluster Manager.
This security group is for the instance on which you will install the Cluster Manager. Use the following settings:
Security Group Name: cm Inbound
Type
Protocol
Port Range
Source
HTTP
TCP
80
0.0.0.0/0
All traffic
All
All
<agent_group_ID> . For example, sg-77c40a13
SSH
TCP
22
0.0.0.0/0
HTTPS
TCP
443
0.0.0.0/0
Outbound
Type
Protocol
Port Range
Source
All traffic
All
All
0.0.0.0/0
-
Create a security group for the agents. This security group is for the instance on which you will install the agents. Use the following settings:
Security Group Name: agent Inbound
Type
Protocol
Port Range
Source
All traffic
All
All
<cluster_manager_group_ID> . For example, sg-f8ca049c
SSH
TCP
22
0.0.0.0/0
All TCP
TCP
0-65535
<agent_group_ID> . For example, sg-77c40a13
Outbound
Type
Protocol
Port Range
Source
All traffic
All
All
0.0.0.0/0
-
(Optional) Create a security group for a separate eMake machine.
This security group is for a separate instance that is required if you want to set up a separate eMake machine. Make sure that both the “cm” and “agent” security groups allow all inbound traffic from this group.
Creating the Agent AMI
The Amazon machine image (AMI) will be the resource that you specify via the --emake-resource option when invoking eMake. To create the agent AMI:
-
Launch an Amazon EC2 instance for the agents in the “agent” security group.
-
Log into the instance by using the following command:
ssh -i <path_to_.pem_file> <DNS_name_of_instance>
For example:
ssh -i /net/f2home/user/.ssh/userkey.pem ubuntu@ec2-54-191-3-81.us-west-2.compute.amazonaws.com
userkey.pemis the private key file that you downloaded when you created your Amazon EC2 key pair. -
Install the ElectricAccelerator agents on the instance.
-
When the
Agents are provisioned on-demand from a cloud - Amazon EC2 etc. [y/N]installer prompt appears, entery. -
When the instance is created and the agents are installed, use it to create an AMI. For details about creating an AMI, see the Create an AMI from an Amazon EC2 Instance web page.
Setting Up the Cluster Manager
To set up the Cluster Manager, you install the Cluster Manager on an instance, choose a machine to run eMake, and configure the Cluster Manager server to use your Amazon EC2 instance by importing a license and selecting Amazon EC2 as the cloud provider.
Installing the Cluster Manager on the Instance
-
Launch an instance (separate from the instance(s) running agents) for the Cluster Manager in the security group that you created above.
This should be at least a t2.medium instance type. For details, see the Amazon EC2 Instance Types web page. Electric Cloud recommends at least 8 GB of memory on the Cluster Manager machine (or more for larger builds or if you run eMake on the same machine).
-
Install the Cluster Manager on the instance.
Choosing a Machine to Run eMake
You can either use the Cluster Manager machine or create a separate machine to run eMake as mentioned above. You must also install any tools (such as compilers and linkers) and so on that your builds require on that machine. For details, see ElectricAccelerator Installation Guide.
Configuring the Cluster Manager Server
-
Open the Cluster Manager in your browser using the public DNS name of its corresponding instance (for example, ec2-54-191-3-81.us-west-2.compute.amazonaws.com).
For details about finding the public DNS, see the Amazon EC2 Instance IP Addressing web page.
-
Import an Accelerator license.
For details about importing a license, see Logging In and Enabling Licensing .
-
Go to the Cluster Manager Administration > Server Settings subtab, and under Resource Manager Type, choose Amazon EC2.
-
Choose your AWS geographic region from the Region menu.
-
Fill in following fields:
-
AWS Access Key ID
-
AWS Secret Key
-
-
Click the Connect button.
The
Your credentials successfully connected to AWSmessage appears, and the menus in the next step become active. -
Choose the appropriate options from the following menus.
-
Instance Type : This type should have enough memory and disk space to handle the number of agents that you installed when you set up the AMI. For details about instance types, see the Amazon EC2 Instance Types web page. For Cluster Manager memory and disk space requirements, see Hardware Requirements.
-
Security Group : Choose agent.
-
Key Pair
-
Availability Zone within the region or the Subnet ID (or both).
-
(Optional) Instance Idle Timeout (minutes) : This is the period of time before idle agents are terminated. After their corresponding cluster resource is done being used, agents become idle and available for a subsequent build during this time. If a new build starts that uses that resource, new instances with new agents are provisioned. The default is 15 minutes.
-
-
Click OK.
For details about the settings listed above, see Server Settings
Testing the Cluster Manager Setup
Navigate to the Administration > Cloud subtab in the Cluster Manager to make sure that your setup works. Launched instances will appear in the Current Instances section on this page. For example:
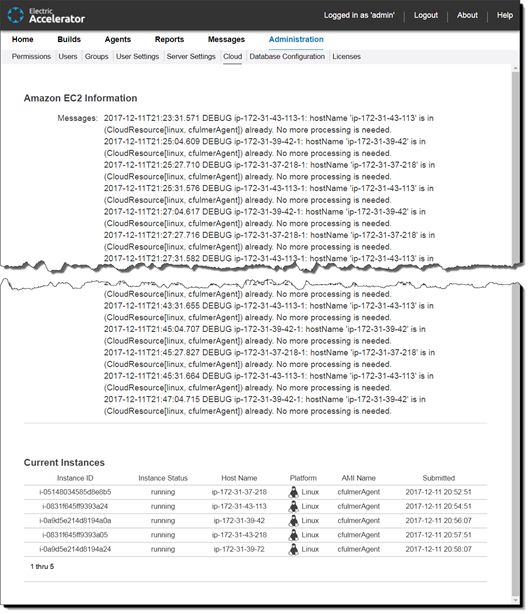
For details about the information in the Administration > Cloud subtab, see Cloud.
Launching a Build
Start a build by starting eMake with a command such as:
emake --emake-cm=<cluster_manager_public_DNS> --emake-resource=<AMI_name_for_agents> --emake-root=<root_dir>
You can limit the number of launched instances. To do so, include the --emake-maxagents=N eMake option, where N is the number of agents.
When you start the build, the instances are launched. The build might require several minutes to begin. A No agents available message might appear while the instances are launching.
When the first instance is up, the build proceeds. When the build finishes, the agents become idle and available for a subsequent build for 15 minutes (by default) until their instances are terminated. You can configure this timeout period as described above in Configuring the Cluster Manager Server.
Troubleshooting
To troubleshoot, examine the <install_dir>/i686_Linux/logs/accelerator.log and <install_dir>/i686_Linux/cloud/cloud.log files, where <install_dir> is /opt/ecloud by default.
Note that the cloud provider integration scripts used by Amazon EC2 are in <install_dir>/i686_Linux/cloud/ec2. The ec2.properties file in this directory contains the settings from the Cluster Manager.
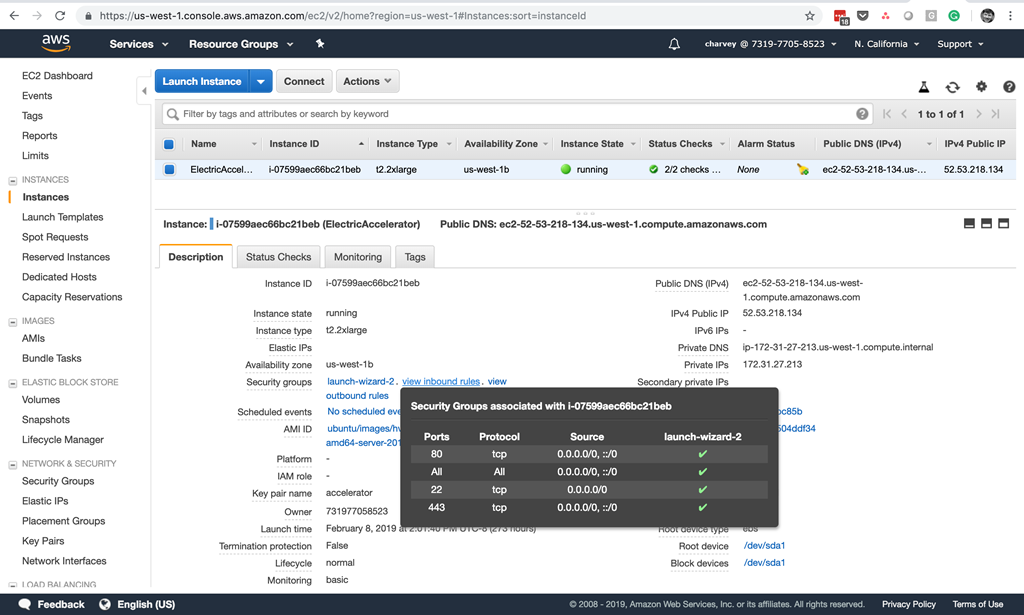
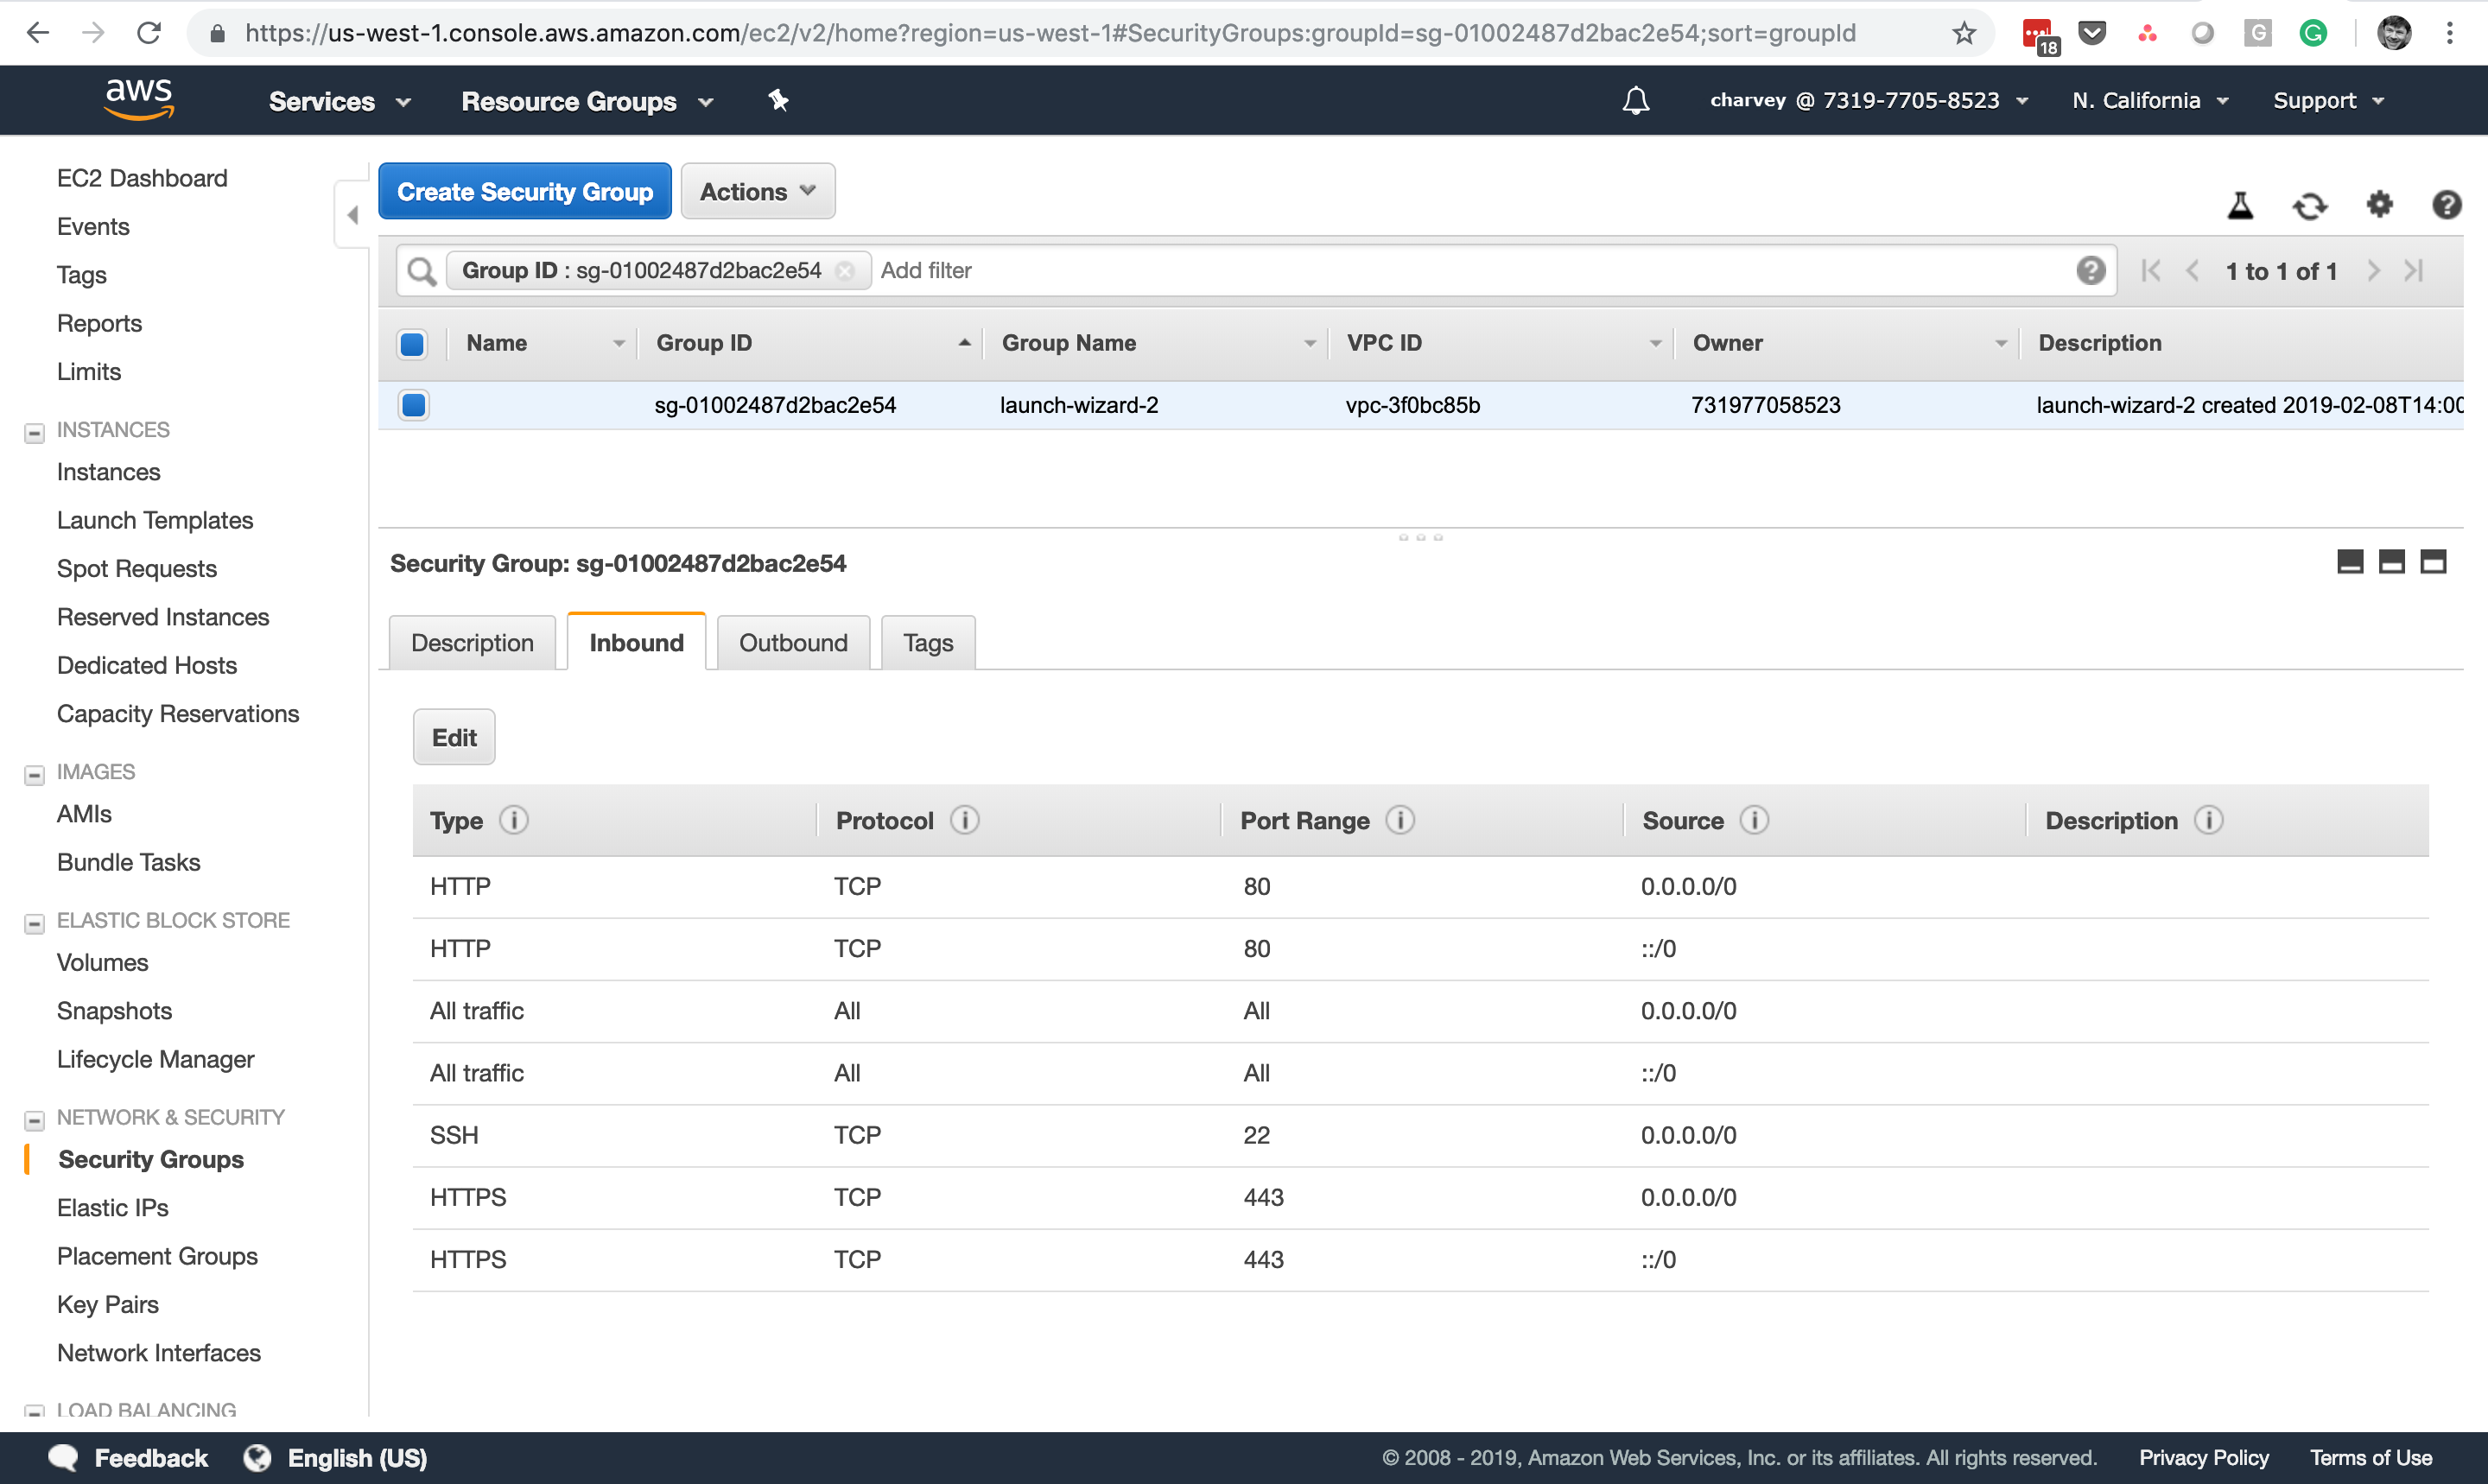
Opening the Ports in Amazon EC2 for the Cluster Manager Instance
To allow users to connect to the Cluster Manager web UI, you must ensure that traffic is enabled on HTTP (port 80) or HTTPS (port 443). To do so, you might need to configure the associated security group and network access control list (network ACL) in your Amazon EC2 dashboard. For example:
Choosing the Amazon EC2 Cloud Provider in the Cluster Manager
The final procedure for enabling Accelerator to use Amazon EC2 is that you must log into the Cluster Manager and choose the Amazon EC2 cloud provider from a list of cloud providers when you create a corresponding resource. A cloud provider lets you select a specific set of available agents when running builds. For example, a build might require a certain hardware feature. If so, ElectricAccelerator will use agents only on hosts containing that hardware. You use the --emake-resource eMake option to select this resource for a build.
For instructions about choosing a cloud provider when creating a resource in the Cluster Manager and for details about cloud providers, see Resources - Create or Edit a Resource.
About the Amazon EC2 Cloud Provider Integration Scripts
The Amazon EC2 integration lets Accelerator communicate with Amazon EC2.
After you enable the Amazon EC2 integration, the Cluster Manager uses the following scripts to communicate with the host Amazon EC2 server. These scripts perform tasks such as checking the AMI resource and also querying, submitting, and killing instances.
These scripts are in the <install_dir>/i686_Linux/cloud/ec2 directory, where <install_dir> is /opt/ecloud by default.
| These scripts are not user-configurable except as noted. |
| Script | Description | Input argument | Output | ||||
|---|---|---|---|---|---|---|---|
|
Checks whether an AMI name is valid. This script is called by the Cluster Manager to validate that a given resource request is OK |
Resource string in |
" |
||||
|
Used internally by Accelerator |
– |
– |
||||
|
Checks whether the Amazon EC2 setup is ready |
– |
" |
||||
|
Terminates an Amazon EC2 instance based on the instance ID. This script is called by the Cluster Manager to terminate a resource that it no longer needs |
Amazon EC2 instance ID |
– |
||||
|
Queries the status of Amazon EC2 instances that match the resource constraints. This script is called by the Cluster Manager to enumerate the active grid resources |
– |
A string format: |
||||
Runs an Amazon EC2 instance. This script is called by the Cluster Manager when it needs new resources. This script contains a variable named To add custom tags, you set the variable to a comma-separated list of
|
Resource string, OS, and |
Amazon EC2 instance ID |
After their corresponding cluster resource is done being used, the agents become idle and available for a subsequent build for 15 minutes (by default) until they are terminated. If a new build starts that uses that resource, new instances with new agents are provisioned. You can change this timeout period by using the Amazon EC2 Instance Idle Timeout server setting in the Cluster Manager web UI as described in About the Amazon EC2 Cloud Provider Integration Scripts.
Note that using Accelerator with Amazon EC2 requires that you configure the Cluster Manager server to use the Amazon EC2 cloud provider. For details, see Server Settings.