Introduction
This tutorial provides instructions to create a functional plugin called SampleJira which retrieves issues from a remote Atlassian Jira server. The following steps are included:
Prerequisites
- The following prerequisites are necessary to complete this tutorial
-
-
An active CloudBees CD/RO instance.
-
Internet connection.
-
pdkis installed and set up.-
The tutorial assumes
pdkis configured in$PATH. If not, you must provide the installation path topdkwhen running commands.
-
-
Gradle v8.2.1 was tested with this tutorial. You must have a compatible Gradle version installed.
-
| A Jira Cloud instance using API v3 was used to develop this tutorial. Depending on your Jira instance, the basic authorization scheme described here may not be possible. |
Create plugin workspace
To create a plugin workspace:
The following steps assume pdk is configured in $PATH. If not, you must provide the installation path to pdk when running commands.
|
-
Change to your working directory:
cd ~/work -
To generate a
pdkplugin workspace, run:pdk generate workspace
An interactive prompt runs. Provide the following information:
-
A name for the plugin, such as
SampleJira. -
For
workspace type, you must userest. -
For
auth scheme, you must usebasic. -
(Optional) An
author name. Default isnone. -
(Optional) A
support URL. Default isnone. -
(Optional) A
plugin category. Default isUtilities.-
CloudBees CD/RO sorts plugins in the UI using the
plugin category, and by default, this plugin is aUtilitiesplugin. If you provide an alternate category, your plugin is sorted to thatplugin category.
-
-
(Optional) Provide a description for the plugin.
-
For the
plugin language, you must usegroovy.
Based on this information, pdk generates your workspace, the output should be similar to:
INFO: Wrote initial declaration to /home/anykey/work/SampleJira/config/pluginspec.yaml INFO: Plugin folder is /home/anykey/work/SampleJira INFO: Wrote flowpdf specification into /home/anykey/work/SampleJira/config/flowpdf.yaml INFO: Initial plugin spec has been placed into /home/anykey/work/SampleJira/config/pluginspec.yaml INFO: Go into the plugin directory: 'cd /home/anykey/work/SampleJira' INFO: Change the plugin spec and run 'pdk generate plugin' from the plugin directory
The following files should now be present in your working directory:
./ └── config ├── flowpdf.yaml └── pluginspec.yaml
Define and generate plugin and dependencies
The config/pluginspec.yaml has 3 basic sections:
-
Plugin metadata (
pluginInfo)The plugin metadata is generated in pluginInfofrom the inputs you provided when runningpdk generate workspace. -
Plugin configuration (
configuration) -
Plugin procedures (
procedures)
Additionally, plugins require dependencies build into the pdk framework. This section demonstrates how to configure the configuration and procedures sections, and generate pdk dependencies.
Update configuration section
To interact with Jira, the following configuration values are required:
-
Jira endpoint
-
Username for authorization.
-
Password for authorization.
In the config/pluginspec.yaml, replace the configuration section with following:
# REST-backed plugin configuration configuration: checkConnection: true restConfigInfo: endpointLabel: 'Endpoint' documentation: Third-party endpoint to connect to (Jira server URL), e.g. 'http://jira:8080/' checkConnectionUri: '/rest/api/3/project' headers: Accept: 'application/json' authSchemes: basic: userNameLabel: 'Username' passwordLabel: 'Password' description: 'Jira Credential' hasProxySupport: true hasDebugLevel: true
This configuration is not complied into the plugin until after you run pdk generate plugin. In general, it is good practice to run pdk generate plugin after making plugin changes. However, for this tutorial, you can proceed to Update procedures section.
|
Update procedures section
Plugin procedures are the actions that allow plugins to carry out tasks. For this tutorial, a procedure called GetIssue is created that retrieves a Jira issue based on its key. To create the GetIssue procedure, in your config/pluginspec.yaml, replace the procedures section with the following:
procedures: - name: 'GetIssue' description: 'Saves details for Jira issue to the properties' # configuration field will be generated automatically hasConfig: true shell: 'ec-groovy' parameters: - name: jiraKey documentation: Key of the issue to retrieve. required: true type: entry label: Jira Key restParamInfo: in: path outputParameters: issueStatus: 'Name of the status of the retrieved issue' # Connects REST endpoint to the plugin procedure restProcedureInfo: url: '/rest/api/3/issue/{{jiraKey}}' methodName: 'getIssue' httpMethod: 'GET'
Regenerate plugin updates
After configuring the configuration and procedures sections, to apply the updates in the plugin project, you must regenerate it. To regenerate, execute the following command from the root level directory of the
plugin workspace:
pdk generate plugin
The output should look similar to:
Updated plugin regeneration output
anykey@hp-anykey:~/work/SampleJira$ ~/pdk/bin/pdk generate plugin INFO: Working in /home/anykey/work/SampleJira INFO: Fetching the asset from https://downloads.cloudbees.com/cloudbees-cd/pdk/release/flowpdf-plugin-layout/versions.json INFO: Fetching latest version from https://downloads.cloudbees.com/cloudbees-cd/pdk/release/flowpdf-plugin-layout INFO: Fetching the asset from https://downloads.cloudbees.com/cloudbees-cd/pdk/release/flowpdf-plugin-layout/versions.json INFO: Latest version is 2.0.3 INFO: Fetching the asset from https://downloads.cloudbees.com/cloudbees-cd/pdk/release/flowpdf-plugin-layout/2.0.3/flowpdf-plugin-layout.zip INFO: Wrote initial README.md INFO: Saved generic check connection step INFO: Saved generic check connection step INFO: Fetching the asset from https://downloads.cloudbees.com/cloudbees-cd/pdk/release/flowpdf-groovy/versions.json INFO: Fetching latest version from https://downloads.cloudbees.com/cloudbees-cd/pdk/release/flowpdf-groovy INFO: Fetching the asset from https://downloads.cloudbees.com/cloudbees-cd/pdk/release/flowpdf-groovy/versions.json INFO: Latest version is 2.0.3 INFO: Fetching the asset from https://downloads.cloudbees.com/cloudbees-cd/pdk/release/flowpdf-groovy/2.0.3/flowpdf-groovy.zip INFO: Generated parameters wrapper class for getIssue INFO: Updated Flow Logic class INFO: Wrote step code for step GetIssue: GetIssue INFO: Copied agent folder files INFO: Inflating REST Client SampleJiraRESTClient INFO: Saved build.gradle INFO: Icon placeholder is placed into /home/anykey/work/SampleJira/htdocs/images/icon-plugin.svg INFO: Copied agent folder files INFO: Inflating REST Client SampleJiraRESTClient INFO: build.gradle already exists in the plugin folder, updating only library version INFO: Inflated core library groovy INFO: Setting asset version to 2.0.3 for the asset groovy-core
Review the auto-generated code
After generating the plugin code and dependencies, your plugin directory will contain multiple generated directories and files. This section provides a short description of the boilerplate code generated for the plugin by the PDK. The following is an example plugin directory structure:
Plugin directory structure example
./ ├── README.md ├── build.gradle ├── config │ ├── flowpdf.yaml │ └── pluginspec.yaml ├── dsl │ ├── procedures │ │ ├── CreateConfiguration │ │ │ └── steps │ │ │ └── checkConnectionGeneric.groovy │ │ ├── SampleRESTProcedure │ │ │ └── steps │ │ │ └── SampleRESTProcedure.groovy │ │ └── TestConfiguration │ │ └── steps │ │ └── checkConnectionGeneric.groovy │ └── properties │ └── groovy │ └── lib │ ├── SampleJira.groovy │ ├── SampleJiraRESTClient.groovy │ └── SampleRESTProcedureParameters.groovy ├── htdocs │ ├── images │ │ └── icon-plugin.svg │ └── pluginhelp.css └── pages └── help.xml
In dsl/properties/groovy/lib/SampleJira.groovy, the plugin logic can be viewed:
Example SampleJira.groovy
import com.cloudbees.flowpdf.* /** * SampleJira */ class SampleJira extends FlowPlugin { @Override Map<String, Object> pluginInfo() { return [ pluginName : '@PLUGIN_KEY@', pluginVersion : '@PLUGIN_VERSION@', configFields : ['config'], configLocations: ['ec_plugin_cfgs'], defaultConfigValues: [:] ] } // === check connection ends === /** * Auto-generated method for the procedure GetIssue/GetIssue * Add your code into this method and it will be called when step runs * Parameter: config * Parameter: jiraKey */ def getIssue(StepParameters p, StepResult sr) { GetIssueParameters sp = GetIssueParameters.initParameters(p) SampleJiraRESTClient rest = genSampleJiraRESTClient() Map restParams = [:] Map requestParams = p.asMap restParams.put('jiraKey', requestParams.get('jiraKey')) Object response = rest.getUser(restParams) log.info "Got response from server: $response" //TODO step result output parameters sr.apply() } /** * This method returns REST Client object */ SampleJiraRESTClient genSampleJiraRESTClient() { Context context = getContext() SampleJiraRESTClient rest = SampleJiraRESTClient.fromConfig(context.getConfigValues(), this) return rest } // === step ends === }
The GetIssue procedure is also generated to the SampleJira.groovy in the getIssues method. This is important to recognize, since you will customize it later in this tutorial.
|
Implement additional logic
One of the main aspects that makes CloudBees CD/RO such a versatile platform is the ability to develop and customize plugins to fit the needs of your projects. In this section, some basics of plugin customization are demonstrated.
Import required libraries
You can add required libraries by importing them using dsl/properties/groovy/lib/SampleJira.groovy.
For the SampleJira plugin, the following libraries are required:
-
com.cloudbees.flowpdf.*: (Included by default) Performs HTTP requests. -
groovy.json.JsonSlurper: Transform the received result to JSON.
To import an additional library to your plugin:
-
Open
dsl/properties/groovy/lib/SampleJira.groovy. -
In head of the file, modify the
importcommands as follows:import com.cloudbees.flowpdf.* import groovy.json.JsonSlurper -
In the plugin root directory, run
pdk generate plugin.
Your plugin is now updated with the necessary libraries.
Modify getIssue step code
The getIssue method is auto-generated by PDK for the GetIssue procedure you configured earlier in dsl/properties/groovy/lib/SampleJira.groovy.
However, the step is missing the necessary logic to convert the HTTP response to JSON, as noted by //TODO step result output parameters:
GetIssue method structure unmodified
/** * Auto-generated method for the procedure GetIssue/GetIssue * Add your code into this method and it will be called when step runs * Parameter: config * Parameter: jiraKey */ def getIssue(StepParameters p, StepResult sr) { GetIssueParameters sp = GetIssueParameters.initParameters(p) SampleJiraRESTClient rest = genSampleJiraRESTClient() Map restParams = [:] Map requestParams = p.asMap restParams.put('jiraKey', requestParams.get('jiraKey')) Object response = rest.getUser(restParams) log.info "Got response from server: $response" //TODO step result output parameters sr.apply() }
To convert the HTTP response to JSON, update dsl/properties/groovy/lib/SampleJira.groovy with the following code:
GetIssue method structure modified with JSON response
/** * Auto-generated method for the procedure GetIssue/GetIssue * Add your code into this method and it will be called when step runs * Parameter: config * Parameter: jiraKey */ def getIssue(StepParameters p, StepResult sr) { GetIssueParameters sp = GetIssueParameters.initParameters(p) SampleJiraRESTClient rest = genSampleJiraRESTClient() Map restParams = [:] Map requestParams = p.asMap restParams.put('jiraKey', requestParams.get('jiraKey')) Object response = rest.getUser(restParams) log.info "Got response from server: $response" // Saving issue as a JSON sr.setOutcomeProperty('/myCall/issue', response) def jsonSlurper = new JsonSlurper() def jsonResponse = jsonSlurper.parseText(response) String issueStatus = jsonResponse?.fields?.status?.name ?: 'no status' log.info("Issue status is: ${issueStatus}") String issueIdentifier = requestParams.get('jiraKey') sr.apply() }
In the plugin root directory, run pdk generate plugin. Your plugin GetIssue procedure is now updated.
Set output parameter
Output parameters can be set as part of the StepResult object for procedure in the dsl/properties/groovy/lib/SampleJira.groovy.
For this tutorial, you will add an output parameter that returns the Status of the retrieved Jira issue:
-
In the
dsl/properties/groovy/lib/SampleJira.groovy, locate thesr.apply()call. -
Modify the code and save as follows:
sr.setOutputParameter('issueStatus', issueStatus) sr.apply() -
In the plugin root directory, run
pdk generate plugin.
The Status of your retrieved Jira issue will now be returned as an output parameter when the GetIssue procedure runs.
Set build summaries
Build summaries can provide helpful information about the tasks that run in pipelines, jobs, and jobSteps. In this step you will set up build summaries for the plugin pipeline, job, and jobStep:
-
In the
dsl/properties/groovy/lib/SampleJira.groovy, locate thesr.apply()call. -
Update the content there from:
sr.setOutputParameter('issueStatus', issueStatus) sr.apply()to:
sr.setOutputParameter('issueStatus', issueStatus) sr.setJobSummary("Issue status is ${issueStatus}") sr.setPipelineSummary("Issue number: ", issueIdentifier) sr.setJobStepSummary("Saved JSON representation of ${issueIdentifier}") sr.apply()where:
-
setJobSummary("Issue status is ${issueStatus}")uses the output parameterissueStatusto display the status of the retrieved Jira ticket. -
setPipelineSummaryandsetJobStepSummaryuse the Jira ticket key as a value forissueIdentifierobject returned byString issueIdentifier = requestParams.get('jiraKey'), which is set by entering the Jira Key as an input parameter when the defining the plugin task in CloudBees CD/RO.
-
Review your plugin code
Your dsl/properties/groovy/lib/SampleJira.groovy should now look similar to the following example:
import com.cloudbees.flowpdf.* import groovy.json.JsonSlurper /** * SampleJira */ class SampleJira extends FlowPlugin { @Override Map<String, Object> pluginInfo() { return [ pluginName : 'SampleJira', pluginVersion : '1.0.0.0', configFields : ['config'], configLocations: ['ec_plugin_cfgs'], defaultConfigValues: [:] ] } // === check connection ends === /** * Auto-generated method for the procedure GetIssue/GetIssue * Add your code into this method and it will be called when step runs * Parameter: config * Parameter: jiraKey */ def getIssue(StepParameters p, StepResult sr) { GetIssueParameters sp = GetIssueParameters.initParameters(p) SampleJiraRESTClient rest = genSampleJiraRESTClient() Map restParams = [:] Map requestParams = p.asMap restParams.put('jiraKey', requestParams.get('jiraKey')) Object response = rest.getUser(restParams) log.info "Got response from server: $response" // Saving issue as a JSON sr.setOutcomeProperty('/myCall/issue', response) def jsonSlurper = new JsonSlurper() def jsonResponse = jsonSlurper.parseText(response) String issueStatus = jsonResponse?.fields?.status?.name ?: 'no status' log.info("Issue status is: ${issueStatus}") String issueIdentifier = requestParams.get('jiraKey') // Setting outputs sr.setOutputParameter('issueStatus', issueStatus) sr.setPipelineSummary("Issue number", issueIdentifier) sr.setJobSummary("Issue status is ${issueStatus}") sr.setJobStepSummary("Saved json representation of ${issueIdentifier}") sr.apply() } /** * This method returns REST Client object */ SampleJiraRESTClient genSampleJiraRESTClient() { Context context = getContext() SampleJiraRESTClient rest = SampleJiraRESTClient.fromConfig(context.getConfigValues(), this) return rest } // === step ends === }
If your SampleJira.groovy is different, go back through the tutorial steps, and try to identify where you diverged.
Copy plugin dependencies
After generating your plugin, you must copy the required PDK plugin dependencies to your plugin project. This is done using the gradle. To copy PDK plugin dependencies:
| Gradle version v8.2.1 was tested with tutorial. You must have a compatible version installed. |
-
Navigate to your plugin root directory.
-
Run:
gradle task copyDependencies
The required dependencies are copied to agent/deps/libs. The content of
├── agent ├── README.md └── deps └── libs ├── annotations-13.0.jar ├── flowpdf-groovy-lib-2.0.3.0.jar ├── groovy-3.0.13.jar ├── hamcrest-2.2.jar ├── junit-platform-commons-1.9.0.jar ├── junit-platform-engine-1.9.0.jar ├── kotlin-stdlib-1.6.20.jar ├── kotlin-stdlib-common-1.6.20.jar ├── kotlin-stdlib-jdk7-1.6.20.jar ├── kotlin-stdlib-jdk8-1.6.20.jar ├── okhttp-4.11.0.jar ├── okio-jvm-3.2.0.jar ├── opentest4j-1.2.0.jar └──spock-core-2.4-M1-groovy-3.0.jar
Build, install, and test plugin
Once you have finished reviewing your plugin code, you must compile the plugin using the pdk build command:
-
Navigate to the root directory of your plugin.
-
To build the plugin, run:
pdk buildThe output should look something like this:
anykey@hp-anykey:~/work/SampleJira$ pdk build INFO: Builder v2 in action INFO: Generated configuration INFO: Generated postprocessor INFO: Generated setup procedure INFO: Copied directory htdocs over to the build directory INFO: Copied directory pages over to the build directory INFO: Copied directory agent over to the build directory INFO: Copied plugin.xml into the build directory INFO: Added fallback code to the ec_setup.pl /home/anykey/work/SampleJira/build/SampleJira.zip -
Locate the
.zipcreated for the plugin in thebuilddirectory.
Congratulations! You have now created a plugin. Next, install and test it in CloudBees CD/RO.
Install and promote the plugin
To install your plugin, follow the same instructions as if you had downloaded the plugin from the CloudBees CD/RO catalog, only replacing the usage of a .jar file with your .zip. Refer to Install CloudBees CD/RO plugins, for complete instructions.
After you install your plugin:
-
In your CloudBees CD/RO instance, navigate to .
-
In the list of installed plugins, locate the SampleJira plugin (or your plugin name if you used a different name).
-
Select the options menu, and Promote.
Your plugin is now available to use in your CloudBees CD/RO instance.
Create a pipeline and configure the plugin
In this section, you will create a pipeline and configure a step to use your plugin.
To get started:
-
In CloudBees CD/RO, navigate to the .
-
In the upper-right corner, select New , which opens the New Pipeline dialog page.
-
Select Create New, enter Sample Jira Pipeline, choose your project, select Ok. The Pipeline editor page opens.
-
In the Stage 1 task explorer select Add task.
-
For Task name enter
GetIssue, and select Add. -
Select Define. The task definition dialog window opens.
-
For Task type, select Plugin.
-
In the Plugin field, select the dropdown, and select SampleJira (or your plugin name).
-
In the Procedure field, select GetIssue.
Having the basic setup for the plugin task, enter the parameters needed for the task to execute GetIssue:
-
Select Input Parameters, which opens the Input Parameters dialog.
-
For Configuration Name, select the dropdown arrow, and select New Configuration, which opens the New configuration dialog.
-
For Name, provide a configuration name you can easily identify for the plugin, such as
SampleJira plugin. -
Set Project to the same project as your SampleJira plugin.
-
(Optional) For Description, provide a description for the configuration.
-
For Endpoint, provide your Jira instance endpoint. For example,
https://your-domain.atlassian.net -
Provide your Jira instance
usernameandpasswordin the respective fields. -
Select Ok to save the plugin configuration. You are redirected back to the plugin Input Parameters, and your configuration is automatically populated.
-
-
For the Jira Key parameter, enter a valid Jira Key from your Jira instance.
-
Select Save changes.
Having configured the plugin and pipeline task, run your pipeline to test your plugin.
Running the pipeline
Having configured the plugin step, run the pipeline to test the plugin. In the pipeline page, select New run, and select Run in the dialog. The pipeline run will be similar to:

After the step runs, select the summary link:
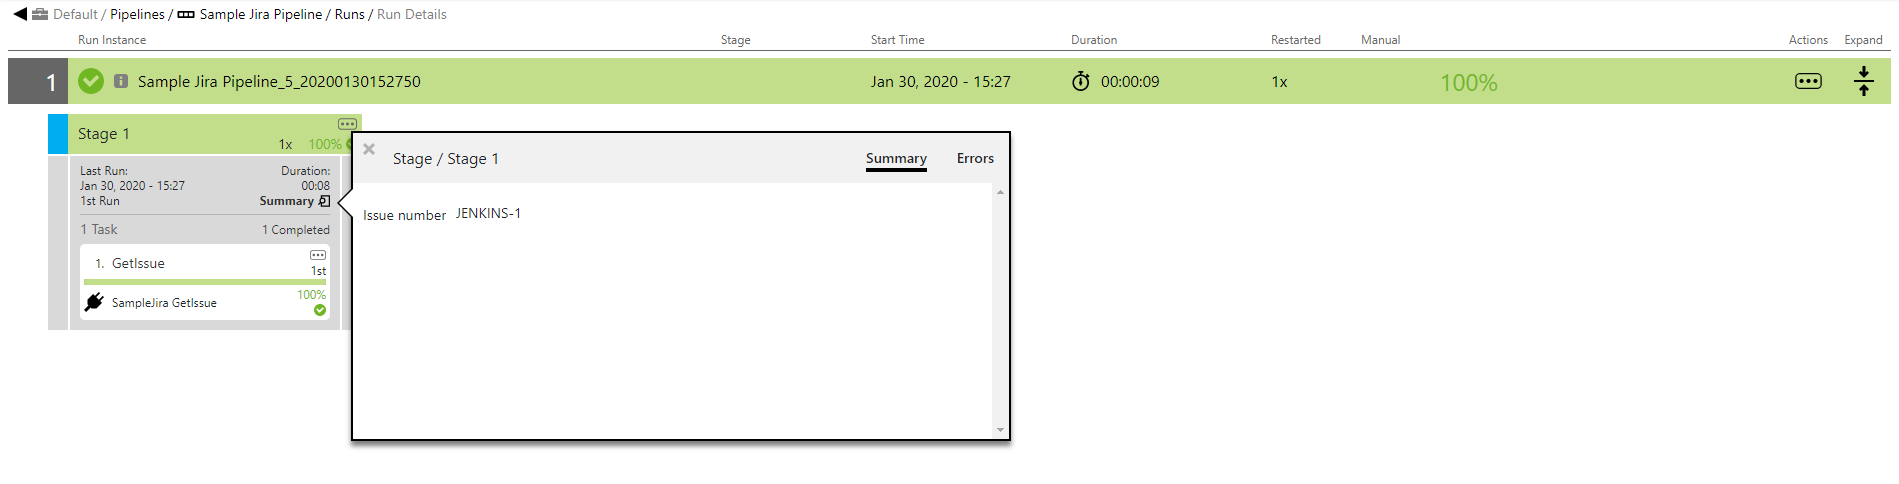
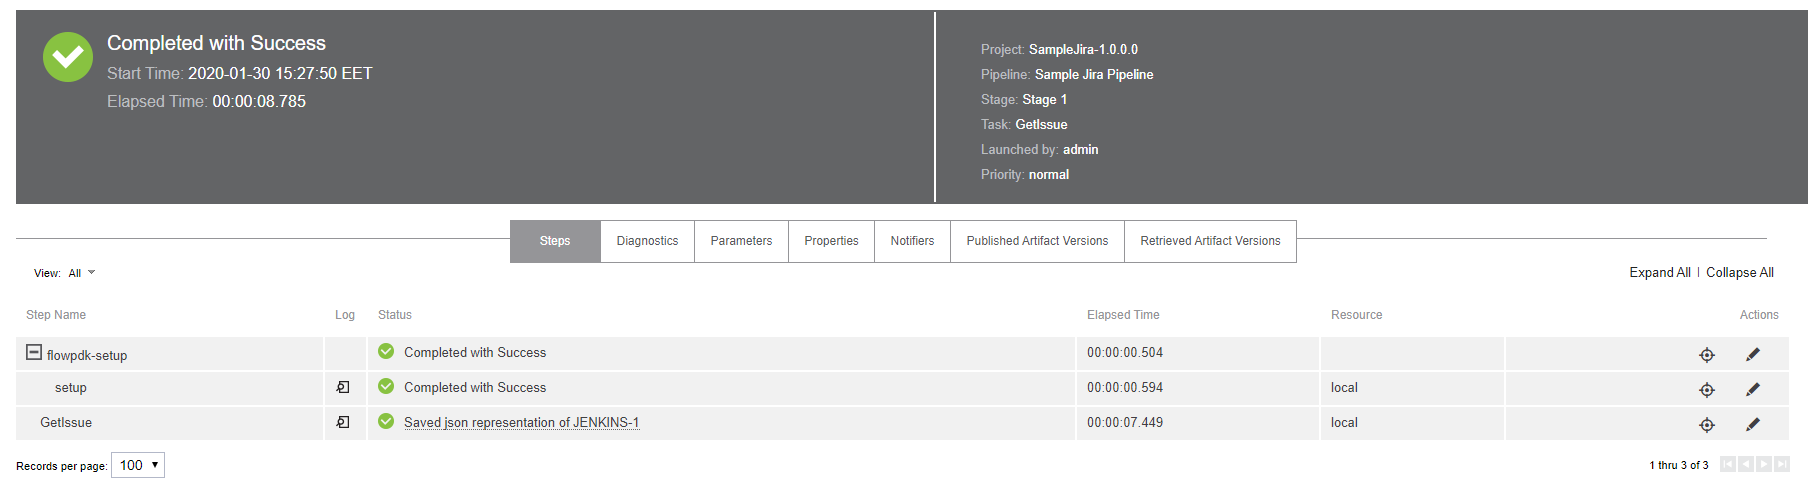
Select GetIssue and confirm that the special step
flowpdk-setup was performed to transfer the dependencies, which should be similar to:
Select the Parameters tab to see the output parameter, which should be similar to:

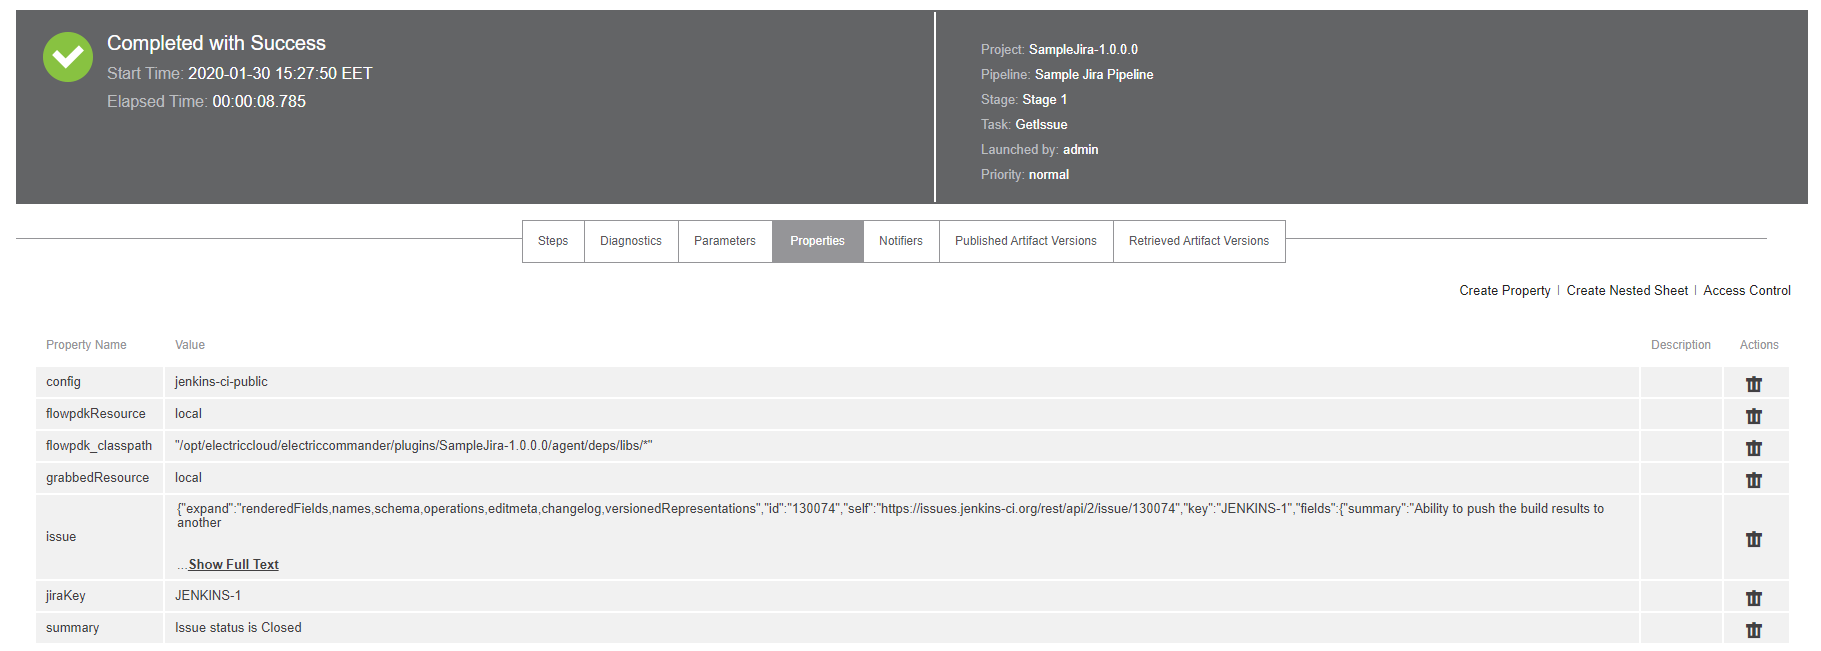
Select the Properties tab to see the JSON representation in the
issue job property, which should be similar to:
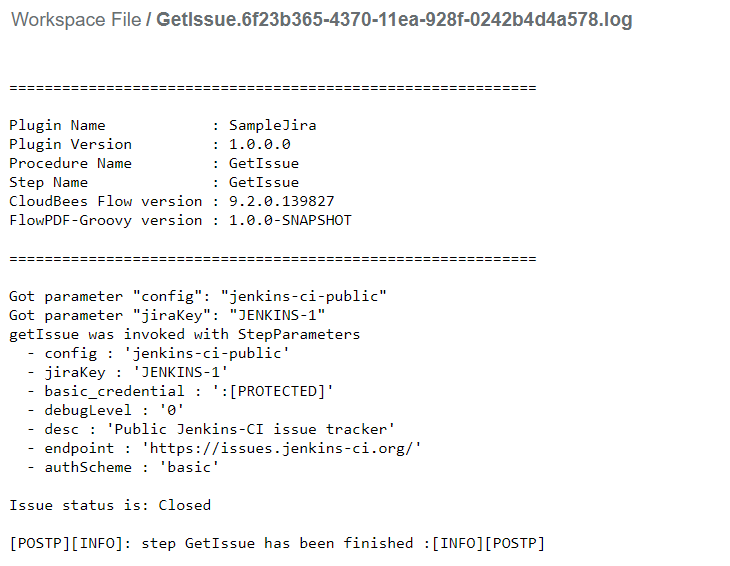
Select Steps and open the GetIssue step log, which should be similar to:
You now have a minimal working plugin to get the status of Jira issues.
| If you had an issue with running the pipeline, confirm the information in your plugin configuration, including your endpoint and credentials. Additionally, confirm the Jira Key provided in the input parameters is valid in the Jira instance. |
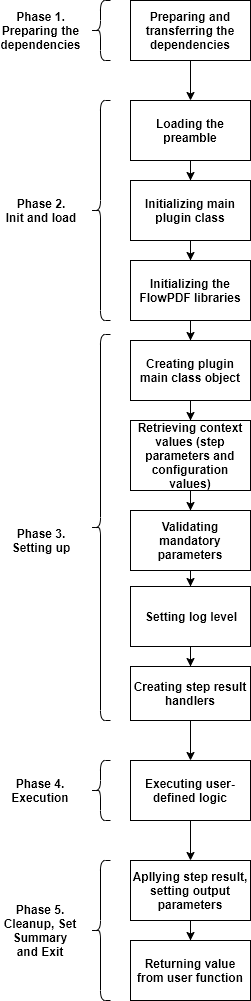
Summary
The following diagram is provided as a reference to enunciate the flow of control using flowpdf-groovy.