The DevOps Insight Report Editor lets you define a report based on criteria such as filters (search criteria), aggregations, and sorting. You create the query definition for a report by using the Report Editor.
These reports are based on Elasticsearch Query DSL and provide an interface to common Elasticsearch queries. The Report Editor includes an Advanced mode, which lets you edit the query DSL directly.
You can add, remove, or alter reporting filters or parameters for command center dashboards in the same manner as the standard types of dashboards. But you cannot add, remove, or alter reporting filters or parameters for the out-of-the-box Release Command Center dashboard. However, you can edit a custom copy of the Release Command Center dashboard, because CloudBees CD creates a copy of the Release Command Center dashboard when you edit and save it for the first time.
You select from a list of available reports when you create a DevOps Insight dashboard widget.
The Reports List
To open the reports list, click DevOps Analytics > Reports from the CloudBees CD main menu in the upper left corner of the CloudBees CD UI: the reports list opens.
The reports list shows all of the reports that are available in the currently-selected project or projects. The list comprises reports included with CloudBees CD as well as any custom reports that you have created. By default, the reports are listed for all projects. You can filter this list by any combination of projects via the projects menu.
A variety of out-of-the-box reports are included with CloudBees CD. These reports can help you learn about the reporting functionality and how to create your own reports. You can also make copies of these reports to use as templates for creating reports. These reports are in the Electric Cloud project and are not editable.
Click the Views button of a specific report for quick access to its Report Editor or Tabular Preview.
Creating a Custom Report
To create a report:
-
From within the reports list, click the New button.
-
Click Report > Create New…. The DevOps Insight Report Editor appears.

This shows the standard editing mode, which is the default mode when you open the Report Editor. The editor lets you define any number of search criteria and aggregation types for creating custom reports.
Editing a Report’s Query by Using Standard Mode
-
Use the Report Editor to create your report’s query. As you create the report, the Code View window shows a read-only view of the underlying DSL code for your query. This view changes dynamically as you modify the report.
-
Click the Save button on the right side of the page to save your changes: you must save the report if you want to subsequently edit the underlying DSL code directly.
Report Search Criteria
The list of search criteria determines the matching for specific object attribute values. You can add one or more search criteria by clicking the Search Criterion button in the Report Editor.
Object Attribute Fields
The Fields pulldown menu displays the list of available object attributes. Examples are Application ID, Job Name, Planned Start Time, Task Type, and Wait for Planned Start.
If the pipeline run, job, or process has output parameters, they appear in the Fields pulldown menu and can be used in the report definition just like any other field. For example, for an output parameter named test, Output Parameter: test is available from the menu. If a desired output parameter is not available in this list, see Sending Additional Data for Pipeline Runs, Deployments, and Jobs to the DevOps Insight Server for instructions.
Search Operators
The following search operators are available:
| Operator | Applicable Attribute Data Types |
|---|---|
Equals |
All |
Exists |
All |
Not Exists |
All |
Greater than |
All data types except BOOLEAN |
Greater than or Equals |
All data types except BOOLEAN |
Less than |
All data types except BOOLEAN |
Less than or Equals |
All data types except BOOLEAN |
Between |
All data types except BOOLEAN |
Aggregations and Sorting
Aggregations and sorting determine the grouping or order of the query results, respecteively. You can choose either aggregation or sorting, but not both.
Query Result Aggregations
You can add aggregations by clicking the Add Aggregation button.
You can add functions by clicking the Add Function button. The following functions are available:
| Function | Applicable for Attribute Types |
|---|---|
Average |
NUMERIC, PERCENT |
Count |
All |
Distinct Count |
All |
Max |
NUMERIC, PERCENT, DATE, DATETIME |
Min |
NUMERIC, PERCENT, DATE, DATETIME |
Sum |
NUMERIC, PERCENT |
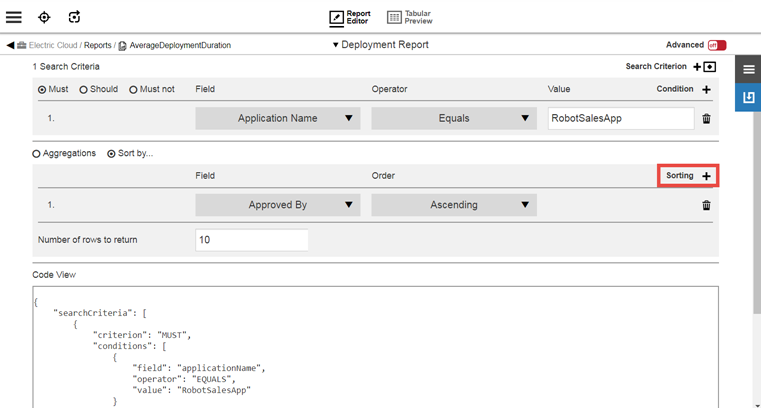
Query Result Sorting
As an alternative to aggregating the query results, you can sort them. For example:
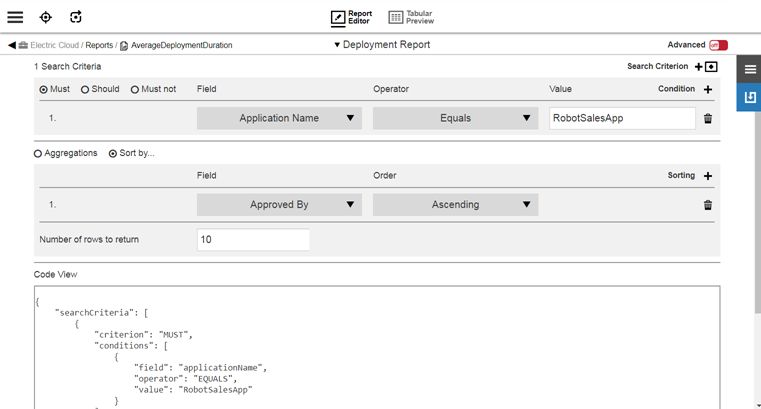
You can sort the query results by a specific object attribute field in ascending or descending order. You can specify the number of rows for the query to return. Up to 10000 rows can be returned.
To add a secondary sorting field, click the Add Sorting Field button:
Editing a Report’s Query DSL Code Directly by Using Advanced Mode
Advanced mode shows a view of the underlying query DSL code. You enter and exit advanced mode by clicking the Advanced slider button in the upper right corner of the UI. You can now edit the query DSL code directly.
Note that editing the query DSL code makes it incompatible with Standard mode in the Report Editor. The following warning is always present in Advanced mode as a reminder:
Note: If you make modifications in Advanced Mode and save them, they will not carry over to the Query Editor.
For details about Elasticsearch Query DSL, see the "Elastic Stack and Product Documentation" web page at https://www.elastic.co.
Previewing Report Query Results by Using Tabular Preview
To check your query results, click the Tabular Preview button at the top of the page. This view shows the first 20 rows of output so that you can test your report criteria. The tabular preview provides a preview of the report data from the DevOps Insight server.
The tables in the following examples describe some of the columns that might be returned based on the report that you have defined.
Example Report: AverageDeploymentDuration
This report is included in DevOps Insight.
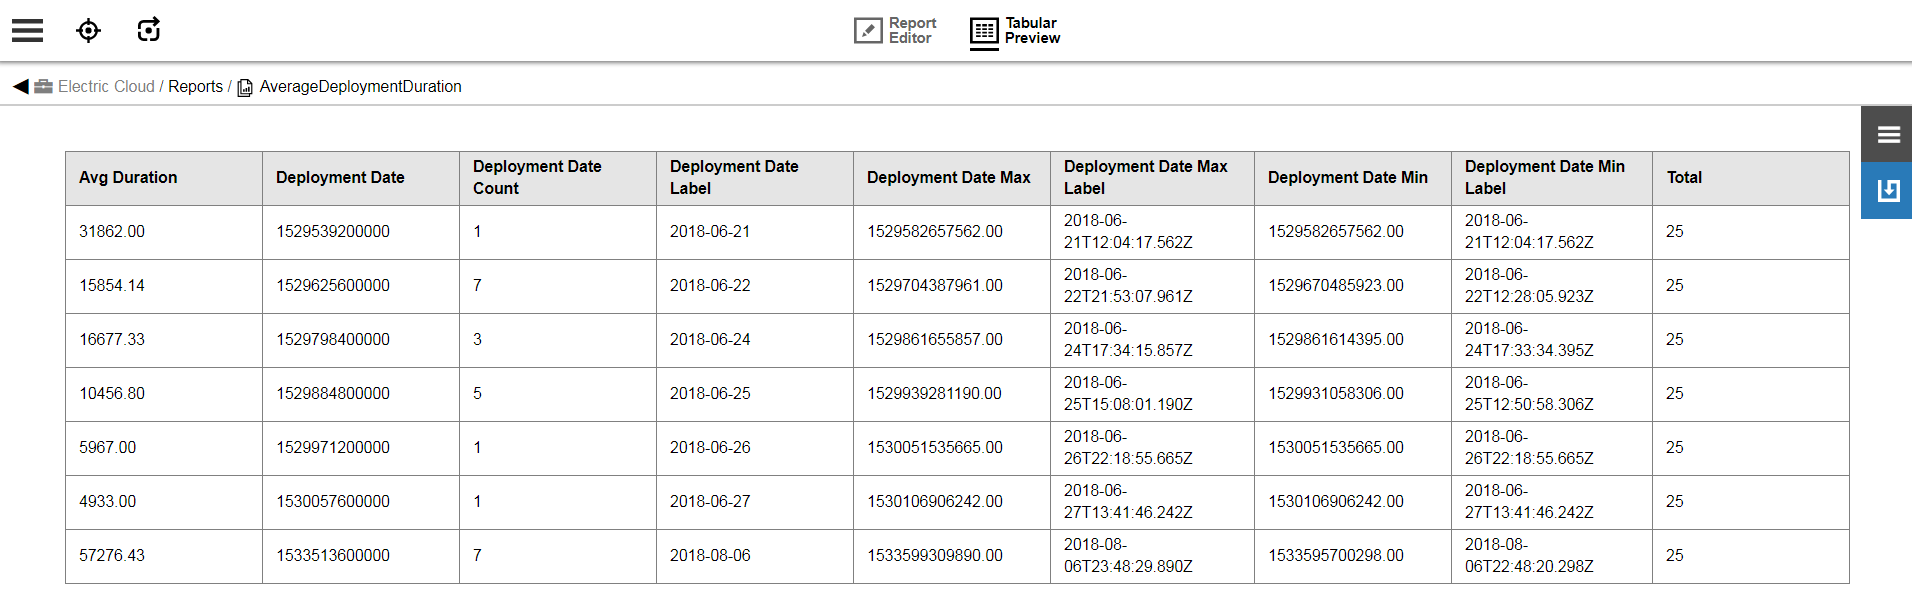
The following table shows some of the date-based fields stored in Elasticsearch for this report and their corresponding formatted fields.
| Column | Description |
|---|---|
Total |
Number of records that matched the report search criteria |
such as Deployment Date |
Date in milliseconds since the epoch. This is the raw data as stored in Elasticsearch. For aggregated data, the column representing this data also has an equivalent column (named Deployment Date Label, for example) in which this data is converted to a user-friendly date |
such as Deployment Date Label |
Date formatted as |
Example Report: TopAppsByDeployments
This report is included in DevOps Insight. This is an example of a report containing aggregations.
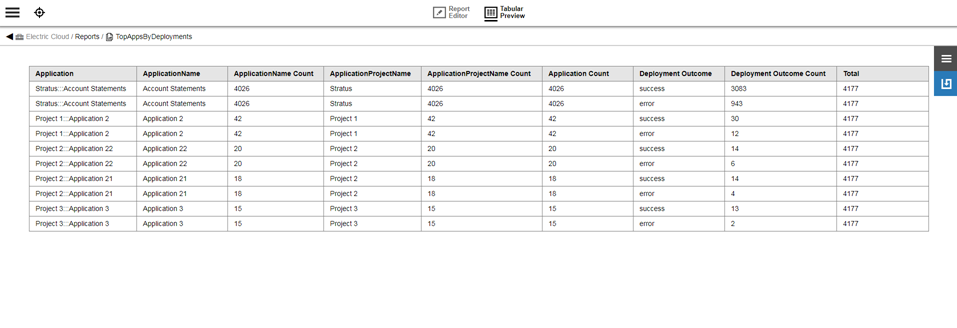
| Column | Description |
|---|---|
Total |
Number of records that matched the report search criteria |
such as Deployment Outcome Count |
Number of records that fall into the aggregation bucket. For example, if you define a group by aggregation on deployment outcome, then for each unique deployment outcome such as |
Sending Additional Data from Pipeline Runs, Deployments, and Jobs
The data that CloudBees CD manages for CloudBees CD runtime objects (pipelines, jobs, and deployments) and sends automatically to the DevOps Insight server is predetermined based on the specific object type. However, adding output parameters to the runtime objects of your choice in the CloudBees CD Deploy UI lets you capture their data so that it is sent to DevOps Insight in the same payload that is normally sent by CloudBees CD for these objects. In this way, output parameters provide an extensible mechanism for adding fields for these objects to a report.
Adding an output parameter to a report is much simpler than adding an input parameter, because you actually create the output parameter ahead of time outside of the Report Editor. To send additional data from pipeline runs, deployments, and jobs to the DevOps Insight server:
Prerequisites to Make Output Parameters Available in DevOps Insight
-
Declare the output parameter on the desired runtime object in the Floy UI at the object level.
For details, see "Declaring an Output Parameter" in the CloudBees CD User Guide .
-
Set the output parameter’s value in some manner on the object.
For details, see "Creating or Editing an Output Parameter" in the CloudBees CD User Guide .
The menu display name for any output parameter that is available for use in reports is Output Parameter: < parameter_name >. For example, for an output parameter created in the CloudBees CD UI named
test, the menu display name in the Report Editor is Output Parameter: test. ++ Output parameters are sent as regular fields in the payload but are prefixed withec_param_for identification purposes. For example, for an output parameter namedtest, the value is saved asec_param_testin the DevOps Insight server: -
Run the pipeline, job, or deployment .
For details, see "Running Pipelines" in the CloudBees CD User Guide .
After the first runtime of that object, the parameter is pushed to the DevOps Insight server and is then available for addition to a report.
Creating a Custom Report from an Existing Report
Copying another report lets you create a custom report more quickly. You can copy your custom reports as well as reports that are included with CloudBees CD. You cannot edit reports that are included with CloudBees CD, but copying them provides a substitute for customizing their functionality while preserving them to use as templates for future custom reports.
-
From within the Reports list, click the New DevOps Insight Dashboard or Report ) button.
This button is also available in the DevOps Insight Dashboards list and any DevOps Insight dashboard. -
Click Report > Copy Existing: the From Report dialog box appears.
-
Click the name of the report that you want to copy.
You can narrow down the list of projects by selecting one or more projects from the projects pulldown menu or by entering search terms into the Search field: the New Report dialog box appears.
-
Enter the new report name into the dialog box, and then select the project that will contain the report.
By default, new reports are added to the Electric Cloud project. You can enter a report description into the comments field if needed.
-
Click OK to save your changes: the new report appears in the Report Editor.
-
Customize the new report’s query as described in Report Search Criteria .
Editing a Custom Report
Any custom report is editable. To edit a report:
-
Open the Reports List as described in The Reports List .
-
Do one of the following to open the Report Editor:
-
Click the report.
-
Click the corresponding view selector button for the report, and select Report Editor.
-
-
Edit the report as described in Editing a Custom Report .
Adding Input Parameters to Reports
Parameters are free-form input values that can be fed to a dashboard or report to filter the data based on the parameter value. For example, the Release Command Center dashboard shows metrics and trends over the last 10 days.
You might want to view the trend over a different time interval such as the last month or last two weeks based on the duration of your releases. In this case, parameters let you define the time interval as a parameter that can be used by the dashboard or report viewer to change the time interval for viewing the Release Command Center metrics.
To add a parameter, open the Parameters dialog, click on the object menu located in the upper right corner of the report editor, and select Parameters.
-
Click Add, or if no parameters have not yet defined for the object, click There are no Parameters yet. Add one + to add a parameter: the New Parameter dialog box opens.
-
Enter the following information. In addition to the information below, several input fields have tool tips, denoted with
 , with additional information to help you. Click OK when finished with the parameter definition.
Field Name Description Name
A unique name for the parameter.
Description
(Optional) Plain text or HTML description for this object. If using HTML, you must surround your text with
<html> … </html>tags. Allowable HTML tags are<a>,<b>,<br>,<div>,<dl>,<font>,<i>,<li>,<ol>,<p>,<pre>,<span>,<style>,<table>,<tc>,<td>,<th>,<tr>, and<ul>.For example, the following HTML:
<p>
<span style="font-family: Arial;">
  <i>Note:</i> For more information about the <b>abc</b> object, see
         <a href="https://www.google.com/">\https://www.google.com</a>.
</span>
</p>
renders as follows:
<i>Note</i>: For more information about the <b>abc</b> object, see \https://www.google.com.This description renders as a tool tip for the parameter at object runtime.
You can include hyperlinks as part of an object description for any CloudBees CD object. Label
(Optional) The label for this parameter as it appears on the parameters panel at object runtime.
Parameter Type
Select the parameter type from the drop-down menu. The following types are available.
Application
Creates an Application drop down to select an application object. In order to use this parameter type, you need to first provide a way for the user to select the application’s project via a Project, Dropdown Menu, or Text Entry parameter.
Note: not available for Dashboard or Report objects.
Checkbox
Creates a checkbox for a value to select (or not) when the parameter is presented.
-
Value when unchecked —The value of the parameter when the checkbox is unchecked.
-
Value when checked —The value of the checkbox when the checkbox is selected.
Credential
Selecting this option requires the user to specify a user name and password to use this parameter at runtime.
Note: not available for Dashboard or Report objects.
Date
Allows for a date value to be selected using a date chooser. The selected date value is in ISO 8601 yyyy-MM-dd .
Dropdown Menu
Creates a drop-down menu from which to select a value when the parameter is presented.
-
Enter options —Click Add Option + to add a new row. Type-in the text and value for each option. The text is what will be displayed in the menu, and the value is the parameter value if that option is selected.
-
Load options from list —Enter a pipe-separated list of options (for example,
foo|bar|baz). The text and value for the options will be the same. -
Load Options from Properties —Enter the path to property sheet that contains options for the parameter. This selection has two choices.
-
Load options using fixed structure:
The options to display for the Parameter are determined using the following properties that must exist within the property sheet.
optionCount=<Number of available options, e.g., 3> option1/ text=<Text to display> value=<Parameter value to use> option2/ text=<Text to display> value=<Parameter value to use> ...and so on till optionN/ text=<Text to display> value=<Parameter value to use>-
Options from a property sheet:
Example 1: If the Property Sheet contains the following Properties:
Version7=7.0 Version8=8.0 Version9=9.2 ...then the following options will automatically be displayed using the Property name as the text to display and the Property value as the Parametervalue to use. Version7 Version8 Version9Example 2: If the Property Sheet contains the following nested Property Sheets:
Version7/ Version8/ Version9/ ...then the following options will automatically be displayed using the Property Sheet name as both the text to display as well as the Parameter value to use. Version7 Version8 Version9-
Load options using DSL —Enter a DSL script that allows for dynamically populating the drop-down menu. Click the tooltip icon
for this selection to see an example. Additional examples are available in the CloudBees CD API Guide at Using the CloudBees CD DSL.
Environment
Creates an Environment drop down to select an environment object. In order to use this parameter type, you need to first provide a way for the user to select the object’s project via a Project, Dropdown Menu, or Text Entry parameter.
Note: not available for Dashboard or Report objects.
Header
Used to render a heading. When rendered, this header is positioned before one or more parameters based on its position in the parameter list. There is no other explicit association with other parameters.
Integer
Allows for an integer value.
Microservice
Creates a Microservice drop down to select an microservice object. In order to use this parameter type, you need to first provide a way for the user to select the object’s project via a Project, Dropdown Menu, or Text Entry parameter.
Note: not available for Dashboard or Report objects.
Pipeline
Creates a Pipeline drop down to select an pipeline object. In order to use this parameter type, you need to first provide a way for the user to select the object’s project via a Project, Dropdown Menu, or Text Entry parameter.
This is not available for Dashboard or Report objects.
Project
Creates a Project drop down to select a project name.
Radio Selector
Creates "radio" buttons to select an entry when the parameter is presented.
-
Enter options —Click + Add Option to add a new row. Type-in the text and value for each option. The text is what will be displayed in the menu, and the value is the parameter value if that option is selected.
-
Load options from list —Enter a pipe-separated list of options (for example,
foo|bar|baz). The text and value for the options will be the same. -
Load options from property sheet —Enter the path to property sheet that contains options for the parameter. The property sheet must be created in a specific format:
-
An
optionCountproperty must exist whose value is the number of options. -
For each option, create a nested property sheet called
optionN, where N is the option number, starting with1. -
In each nested sheet, create two properties—
textandvalue. The value of the propertytextwill be displayed in the menu. The value of the propertyvalueis the parameter value if that option is selected. -
If
optionCountis set to3, you must create three nested sheets—option1,option2, andoption3.
Release
Creates a Release drop down to select an release object. In order to use this parameter type, you need to first provide a way for the user to select the object’s project via a Project, Dropdown Menu, or Text Entry parameter.
Note: not available for Dashboard or Report objects.
Text Area
Allows for a longer text entry.
Text Entry
Allows for a short text entry.
Default Value
Default value to assign to the parameter if no explicit value is provided.
Required
Click the checkbox to select the parameter as required. A value must be provided for the parameter if it is required.
Defer Expansion
Determines whether to defer parameter value expansion when the parameter value contains $[].
-
If unchecked (default), expansion is not deferred and is done at the time the parameter value is passed to the process, procedure, task, and so on, depending on where the parameter was defined.
-
If checked, expansion is deferred and occurs when the process step, procedure step, and so on, executes.
Custom Validation
Provides run-time validation on parameters via a user-supplied DSL script. If selected, the Custom Validation dialog displays, allowing you to supply the validation DSL script.
If left empty, no validation occurs.
Click the tooltip icon
for this selection on the New Input Parameter dialog to see examples.Render Condition
Render this parameter based on the condition of another parameter. For example, render this parameter if
anotherparamequals10.If left empty, this parameter renders by default.
Click the tooltip icon
for this selection to see examples.Dependencies
One or more formal parameters on which this parameter depends on for custom validations or for rendering drop-down options using DSL. For an example, see the "createFormalParameter" section of the CloudBees CD API Guide on this page: Parameter Management.
If left empty, this parameter renders by default.
-