Issue
-
I would like to create a custom component for the Active Choices Plugin.
-
I would like to improve the layout of the build with parameters page.
Environment
-
CloudBees CI (CloudBees Core) on modern cloud platforms - Managed controller
-
CloudBees CI (CloudBees Core) on traditional platforms - Client controller
-
CloudBees Jenkins Enterprise - Managed controller
Resolution
The Active Choices Plugin allows to define a custom html component as an input. In this article we will describe step by step how to create a simple component that will take a list and allow to filter it. The point of this article is to show the various pitfalls one can encounter when trying to write such a component for use within Jenkins. It should serve as a basis to write more complex components. The plugin documentation also presents an example using d3js.
The UI code
We will split the code into two html snippets, one containing the UI, the other one the business logic:
<head> <style> .noselect { -webkit-touch-callout: none; -webkit-user-select: none; -khtml-user-select: none; -moz-user-select: none; -ms-user-select: none; user-select: none; } .jenkins-parameter-container { float: left; width: 200px; margin: 20px auto 10px; font-size: 14px; font-family: sans-serif; overflow: auto; } .jenkins-parameter-list { float: left; width: 100%; border: 1px solid lightgray; box-sizing: border-box; padding: 10px 12px; } .jenkins-parameter-search { padding: 5px 0; } .jenkins-parameter-input { margin: 10px 0; max-height: 200px; overflow-y: auto; input[type="checkbox"] { position: relative; top: 2px; } } </style> </head> <div class="jenkins-parameter-container"> <div class="jenkins-parameter-list"> <input type="hidden" class="jenkins-parameter-result" name="value"> <input type="search" placeholder="Filter item" class="jenkins-parameter-search" /> <ul class="jenkins-parameter-input"></ul> </div> </div>
Two important things here:
-
Note that we have added a prefix to the various classes used in order to avoid collision with other components in the Jenkins page.
-
Note the
<input type="hidden" class="jenkins-parameter-result" name="value">component. This is the component responsible for performing the connection with the Jenkins plugin. The plugin will look for a component having thename="value"attribute and will retrieve the value of this attribute.
<script src="https://cdnjs.cloudflare.com/ajax/libs/lodash.js/3.5.0/lodash.js" integrity="sha256-FnlET6HjAjzJk+xp/VPmlH5dKcYClzy2/yl08DuN4eA=" crossorigin="anonymous"></script> <script> function itemName(i) { return i.name; } function generateUl(i) { return '<li><input name=' + i.name + ' type="checkbox"> <label>' + i.name + '</label></li>'; } Q('.jenkins-parameter-container') .on('input', '.jenkins-parameter-search', function () { var target = Q(this); var list = target.closest('.jenkins-parameter-list'); var search = target.val().toLowerCase(); if (!search) { list.find('li').show(); return false; } list.find('li').each(function () { var text = Q(this).text().toLowerCase(); var match = text.indexOf(search) > -1; Q(this).toggle(match); }); }) .on('change', '[type="checkbox"]', function () { var container = Q(this).closest('.jenkins-parameter-container'); var selected = container.find('[type="checkbox"]:checked'); var results = _.map(selected, itemName).join() container.find('.jenkins-parameter-result').val(results || ''); }); var items = ${ itemsAsJson } _.each(items, function (i) { Q('.jenkins-parameter-input').append(generateUl(i)); }); </script>
This code needs more explanations:
-
We import Lodash as we would do in any web page.
-
JQuery is not imported and is not using the standard
$. Usage of JQuery within Jenkins is a bit more complex. The$variable is already used in Jenkins core byprototype.js. The solution used here is to rely on the JQuery Plugin that will make JQuery available for us and bind it to theQvariable. Note that another solution would be rebind the$variable in a custom scope. This might be handy in case you would like to use external libraries that rely on$being bound to JQuery. You can read more on this in the JQuery Plugin documentation. -
The
var items = ${ itemsAsJson }is here to inject items from groovy code (see the next section). In case you have a fixed collection of item, you can simply put it here egvar items = [{name: 'hello'}, {name: 'world'}]. -
Make sure to review how the
generateUlworks, as you can see here we simply rely on objects having anamefield. You can do write more complex logic here…or rely on lodash templates for instance.
The creation of the parameters
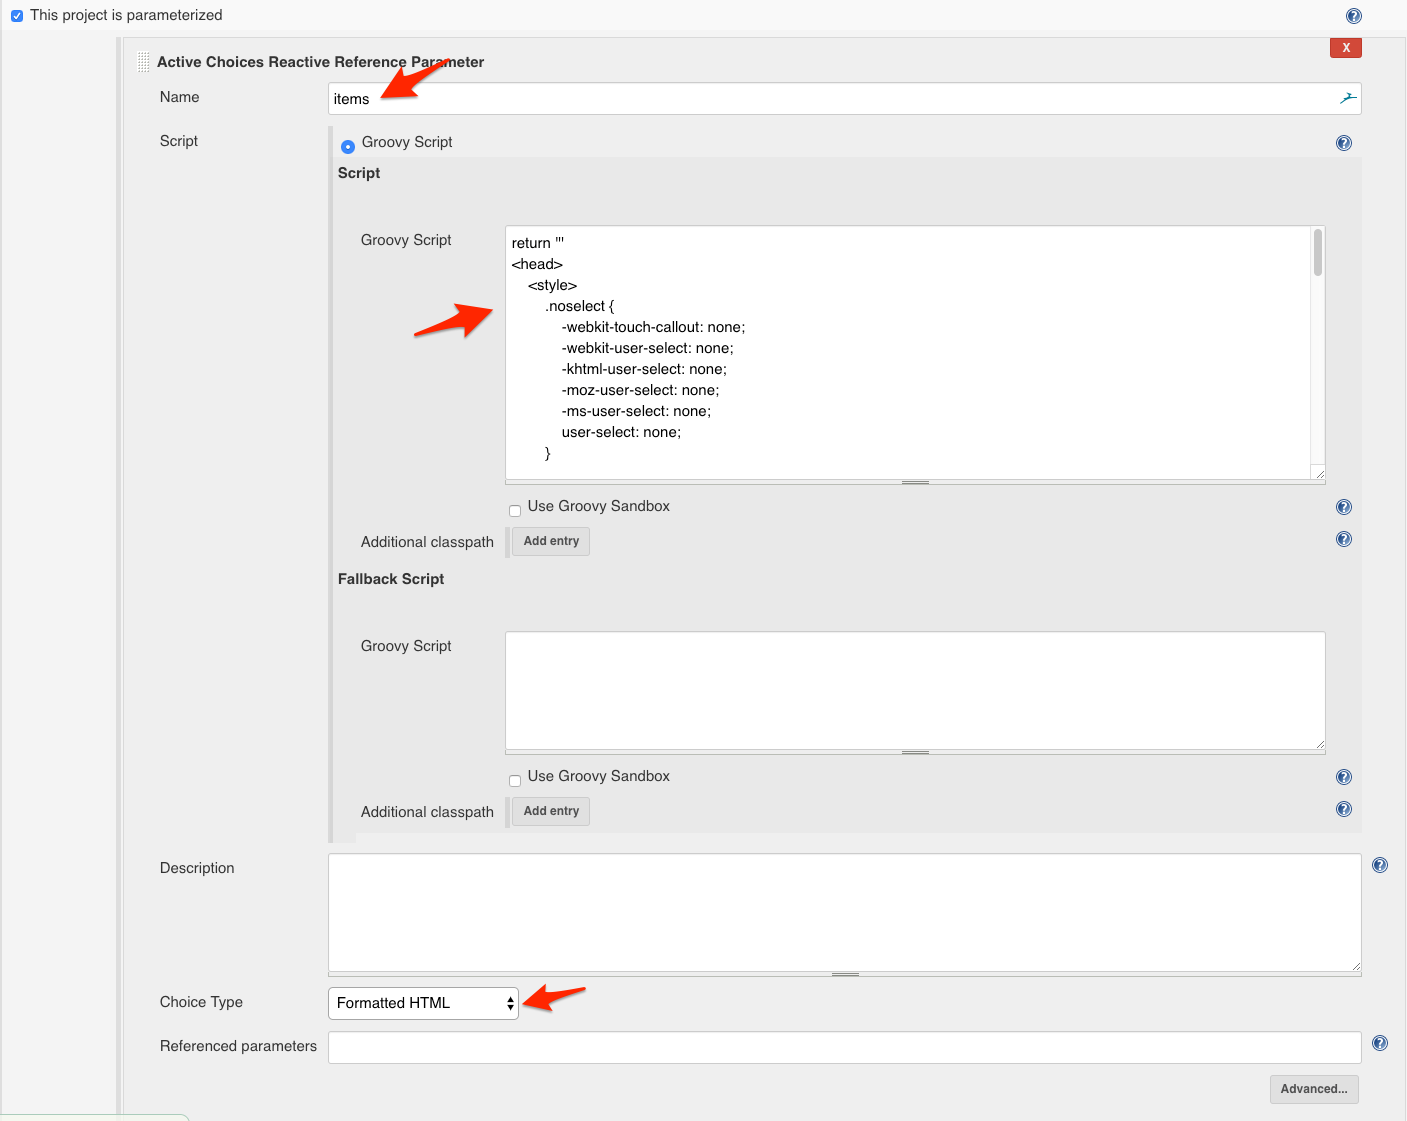
From the job page, we will create two build parameters of type Active Choice Reactive Parameter.
First parameter
This is the parameter that will be used by the end user. Its name will be the variable that you will retrieve later in your job and it will be visible by the end user. We want the Choice Type to be Formatted HTML. The groovy code will simply return the html we wrote in the previous section:
return ''' <head> <style> .noselect { -webkit-touch-callout: none; -webkit-user-select: none; -khtml-user-select: none; -moz-user-select: none; -ms-user-select: none; user-select: none; } .jenkins-parameter-container { float: left; width: 200px; margin: 20px auto 10px; font-size: 14px; font-family: sans-serif; overflow: auto; } .jenkins-parameter-list { float: left; width: 100%; border: 1px solid lightgray; box-sizing: border-box; padding: 10px 12px; } .jenkins-parameter-search { padding: 5px 0; } .jenkins-parameter-input { margin: 10px 0; max-height: 200px; overflow-y: auto; input[type="checkbox"] { position: relative; top: 2px; } } </style> </head> <div class="jenkins-parameter-container"> <div class="jenkins-parameter-list"> <input type="hidden" class="jenkins-parameter-result" name="value"> <input type="search" placeholder="Filter item" class="jenkins-parameter-search" /> <ul class="jenkins-parameter-input"></ul> </div> </div> '''
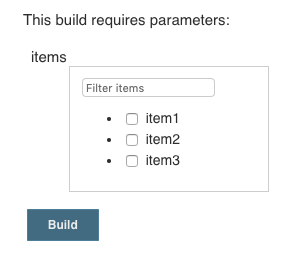
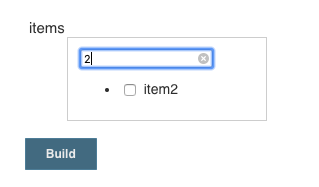
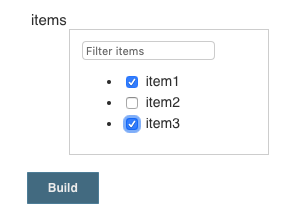
Here is a screenshot showing how it looks like in the UI:
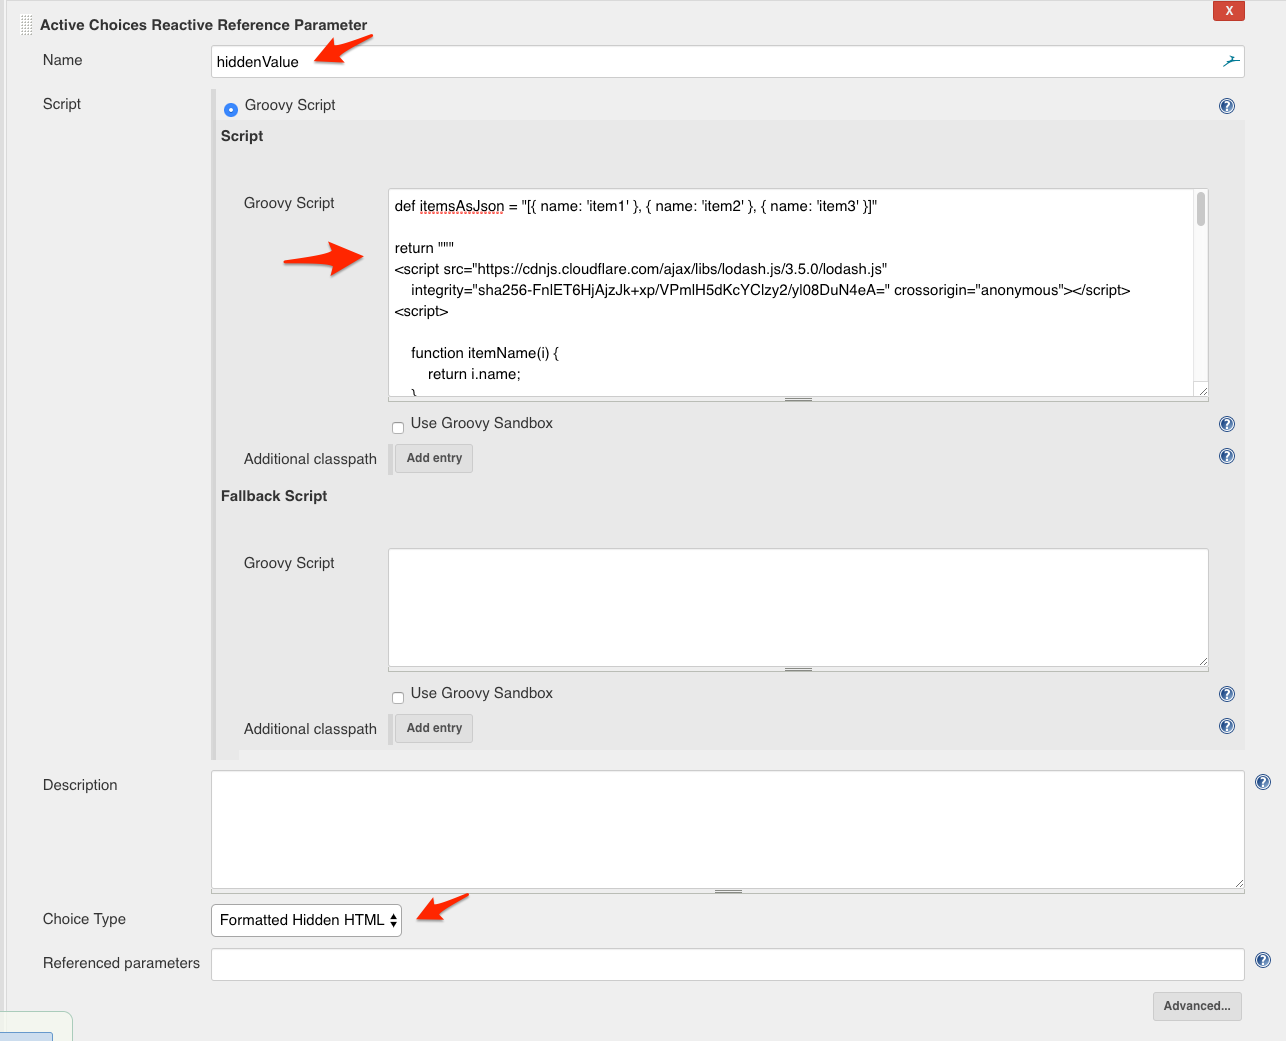
Second parameter
This one will be hidden to the end user.
We want the Choice Type to be Formatted Hidden HTML.
In this example we define the list of item in the groovy code as a itemsAsJson variable, obviously one can use more complex logic to load the items in the groovy code.
The groovy code looks like the following:
def itemsAsJson = "[{ name: 'item1' }, { name: 'item2' }, { name: 'item3' }]" return """ <script src="https://cdnjs.cloudflare.com/ajax/libs/lodash.js/3.5.0/lodash.js" integrity="sha256-FnlET6HjAjzJk+xp/VPmlH5dKcYClzy2/yl08DuN4eA=" crossorigin="anonymous"></script> <script> function itemName(i) { return i.name; } function generateUl(i) { return '<li><input name=' + i.name + ' type="checkbox"> <label>' + i.name + '</label></li>'; } Q('.jenkins-parameter-container') .on('input', '.jenkins-parameter-search', function () { var target = Q(this); var list = target.closest('.jenkins-parameter-list'); var search = target.val().toLowerCase(); if (!search) { list.find('li').show(); return false; } list.find('li').each(function () { var text = Q(this).text().toLowerCase(); var match = text.indexOf(search) > -1; Q(this).toggle(match); }); }) .on('change', '[type="checkbox"]', function () { var container = Q(this).closest('.jenkins-parameter-container'); var selected = container.find('[type="checkbox"]:checked'); var results = _.map(selected, itemName).join() container.find('.jenkins-parameter-result').val(results || ''); }); var items = ${itemsAsJson} _.each(items, function (i) { Q('.jenkins-parameter-input').append(generateUl(i)); }); </script> """
Note how we use a triple double quoted string to properly inject the groovy variable.
You will need to keep this in mind in case you intend to use the $ variable.
This is how it looks like in the UI:
Tested product/plugin versions
Jenkins 2.173.3 with Active Choices Plugin version 2.1 and JQuery Plugin version 1.12.4-1