Resolution
While there is a solution - i.e. the Kubernetes plugin - to provision on-demand Kubernetes agents, there might be scenarios where a dedicated agent is suitable. Following are some examples on how to deploy dedicated Agents in Kubernetes for different launcher:
Dedicated Inbound Agent
The deployment of such agent requires two steps:
-
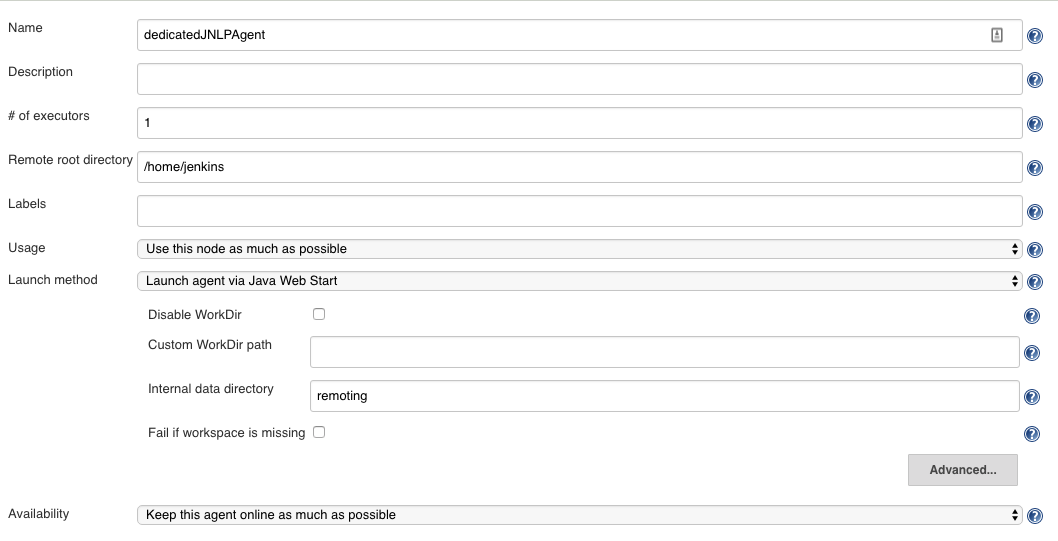
Create a Permanent Agent in and select the "Launch agent by connecting it to the controller":

-
Deploy the agent in kubernetes. Here is an example of a
Deployment:apiVersion: apps/v1 kind: Deployment metadata: name: "jenkins-inbound-agent" labels: name: "jenkins-inbound-agent" spec: replicas: 1 selector: matchLabels: name: "jenkins-inbound-agent" template: metadata: labels: name: "jenkins-inbound-agent" spec: containers: - name: inbound-agent image: cloudbees/cloudbees-core-agent:CONTROLLER_VERSION env: - name: JENKINS_URL value: "http://ci.example.com/jenkins/" - name: JENKINS_AGENT_NAME value: "dedicatedJNLPAgent" - name: JENKINS_SECRET value: c02454dd29892ba194dc5f98fb68f83463a8518da7be06254b460058114ac21d livenessProbe: exec: command: - uname - -a initialDelaySeconds: 60 timeoutSeconds: 1The values for the variable
JENKINS_URL,JENKINS_AGENT_NAMEandJENKINS_SECRETmust be set accordingly. Note that If Jenkins is running in the kubernetes cluster, theJENKINS_URLcan be set to the name / kubernetes DNS name of the service exposing the Jenkins controller.
For more information about the configuration, have a look at the base image cloudbees/cloudbees-core-agent:CONTROLLER_VERSION.
Dedicated SSH Agent
This scenario can be used for connecting SSH Agents with either the CloudBees SSH Build Agents plugin or the SSH Build Agents plugin.
The deployment of such agent requires two steps:
-
Deploy the agent in kubernetes. Here is an example of a
Deployment:--- apiVersion: apps/v1 kind: Deployment metadata: name: "jenkins-ssh-agent" labels: name: "jenkins-ssh-agent" spec: replicas: 1 selector: matchLabels: name: "jenkins-ssh-agent" template: metadata: labels: name: "jenkins-ssh-agent" spec: containers: - name: ssh-agent image: jenkins/ssh-agent env: - name: JENKINS_AGENT_SSH_PUBKEY value: "ssh-rsa AAAAB3NzaC1yc2EAAAADAQABAAACAQC3lXl4ODAXtdb6NBVXx8VCOtTT0lKKcNyokxAsE47eb5HjwV/UF9izc+DgDKPt6bC4R6PEeSuYiUzoYsi7MzA2o3NURDH0Fb8XKWLwCykJznVHoqWXITloKxabtFOMR8FyNiV0qIn49NeQqGkLFld2WL4/dJj76DLV6AEqVsB52GVyJjt+TJnMzz9x0dXzRUDM5DIaLDBW3NGSMMpo1DxhJL4HrXGbUjF0TLaqBU8CqxOWmH88EU8yedbBBTSDNTY+8Qk9WWpI2E/ssAWjnLLsrJFxduTg5/iTsF/FWcOHrFmjcsf3ojpy2/PYYA5+jfgHKDn82zcLYdhyqKkxBzIq84/vwMASzgSUc3ONtxirPmIVgCHQixeGHzlAC4ea/6h66QoMyssozyAz3/X4byoG6gqEwDxhJyb36ntL/81wLFt5dZWqg/+OvBZ2XJMetAAjulh3KCPx5gc2G9XWb0JxzwoAiUGsOLONzGPNU/Lu/eMVKJopNY2ZibmwTvR63x7bMiRhe/cO2/5D/LKDhEpy2EAdS8j8wPyTeFZPoxhQPGtiwb4eAB2BudAjAnPTZELk7Hv6pHXrMMCebZhemHToX4q5hOUUZeA5/j+9ynMptCrouUW9v/QmTvmJu0of0vQ2Ywrh7tzDODbov1M55CklLgqkERSiYYIN4ZIbRpsPbw== cje.example.com" livenessProbe: tcpSocket: port: 22 initialDelaySeconds: 60 timeoutSeconds: 1 --- apiVersion: v1 kind: Service metadata: name: jenkins-ssh-agent spec: selector: name: jenkins-ssh-agent ports: - name: ssh port: 22 protocol: TCPThe value of the
JENKINS_AGENT_SSH_PUBKEYis the SSH public key of the Jenkins server. -
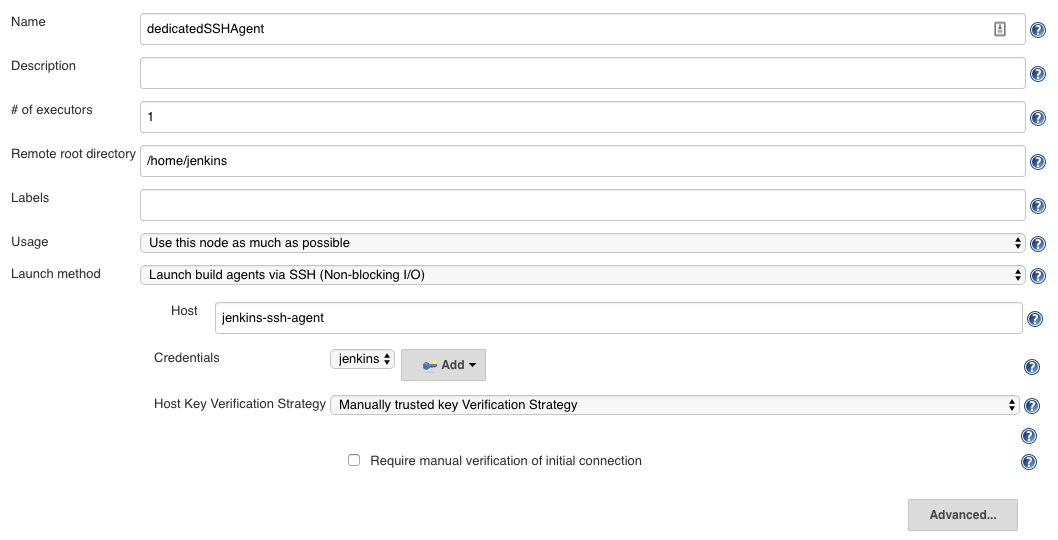
Create a Permanent Agent in , select an SSH launcher and specify the Jenkins SSH Credentials holding the private key:

If Jenkins is running in the kubernetes cluster, the Host can be set to the name / kubernetes DNS name of the service (here jenkins-ssh-agent). Otherwise, thejenkins-ssh-agentwould need to be exposed externally from the Kubernetes cluster. For that matter, the SSH launcher is more suitable when Jenkins is running aside in the same Kubernetes cluster.
For more information about the configuration, have a look at the base image jenkins/ssh-agent.
Dedicated Swarm Agent
|
This example is using a Tier 3 Community plugin. For more information about Tier see CloudBees plugin support policies |
This scenario can be used for connecting Swarm Agents with the Self-Organizing Swarm Modules plugin. The advantage of that solution is that you can scale with more than 1 replicas.
The deployment of such agent requires only one step, to deploy the agent in Kubernetes. Here is an example of a Deployment:
--- apiVersion: apps/v1 kind: Deployment metadata: name: "jenkins-swarm-agent" labels: name: "jenkins-swarm-agent" spec: replicas: 3 selector: matchLabels: name: "jenkins-swarm-agent" template: metadata: labels: name: "jenkins-swarm-agent" spec: containers: - name: swarm-agent image: csanchez/jenkins-swarm-slave env: - name: MASTER value: "https://cje.example.com" - name: USERNAME value: admin - name: PASSWORD value: supersecretpassword - name: NAME value: dedicatedSwarmAgent - name: EXECUTORS value: "1" - name: FSROOT value: /home/jenkins-slave livenessProbe: exec: command: - sh - -c - "netstat -tan | grep ESTABLISHED" initialDelaySeconds: 60 timeoutSeconds: 1
The values for the different variable MASTER, NAME, EXECUTORS, USERNAME, PASSWORD, FSROOT must be set accordingly. Note that If Jenkins is running in the kubernetes cluster, the MASTER variable can be set to the name / kubernetes DNS name of the service exposing the Jenkins controller.
There are many more environment variables that are possible. For more information about the configuration, have a look at the base image csanchez/jenkins-swarm-slave and also the source code of that image carlossg/jenkins-swarm-slave-docker.
The above example is meant to provide the basics. It is best to use a Kubernetes secret for the value of USERNAME and PASSWORD.
|