Now that you have deployed applications within the appliance, let’s deploy applications to your own servers. This can be accomplished by installing the CloudBees CD (CloudBees Flow) agent on your target server. Follow the instructions described below for the agent installation. Once installed, you can use the appliance with your remote agents.
In this module, you learn how to:
-
Review the prerequisites for the remote machine where the agent will be installed.
-
If your remote machine runs Linux, download the Linux 64-bit agent installer and install the agent.
-
If your remote machine runs Windows, download the Windows 64-bit agent installer and install the agent.
-
Verify the agent installation.
-
Add the agent to an environment.
See the following sections for details about each step.
Step 1: Review the prerequisites for the remote machine.
Make sure that the selected machine meets all of the platform-specific prerequisites and that it has access to the appliance. Go to Supported Platforms and Prerequisites for Remote Agents for the list of prerequisites.
Step 2: Download the Linux 64-bit agent installer and install the agent.
You must be logged in as the root user.
Download the Agent installer from https://docs.cloudbees.com/downloads
The agent software must be installed on each machine that you intend to use with the CloudBees CD (CloudBees Flow) appliance. The installer needs to be on the agent machine (downloaded or copied to it).
-
Choose one of the following commands to start the installer:
-
If you have a Linux platform, enter this command:
./ElectricFlowAgent-x64- -
If you have a Linux platform with the X Window System, the installer will automatically bring up the graphical user interface. To override this behavior, enter the command:
./ElectricFlowAgent-x64- --mode console
The software displays the following message:
Copyright (c) 2006-2015, Electric Cloud, Inc. All rights reserved.
This will install ElectricFlow Agent on your computer. Continue? [n/Y] -
-
Continue the installation by entering
y.The software displays the following message:
Specify the type of setup you would like to perform: expressAgent or advanced. [expressAgent] -
Enter
expressAgent.-
Go to here when the software displays the following message:
Discover the plugins directory from a remote ElectricFlow server? [n/Y] -
If you are installing ElectricFlow on a 64-bit machine but the 32-bit libraries required for ElectricFlow to run correctly are not installed, the software displays the following messages:
Warning: In the future, you may need to allocate up to 3265.0 MB of additional space in "/opt/electriccloud/electriccommander".
The following libraries are missing on your system: libstdc++.i686nss-pam-ldapd.*i686 . They are required for correct work of ElectricFlow.
Install them? [n/Y]
-
-
Enter
y.The missing 32-bit libraries are installed.
Note: If you entern, the installation process stops and the installer exits.The software displays the following message:
Discover the plugins directory from a remote ElectricFlow server? [n/Y] -
Enter
yto allow the agent machine to have access to the plugins directory. We recommend that you allow access to the plugins directory so agents have access to collections of features, third-party integrations, or third-party tools.The plugins directory on the ElectricFlow server must be "shared" before the agent machine can use "discover" to find the directory. The software displays the following message:
Create a resource for the installed agent on a remote ElectricFlow server? [n/Y] -
Enter
yto automatically create a resource object for the agent on a (remote) ElectricFlow server. This option is recommended to save time configuring new ElectricFlow resources for pre-existing ElectricFlow servers.The software displays the following message:
Register as trusted agent? [y/N] -
Enter
n.The software displays the following message:
Specify the user the agent will run as. [] -
Enter a user name. This is the user who owns the ElectricFlow agent process. For example, you might enter
releng1.The user/group that the agent runs as must have permission to write to the
$INSTALL_DIRECTORY/logdirectory.The software displays the following message:
Specify the group the agent will run as. [] -
Enter a Group Name. This is the group that owns the ElectricFlow agent process. For example, you might enter
team2.The ElectricFlow agent software is installed on the machine.
When the installation completes successfully, a message that contains the line "
ElectricFlow was successfully installed!" appears.
Step 3: Download the Windows 64-bit agent installer and install the agent.
Download the Agent installer from https://docs.cloudbees.com/downloads
The agent software must be installed on each machine that you intend to use with the ElectricFlow appliance. The installer needs to be on the agent machine (downloaded or copied to it).
In this procedure, ignore any Windows message about "Publisher Unknown" in the GUI.
-
Double-click the
ElectricFlowAgent-x64-.exefile on the target machine.
The Welcome to the ElectricFlow Installer screen appears. -
Select the Express Agent option, and click Next to continue.
The Remote ElectricFlow server screen appears. This screen captures details of your ElectricFlow server so that your agent can communicate with it. -
Enter the following information on the Remote ElectricFlow server screen:
Server Host Name - Use this field to enter the name or IP address of the ElectricFlow server that will communicate with the agent. If the remote server is using a non-default HTTP port, you must specify the Server Host Name as
host:port.ElectricFlow User Name and Password - Use these fields to connect to the server. Enter the name and password of an ElectricFlow user who has sufficient privileges to create a resource. You can use your registered email address and password (the same user name and password that you used to log into ElectricFlow UI from a browser).
Resource Name - Use this field to enter the name of the resource you would like to use for the agent. This field is available for use when the Create a resource check box is selected. When the installation is completed, the system creates a new resource in the system with this name. You can then use this resource as part of your environment definition.
For the rest of the fields, use the default values on the screen.
-
Click Next to continue.
The Agent service account screen appears where you can specify the account that the agent service will run as. -
Enter the following information on the screen:
User Name - Use this field to enter the name of the user who will run the ElectricFlow agent service. The user that the agent runs as must have permission to write to the
$INSTALL_DIRECTORY/logdirectory.Password - Use this field to enter the password of the user who will run the ElectricFlow agent service.
Domain - Use this field to enter the domain name information for the user. For example, electric-cloud.com . Leave this field blank if this is a local user.
Use the local system account - Select this check box if you want the ElectricFlow agent service to run as the local Windows system account.
-
Click Next to continue.
The Ready to install screen appears and shows a summary of the information that you entered. -
Review this screen to verify your selections. Use the Back button to change any of your settings if necessary.
-
Click Next to continue.
ElectricFlow installs the agent and creates the resource. This process can take a few minutes.
When the installation is completed, this message appears:
ElectricFlow was successfully installed!
Installer log file: c:/ProgramData/ElectricCommander/logs/installer.log.
Click Finish to exit the wizard.
Step 4: Verify the agent installation.
The agent has been successfully installed if it is in the list of resources on the Resources page in the ElectricFlow platform.
-
Log into ElectricFlow.
-
In the Home page, click Automations >Platforms and Projects .
The ElectricFlow Projects page opens. -
Click Cloud > Resources .
-
In the Resources page, review the list of resources.
The agent (a resource) that you created should be in the list.
Step 5: Add the agent to an environment as a resource.
When creating an application in ElectricFlow, you assign resources, including agents, to an environment where the application will deployed. Resources can be added to a new environment (go to Step 5a) or to an existing environment (go to Step 5b).
Step 5a: Add a resource to new environment.
-
Go to the ElectricFlow Home page.
-
Click Environments .
-
Click the Add + button in the upper right corner of the Environments List.
-
In the New dialog box, click Environment > Create new .
-
Enter the name and description of the new environment.
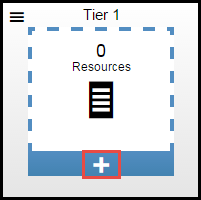
The Environments Visual Editor opens and has one environment tier with no assigned resources. -
In the Environments Visual Editor, click the + button in the Resources area of the environment tier.
-
In the New dialog box, click Add resources .
-
Select an available resource.
A resource is available when you can click on it and it is not dimmed. The first resource in the list below is available while the second is not.
When a resource is selected, there is a green check mark next to the resource name.
-
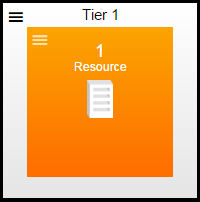
Click OK . The Environments Visual Editor now shows the environment tier with one resource.
For more information about modeling environments, go to Environment Modeling. If you want to set up a dynamic environment, go to Dynamic Resources.
Step 5b: Add a resource to an existing environment.
-
Go to the CloudBees CD (CloudBees Flow) Home page.
-
Click Environments .
-
Click on the name of an environment in the Environments List.
The Environments Visual Editor opens. -
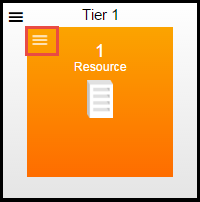
To add a resource to an existing environment tier, click the Menu button in the Resource area of the tier, click Detail , and then go to Step 6.
-
To add a resource to a new environment tier:
-
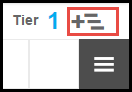
Click the Add tier button in the upper right corner of the visual editor.
A new environment tier appears in the Environments Visual Editor.
-
Click the Menu button in the Resource area of the tier, and then click Details .
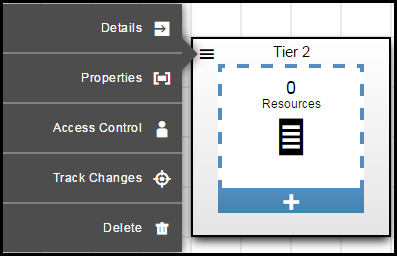
The Environment Tier Details dialog box opens.
-
Enter a new name and description for the environment tier.
-
Click the Menu button in the Resource area of the tier, and then Details .
-
Go to Step 6.
-
-
Select an available resource.
A resource is available when you can click on it and it is not dimmed.
When a resource is selected, there is a green check mark next to the resource name.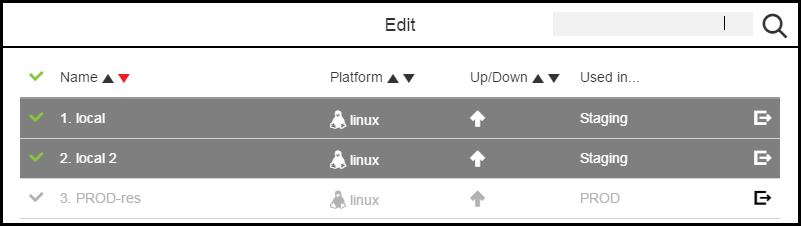
-
Click OK .
The Environments Visual Editor now shows the new environment tier with the resource that you added.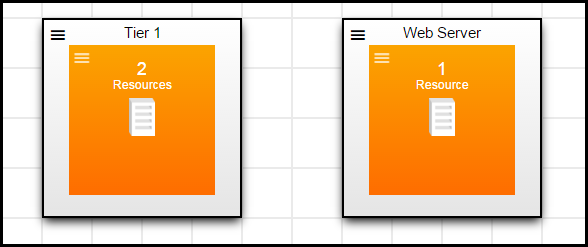
For more information about modeling environments, go to Environment Modeling. If you want to set up a dynamic environment, go to Dynamic Resources.