Resolution
There are multiple possible ways to connect a Windows agent to a controller:
-
Using SSH
-
Using WebSocket transport and creating the service using WinSW
-
Using the Java Web start service install (Java 8 and earlier only)
1. Use SSH
You can use ssh to connect the agent by following Configuring Windows agents Note: This solution does not actually use a Windows service, as the agent launch is handeled by your controller automatically.
2. Use WebSocket transport and creating the service using WinSW
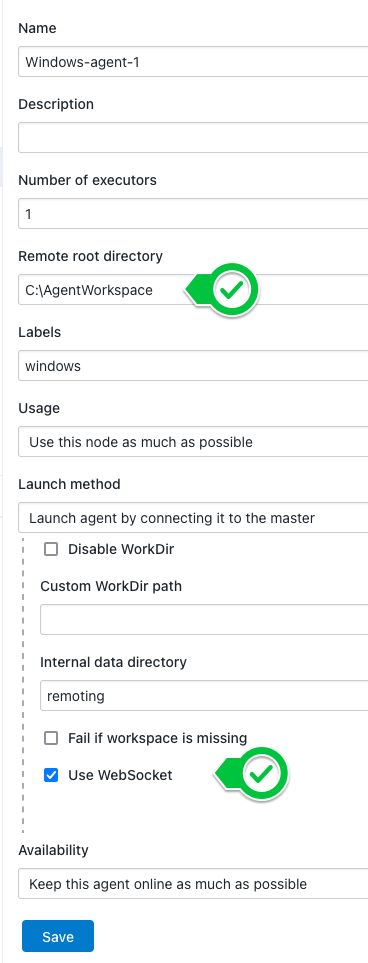
a) Create the agent and ensure Use WebSocket is checked:

b) Logon to your Windows agent machine and create a new directory (eg C:\AgentWorkspace), the next steps are based upon https://github.com/winsw/winsw/blob/v2/doc/installation.md#winsw-installation-guide
c) Download WinSW from https://github.com/winsw/winsw/releases/tag/v2.12.0 (or latest version) to the service directory. (WinSW-64x.exe)
d) Optionally, rename WinSW-64x.exe to a name of your choice such as C:\AgentWorkspace\jenkinsAgentService.exe
e) Use the xml file from https://github.com/winsw/winsw/blob/v3/samples/jenkins.xml as a template for your service and save it as an XML file named after the exe file from step d (eg C:\AgentWorkspace\jenkinsAgentService.xml)
f) Download the agent.jar from JENKINS_URL/jnlpJars/agent.jar or clicking on agent.jar at JENKINS_URL/computer/<my-node>/, save it to C:\AgentWorkspace\agent.jar.
g) View the launch command at JENKINS_URL/computer/<my-node>/ to find the Java arguments to use, and paste those arguments into the <arguments> section of the C:\AgentWorkspace\jenkinsAgentService.xml.

h) Update C:\AgentWorkspace\jenkinsAgentService.xml with the correct path to the the agent.jar (eg C:\AgentWorkspace\agent.jar).
-
Update
C:\AgentWorkspace\jenkinsAgentService.xmlwith the correct path to Java inside of the<executable>xml element.
j) Update C:\AgentWorkspace\jenkinsAgentService.xml with the user/service account to run the agent (that does not have superuser/admin access) using the <serviceaccount> syntax in this example. Note: this user will need to have "logon as a service" access as well as write access to the folder created in step b. The folder from step b should be restricted to only be readable and writable by this user account.
k) Open a Windows cmd or PowerShell window "As Administrator"
l) CD into the service directory: cd C:\AgentWorkspace
m) Run jenkinsAgentService.exe install, the expected output will be similar to:
2021-08-02 18:20:59,119 INFO  - Installing service 'JenkinsAgent (jenkinsAgent)'...
2021-08-02 18:20:59,172 INFO  - Service 'JenkinsAgent (jenkinsAgent)' was installed successfully.
n) Start the service from the Windows services application, or run jenkinsAgentService.exe start (it will also start automatically after the agent restarts).
o) Open JENKINS_URL to validate that the Agent is showing as connected.
3. Using the Java Web start service install (Java 8 and earlier only)
| This method is not usable when using WebSocket transport to connect due to JENKINS-64144. |
| This method cannot be used when using Java 11, as Java Web start is not included in Java 11 https://www.jenkins.io/redirect/java11-java-web-start. |
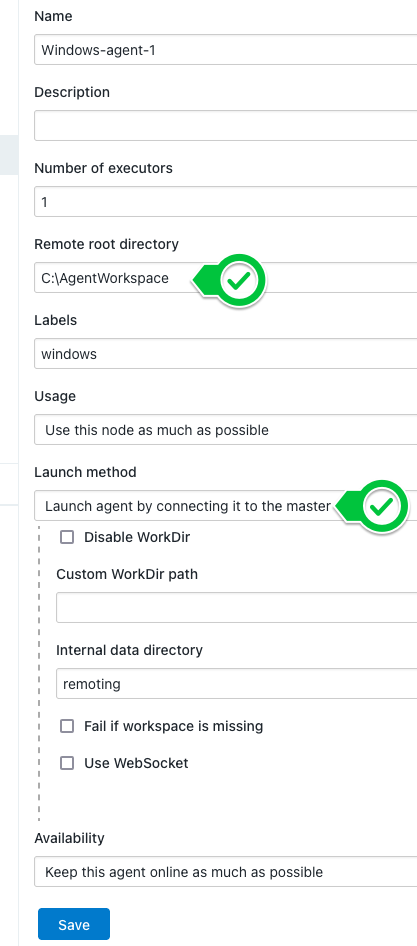
a) Create an agent and ensure Use WebSocket is unchecked:

b) There are different ways to launch the agent:
* The easiest way is to open a web browser and access the JENKINS_URL from the agent machine, go to the node page `JENKINS_URL/computer/<my-node>/` and click on the `Launch` button. This downloads the file `jenkins-agent.jnlp` and runs it.
* Another way is to run the command `java -jar agent.jar -jnlpUrl JENKINS_URL/computer/<my-node>/jenkins-agent.jnlp -secret <my-secret>` described at `JENKINS_URL/computer/<my-node>/`
* You can download `jenkins-agent.jnlp` from the controller, copy it to the agent machine and run `javaws jenkins-agent.jnlp`

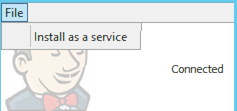
c) Once the agent is launched, you will see a Windows application open. To install this agent as a service, click on File/Install as a service.
