The CloudBees SCM Reporting feature is an integration that allows you to receive and act upon granular, actionable build and reporting data directly in GitHub or Bitbucket. You can see whether a build has passed or failed and, in the case of failure, quickly pinpoint the root cause.
This capability eliminates context switching and supports a workflow that is not only desirable for usability but also for auditability and reporting purposes with Git as the single source of truth.
CloudBees SCM Reporting feature benefits
The CloudBees SCM Reporting feature provides the following benefits:
-
Installs easily and does not require updates to Pipelines.
-
Provides rich information beyond the standard GitHub or Bitbucket pass/fail status including:
-
Build stages and steps.
-
Parallel branches so you can see which are in progress, which have errors, and which are finished.
-
-
Displays checks for code coverage and test results directly in GitHub or Bitbucket.
-
Picks up individual files for problematic lines of code.
-
Supports rich Markdown (copies of stack traces, test results or other information that can be picked up automatically from a Jenkins plugin, etc.).
-
-
Delivers detailed error and warning summaries. For example, for a failed shell command, CloudBees SCM Reporting provides the text of the shell command output.
Supported versions
The CloudBees SCM Reporting plugin is available on the following versions and platforms:
-
CloudBees CI on modern cloud platforms version 2.222.4.3 (and higher)
-
CloudBees CI on traditional platforms version 2.222.4.3 (and higher)
-
CloudBees Jenkins Platform version 2.222.4.3 (and higher)
Prerequisites
The following prerequisites are required before enabling CloudBees SCM Reporting:
-
Install the Bitbucket Branch Source plugin to your CloudBees Jenkins Platform instance if you will be using Bitbucket as your SCM.
-
Install the CloudBees SCM Reporting plugin to your CloudBees Jenkins Platform instance.
The CloudBees SCM Reporting plugin adds to existing build data provided by the GitHub Branch Source plugin, which is installed by default on CloudBees Jenkins Platform installations.
| The additional build data appears only for Multibranch Pipelines on GitHub or Bitbucket. |
Installing the CloudBees SCM Reporting plugin
To install the CloudBees SCM Reporting plugin:
-
From the CloudBees Jenkins Platform dashboard, select Manage Jenkins > Manage Plugins.
-
Select the Available tab.
-
Use the Filter field to search for CloudBees SCM Reporting plugin.
-
Select the checkbox to choose the CloudBees SCM Reporting plugin.
-
Select Download now and install after restart to install the plugin.
Enabling GitHub App authentication
You can create a GitHub App and switch your SCM source to use GitHub App authentication.
This has several benefits:
-
It is simpler and safer to use an app with limited permissions than a personal access token even from a bot account.
-
You get a request rate limit that grows with your GitHub organization size (users/repositories) limit.
-
CloudBees SCM Reporting plugin will automatically switch to using the Checks tab and offer much richer information.
-
GitHub checks display the duration for build stages.
There are two options for enabling GitHub App authentication:
-
Use the GitHub App wizard.
-
Manually create a GitHub App.
If you are only using the GitHub App authentication for a single organization then the GitHub App wizard option is the best choice. However, if you need to allow multiple organizations to use GitHub App authentication or have complex requirements and need a more customized approach, you should manually create the GitHub App.
| If your SCM source is an organization, you must be an owner to create a GitHub App. |
To enable GitHub App authentication using the GitHub App wizard:
-
From the GitHub Organization in CloudBees Jenkins Platform, select Create GitHub App in the left navigation.
-
Select Create App.
-
Confirm your GitHub password, if requested.
-
Edit the suggested GitHub App name in the text field if desired, and select Create GitHub App for <GitHub organization/user name>.
The <GitHub organization/user name> will be the GitHub organization/user account where the GitHub App will be located. -
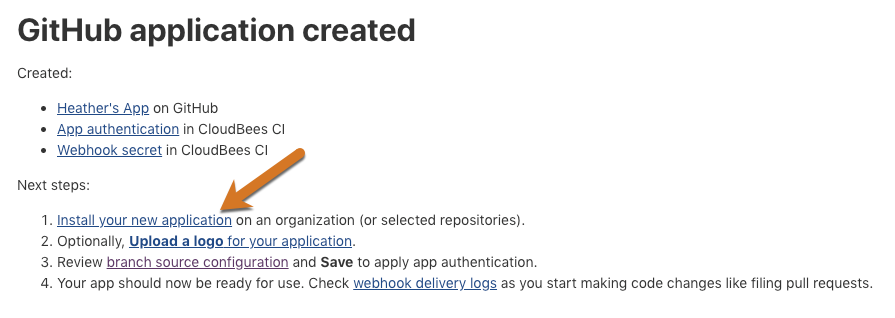
Select Install your new application under Next steps: to install your GitHub App.
 Figure 1. New application
 -
Select Install to confirm the installation location.
-
Select either All repositories or Only select repositories for where you want to install the GitHub App.
-
Select Install.
-
[Optional] Select Upload a logo for your application to update the GitHub App profile with an appropriate icon to display with notifications.
Adding an appropriate logo here will help users to understand the context of the notifications they see in the Checks tab of a pull request. -
Select branch source configuration to verify that GitHub App authentication has been applied to your CloudBees Jenkins Platform project, and Save to trigger a rescan using the new credentials.
While on the GitHub Organization configuration page in CloudBees Jenkins Platform you can also update CloudBees SCM Reporting configuration options as described in Configuring CloudBees SCM Reporting notifications. -
[Optional] Select webhook delivery logs to verify the webhook the GitHub App wizard established is working as expected.
To enable GitHub App authentication by creating the GitHub App manually, follow the instructions in Using GitHub App authentication.
After enabling CloudBees SCM Reporting, users can configure notifications.