There are several reasons for considering this authentication approach including:
-
The rate limit for a GitHub App scales with your organization size, whereas a user based token has a limit of 5000 requests per hour, regardless of how many repositories you have.
-
For organizations that have 2-factor authentication enforced - with GitHub Apps there is no need to manage 2-factor authentication tokens for a 'bot' user.
-
Jenkins GitHub Apps require a minimal, controlled set of privileges compared to a service user and its personal access token.
GitHub App authentication can be used with Multibranch Pipeline jobs, Organization folders, and Shared Libraries. It is not available for regular Pipeline or Freestyle jobs.
Setting up GitHub App authentication requires several steps in both GitHub and Jenkins. Complete the following steps in GitHub:
Afterward, complete the following steps in Jenkins:
Supported versions
GitHub App authentication is available on the following versions and platforms:
-
CloudBees CI on modern cloud platforms version 2.222.4.3 (and higher)
-
CloudBees CI on traditional platforms version 2.222.4.3 (and higher)
-
GitHub Branch Source plugin version 2.7.1 (or higher)
Create the GitHub App
To create the GitHub App:
-
Do one of the following:
-
For a GitHub App owned by an organization: In the upper-right corner of any page in GitHub, select your profile icon > Your organizations then select Settings for the organization.
-
For a GitHub App owned by a personal account: In the upper-right corner of any page in GitHub, select your profile icon > Settings.
-
-
In the left navigation, select Developer settings > GitHub Apps.
-
Select New GitHub App.
-
Complete the following fields as follows:
-
GitHub App Name: enter an appropriate name to reference this authentication, i.e. "Jenkins - <team name>".
-
Homepage URL: enter your company domain or GitHub repository URL.
-
Webhook URL: enter your Jenkins instance URL such as
https://<jenkins-host>/github-webhook/.
-
-
You do not need to complete any of the fields in the Identifying and authorizing users section.
-
Under Repository permissions, choose the following permissions. For each type of permission, use the drop-down menu to select Read-only, Read & write, or No access.
-
Administration: Read-only
-
Checks: Read & write
-
Contents: Read-only (to read the
Jenkinsfileand the repository content duringgit fetch). -
Metadata: Read-only
-
Pull requests: Read-only
-
(Optional)Webhooks: If you want the plugin to manage webhooks for you, Read & write.
For more information on using webhooks with Jenkins, refer to Creating projects based on GitHub repository structure - Using build triggers and webhooks. -
Commit statuses: Read & write
These permissions are the minimum permissions CloudBees CI will need for general Multibranch Pipeline workflows; however, you can add more permissions. We recommend that you select minimal permissions to limit the security risk if CloudBees CI is somehow compromised.
-
-
Under Subscribe to events, select the following events:
-
Check run
-
Check suite
-
Pull request
-
Push
-
Repository
If you do not see an event listed, check that you have applied the appropriate Repository permissions in the previous step. The events are added to the list based on the permissions selected. You can add additional events, the ones listed in this step are events CloudBees CI will use for general Multibranch Pipeline workflows.
-
-
Select the appropriate choice for Where can this GitHub App be installed?
-
Only on this account: If you only want to use the GitHub App for a single GitHub account.
-
Any account: If you want to use the GitHub App for multiple organizations.
If you select Any account, you will need one credentials entry in CloudBees CI per organization.
-
-
Select Create GitHub App.
| See Creating a GitHub App for more information on creating a GitHub App from GitHub’s Developer guide. |
| You are not required to use webhooks, but it strongly recommended over alternatives such as polling. To use webhooks, add the Webhook URL and secret (noted above). |
| This version of CloudBees CI does not support concurrent registration of multiple webhook secrets. |
Generate a private key for authenticating to the GitHub App
After you have created the GitHub App, you will need to generate a private key for authenticating to the GitHub App.
To generate a private key authenticating to the GitHub App:
-
In the upper-right corner of any page in GitHub, select your profile icon > Settings.
-
In the left navigation, select Developer settings > GitHub Apps.
-
Select the GitHub App.
-
Under Private keys, select Generate a private key option.
-
A private key in PEM format will be downloaded to your computer.
Convert the private key for Jenkins
After you have generated the private key authenticating to the GitHub App, you need to convert the key into a different format that Jenkins can use with the following command:
openssl pkcs8 -topk8 -inform PEM -outform PEM -in key-in-your-downloads-folder.pem -out converted-github-app.pem -nocrypt
Install the GitHub App to your organization
Finally, you must install the newly created app to your organization.
To install the newly created GitHub App to your organization:
-
From the GitHub Apps settings page, select the GitHub App.
-
In the left navigation, select Install App.
-
Select Install next to the organization or user account containing the correct repository.
-
Install the app on all repositories or select repositories.
-
Once installed, you will have configuration options for the app on your selected account.
Add the Jenkins credential
To add the Jenkins credential in the UI:
-
From the CloudBees CI dashboard, select Credentials in the left navigation.
-
Select the global credential store.
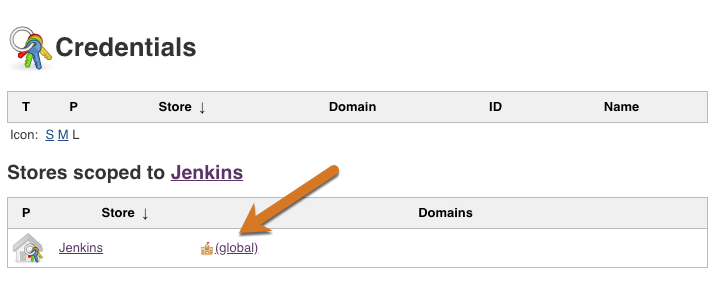
-
Select Add Credentials.
-
Select GitHub App as the Kind.
-
For the ID, enter the GitHub App Name you created in Create the GitHub App.
-
For App ID enter the GitHub App ID.
The GitHub App ID can be found in the About section of your GitHub App under the General tab in GitHub. 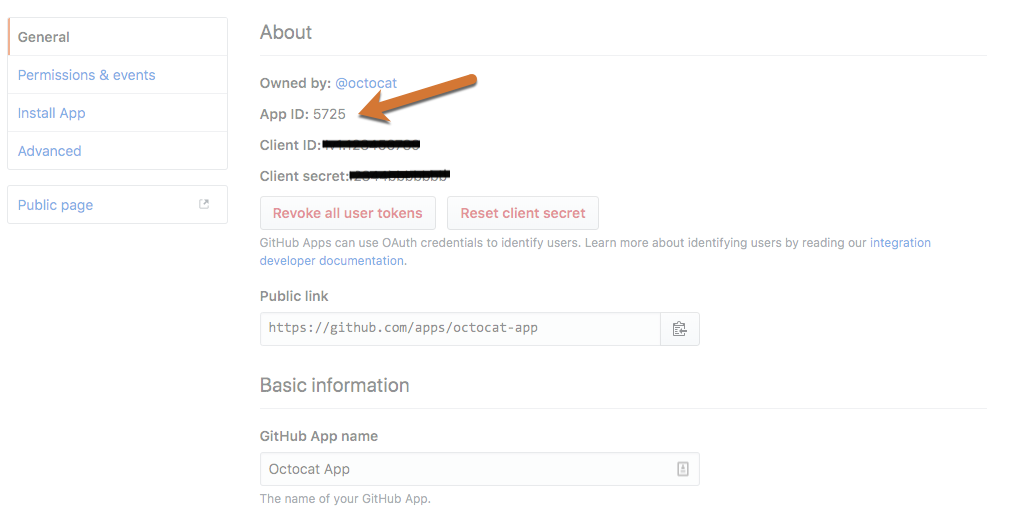
-
(Optional) Enter the API Endpoint.
This field will only appear if you are adding a Jenkins Credential to a GitHub Enterprise account. -
Select the Add button to enter the converted private key in the Key field.
-
(Advanced) Select the Advanced… button if you have installed the same GitHub App on multiple organizations, and enter the name of the organization or user in the Owner field.
-
Select OK.
Configure the GitHub Organization
| The following instructions assume you have already created a GitHub Organization in Jenkins. For more information see Create projects based on a GitHub repository structure. |
To configure your GitHub Organization to use your GitHup App for authentication:
-
From the GitHub Organization, select Configure in the left navigation.
-
Select the Projects tab.
-
Select the new GitHub App credentials from the Credentials drop down in the GitHub Organization section.
GHApp verified, remaining rate limit: 5000displays.If you are using GitHub Enterprise, the API URL must be set to your server. The API URL must be set on both the credential and the job. -
Select Save.
-
In the left navigation, select Scan Organization Now.
-
View the Scan Organization log and verify that the success message displays.
Configure a controller to use a webhook secret
To configure a controller to use a webhook secret:
-
Select in the upper-right corner to navigate to the Manage Jenkins page.
-
Select System.
-
Under , select Advanced next to a notebook with a pencil icon.
-
For Shared secret, select Add and choose Jenkins.
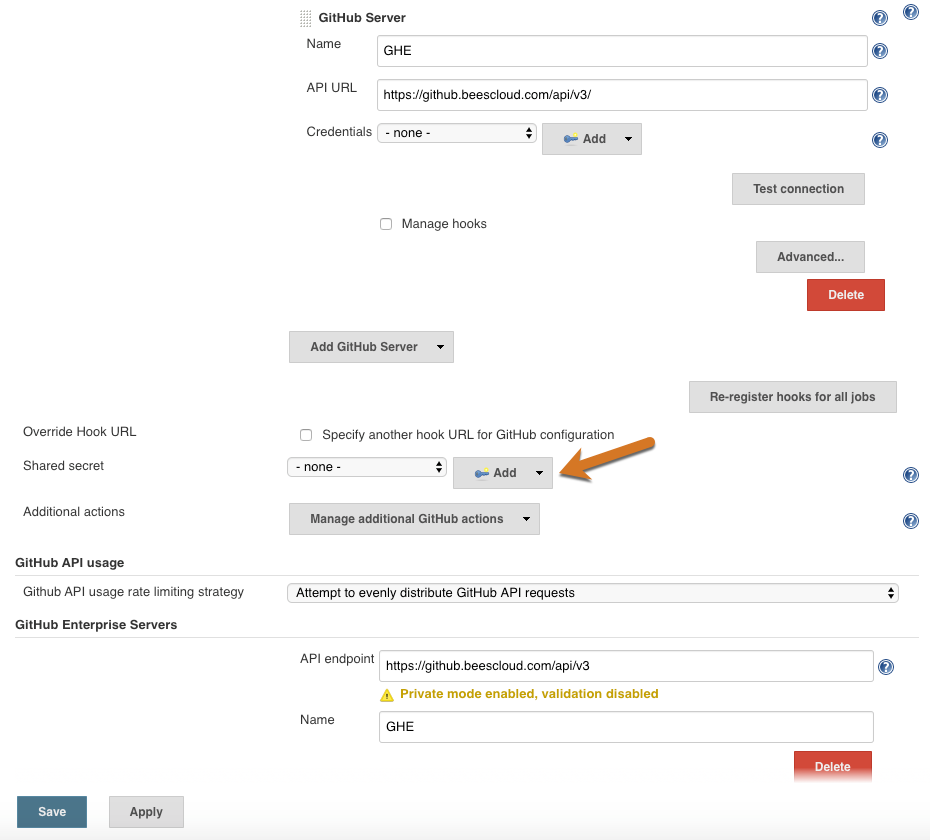
-
For Kind, select Secret text.
-
Enter the webhook secret you added to the GitHub App in Create the GitHub App.
-
Select Add.
Unthrottle GitHub API usage
By default, CloudBees CI tries to be parsimonious with GitHub API usage since the rate limit can easily be exceeded when using a personal access token. Exceeding the rate limit is unlikely to be an issue when using a GitHub App for authentication, since the rate limit is elastic and much higher.
To unthrottle GitHub API usage:
-
Select in the upper-right corner to navigate to the Manage Jenkins page.
-
Select System.
-
Navigate to .
-
Switch Normalize API requests to Throttle at/near rate limit, and then select Save. Refer to GitHub rate limiting for more information.