OpenID Connect (OIDC) 1.0 is a simple identity layer on top of the OAuth 2.0 protocol. It allows CloudBees Software Delivery Automation to verify the identity of a user based on the authentication performed by an authorization server and obtain basic profile information about the user in an interoperable and REST-like manner. It uses security tokens containing assertions to pass information about a user between the following:
-
An OIDC identity provider, such as Okta, GSuite, or Keycloak.
-
An OIDC service provider, such as the CloudBees Software Delivery Automation server.
Configuring an OKTA integration
This section demonstrates how to create an OIDC SSO application integration between OKTA and your CloudBees Software Delivery Automation environment. Steps in this section take place on the Okta platform. These instructions are for example purposes only and may not reflect the current Okta UI. Refer to the Okta documentation for instructions on how to use Okta.
| You must have an active Okta account populated with user names. |
To configure the integration:
-
Sign in to the Okta account and navigate to the Applications dashboard.
-
Select Create App Integration. The Create a new app integration dialog displays.
-
Configure the following:
-
Sign-in method: Select OIDC - OpenID Connect.
-
Application type: Select Web Application.
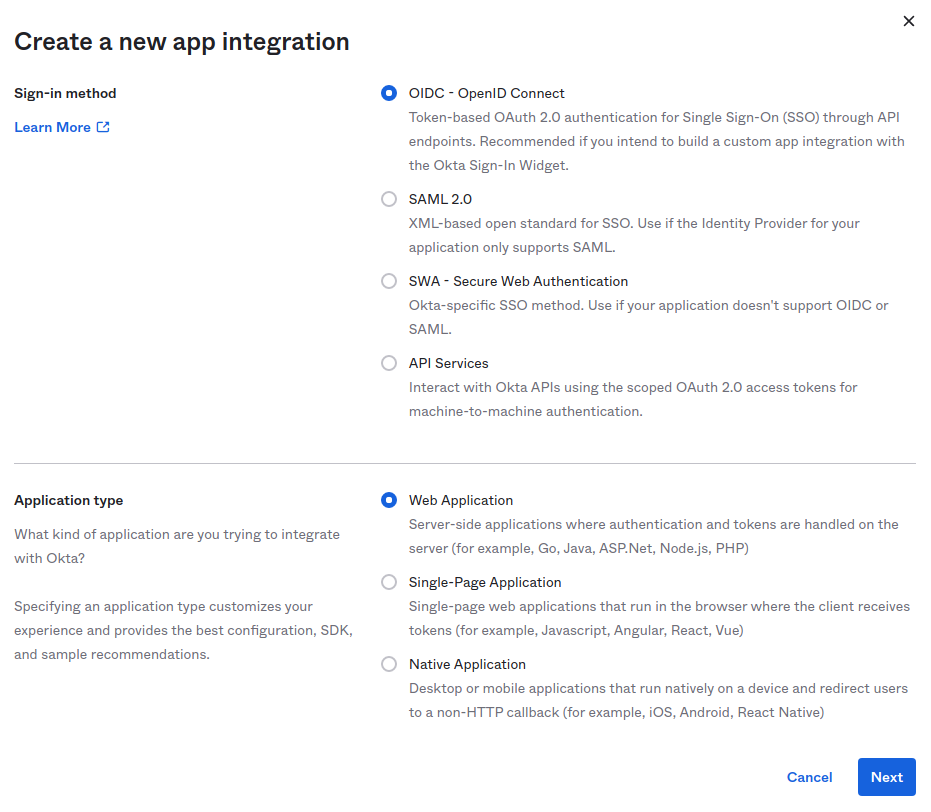 Figure 1. Creating a new OIDC app integration
-
-
Select Next. The New Web App Integration page displays.
-
Enter the following information:
-
App integration name: Enter
<any name>. For example:Sample OIDC App. -
Sign-in redirect URIs: Enter
https://<cloudbees-cd-server-hostname>/commander/login.php+. For example:http://localhost:8080/commander/login.php+. -
Sign-out redirect URIs: Enter
https://<cloudbees-cd-server-hostname>/commander/logout.php+. For example:https://localhost:8080/commander/logout.php+. -
Assignments: Select Allow everyone in your organization to access.
-
-
Select Save. The page displays information for the Sample OIDC App created in the last step and the General tab is active.
-
Note the values in the following fields. You will need them to create the OIDC SSO configuration on the CloudBees Software Delivery Automation server:
-
Client ID
-
Client secret
-
Okta domain
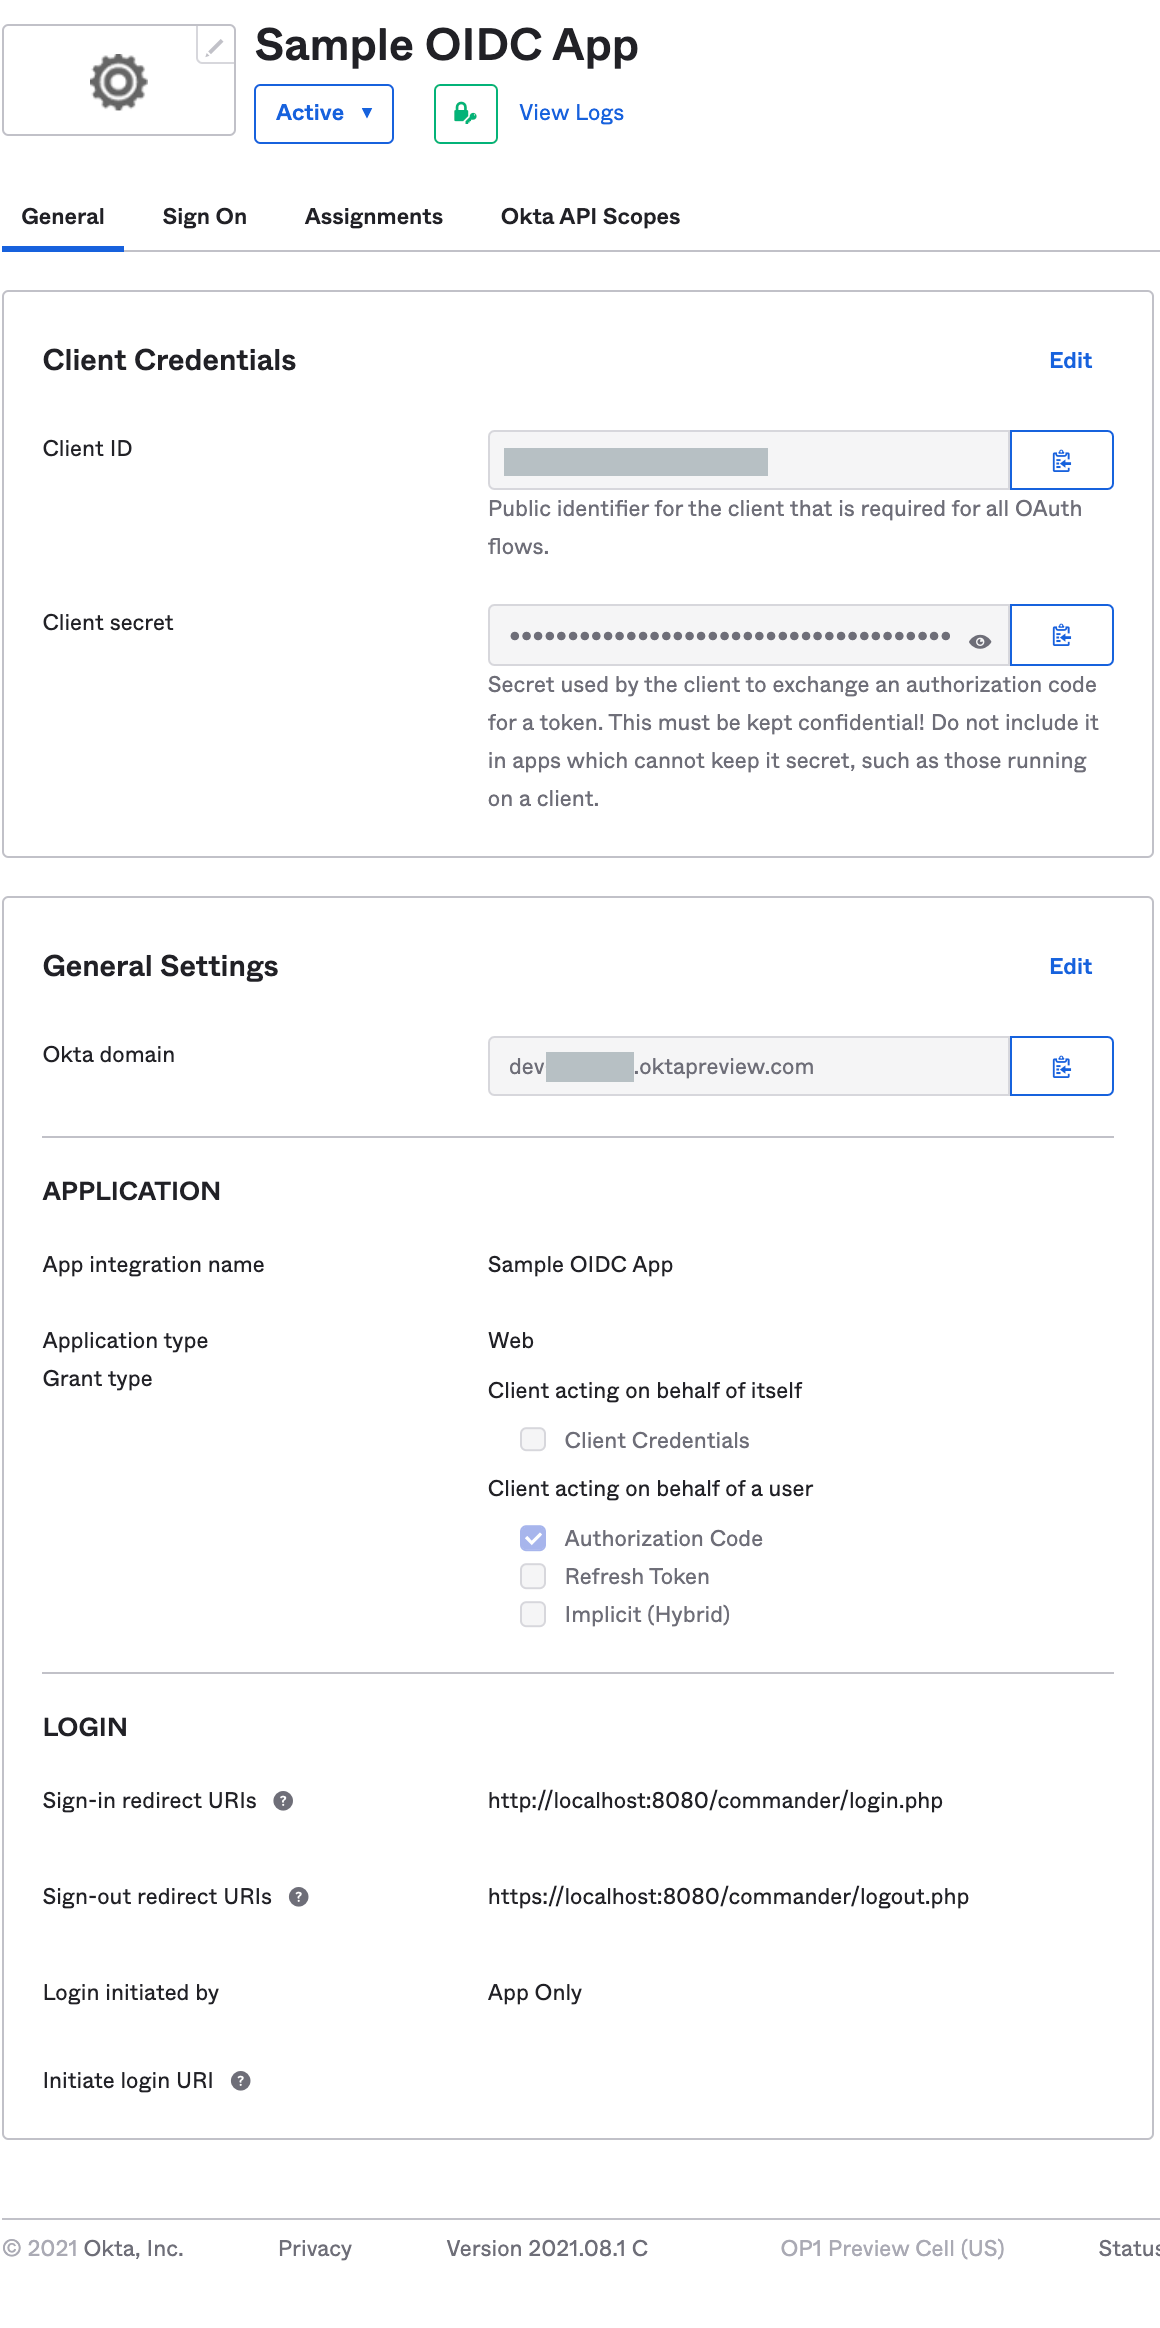 Figure 2. Application information
-
-
Select the Assignments tab and assign people to this application.
Now, you are ready to create an OIDC service provider on the CloudBees Software Delivery Automation server. Refer to Creating an OIDC service provider for details.
Configuring a Keycloak integration
This section demonstrates how to create an OIDC SSO application integration between Keycloak and your CloudBees Software Delivery Automation environment. Steps in this section take place on the Keycloak platform. These instructions are for example purposes only and may not reflect the current Keycloak UI. Refer to the Keycloak documentation for instructions on how to use Keycloak.
To configure the integration:
-
From a terminal, type the following command to start Keycloak:
docker run -p 8080:8080 -e KEYCLOAK_ADMIN=admin -e KEYCLOAK_ADMIN_PASSWORD=admin quay.io/keycloak/keycloak:17.0.0 start-dev -
Type the following URL to access the Keycloak UI:
http://localhost:8080. -
Type
adminfor the Keycloak username and password, and then select Sign In. -
In Keycloak, in the left pane, select Clients, and then select Add Client.
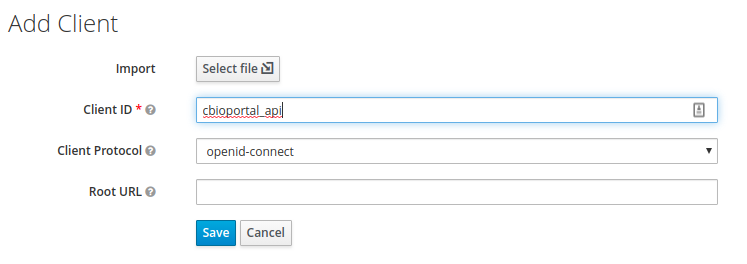 Figure 3. Add Keycloak client
 -
Enter the following details:
-
In Client ID, type
cbioportal_api. -
In Client Protocol, type
openid-connect.
-
-
Click Save.
-
In the left pane, select Clients, and then select the cbioportal_api client that you created in step 5.
-
On the Settings tab, enable the following options:
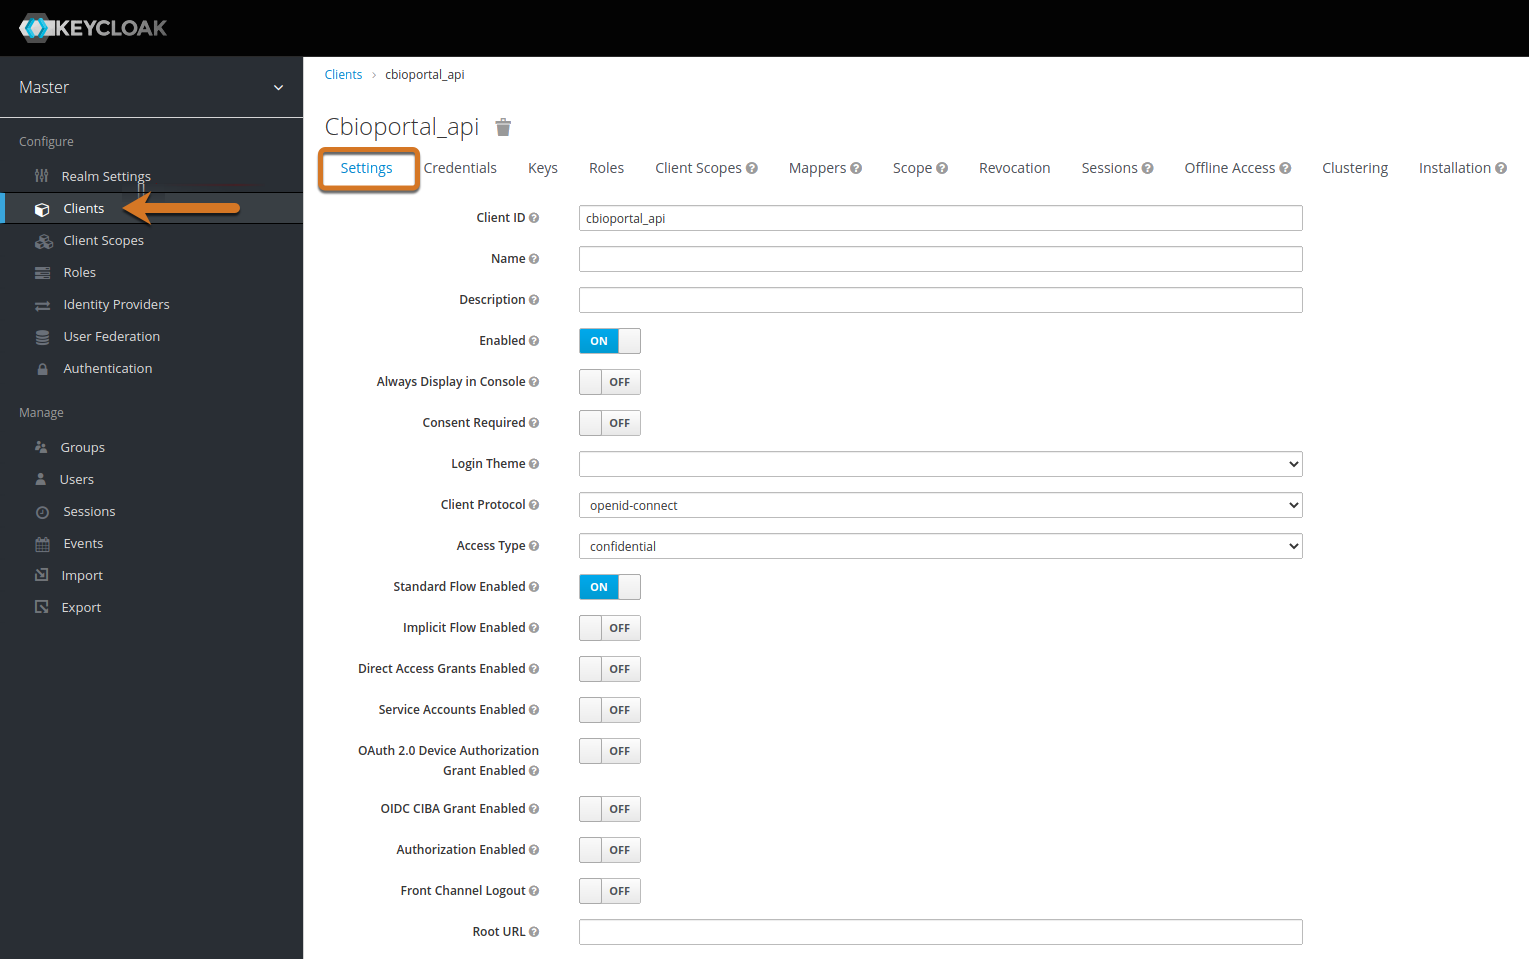 Figure 4. Configure client settings
-
Enabled: Toggle this option to ON.
-
Standard Flow Enabled: Toggle this option to ON.
-
Valid Redirect URIs: Type
https://localhost/commander/login.php. Note that if you plan to enable the Enable single option in Creating an OIDC service provider, then you must enter the redirect URI for logout, too. -
Backchannel Logout Session Required: Toggle this option to ON.
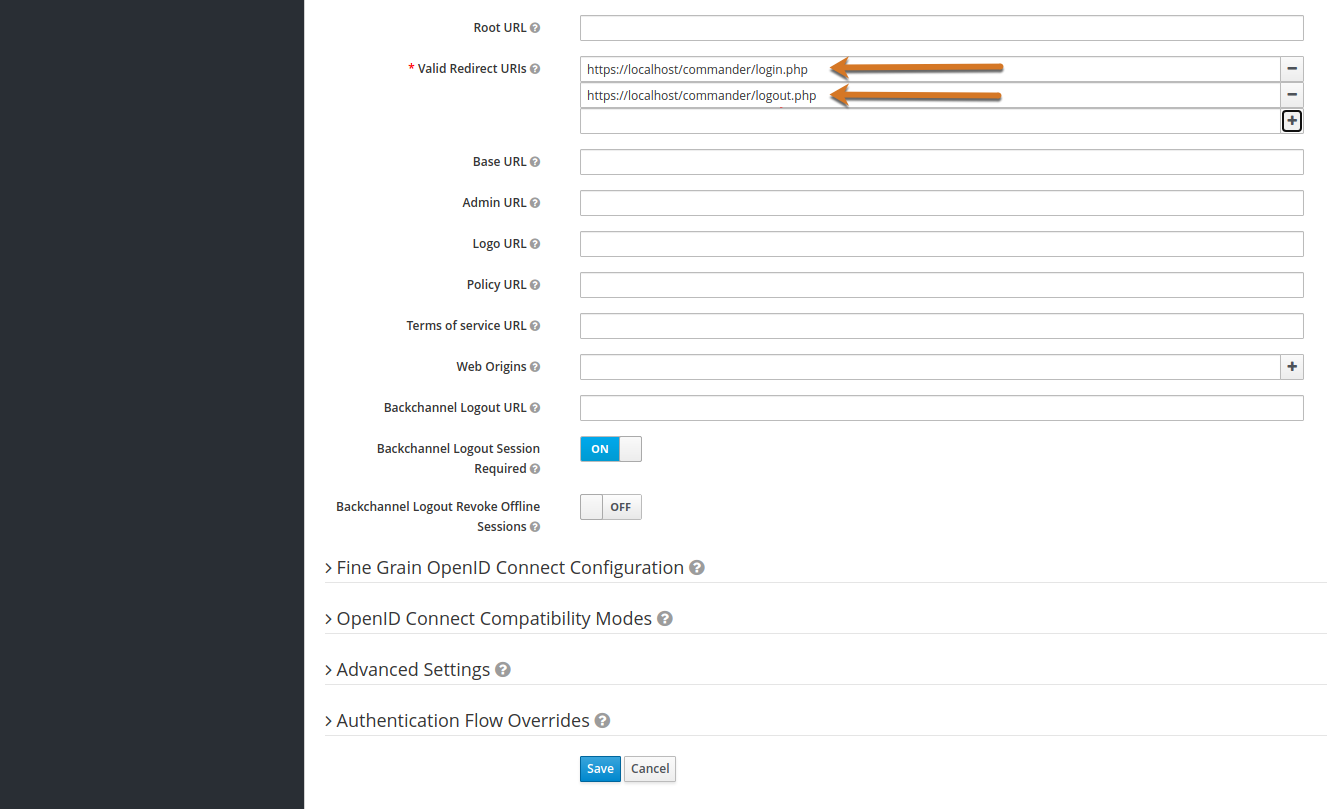 Figure 5. Configure client settings continued
-
-
On the Credentials tab, in Client Authenticator, select Client ID. Select Regenerate secret if you need to generate a new secret.
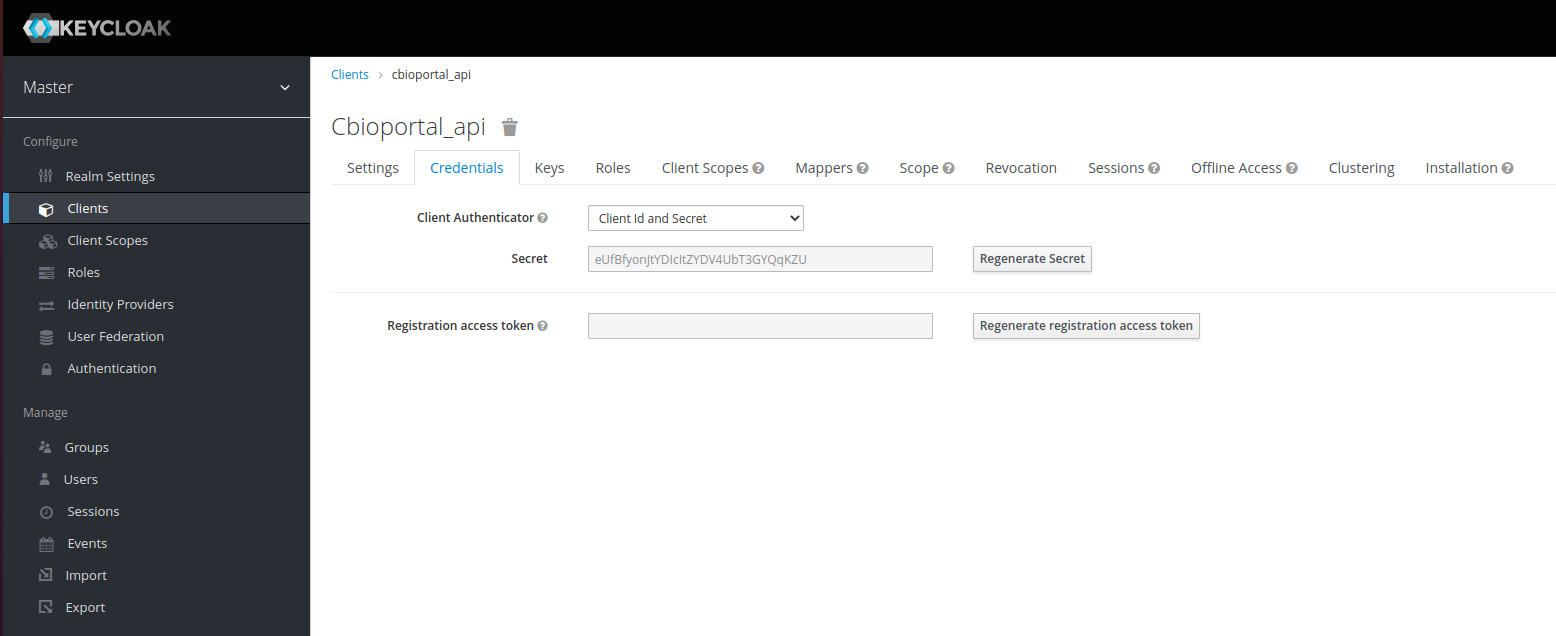 Figure 6. Keycloak client credentials
 -
Select Save.
-
On the Client Scopes tab, verify that all default and optional client scopes are in the Assigned Default Client Scopes and Assigned Optional Client Scopes lists.
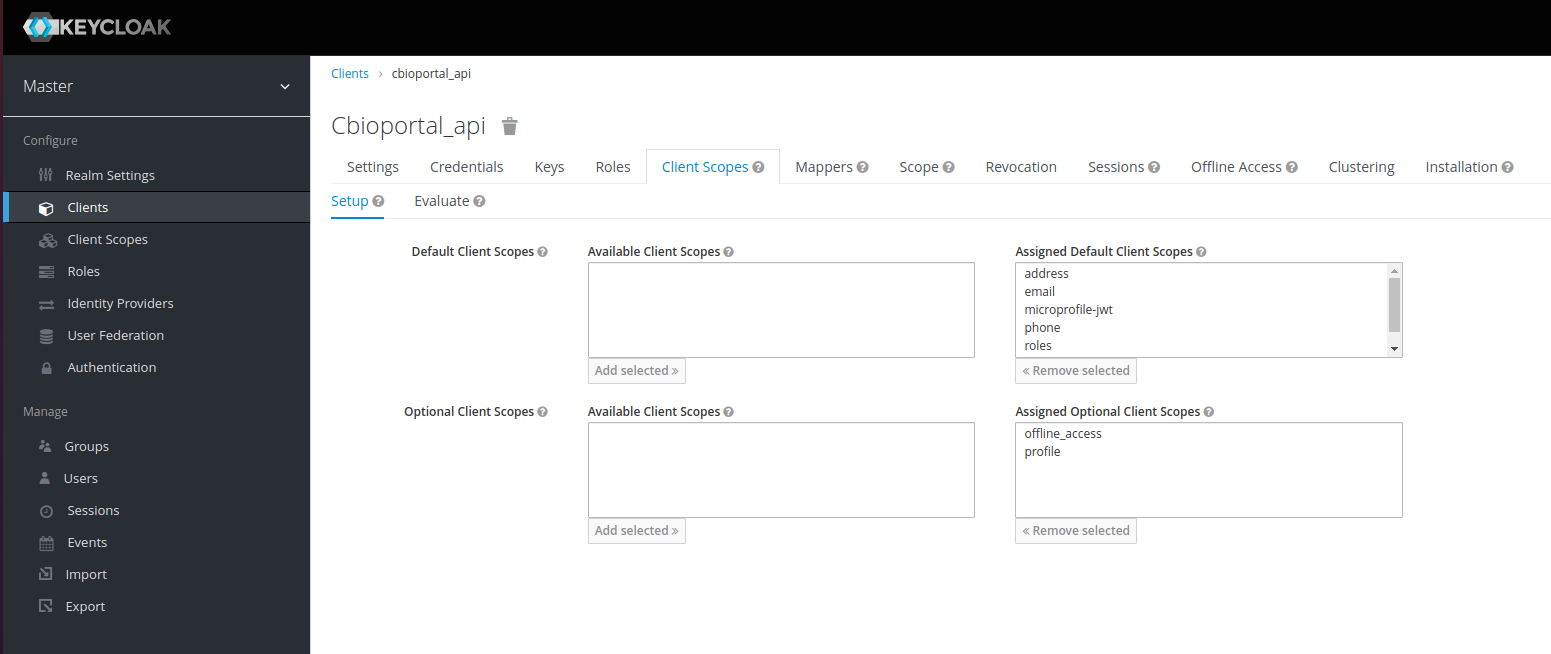 Figure 7. Keycloak client scopes
 -
On the Mappers tab, complete the options as follows:
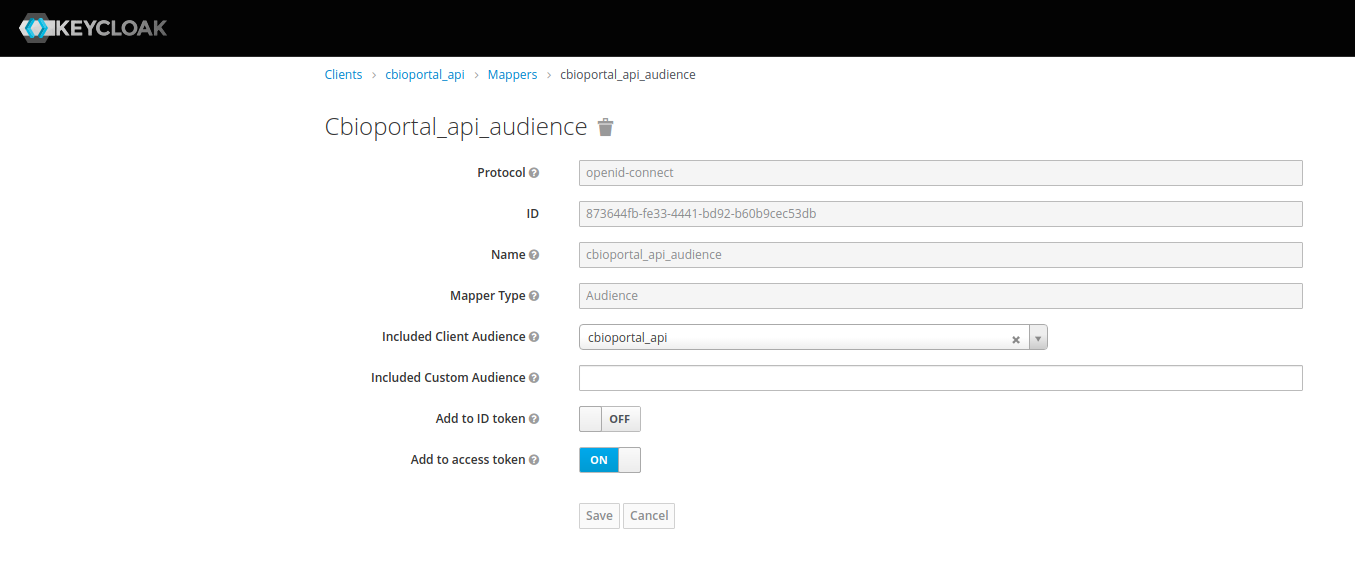 Figure 8. Keycloak client mappers
-
Protocol: Type
openid-connect. -
ID: The ID is generated automatically.
-
Name: Type
cbioportal_api. -
Add to access token: Toggle this option to ON.
-
-
Select Save.
-
On the Mappers tab, select Create to create a group claim attribute.
-
Name: Type
groups. -
Mapper Type: Select Group Membership.
-
Token Claim Name: Type
groups. -
Full group path: Toggle this option to OFF.
-
-
Select Save.
-
On the Scope tab, verify the following:
 Figure 9. Keycloak client scope
-
Available Roles includes create-realm, default-roles-master, offline_access, and uma_authorization.
-
Assigned Roles includes admin.
-
Effective Roles includes admin and create-realm.
-
-
Select Save.
-
In the left pane, under Manage, select Users, and then select Add user.
-
Add the user’s email address and name. Verify that User Enabled and Email Verified are toggled to ON.
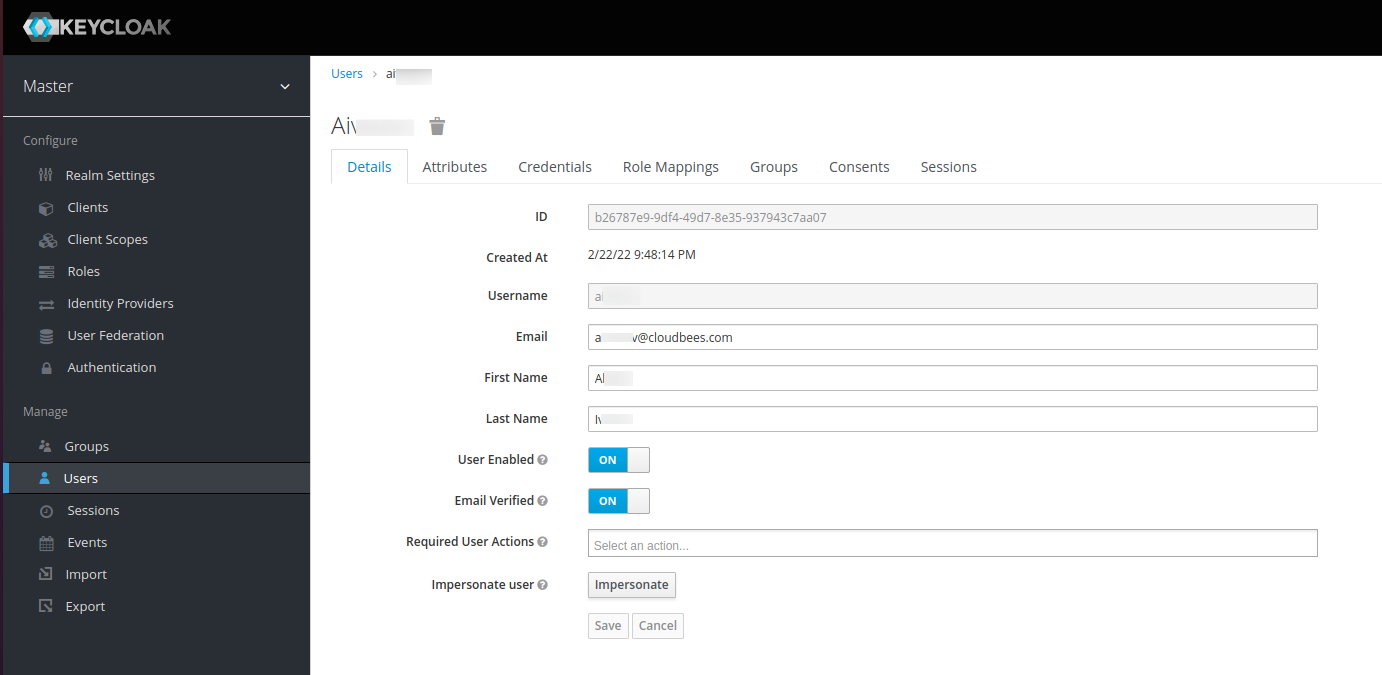 Figure 10. Keycloak user details
 -
Select Save.
Now, you are ready to create an OIDC service provider on the CloudBees Software Delivery Automation server. Refer to Creating an OIDC service provider for details.
Creating an OIDC service provider
| Before creating an OIDC service provider on CloudBees Software Delivery Automation, you must have an OIDC app integration created with an identity provider such as Okta, GSuite, or Keycloak. Refer to [Configuring a new OIDC app integration] for an example using Okta and to Configuring a Keycloak integration for an example using Keycloak. |
To use OIDC single sign-on (SSO), you must create an OIDC service provider. In this case, the service provider is CloudBees Software Delivery Automation; set it up for the CloudBees Software Delivery Automation server and the CloudBees Software Delivery Automation web server components.
To create an OIDC service provider:
-
From the CloudBees navigation, select CD/RO or Analytics.
-
From the CloudBees CD/RO or CloudBees Analytics main menu, select . The Single Sign-On page displays.
-
From the Edit SSO Configuration list, select Enable OpenID Connect SSO.
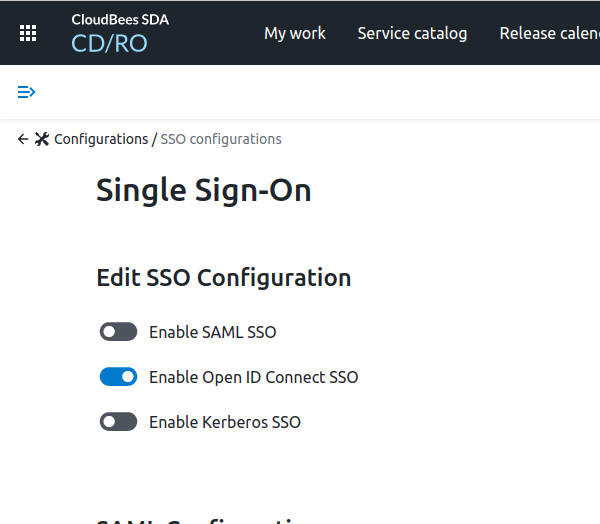 Figure 11. Select SSO configuration
 -
In the OpenID Connect configurations section, select Add OpenID Connect configuration. The New OpenID Connect page displays.
-
Enter the details for the new configuration as follows:
Item Description ОpenID Connect configuration name
The name of the OIDC identity provider. This is a user-defined string used to identify this configuration. For example, use Okta or Keycloak depending on which provider you are using.
Enabled
Determines whether this OIDC configuration is enabled. Deselect to disable the configuration. Defaults to
enabled.Description
User-defined description for this provider.
SSO Provider
Select the SSO provider.
Web Server URL
The web server URL for the service provider host. This is the URL that an identity provider, such as Okta or Keycloak, sends a response after processing the request from CloudBees Software Delivery Automation. In this case, the service provider is the CloudBees CD/RO or CloudBees Analytics application and the URL is for the CloudBees CD/RO or CloudBees Analytics web server. For example,
https://<cloudbees-web-server>, without appending/flowor/commanderto the URL.Refresh configuration
Indicates whether the endpoint attributes such as
authorizationEndpoint,tokenEndpoint, and other configuration details should be updated using theconfigurationURL. Iftrue, thenconfigurationURLmust be set. Defaults tofalse.This option must be enabled if you are using Keycloak.
Configuration URL
The OIDC identity provider’s well-known configuration endpoint. If specified, the other endpoints are dynamically discovered when Refresh configuration is set to
true.If using the Okta identity provider, it is in the following form:
<Okta domain>/oauth2/default<Okta domain>is the value of the Okta domain field from the Okta application’s dashboard.If using Keycloak, use the following:
http://localhost:8080/realms/master/.well-known/openid-configurationEnable single logout
Determines whether the user is logged out from the OIDC provider when the user logs out of CloudBees Software Delivery Automation. Defaults to
disabled.- NOTE
-
If you enable this option and you use Keycloak, you must enter the URI for logout in Keycloak. To set the URI for logout, in Keycloak, go to , and then type the URI in the Valid Redirect URIs field.
Logout endpoint
URL for the logout endpoint. Applicable if Enable single logout (above) is selected. If using the Okta identity provider, it is in the following form:
<Okta domain>/oauth2/default/v1/logoutAuthorization endpoint
URL for the authorization endpoint. If using the Okta identity provider, this is the value of the Authorization endpoint field from the Okta application’s dashboard. If using the Okta identity provider, it is in the following form:
<Okta domain>/oauth2/default/v1/authorizeToken endpoint
URL for the token endpoint. If using the Okta identity provider, it is in the following form:
<Okta domain>/oauth2/default/v1/tokenJWK provider endpoint
URL for the JWK key’s endpoint. If using the Okta identity provider, it is in the following form:
<Okta domain>/oauth2/default/v1/keysID Token JWS algorithms
The supported ID token JWS algorithms separated by commas. Valid algorithm values:
ES256ES384ES512HS256HS384HS512PS256PS384PS512RS256RS384RS512The verification process follows the following sequence:
-
If the JWT token contains the name of an algorithm, that algorithm is used for token validation.
-
If the JWT token does not contain the name of an algorithm, the application checks for values in the ID Token JWS algorithms field of the OpenID Connect configuration.
-
If ID Token JWS algorithms field is empty, an error is displayed.
-
If ID Token JWS algorithms field contains algorithm values, the application validates the JWT token authenticity using the algorithms specified.
-
-
The verification process ends when an algorithm passes validation. All algorithms appearing in the list after the passing algorithm will not be checked.
Client ID
The value used to uniquely identify the CloudBees Software Delivery Automation server with the OIDC identity provider. If using the Okta identity provider, this is the value of the Client ID field on the Okta application’s dashboard.
Client secret
The secret used to request the token ID from the OIDC identity provider for authentication.
If using the Okta identity provider, this is the value of the Client secret field on the Okta application dashboard.
If using the Keycloak identify provider, you can locate the secret in Keycloak on the Credentials tab > Secret.
Claim names in the token ID for obtaining user information:
User name
Claim name in the token ID used to retrieve the user name. Defaults to
sub.User full name
Claim name in the token ID used to retrieve the user’s full name. Defaults to
name.User email
Claim name in the token ID used to retrieve the user’s email. Defaults to
email.User groups
Claim name in the token ID used to retrieve the groups that the user belongs to. Defaults to
groups. -
Select Save Changes. The new configuration appears in the list of OIDC configurations in the OpenID Connect configurations section.
Managing access control
The access control functionality in CloudBees Software Delivery Automation determines who can modify the single sign-on configuration settings.
To configure access control:
-
From the CloudBees navigation, select CD/RO or Analytics.
-
From the CloudBees CD/RO or CloudBees Analytics main menu, select .
-
Select Access Control. The Access Control settings display.
-
Review and change Privileges and Inherited Privileges as needed.
Signing in to CloudBees Software Delivery Automation
To sign in, copy https://<webHostName>/flow/ into a browser window, then enter your CloudBees Software Delivery Automation web host name as the <webHostName>.
|
If you experience page redirect problems during SSO sign in, you can modify the
|
The sample sign-in page below is SSO-enabled with GSuite and Kerberos SSO. Your page may be enabled with other SSO identity providers, such as Okta.
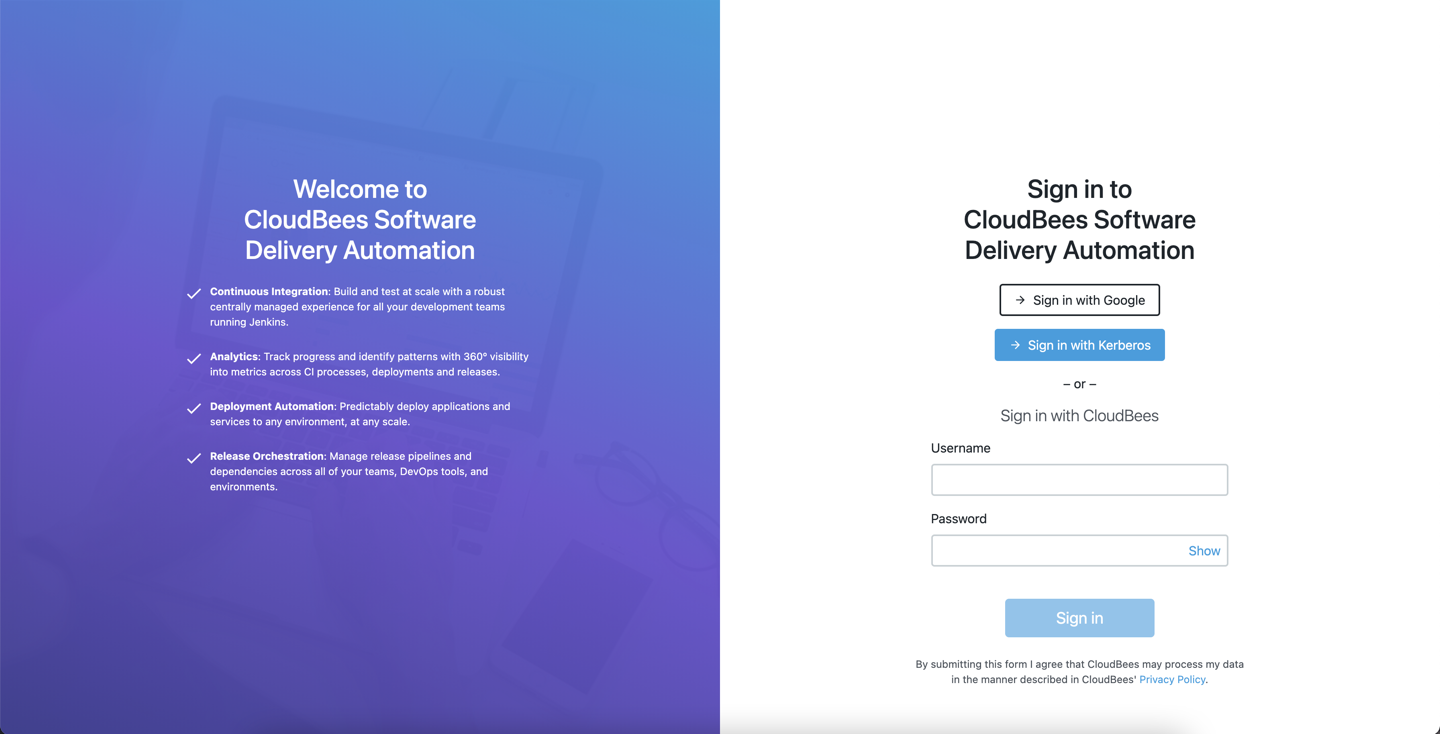
From here, use one of the following methods to sign in:
-
Select Sign in with Google: The credentials are authenticated via the Google identify provider, and if successful, you are redirected to the home page.
-
Select Sign in with Kerberos: This system has additionally been enabled with Kerberos SSO. The credentials are authenticated, and if successful, you are redirected to the home page.
-
Enter a Username and Password for local authentication. Then select Sign in. If successful, you are redirected to the home page.
| If you do not already have an active session, you are unable to sign in through the CloudBees Software Delivery Automation server when the CloudBees Software Delivery Automation server is being upgraded. The following message appears on the sign-in screen until the CloudBees Software Delivery Automation server upgrade is complete: “Server is starting. Please wait.” |