Security Assertion Markup Language (SAML) 2.0 is a standard for signing users in to applications based on their sessions from another context. This single sign-on (SSO) login standard has significant advantages over logging in using a username/password:
-
No need to type in credentials
-
No need to remember and renew passwords
-
No weak passwords
SAML enables web-based, cross-domain SSO, which helps reduce the administrative overhead of distributing multiple authentication tokens to the user. It uses security tokens containing assertions to pass information about users between:
-
A SAML consumer, such as the CloudBees Software Delivery Automation services.
-
A SAML authority, referred to as an identity provider, such as Okta, OneLogin, SiteMinder, or Active Directory Federation Services (ADFS).
SAML does not require configuration that is specific to CloudBees Software Delivery Automation. However, you must configure CloudBees Software Delivery Automation to enable SAML.
To configure SAML SSO:
Configuring a SAML service provider
To use SAML SSO, you must configure a SAML service provider. In this case, the service provider is the CloudBees CD/RO or CloudBees Analytics application; set it up for the CloudBees CD/RO or CloudBees Analytics server and web server components.
To configure a SAML service provider:
-
From the CloudBees navigation, select CD/RO or Analytics.
-
From the CloudBees CD/RO or CloudBees Analytics main menu, select . The Single Sign-On page displays.
-
From the Edit SSO Configuration list, select Enable SAML SSO.
-
In the Service provider section, select Add service provider. The Add service provider page displays.
-
Enter the details for the new service provider as follows:
Item Description Web Server URL
The web server URL for the service provider host. This is the URL that an identity provider, such as Okta, sends a response after processing the request from CloudBees Software Delivery Automation. In this case, the service provider is the CloudBees CD/RO or CloudBees Analytics application and the URL is for the CloudBees CD/RO or CloudBees Analytics web server. For example,
https://<cloudbees-web-server>, without appending/flowor/commanderto the URL.Entity ID
Service provider entity ID (usually URI).
Assertion Consumer Service Endpoint
Location at the service provider where the SSO tokens are sent. This location accepts
<samlp:Response>messages, or SAML artifacts, for the purpose of establishing a session based on an assertion. It refers to an HTTP resource, often virtual, on a website that processes SAML protocol messages and returns a cookie representing the information extracted from the message. For example,https://sp.example.org/CB.sso/SAML2/POST.Single Logout Service Endpoint
URL of the single logout service endpoint for the service provider.
NameID Format
NameID format is a Preview feature. Select a format for the NameID.
A Preview feature:-
Has not undergone end-to-end testing with CloudBees products.
-
Is provided without service-level agreements (SLA), and therefore does not include CloudBees' commitment to functionality or performance.
-
May impact other stable areas of the product when used.
-
May have limited documentation.
-
May not be feature-complete during the Preview period.
-
May graduate from Preview to a supported feature or be removed from the product.
-
May introduce breaking changes that prevent upgrades due to incompatibility with future development.
Product features and documentation are frequently updated. If you find an issue or have a suggestion, please contact CloudBees Support.
AuthnRequestsSigned
Select to include AuthnRequestsSigned="true/false" metadata in descriptor.
WantAssertionsSigned
Select to include WantAssertionsSigned="true/false" metadata in descriptor.
Public Certificate and Private Key
To configure SAML using SSO, you must specify the service provider’s public certificate and private key. If you do not have a public certificate and private key, you can generate them using the following commands:
openssl genrsa -out private.key 2048 openssl req -new -x509 -key private.key -out publickey.cer -days 365 openssl pkcs12 -export -out public_privatekey.pfx -inkey private.key -in publickey.cerService Provider Public X.509 certificate (same certificate for signing and encryption)
The service provider’s public certificate. You must specify the
publickey.cerfile for the service provider’s public certificate.SP Private Key
The service provider’s private key. You must specify the
private.keyfile for the service provider’s private key.Passphrase
The passphrase used for the service provider’s private key.
Service Provider Metadata
Sign Service Provider Metadata
If selected, sign service provider metadata.
-
-
Select Save Changes. The new service provider appears in the list of service providers in the Service Provider section.
Creating a SAML identity provider
You can create one or more SAML identity providers. These include identity providers such as Okta, OneLogin, SiteMinder, or Active Directory Federation Services (ADFS).
To create a SAML identity provider:
-
From the CloudBees navigation, select CD/RO or Analytics.
-
From the CloudBees CD/RO or CloudBees Analytics main menu, select . The Single Sign-On page displays.
-
From the Edit SSO Configuration list, select Enable SAML SSO, if not already enabled. The Identity providers section shows a list of the existing SAML identity provider configurations.
-
Select Add identity provider in the Identity providers section. The Add identity provider page displays.
-
Enter the details for the identity provider as follows:
Item Description IDP Name
Name of the SAML identity provider.
Enable identity provider
If selected, this connector is enabled and any previously enabled identity provider is disabled.
Description
Comment text describing this object. This is not interpreted at all by CloudBees Software Delivery Automation.
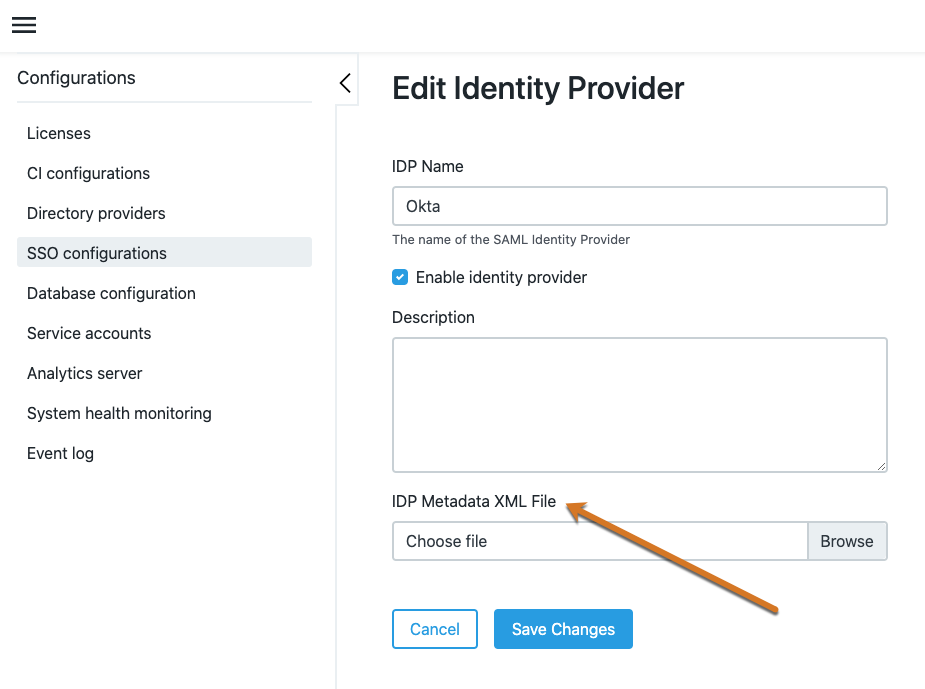
IDP Metadata XML File
File name containing metadata for this SAML identity provider. This is provided to you by the identity provider when you configure a CloudBees SAML SSO application on their site. Refer to Example: Configuring an Okta identity provider integration.
-
Select Save Changes. The new identity provider appears in the list of identity providers in the Identity Provider section.
Example: Configuring an Okta identity provider integration
This section demonstrates how to create a SAML SSO application integration for your CloudBees Software Delivery Automation environment. Steps in this section take place on the Okta platform. These instructions are for example purposes only and may not reflect the current Okta UI. Refer to the Okta documentation for instructions on how to use Okta.
Prerequisites
-
An active Okta account.
-
Your Okta account populated with user names.
-
A SAML SSO service provider configured on your CloudBees Software Delivery Automation server.
Creating the integration
To create the integration:
-
Sign in to your Okta account and navigate to the Applications dashboard.
-
Select Create App Integration. The Create a new app integration dialog displays.
-
Select
SAML 2.0as the Sign-on method, and then select Next. Create SAML Integration displays with the General Settings tab preselected. -
Enter general settings for your integration and select Next. The Configure SAML tab activates.
-
On the Configure SAML tab, enter the following:
-
Single sign on URL: Use the value from the Single sign on URL field from the CloudBees CD/RO or CloudBees Analytics SAML SSO service provider configuration.
-
Audience URI: Use the value from the Audience URI field from the CloudBees CD/RO or CloudBees Analytics SAML SSO service provider configuration.
-
Attribute statements: Create four as follows:
Name Value FirstNameuser.firstNameLastNameuser.lastNameEmailuser.emailLoginuser.login
-
-
Select Next.
Download provider metadata
To download the provider metadata:
-
Navigate to the Applications dashboard on the Okta platform.
-
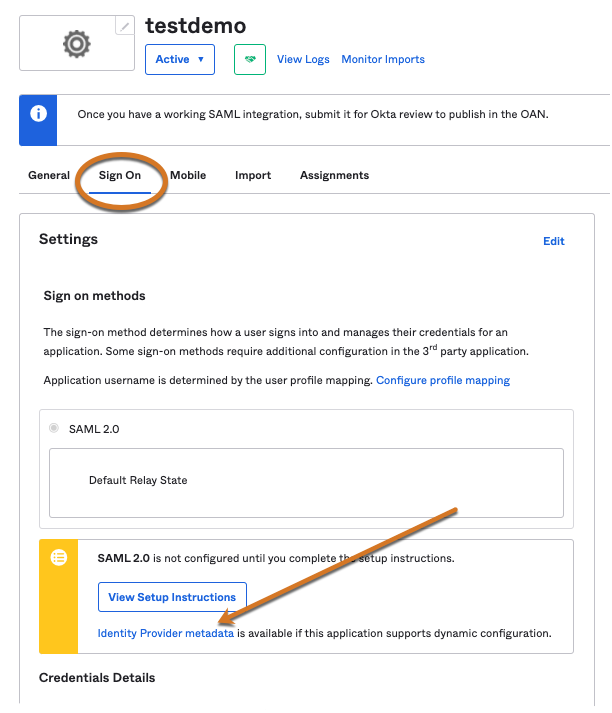
Select the application you just created. The application’s settings page displays.
-
Select Sign On to display the Sign on methods page.
-
Select Identity Provider metadata. The metadata XML file displays.
-
Copy and paste it into a file.
 Figure 1. Identity provider metadata
 -
Enter this file name into the IDP Metadata XML file field of the CloudBees CD/RO or CloudBees Analytics SAML SSO Edit Identity Provider page and select Save Changes.
 Figure 2. IDP Metadata XML file
Configuring automatic registration of SAML users for SSO
You can optionally choose to not configure Directory providers by enabling CloudBees Software Delivery Automation to automatically register users upon authentication by the SSO identity provider.
To configure automatic registration of SAML users for SSO:
-
From the CloudBees navigation, select CD/RO or Analytics.
-
From the main menu, select .
For the Automation Platform UI, navigate to https://<cloudbees-flow-server>/commander/and select from the main menu. From the top right corner of the Server page, select Settings. -
Set Auto register SSO users to Enabled.
-
Optionally, you can also set the Group claim SAML attribute delimiter to one appropriate to your environment. The default is comma-based.
Managing access control
The access control functionality in CloudBees Software Delivery Automation determines who can modify the single sign-on configuration settings.
To configure access control:
-
From the CloudBees navigation, select CD/RO or Analytics.
-
From the CloudBees CD/RO or CloudBees Analytics main menu, select .
-
Select Access Control. The Access Control settings display.
-
Review and change Privileges and Inherited Privileges as needed.
Signing in to CloudBees Software Delivery Automation
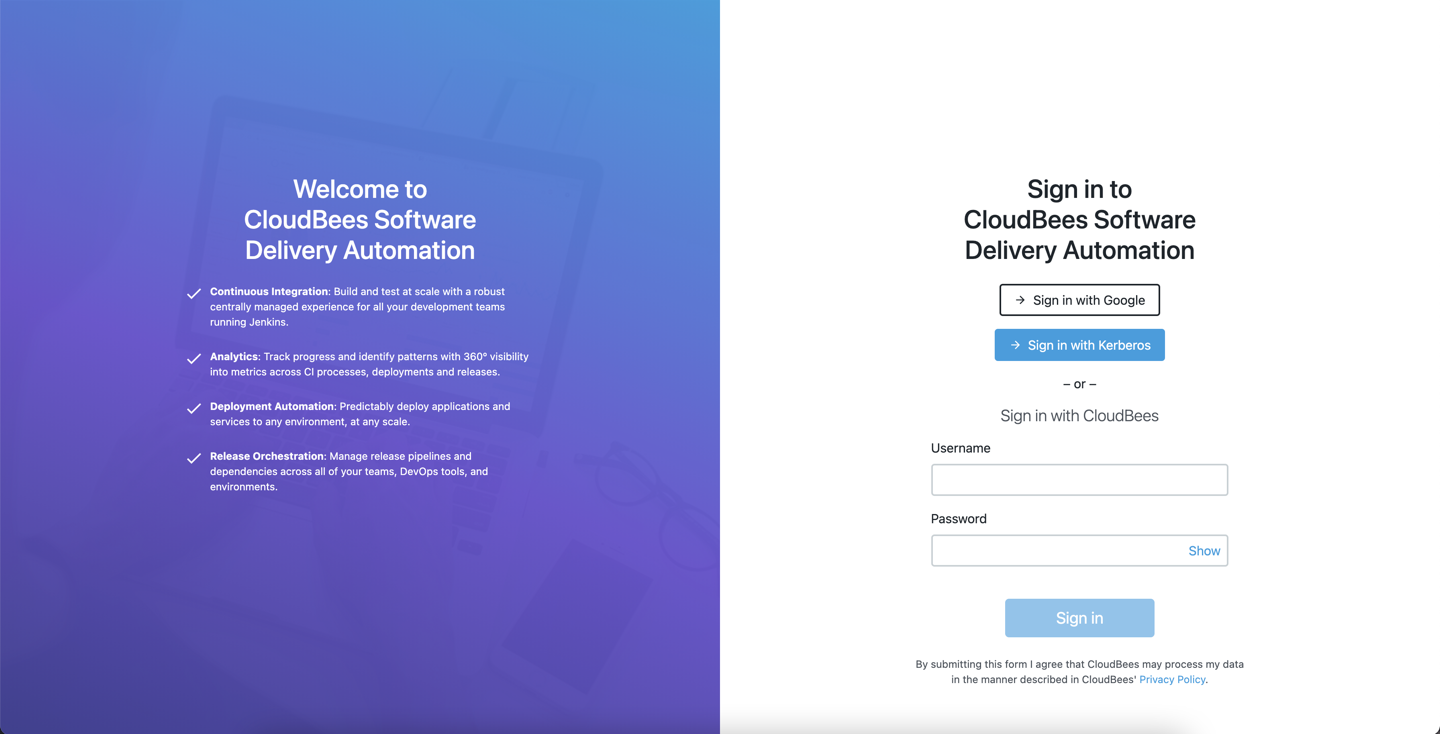
To sign in, copy https://<webHostName>/flow/ into a browser window, then enter your CloudBees Software Delivery Automation web host name as the <webHostName>.
|
If you experience page redirect problems during SSO sign in, you can modify the
|
The sample sign-in page below is SSO-enabled with GSuite and Kerberos SSO. Your page may be enabled with other SSO identity providers, such as Okta.

From here, use one of the following methods to sign in:
-
Select Sign in with Google: The credentials are authenticated via the Google identify provider, and if successful, you are redirected to the home page.
-
Select Sign in with Kerberos: This system has additionally been enabled with Kerberos SSO. The credentials are authenticated, and if successful, you are redirected to the home page.
-
Enter a Username and Password for local authentication. Then select Sign in. If successful, you are redirected to the home page.
| If you do not already have an active session, you are unable to sign in through the CloudBees Software Delivery Automation server when the CloudBees Software Delivery Automation server is being upgraded. The following message appears on the sign-in screen until the CloudBees Software Delivery Automation server upgrade is complete: “Server is starting. Please wait.” |