| The account management features described in this topic apply to all CloudBees support and training environments. For more information about managing accounts in other CloudBees products, refer to the documentation for those products. |
CloudBees account management has two roles: admin and user. Any role type can belong to one or more organizations.
A user role can only modify the profile associated with their profile.
An administrator has access to additional functions, including the following:
-
Create, modify, and delete user profiles
-
Invite new users to the organization, and optionally add them to a team simultaneously
-
View organization permissions
-
Change a user or administrator’s assigned role
-
Remove users or administrators from an organization
| Refer to Managing teams for additional team management capabilities. |
Users receive a confirmation email when they are invited to an organization. Their profile is listed as pending until they click the verification link in the email.
| Once you have invited a user, that email address cannot be changed. |
Inviting users to an organization and a team
| This procedure requires administrative privileges for the organization. |
To invite one or more users to an organization and optionally invite them to a team:
-
Sign in to Management Console as an admin, and select Manage organization.
-
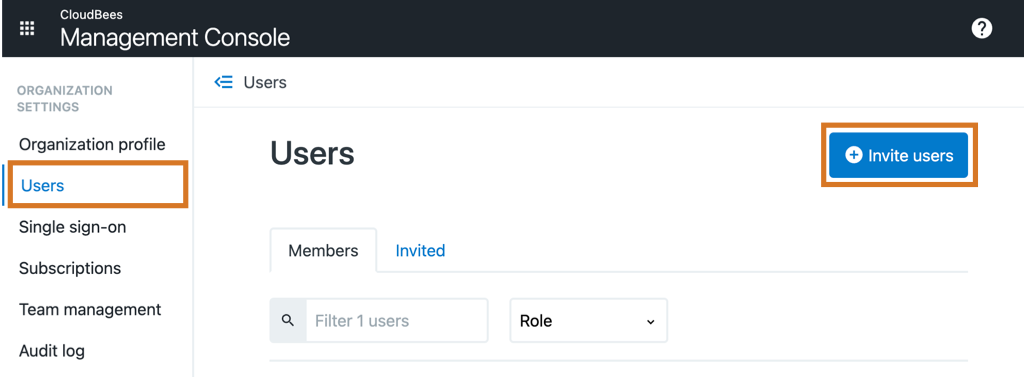
Select Users from the left navigation menu.
-
In the top right of the main screen, select Invite users.
 Figure 1. Selecting Users, and then Invite users.
 -
Add the user’s email address, and select Invite 1 user.
-
(Optional) To add more than one email address, separate each email address with a comma.
 Figure 2. One user email is added successfully, and one is incorrectly formatted.
The number of correctly formatted email addresses are indicated next to the green checkmark, and on the Invite n users button.
If an email address is duplicated or formatted incorrectly, it is highlighted in red. The number of incorrect email addresses are also indicated next to the red X.
If you have an incorrect email:
-
Select the x next to a single address that is highlighted in red to remove one at a time.
-
Alternatively, you can select Remove emails, to remove all incorrect email addresses.
-
-
(Optional) To add the user to a team, select the team under Add to team.
-
Select Invite (x) users. The (x) represents the number of users to be invited.
If a team is not selected, the users are only invited to the organization.
| Once a user accepts the invitation to the organization, they can be added to one or more teams. Refer to Managing teams for more information. |
The user receives an email inviting them to the organization. Once they select Join from within the email, they are be added to the organization. If the user was invited to a team, they are also added to that team. Refer to Signing in to your user profile for more information.
Changing a user’s assigned role
| This procedure requires administrative privileges for the organization. |
A user’s role is assigned at the organization level. One user profile may belong to multiple organizations and have different roles in each organization.
Each organization must have at least one user assigned an admin role. By default, the user who creates an organization is automatically assigned as that organization’s admin.
To change a user’s role:
-
Sign in as an admin.
-
In the top right, select your organization to display the User profile menu and then select your name.
-
In the left navigation, select .
-
Locate the user profile.
-
Select a role from the Role drop-down.
If the change is successful, a green success message appears at the bottom of the page.
Removing a user from an organization
| This procedure requires administrative privileges. |
You must have an admin or owner role for an organization to remove a user. An organization must always have at least one user; the last administrator cannot be removed from an organization.
To remove a user from an organization:
-
Sign in as an admin.
-
In the top right, select your organization to display the User profile menu and then select your name.
-
In the left navigation, Select .
-
Locate the user you wish to remove.
-
Select the three vertical dots to the far right of the user’s name.
-
Select Remove user.
-
Confirm removing the user by selecting Remove user.
Removing user data from an organization
Contact CloudBees support to request to have data removed from the System of Record.