Installing a component overwrites the entire installation on that machine. Only one Accelerator installation can exist on a machine, which is the combination of components that are in the most recent installation. For example, installing the Cluster Manager on a machine with the Electric Agent results in a machine with the Cluster Manager only, not a machine with the Electric Agent and the Cluster Manager.
Additional Windows Installation Information
Installer Activity
-
The installer automatically takes the following actions (where applicable to your Windows version):
-
Disables the Windows error reporting service
-
Sets HKLM\SYSTEM\CurrentControlSet\Control\FileSystem\NtfsDisableLastAccessUpdate to 0. The default value for Windows Server 2008 R2 is 1
-
Disables User Account Control (UAC) for 64-bit versions. Disabling UAC avoids popup windows for applications that require administrator privileges. If UAC is enabled, application registry access is redirected to each user’s virtual store, even if it runs under the Administrator account
-
If you invoke the installer from a network drive, an Unknown Publisher security warning might appear. You can disregard this warning and proceed with installation.
Installing from the Cygwin Shell
If you run the installer from the Cygwin shell, be advised of the following:
-
Before running the installer, disable UAC, or start the Cygwin shell using the Run as Administrator menu item (right-click the Cygwin desktop icon). Running the installer with UAC enabled might result in a “permission denied” error. This is applicable for all Windows versions that use UAC (Windows 7 and Windows Server 2008 R2).
-
You might encounter issues when running the installer from the Cygwin
/tmpdirectory. Electric Cloud recommends running the installer from a different directory. This is applicable for all Windows versions.
Antivirus Software
Some antivirus software might affect the installer. Turn antivirus software off during installation. If antivirus software is running when you start the installer, you might receive an error dialog. The antivirus software might have reported Accelerator files as a virus and removed them from the temp location. As a workaround, turn off the antivirus software and rerun the installer.
If Norton Antivirus software is installed, disable it before installation to avoid serious file system conflicts. If Norton Antivirus cannot be disabled, put the ECloud directory in an exclusion list or disable the AutoProtect feature. If you need more information, contact Electric Cloud technical support. For contact information, see https://support.cloudbees.com/hc/en-us/categories/360002059512.
Installing from a Network Drive
If you invoke the installer from a network drive, you might receive an Unknown Publisher security warning. You can disregard this warning and proceed with installation.
mysqlcheck
By default, mysqlcheck looks for my.cnf in /etc and ~/.my.cnf ` for configuration information. The installer does not currently copy my.cnf to `/etc, causing mysqlcheck to fail. You must add the following to the mysqlcheck command line parameter: --defaults-file=<path_to_my.cnf> For example:
mysqlcheck --defaults-file=/opt/ecloud/i686_Linux/mysql/my.cnf -o ecloud
Installing the Cluster Manager
The Cluster Manager is a web server and can be installed on any networked machine with access to eMake and the cluster hosts or on the main build machine where eMake is installed.
Install only one copy of the Cluster Manager, regardless of the number of hosts in the cluster or the number of machines with eMake installed. eMake is installed with the Cluster Manager by default.
If you are upgrading a previously-installed ElectricAccelerator version, follow the upgrade instructions before installing the new version.
| Electric Cloud no longer bundles MySQL as the default local database for ElectricAccelerator. Starting with version 7.1, Electric Cloud bundles MariaDB and installs it as the default local database on the Cluster Manager. When you perform a Cluster Manager upgrade, MariaDB replaces the local MySQL database (if applicable) and migrates all information from it. |
MariaDB is an open-source database that is fully compatible with MySQL. As open-source software, it has no enterprise license support model. If using an open-source database is of concern to your organization, you can use any of the following databases as a replacement: MySQL, Oracle, or SQL Server. See the online help topic “Database Configuration” for information about configuring Accelerator to use an external database.
| On Windows Server 2008 R2, you might encounter a “Not Responding” error during install. Electric Cloud recommends waiting for up to 10 minutes for the install to continue normally. |
You can install the Cluster Manager and agents at the same time on the same machine. The Cluster Manager is 64-bit only and thus requires installation on a 64-bit machine.
To install the Cluster Manager:
-
Log in as Administrator. (You must be a member of the Administrator group—Administrator privileges are not sufficient.) If you are running rdp on the Cluster Manager server, ensure that rdp is in installation mode:
change user/install. -
Double-click the
ElectricAccelerator-<version>-<platform>-Installinstaller file.(For Windows Server 2008 or later, the administrator user must right-click the file and select Run as administrator.)
If you have not already downloaded the Accelerator installer, see Downloading the Accelerator Software . The installation packages might need a few minutes to extract. If a security alert pop-up appears, click unblock and continue. ** ElectricAccelerator requires the Microsoft Visual C++ 2005 SP1 Redistributable. If it is already installed, select the checkbox.
-
Click Next to continue.
-
When the Welcome screen appears, click Next.
-
On the Setup Type screen, select Cluster Manager (eMake also installs automatically with the Cluster Manager) and click Next.
-
On the Choose Destination Location screen, accept the default installation directory or browse to select an alternative directory.
-
Avoid selecting an alternative directory that includes spaces in the name. Spaces can create problems when configuring connections with other command-line-based components.
-
If you plan to install eMake in a non-default location, use the same location on all agent hosts and on the Cluster Manager host.
-
Click Next.
-
On the Base Setup screen, choose whether you want to install Electric Runner client applications (which enable you to run Accelerator administration tools) and click Next.
-
On the Cluster Manager screen, enter Cluster Manager configuration options:
-
Accept the default ports or type in alternative port numbers if the defaults are already in use.
You must access the Cluster Manager web UI via HTTPS; keep this in mind when specifying an alternative port number. -
Accept the default to keep old log files or select the checkbox to remove old log files.
-
Accept the default (checked checkbox])to leave web server log rotation turned on or clear the checkbox to turn off log rotation.
Log rotation might affect Cluster Manager performance. -
Select the type of database to use.
If you do not use MariaDB, the database must already exist and you must be able to connect to it. The installer does not validate database connections.
-
Then click Next.
-
On the next Cluster Manager screen, continue to enter Cluster Manager configuration options:
-
You can change the Cluster Manager
adminpassword or accept the default password (changeme). -
You do not need to migrate the existing database or back up the local database if this is your first Cluster Manager installation.
-
Fill in the user name or choose a user that the Cluster Manager service should run as or leave blank. Choose a password for the Cluster Manager service user or leave blank.
-
Click Next.
-
On the Cluster Manager Database screen, type in the Cluster Manager database port number. For MS SQL, use port 1433.
If you did not select MariaDB as your database type, the following additional fields are available:
-
Database Host/IP Address
-
Database User
-
Database Password
-
Database Name
Do not use a . (period) in the database name. A period in the name will prevent the Cluster Manager from starting.
Click Next.
-
When the Start Copying Files screen appears, click Next.
-
The Installing screen displays while the installation proceeds. When installation is finished, the Complete screen displays. Click Finish.
Installation is complete. The installation log file is in the install directory’s root by default.
| If Apache fails to start properly after the Cluster Manager installs, reboot the system. |
Installing Electric Agent/EFS
Electric Agent/EFS software must be installed on each machine in the cluster. This includes any machines in a cloud service such as Amazon EC2 or Kubernetes.
Electric File System (EFS) and the Electric Agent are installed simultaneously on each host machine during Electric Agent/EFS installation. Multiple instances of Electric Agent/EFS pairs can be set up to run in parallel on a host. For example, if you have a multiprocessor machine, you might want to set up an Electric Agent for each processor. For details about running multiple agents, see Working with Agents - Modifying the Number of Agents per Host.
If you are upgrading a previously-installed ElectricAccelerator version, follow the upgrade instructions before attempting to install the new version.
Your toolchain should be installed on each agent host. You can virtualize the toolchain in some cases, but this can be problematic especially when the Windows registry is involved. For performance reasons, you should install the toolchain on each agent host. Many companies use “ghosting” software for this purpose.
| “Ghosting” with the Electric Agent already installed is not recommended. |
If Norton antivirus software is installed on your intended agent machines, disable it before installing Electric Agent/EFS to avoid serious file system conflicts. If Norton antivirus cannot be disabled, put C:\ECloud in an exclusion list or disable the AutoProtect feature. Electric Cloud generally considers agent machines safe, because they are internal machines behind a firewall. For more information, contact Electric Cloud technical support. For contact information, see https://support.cloudbees.com/hc/en-us/categories/360002059512 .
|
You can install the Cluster Manager and agents at the same time on the same machine.
Installation Procedure
-
Log in as Administrator. (You must be a member of the Administrator group—Administrator privileges are not sufficient.) If you are running rdp on the Cluster Manager server, ensure that rdp is in installation mode:
change user/install. -
Double-click the
ElectricAccelerator-<version>-<platform>-Installinstaller file.(For Windows Server 2008 or later, the administrator user must right-click the file and select Run as administrator.)
If you have not already downloaded the Accelerator installer, see Downloading the Accelerator Software . The installation packages might need a few minutes to extract. If a security alert pop-up appears, click unblock and continue. ** ElectricAccelerator requires the Microsoft Visual C++ 2005 SP1 Redistributable. If it is already installed, select the checkbox.
-
Click Next to continue.
-
When the Welcome to the setup wizard for ElectricAccelerator screen appears, click Next.
-
On the Which components do you want to install? screen, select Electric Agent, then click Next.
-
On the What type of install? screen, select Custom, then click Next.
-
On the Choose Destination Location screen, accept the default installation directory or click Browse… browse to select an alternative directory.
Do not select an alternative directory that includes spaces in the name. Spaces can create problems when configuring connections with other command-line-based components. -
Click Next.
-
On the Base Setup screen, click to choose whether you want to Install Electric Runner client applications, then click Next.
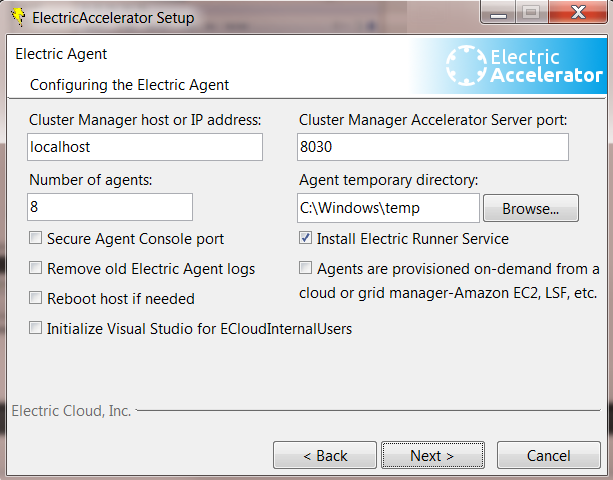
The Configuring the Electric Agent screen appears:
-
On the Configuring the Electric Agent screen, enter options for the locally-installed Electric Agent/EFS:
-
Type in the Cluster Manager host or IP address.
-
Accept the default Cluster Manager Accelerator Server port 8030 or type in the alternative port that you supplied during the Cluster Manager server installation.
-
Enter the Number of agents to run. The installer calculates the default number of agents based on the effective number of CPUs on the machine. The default is 1, if one CPU is present.
If more than one CPU is present, the default value is the number of effective CPUs. The maximum number of agents allowed on one 32-bit machine is 32; the maximum on one 64-bit machine is 64.
-
Accept the default Agent temporary directory, or choose an alternative.
-
Accept the default for the Secure Agent Console Port checkbox if you will not use the secure port, or select the checkbox to use the secure port.
-
If this agent machine is part of a cloud service, check the Agents are provisioned on-demand from a cloud - Amazon EC2 etc. checkbox.
In a cloud environment such as Amazon EC2 or Kubernetes, agents are not bound to a Cluster Manager during installation. Instead, the cloud management software tells the agents which Cluster Manager to use.
-
(Optional) Select the Remove old Electric Agent logs checkbox.
-
(Optional) Select the Reboot host if needed checkbox.
-
(Optional) Check the Initialize Visual Studio for ECloudInternalUsers checkbox if you want to initialize Visual Studio automatically for these users on your agent hosts. For details, see Initializing Visual Studio.
Using this checkbox can add up to 30 minutes to the installation time (depending on the number of agents and the number of installed Visual Studio versions). -
(Optional) Unselect the Install Electric Runner Service checkbox (this is selected by default).
Electric Runner (eRunner) is a “helper” service normally installed on all agent machines. This service listens for commands to execute on agents to facilitate administration tasks. For example, with eRunner, you can upgrade all agents at the same time remotely.
-
-
On the Windows Agent Users screen, select the user accounts that you will use to run agents. Accept the default ECloud internal user, or select Existing User. If you select Existing User, click Add User to add a user account, then click Next.
-
On the Configuring the Electric Runner Server screen, select options for the Electric Runner server:
-
Accept the default Electric Runner Server port or type in an alternative.
-
(Optional) Check the Remove old Electric Runner logs checkbox.
-
-
Click Next.
-
When the Start Copying Files screen appears, review your settings, then click Next.
The Installing ElectricAccelerator screen displays while the installation proceeds.
-
When installation is finished, the Complete screen appears, click Finish.
-
When the Really Reboot? popup appears, click Yes to reboot your system.
Installation is complete. The installation log file is in the install directory’s root by default.
Agent Communication and Firewall Settings
Because the ports used to communicate with agents are dynamic, you might experience issues on Windows agent hosts depending on your firewall settings.
If you experience installation issues, exclude the following programs from the block list during agent host installation:
-
C:\ecinst\ecinstconf.exe -
C:\ecinst\eclouduninst.exe -
C:\ecinst\fsize.exe -
C:\ecinst\Setup.exe -
C:\ecinst\SetupErunnerTmp.exe -
C:\ERunnerTmp\i686_win32\bin\erunnerdtmp.exe
These programs exist only during Accelerator installation. You might find it easier to disable communication restrictions with the agent host during agent installation. If you do not want to do this:
-
Create folders
C:\ecinstandC:\ErunnerTmp\i686_win32\bin. -
Move files with those specified names into these directories.
-
Exclude these programs from the “blocked programs” list.
-
Delete the directories
C:\ecinstandC:\ErunnerTmp. -
Install agents.
Installing eMake
eMake can be installed on a networked machine or on a shared file server accessible to other build machines. Wherever eMake is installed, it must have access to the Cluster Manager machine and agents on the cluster host machines. If you are upgrading a previously installed ElectricAccelerator version, follow the upgrade instructions before attempting to install the new version.
| An eMake-only installer is available, which lets you streamline eMake client installation. |
After eMake is installed, you must configure eMake for your build environment and enable communication with the Cluster Manager. For details, see Setting Up CloudBees Accelerator.
You can install the Cluster Manager and agents at the same time on the same machine.
To install eMake:name: value
-
Log in as Administrator. (You must be a member of the Administrator group—Administrator privileges are not sufficient.) If you are running rdp on the Cluster Manager server, ensure that rdp is in installation mode:
change user/install. -
Double-click the
ElectricAccelerator-<version>-<platform>-Installinstaller file.(For Windows Server 2008 or later, the administrator user must right-click the file and select Run as administrator.)
If you have not already downloaded the Accelerator installer, see Downloading the Accelerator Software . The installation packages might need a few minutes to extract. If a security alert pop-up appears, click unblock and continue. ** ElectricAccelerator requires the Microsoft Visual C++ 2005 SP1 Redistributable. If it is already installed, select the checkbox.
-
Click Next to continue.
-
When the Welcome screen appears, click Next.
-
On the Setup Type screen, select Electric Make, and click Next.
-
On the Choose Destination Location screen, accept the default installation directory or browse to select an alternative directory. Ensure the eMake path matches the path used for the installed Electric Agent.
| Do not choose an alternative directory that includes spaces in the name. Spaces can create problems when configuring connections with other command-line-based components. |
An error appears if you do not have permission to write to the alternative directory. If this occurs, you must either acquire permission or exit the installer, then log in as root, and then restart the installation.
Click Next.
-
On the Base Setup screen, choose whether you want to install Electric Runner client applications. eRunner is a “helper” daemon normally installed on all agent machines. This daemon listens for commands to execute on agents, facilitating administration tasks. For example, with eRunner you can upgrade all agents at the same time, remotely. Make you selection and click Next.
-
If the machine already has eMake installed and you chose to install this version of eMake in a different location, you can allow multiple eMake installations on the same machine. If you don’t allow this, the previous version of eMake will be uninstalled. Choose your option and click Next.
-
When the Start Copying Files screen appears, click Next.
-
The Installing screen displays while the installation proceeds. When installation is finished, the Complete screen displays. Click Finish.
Installation is complete. The installation log file is in the install directory’s root, by default.