More and more enterprises from regulated industries, like financial services and healthcare, have strict auditing guidelines around data retention. For example, some agencies need to maintain records for seven years for compliance purposes. As CloudBees CD/RO is used, the volume of runtime data accumulates in its databases possibly eroding performance, along with data storage challenges. CloudBees CD/RO data retention provides a way for the enterprise to manage its data archival and purge needs for runtime objects.
Data retention in CloudBees CD/RO includes support for these concepts:
-
Support for data archiving—The process of copying data to storage external to the CloudBees CD/RO server. Available via either UI or API.
-
Support for data purging—The process of deleting data from the CloudBees CD/RO server. Available via either UI or API.
-
Data retention policies—Data archive and purge criteria, based on object type. Configure via either UI or API.
-
Archive connectors—Specifications of the target archival systems. Configure via API, only.
Key benefits of data retention
CloudBees CD/RO data retention provides the following key benefits to your organization:
-
Performance and cost benefits: Archiving infrequently accessed data to a secondary storage optimizes application performance. Systematically removing or purging data that is no longer needed from the system helps in improving performance and saves disk space.
-
Regulatory compliance: Enterprises in regulated industries such as the Financial industry are required to retain data for certain lengths of time for regulatory compliance.
-
Internal corporate policy compliance: Organizations may need to retain historical data for audit purposes or to comply with corporate data retention policies
-
Business intelligence and analytics: Organizations want to use archived information in potentially new and unanticipated ways. For example, in retrospective analytics, ML, and more.
Planning your data retention strategy
-
Decide which objects to include in your retention strategy. Supported objects include:
-
Releases
-
Pipeline runs
-
Deployments
-
Jobs
-
CloudBees CI builds
-
-
Decide on data retention server settings. See Setting up data retention.
Keeping in mind the amount and frequency of data you wish to process, configure CloudBees CD/RO server settings to handle the rate.
-
Decide the archive criteria for each object type. See [Managing data retention rules].
-
List of projects to which the object can belong.
-
List of completed statuses for the object based on the object type. Active objects cannot be archived.
-
Look-back time frame of completed status.
-
Action: archive only, purge only, purge after archive.
-
-
Decide on the archive storage system. See Managing archive connectors.
Often the choice of archive storage systems is driven by enterprise’s data retention requirements. For example, regulatory compliance might require a WORM compliant storage that prevents altering data while data analytics might require a different kind of storage that allows for easy and flexible data retrieval. Based on your archival requirements, you can create an archive connector into which the CloudBees CD/RO data archiving process feeds data.
These are some of the types of archive storage systems: Cloud-based data archiving solutions—AWS S3, AWS Glacier, Azure Archive Storage, and so on. WORM compliant archive storage—NetApp. Analytics and reporting system—Elasticsearch, Splunk, and so on. Traditional disk-based storage. ** RDBMS and NoSql databases.
Setting up data retention
To set up data retention for your CloudBees CD/RO server you must perform the following:
-
Create your data detention rules. See [Managing data retention rules] for details.
-
For archiving: An archive connector needs to be established. See Managing archive connectors for details.
Following is the list of CloudBees CD/RO server settings related to data retention. To access server settings, available from CloudBees CD/RO:
-
From the CloudBees navigation, select CloudBees CD/RO.
-
From the main menu, go to . The Edit Data Retention page displays.
Related settings include:
| Setting Name | Description |
|---|---|
Enable Data Retention Management |
When enabled, the data retention management service is run periodically to archive or purge data base on the defined data retention policy.
Property name: Type: Boolean |
Data Retention Management service frequency in minutes |
Controls how often, in minutes, the data retention management service is scheduled run. Default: Property name: Type: Number of minutes |
Data Retention Management batch size |
Number of objects to process as a batch for a given data retention policy in one iteration. Default: Property name: Type: Number |
Maximum iterations in a Data Retention Management cycle |
Maximum number of iterations in a scheduled data archive and purge cycle. Default: Property name: Type: Number |
Number of minutes after which archived data maybe purged |
Number of minutes after which archived data maybe purged if the data retention rule is setup to purge after archiving. Default: Property name: Type: Number of minutes |
Managing data retention policies
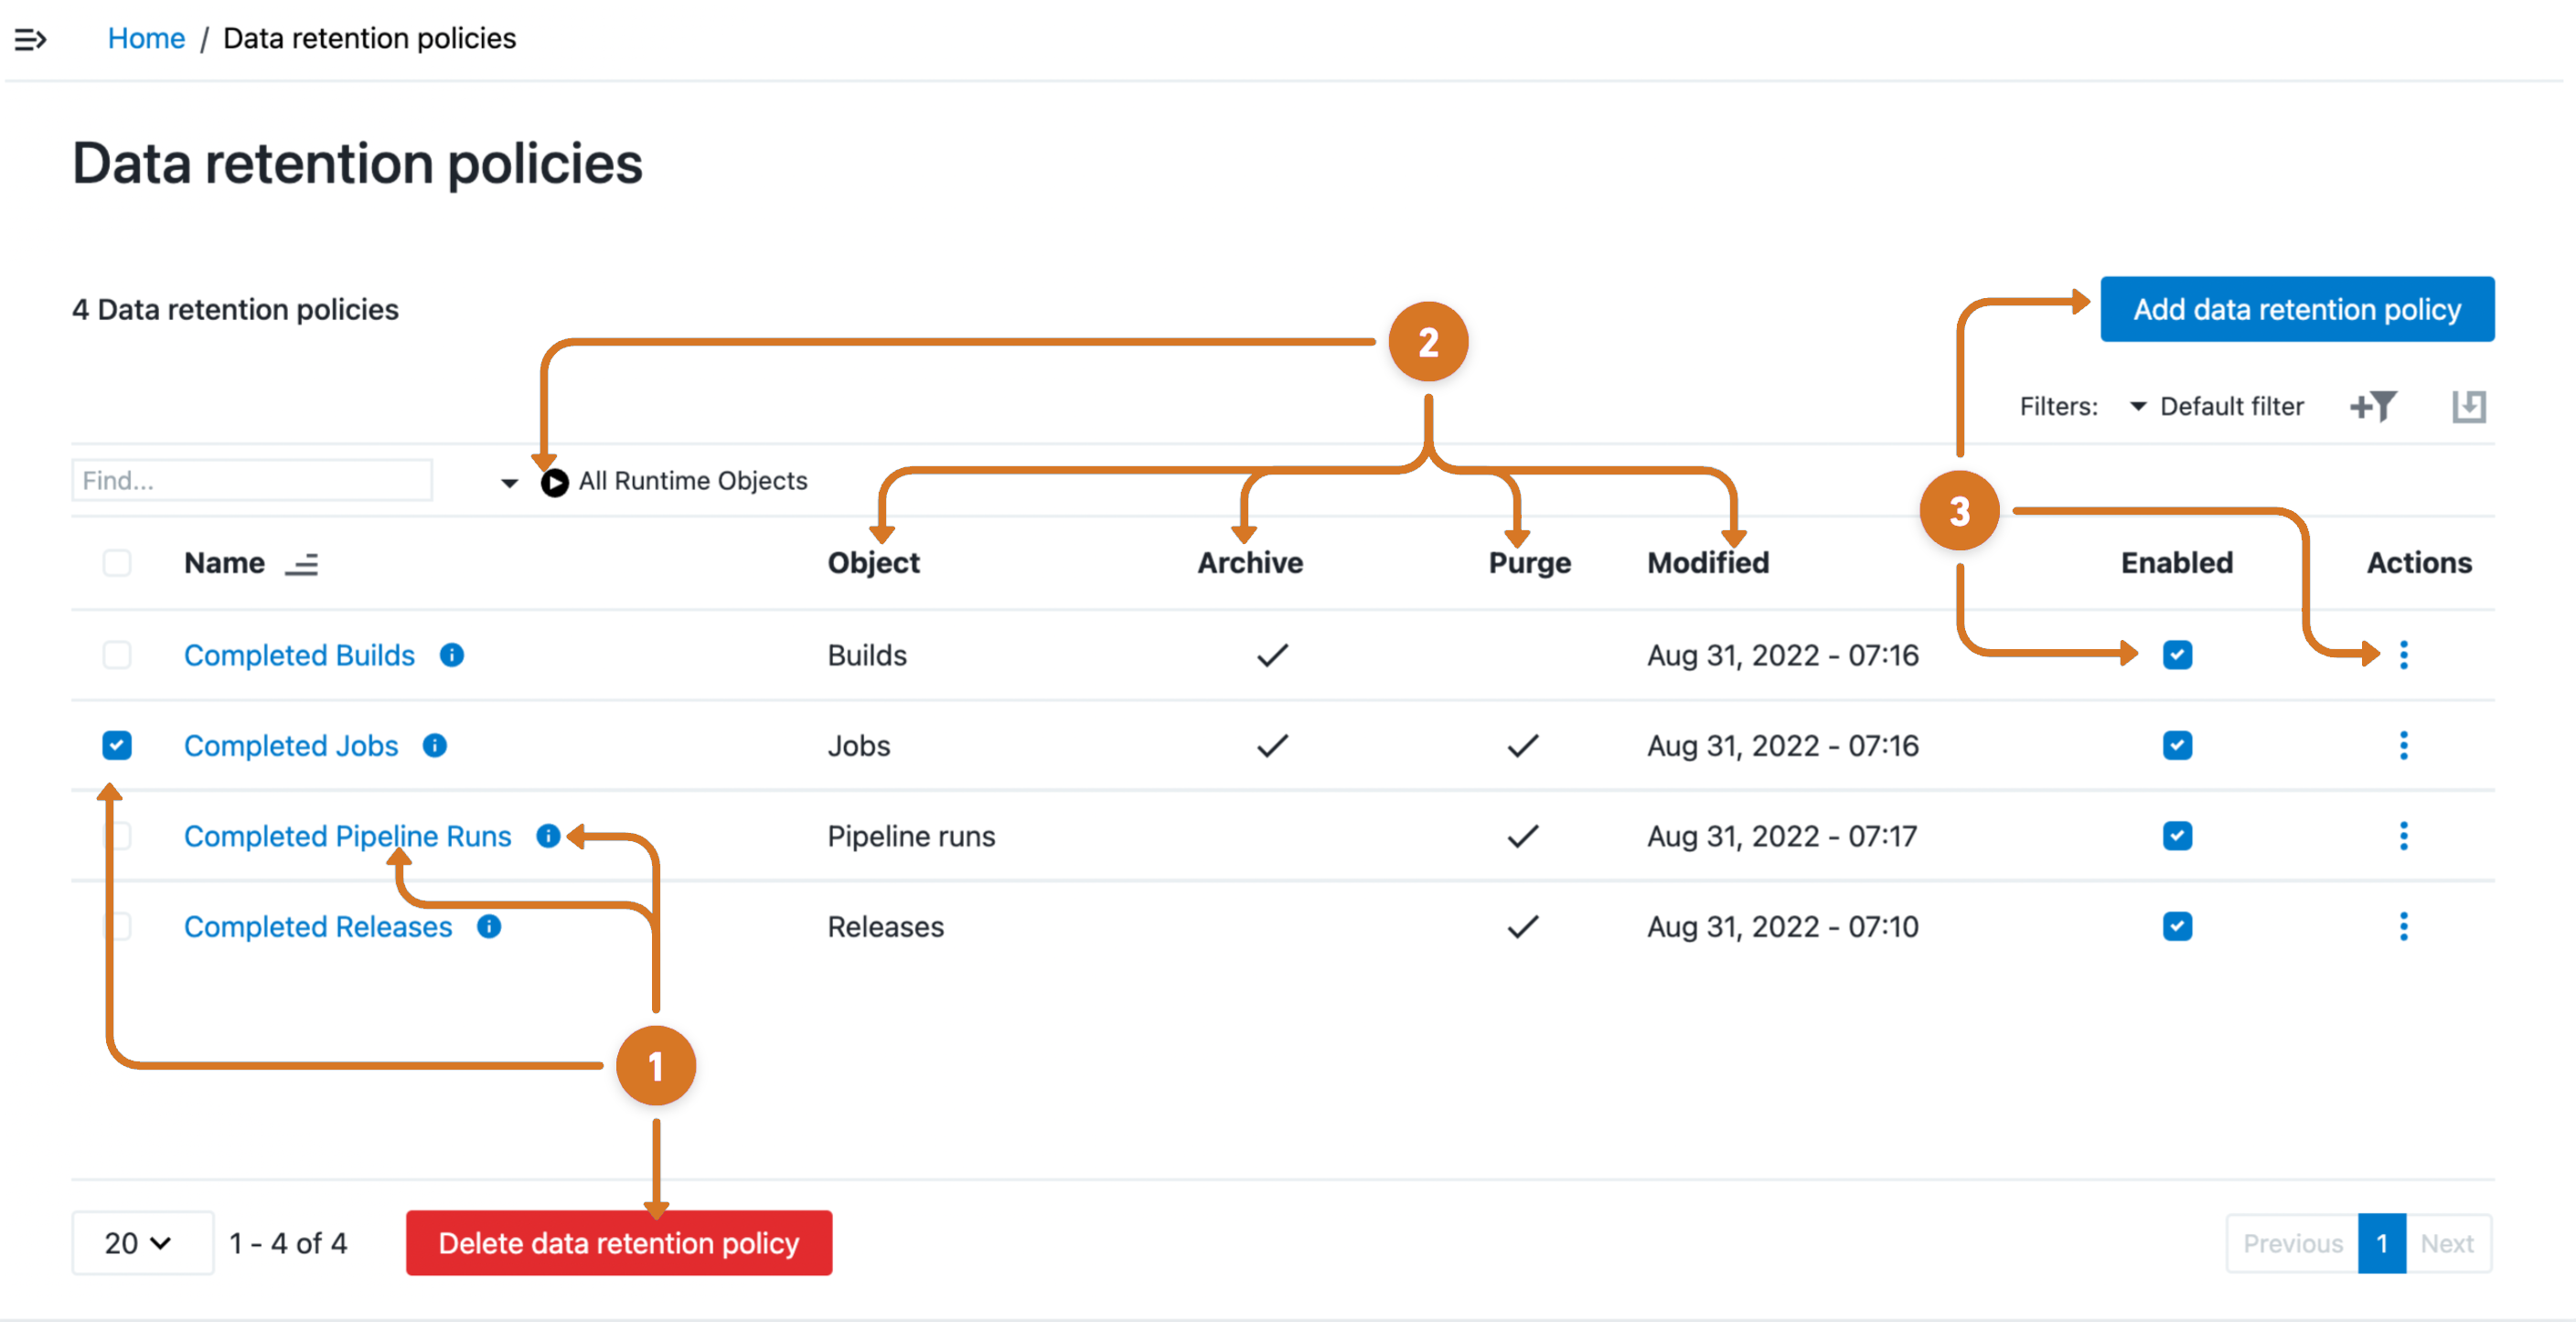
From the CloudBees CD/RO UI, browse to https://<cloudbees-cd-server>/ and select from the main menu.
Use the information detailed below to view and manage data retention policies.

| 1 | Manage data retention policies by:
|
| 2 | Review the following retention policy information:
|
| 3 | Configure a data retention policy by:
|
Editing a data retention policy
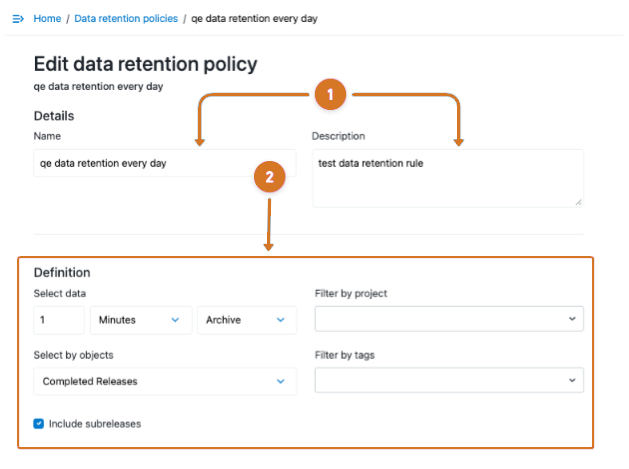
Access policy modification features from the Data retention policies page by:
-
Selecting the data retention policy name link or
 policy information.
 -
Selecting Edit from the
 three-dots menu.
Data retention policy: Details and Definitions
Use the information detailed below to edit data retention policy details and definitions.

| Save, cancel, and preview features are located at bottom of screen. |
| 1 | Modify policy details by editing the name or description. |
| 2 | Manage policy object attributes by:
|
Data retention policy - Schedule and More criteria
Select the link below to use the schedules feature to modify all schedules linked to the data retention policy.

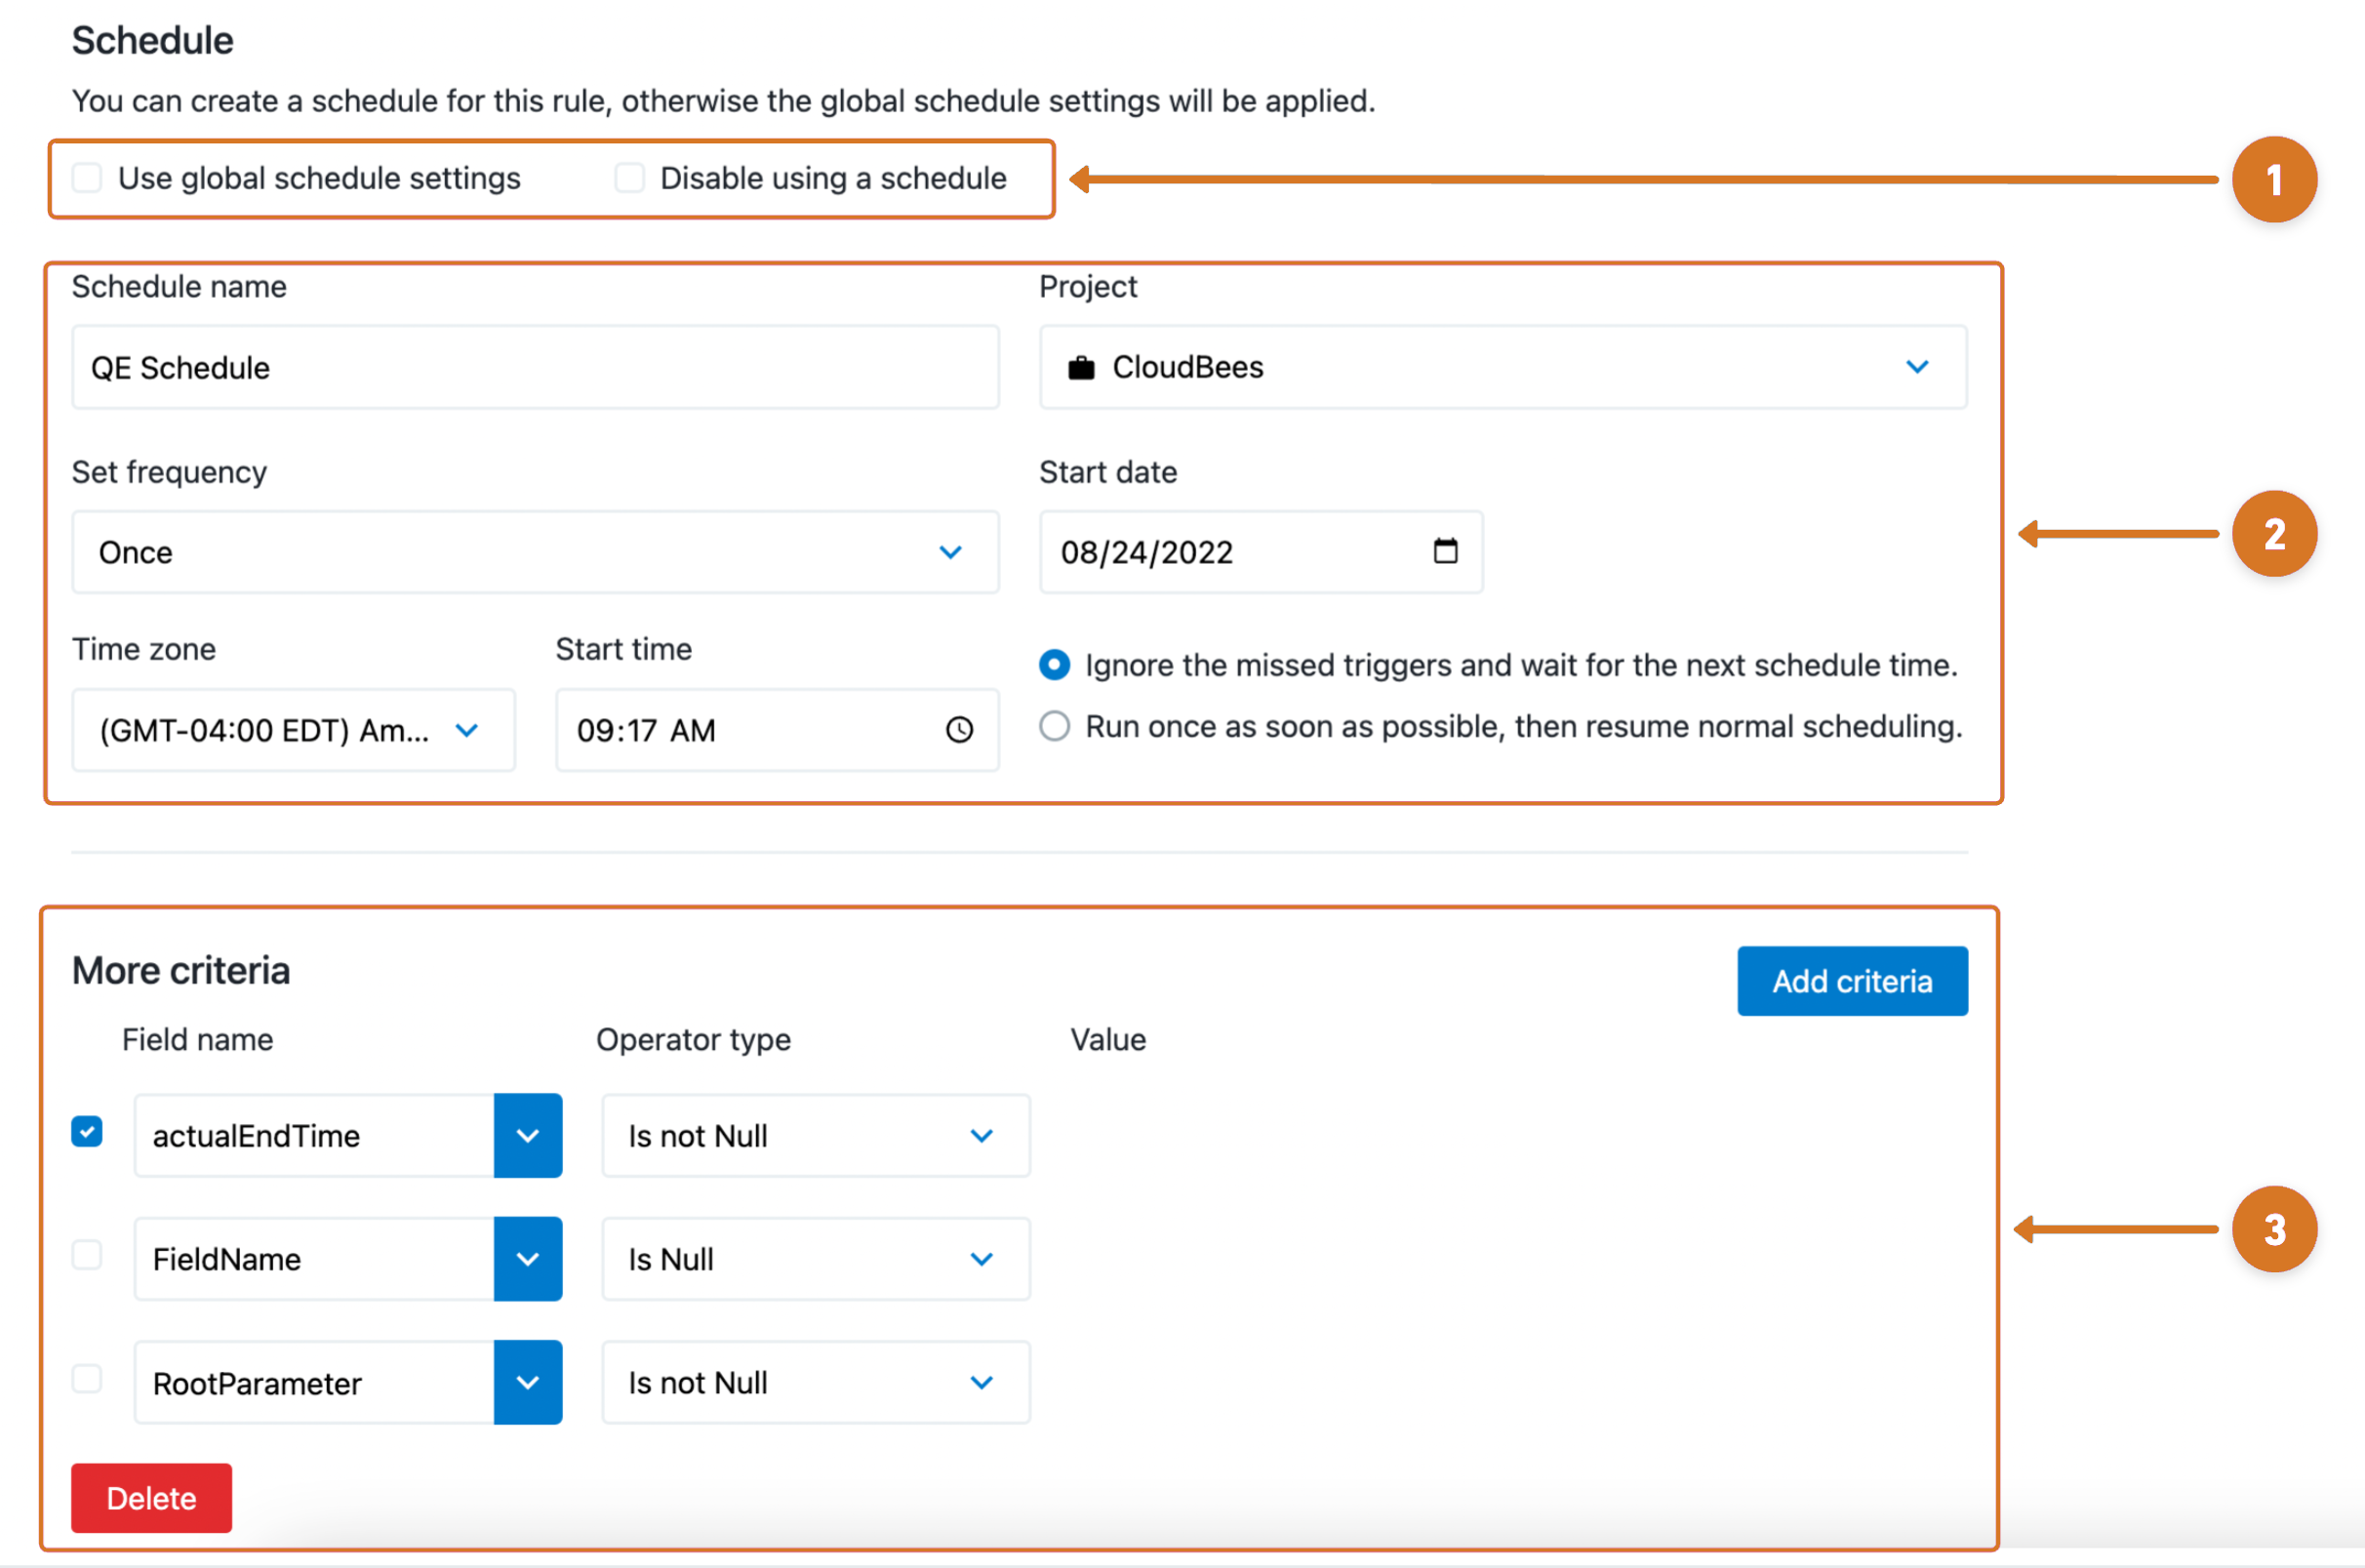
Use the information detailed below to edit the data retention policy schedule and retention object criteria.

| Save, cancel, and preview features are located at bottom of screen. |
| 1 | Choose a retention policy schedule option.
|
| 2 | Define schedule attributes.
|
| 3 | Configure the field name or root parameter object criteria.
|
Via API
You can create and manage data retention rules using the API commands through the ectool command-line interface or through a DSL script. For complete details about the API, refer to Data Retention.
Managing archive connectors
In order to support different kinds of archival systems, the data retention framework provides an extension mechanism to register archive connectors configured for the particular storage system.
Out of the box, CloudBees CD/RO comes with two sample archive connectors to use as a starting point for your own custom connector:
-
File Archive Connector—configures a directory to use as the archive target. -
CloudBees Analytics Server Connector—configures archiving to a report object.
Only one archive connector can be active at a time.
Via API
You can create and manage archive connectors using the API commands through the ectool command-line interface or through a DSL script.
Out of the box, CloudBees CD/RO provides DSL for two archive connectors. Use these as starting points to customize based on your own requirements. When ready to implement your connector, save the DSL script to a file ( MyArchiveConnector.dsl is used below) and run the following on the command line:
ectool evalDSL --dsl MyArchiveConnector.dsl
File archive connector
This connector writes data to an absolute archive directory in your file system. Use as is or customize with your own logic, for example, to store data is subdirectories by month or year.
If you customize the logic, update the example DSL and apply it to the CloudBees CD/RO server by using the following command, where fileConnector.dsl is the name of your customized DSL script:
ectool evalDsl --dslFile fileConnector.dsl
Now, enable it (in either case) with the following command:
ectool modifyArchiveConnector "File Archive Connector" --actualParameter archiveDirectory="C:/archive" --enabled true
archiveConnector 'File Archive Connector', { enabled = true archiveDataFormat = 'JSON' // Arguments available to the archive script // 1. args.entityName: Entity being archived, e.g., release, job, flowRuntime // 2. args.archiveObjectType: Object type defined in the data retention policy, // e.g., release, job, deployment, pipelineRun // 3. args.entityUUID: Entity UUID of the entity being archived // 4. args.serializedEntity: Serialized form of the entity data to be archived based on // the configured archiveDataFormat. // 5. args.archiveDataFormat: Data format for the serialized data to be archived // // The archive script must return a boolean value. // true - if the data was archived // false - if the data was not archived archiveScript = ''' def archiveDirectory = 'SET_ABSOLUTE_PATH_TO_ARCHIVE_DIRECTORY_LOCATION_HERE' def dir = new File(archiveDirectory, args.entityName) dir.mkdirs() File file = new File(dir, "${args.entityName}-${args.entityUUID}.json") // Connectors can choose to handle duplicates if they needs to. // This connector implementation will not process a record if the // corresponding file already exists. if (file.exists()) { return false } else { file << args.serializedEntity return true }''' }
CloudBees Analytics archive connector
This connector configures archiving to the CloudBees Analytics server.
If you customize the logic, update the example DSL and apply it to the CloudBees CD/RO server by using the following command, where fileConnector.dsl is the name of your customized DSL script:
ectool evalDsl --dslFile fileConnector.dsl
Enable it with the following command:
ectool modifyArchiveConnector "{SDA-ANALYTICS} Server Connector" --enabled true
Apply the DSL script below to create a report object type for each object that can be archived.
// Create the report objects for the archived data before creating the // archive connector for {SDA-ANALYTICS} server connector. reportObjectType 'archived-release', displayName: 'Archived Release' reportObjectType 'archived-job', displayName: 'Archived Job' reportObjectType 'archived-deployment', displayName: 'Archived Deployment' reportObjectType 'archived-pipelinerun', displayName: 'Archived Pipeline Run'
This DSL script creates the following report object types:
-
archived-release
-
archived-job
-
archived-deployment
-
archived-pipelinerun
archiveConnector '{SDA-ANALYTICS} Server Connector', { // the archive connector is disabled out-of-the-box enabled = true archiveDataFormat = 'JSON' // Arguments available to the archive script // 1. args.entityName: Entity being archived, e.g., release, job, flowRuntime // 2. args.archiveObjectType: Object type defined in the data retention policy, // e.g., release, job, deployment, pipelineRun // 3. args.entityUUID: Entity UUID of the entity being archived // 4. args.serializedEntity: Serialized form of the entity data to be archived based on // the configured archiveDataFormat. // 5. args.archiveDataFormat: Data format for the serialized data to be archived // // The archive script must return a boolean value. // true - if the data was archived // false - if the data was not archived archiveScript = ''' def reportObjectName = "archived-${args.archiveObjectType.toLowerCase()}" def payload = args.serializedEntity // If de-duplication should be done, then add documentId to the payload // args.entityUUID -> documentId. This connector implementation does not // do de-duplication. Documents in DOIS may be resolved upon retrieval // based on archival date or other custom logic. sendReportingData reportObjectTypeName: reportObjectName, payload: payload return true ''' }
For complete details about the API, refer to Data Retention.