The CloudBees CD/RO Service catalog helps accelerate application deployment. This feature allows you to automate routine deployment tasks and publish them as templates for end-users to utilize.
As shipped, CloudBees CD/RO includes five standard catalogs: Applications, Cloud Provisioning, Containers, Pipelines, and Utilities; all standard catalogs are included in the CloudBees project.
Using Service catalog
Use the information below to use service catalog features.
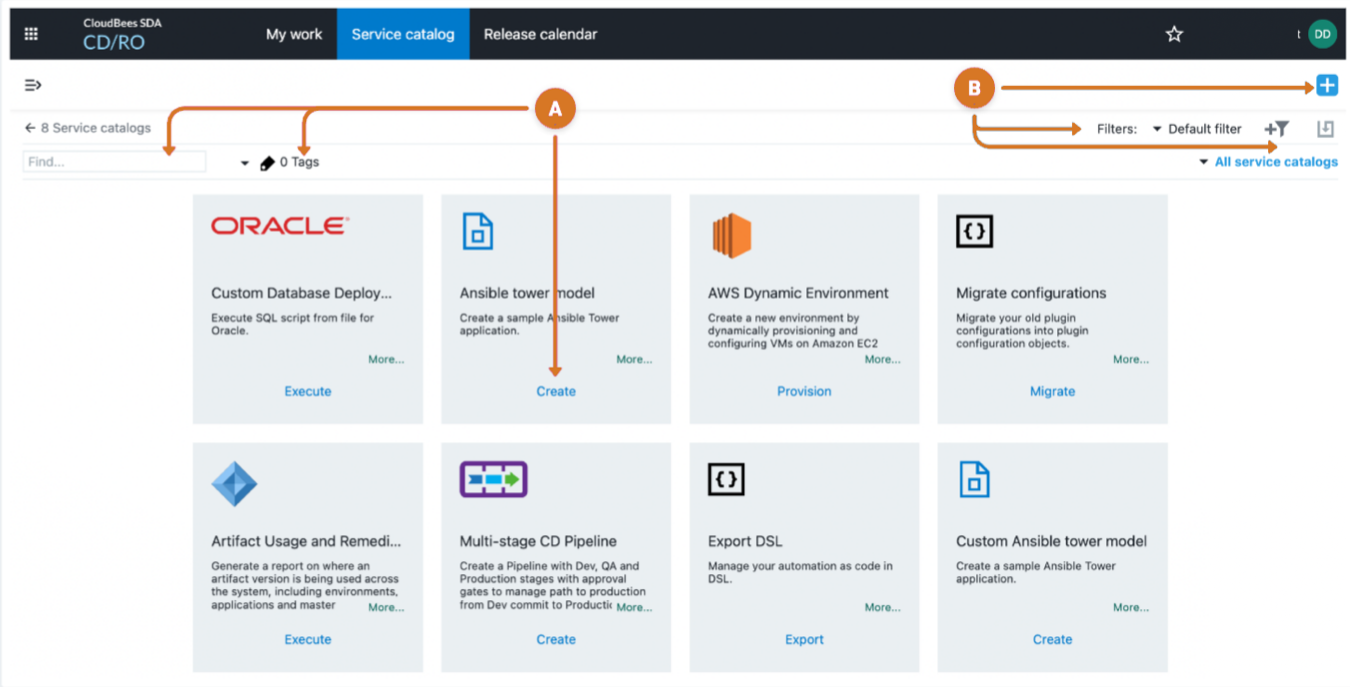
-
Use these features to:
-
Locate a specific template by entering text into Search field.
-
Select tags to narrow displayed items.
-
Select the item link to access the catalog item template.
-
-
Manage catalog:
-
Create a custom catalog by selecting the
 New catalog.
 -
Use Filters menu to:
-
Sort catalog items by chosen filter option.
-
Modify or delete a filter.
-
-
Create a new catalog item filter by selecting
 New filter.
-
Manage catalog item filters
Use the steps in this section to create, modify or delete catalog item filters.
Adding a catalog item filer
-
Select the
 New filter.
 -
Select the parameter name from the Field menu.
-
Select the parameter Operator.
-
Enter the parameter Value.
-
Select Apply.
-
Select the
 Modify item.
 -
Enter name in Filter field.
-
Allow other to use the filter by selecting the Shared checkbox.
-
Select OK.
Modifying an existing item filter
-
Select the filter name from the menu.
-
Select the
 Modify item.
 -
Modify the Field, Operator, or Value field entries.
-
Select the Apply.
-
Select the
 Modify item.
 -
Choose a save option:
-
Select Save to save current changes.
-
Select Save As to modify the filter title or sharing permission.
-
Modify the title and permission.
-
Select OK
-
-
Creating or copying a catalog
Use these steps to add or duplicate service catalog.
-
Select the
 Create item.
 -
Choose a catalog function.
-
Make a new catalog, by selecting the Create new
-
Duplicate an existing catalog by:
-
Selecting Copy existing.
-
Selecting the catalog to be copied.
-
Selecting Copy existing.
-
-
-
Enter catalog title in Name field.
-
Select a name from the Project menu.
-
Enter a catalog infomration Description in the field.
-
Select OK.
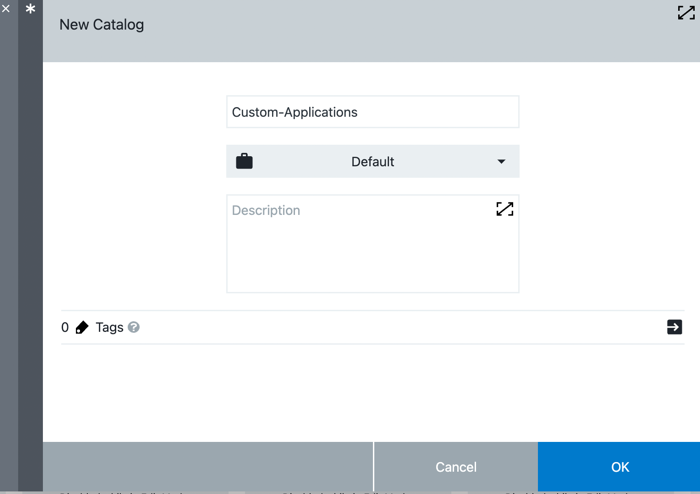 Figure 2. New catalog
| Continue item creation by: using DSL or XML to configure formal parameter, selecting a plugin as an item attribute, or choosing a procedure as an item attribute. |
Removing a custom catalog
Use these steps to delete a custom catalog:
-
Select
Default filterfrom the Filter menu. -
Select
All service catalogsfrom the Catalog menu. -
Select the name of the custom catalog to be deleted.
-
Select Catalog editor.
-
Select
Deletefrom the three-line menu.
 -
Select OK.
Accessing catalog modification features
Use one of the following ways to access catalog editing functionality:
-
Locate the custom catalog to be modified by:
-
Selecting
Default filterfrom the Filter menu. -
Select
All service catalogsfrom the Catalog menu. -
Select the name of the custom catalog to be reconfigured.
-
-
Select the OK button on the New catalog or the Copy existing catalog screens.
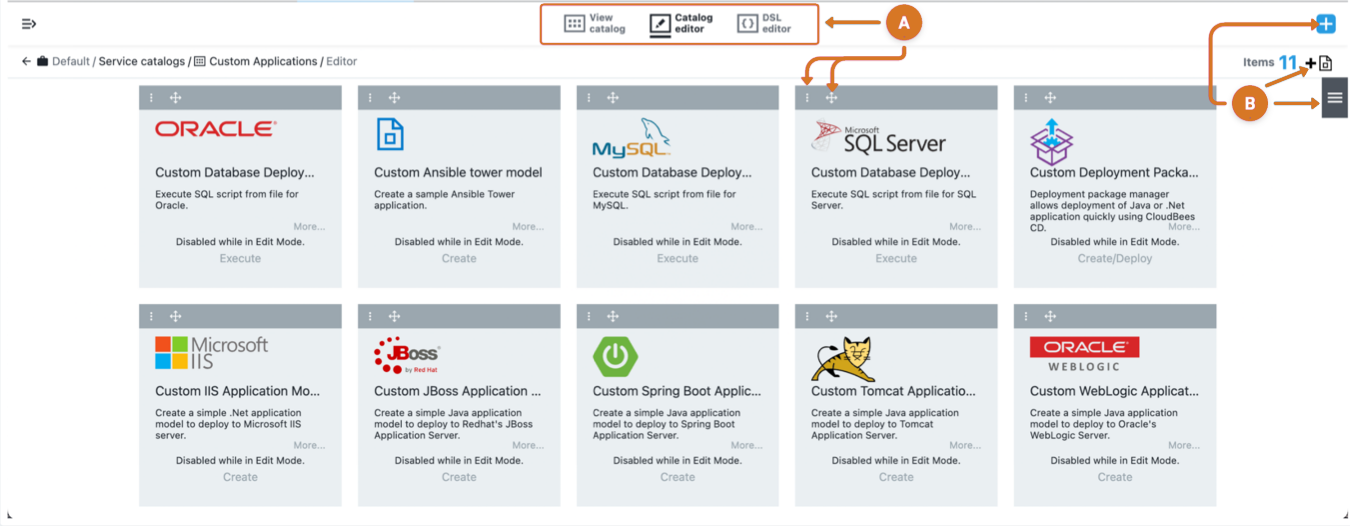 Figure 3. Catalog editor
-
Toggle catalog view:
-
Review catalog by selecting View catalog.
-
Reconfigure catalog using UI by selecting Catalog editor.
-
Modify the catalog using DSL by selecting DSL editor.
-
Reconfigure a catalog item by selecting
 three-dots menu.
 -
Rearrange catalog item order by selecting
 Move and dragging the item to the desired position.
-
-
Manage catalog attributes:
-
Create a custom catalog by selecting the
 New catalog.
 -
Add a new catalog item by selecting
 New item filter.
 -
Access these catalog modification features by selecting
 three-lines menu.
-
Details.
-
DSL export.
-
Access Control.
-
Change History.
-
Delete.
-
-
Configuring catalog item tags
-
Select `Default filter`from the Filter menu.
-
Select
All service catalogsfrom the Catalog menu. -
Select the name of the custom catalog that contains items to be tagged.
-
Select Catalog editor.
-
Select
Detailsfrom the three-dots menu.
 -
Select
 modify arrow.
-
Modify tags:
-
Enter tag name to create a new tag.
-
Select the X button to remove the tag.
-
-
-
Select OK.
Creating a new catalog item
Use these steps to begin adding a a new item to a catalog:
-
Access the catalog editor for the catalog to modified.
-
Select
 New item.
 -
Enter item title in Name field.
-
Enter item information in Description field.
-
Do one of the following:
-
Keep changes and finish creation later by selecting Done.
-
Select Define to:
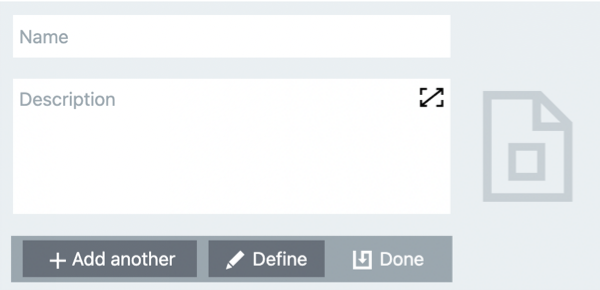 Figure 4. New catalog item
 -
Configuring item display and description
|
You must create the If the property is not found, then the Service Catalog UI tries to render the form based on the parameter definition with the exception for Credentials, Credential Parameters, and Projects types. |
Use these steps to modify a catalog item display and description:
-
Access the catalog editor for the catalog to modified.
-
Select
Definitionsfrom the 3-dots menu.
 -
Choose item link label from the Select Button Label menu:
-
Create.
-
Create & Deploy.
-
Execute.
-
Provision.
-
Other and Other text.
-
-
Select a display icon for the item:
-
Use avaiable icons by selecting Icon Library.
-
Choose a custom icon by selecting URL link and entering icon address into URL text field.
-
-
Enter catalog item usage information into the Additional information field. This data will appear in the Instructions section of the item template.
-
Do one of the following:
-
Keep changes and finish creation later by selecting OK.
-
Continue item modification by scrolling down to section 3 to:
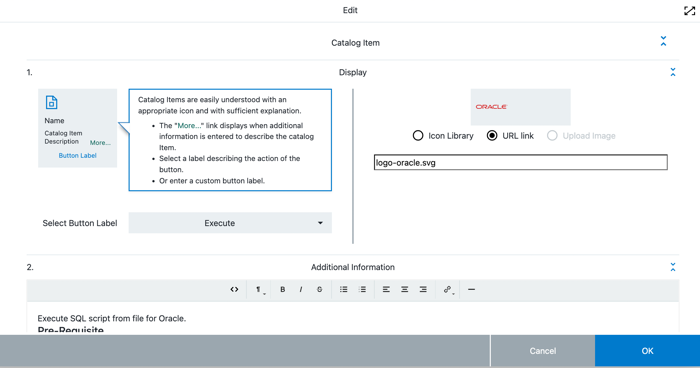 Figure 5. Edit catalog item: Display and Additional Information
 -
Using DSL or XML to configure item formal parameter
DSL-based catalog items are the easiest to create. This type of catalog item is made up of a DSL script accompanied by UI form metadata or formal parameters to capture the user input required by the DSL.
-
For more information, refer to Using the CloudBees CD/RO DSL.
-
You have a choice to use form XML metadata or the formal parameter panel to specify user input parameters.
|
You must create the If the property is not found, then the Service Catalog UI tries to render the form based on the parameter definition with the exception for Credentials, Credential Parameters, and Projects types. |
Use these steps to modify catalog item formal parameter.
-
Access the catalog editor for the catalog to modified.
-
Select
Definitionsfrom the item 3-dots menu.
 -
Scroll down to - Section 3 Definitions.
-
Modify item formal parameters.
-
Configure formal parameters using DSL by entering parameter definitions into DSL Editor field. Refer to these script examples to create:
-
Enter formal parameters using XML.
-
Select Use Form XML.
-
Enter parameter definitions in XML into Parameter Form field. For sample code refer to: Create a
Pipeline Nameparameter.
-
-
-
Specify optional end-target navigation. This is where CloudBees CD/RO takes the user after the service catalog item is run and completes successfully. For object end navagation examples, refer to End target navigation.
-
Select Use Formal Parameters.
-
Enter end-navigation data into End Target JSON field.
-
-
Select OK.
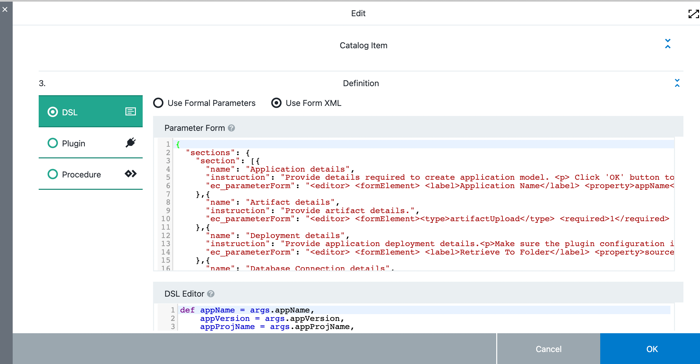 Figure 6. Edit catalog item: DSL, XML and End Json
Selecting a plugin as a catalog item attribute
|
You must create the If the property is not found, then the Service Catalog UI tries to render the form based on the parameter definition with the exception for Credentials, Credential Parameters, and Projects types. |
Use these steps to set a plugin as a catalog item attribute:
-
Access the catalog editor for the catalog to modified.
-
Select
Definitionsfrom the item 3-dots menu.
 -
Scroll down to - Section 3 Definitions.
-
Select Plugin in the left panel.
-
Select the category from the Select Category menu.
-
Select plugin name from the Select Plugin menu.
-
Select the procedure name form Select Procedure menu.
-
Select OK.
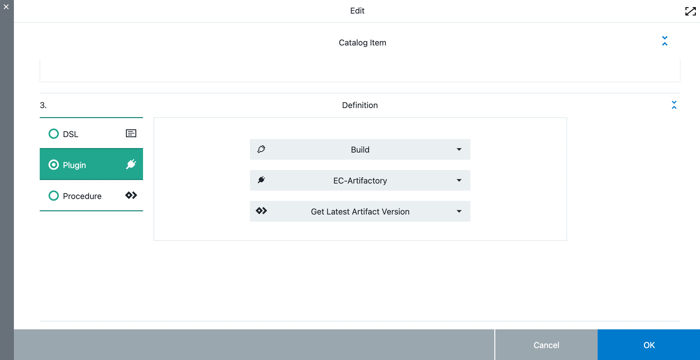 Figure 7. Edit catalog item: Plugin
Choosing a procedure as catalog item attribute
|
You must create the If the property is not found, then the Service Catalog UI tries to render the form based on the parameter definition with the exception of Credentials, Credential Parameters, and Projects types. |
Use these steps to set a procedure as a catalog item attribute:
-
Access the catalog editor for the catalog to modified.
-
Select
Definitionsfrom the item 3-dots menu.
 -
Scroll down to - Section 3 Definitions.
-
Select Procedure in left panel.
-
Select project name from the Select project menu.
-
Select the procedure name form Select Procedure menu.
-
Select OK.
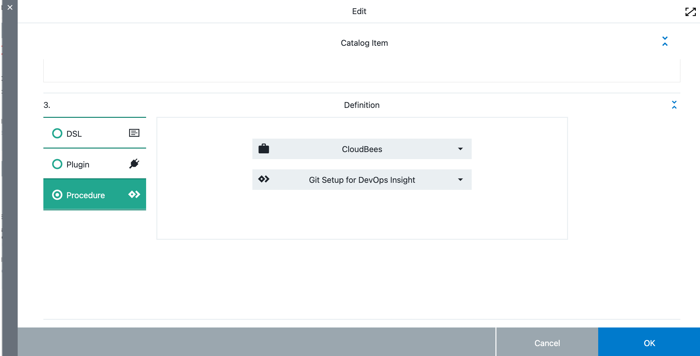 Figure 8. Edit catalog item: Procedure
Define a formal parameter as an the item attribute
Once finished specifying the DSL specifics for the catalog item template, select OK to save your work.
In the upper-left corner of the catalog item editor, select ![]() and select Parameters. The Parameters dialog opens.
and select Parameters. The Parameters dialog opens.
Refer to Parameters for full details about creating formal parameters from the parameter panel.
Deployment package manager catalog items
This is a special type of catalog item that lets you deploy Java or .NET applications quickly.
Before you create this type of item, you must create the deployment package outside of CloudBees CD/RO. A deployment package is a manifest.json file plus one or more components that make up an application. After you create the deployment package, you can use it to create an application model that corresponds to the uploaded application package with little CloudBees CD/RO knowledge. For details, refer to Deployment packages.
End target navigation
The end-target navigation is specified in the End Target JSON field. This location is where CloudBees CD/RO takes the user to continue defining the selected service catalog object. For example, if the multi-stage pipeline catalog template is selected, then CloudBees CD/RO would navigate the user to the pipeline editor. For end navigation for all objects refer: Default end-target navigation list .
The following example defines the JSON format of the end-target navigation.
{ "source": "<source>", "object": "<objectType>", "objectName": "<objectName>", "objectProjectName": "<objectProjectName>", "objectId" : "<objectId>" }
where:
-
<source>is one of:-
parameteruses values supplied withobjectName,objectProjectName, andobjectId ` as fields in the formal parameter; set `useFormalParametertotrue. -
formuses values supplied withobjectName,objectProjectName, andobjectId ` as fields in the form XML; set `useFormalParametertofalse. -
propertyuses values supplied withobjectName,objectProjectName, and `objectId ` as properties. -
nameuses values supplied withobjectName,objectProjectName, and `objectId ` as literal strings.
-
-
<objectType>is the type of object. -
<objectName>is the name of the object. Can be a literal string, property, or formal parameter field based on<source>type. -
<objectProjectName>is the project. Can be a literal string, property, or formal parameter field based on<source>type. -
<objectId>is the object id. Can be a literal string, property, or formal parameter field based on<source>type.
Default end-target navigation list
The table below shows the default JSON formatted end-target navigation for service catalog template objects.
| Catalog object | End-target navigation |
|---|---|
application job |
application-process-runs/${objectId}/steps |
catalog |
catalogs/${objectId} |
ciConfiguration |
configurations/ci-configurations/filters/${search} |
credential |
credential-management/credentials/filters/${search} |
credentialProvider |
credential-management/credential-providers/filters/${search} |
dashboard |
dashboards/${objectId} |
dataRetentionPolicy |
data-retention-policies/${objectId} |
directoryProvider |
configurations/directory-providers/filters/${search} |
emailConfig |
configurations/email-configurations/filters/${search} |
environment |
environments/${objectId} |
environmentTemplate |
environments/environments-templates/${objectId} |
flowRuntime |
pipeline-run/${pipelineId}/${objectId} |
gateway |
cloud-gateways/filters/${search} |
group |
groups/${objectId}/users |
persona |
personas/filters/${search} |
pipeline |
pipelines/${objectId} |
pluginConfiguration |
plugin-management/configurations/filters/${search} |
procedure |
procedure/${objectId} |
procedure job |
procedure-runs/${objectId}/steps |
project |
projects/filters/${search} |
release |
releases/${objectId} |
report |
dashboard-reports/${objectId}/edit |
resource |
resources-list/filters/${search} |
resourcePool |
pools/filters/${search} |
resourceTemplate |
environments/resources-templates/filters/${search} |
schedule |
schedules/filters/${search} |
scmSync |
configurations/source-code-synchronization/filters/${search} |
scmSync job |
configurations/source-code-synchronization-runs/${objectId}/steps |
serviceAccount |
configurations/service-accounts/filters/${search} |
user |
users/filters/${search} |
workspace |
workspaces/filters/${search} |
zone |
zone-list/filters/${search} |
DSL Example 1: Create an application in the default project folder
The following is a simple DSL script. This creates an application in the default project folder:
/* args.appName is user entered value passed in as argument */ def appName = args.appName; application appName, { projectName = "Default" }
DSL Example 2: Create a simple application object in custom catalog
This is sample code to create a catalog item in the Custom catalog. This DSL-based catalog item creates a simple application object.
catalog 'Custom', { description = 'Catalog item description' iconUrl = 'icon' projectName = 'CloudBees' catalogItem 'Sample Catalog Item', { description = '''<xml> <title>This is the short description that is shown in the Service catalog UI as part of this catalog item</title> <htmlData> <![CDATA[<div> This is the html stylized text based on catalog item details that gets show when the user clicks the more link. </div>]> </htmlData> </xml>''' buttonLabel = 'Create' catalogName = 'Custom' dslParamForm = '''{ \"sections\": { \"section\": [{ \"name\": \"Application details\", \"instruction\": \"Provide Application details\", \"ec_parameterForm\": \"<editor> <formElement> <label>Application Name</label> <property>appName</property> <documentation>Name of the application to be created.</documentation> <type>entry</type> <required>1</required> </formElement> </editor>\" }], \"endTarget\": { \"object\": \"application\", \"formValue\": \"appName\" } } }''' dslString = '''def appName = args.appName; application appName, { projectName = "Default" }''' iconUrl = 'public/app/assets/img/taskicon.png' projectName = 'CloudBees' subpluginKey = null subprocedure = null subproject = null } }
DSL Example 3: Create a catalog item with access to the myProject catalog item
This is sample code to create a catalog item with access to the myProject catalog item.
catalog 'CD 10.7 SSC Parameter Enhancements', { projectName = 'Default' catalogItem 'myProject usage', { description = "Creates a pipeline in the catalog project" dslString = '''\ def projName = getProperty("/myProject/projectName").value pipeline "createdFromSSC", projectName: projName '''.stripIndent() } }
JSON Example 1: Create a Pipeline Name parameter
The example below shows details for the Pipeline Name parameter:
{ "sections": { "section": [{ "name": "Pipeline Details", "ec_parameterForm": " <editor> <formElement> <property>pipelineProjName</property> <label>Pipeline Project Name</label> <type>project</type> <required>1</required> </formElement> <formElement> <property>pipelineName</property> <label>Pipeline Name</label> <type>entry</type> <required>1</required> </formElement> </editor>" }], "endTarget": { "source": "form", "object": "pipeline", "objectName": "pipelineName", "objectProjectName": "pipelineProjName" } } }
-
sectionallows groupings of user input parameters into different sections. -
ec_parameterFormspecifies the form XML that defines the user input form relevant to a section. -
endTargetspecifies where to take the user once the service catalog item runs and has completed successfully. For details, refer to End target navigation