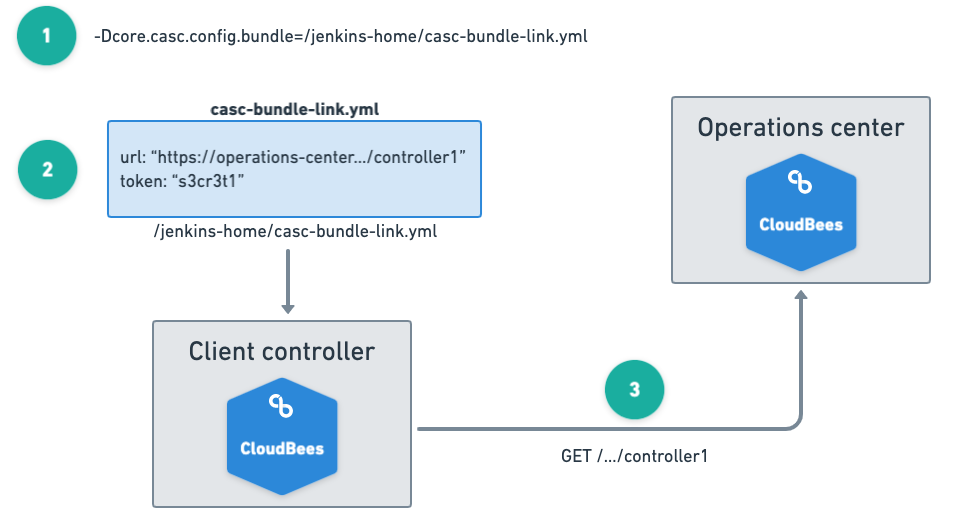
Controller send requests for their bundles through a secure HTTP(S) endpoint in operations center. Each controller is aware of the bundle it is connected to through the casc-bundle-link.yml file that contains the bundle URL and access token.
You can configure a client controller using Configuration as Code by providing it with the location of the appropriate bundle and access token contained in the casc-bundle-link.yml file. The client controller fetches its configuration bundle using the details in the casc-bundle-link.yml file and configures itself accordingly.

The process of setting up a client controller involves the following steps:
Prerequisites
The following plugins must be installed to your controller:
-
If using CloudBees CI 2.222.4.3 - 2.303.3.3: CloudBees CasC API Plugin (Deprecated) version 1.2 - 1.41
-
If using CloudBees CI 2.319.1.5 or later: CloudBees CasC Client Plugin, version 1.44 or later
-
Configuration as Code plugin
Assigning a bundle to a controller
Once you have configured bundle availability, you can assign a bundle to the controller.
To assign a bundle to a controller:
-
Ensure you are signed in to the operations center as a user with the Configure or Administer permission.
-
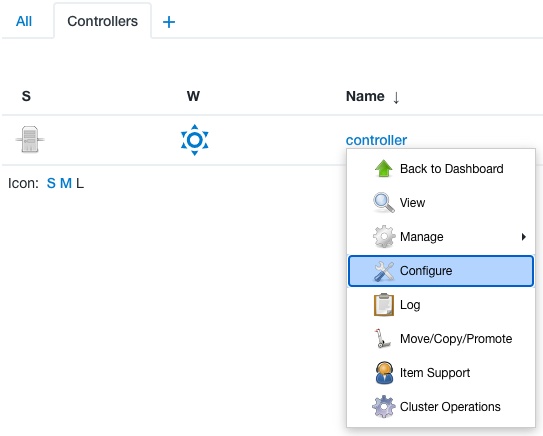
From the operations center dashboard, select the down arrow to the right of your controller’s name, and then select Configure.
 Figure 2. Controller dropdown menu
 -
Scroll down to Configuration as Code (CasC).
-
Select the appropriate bundle to assign to the controller.
If a Default bundle has already been selected from the Configuration as Code bundles screen, it is pre-selected in the Bundle dropdown. -
Select Save.
Downloading the casc-bundle-link.yml file
Once you have assigned the bundle to the client controller, you can download the casc-bundle-link.yml file.
| For the Download linkfile option to be accessible from the Manage screen, you must first configure the bundle availability and assign a bundle to the client controller. For more information, refer to Configuring bundle availability for controllers and Assigning a bundle to a controller. |
To download the casc-bundle-link.yml file:
-
Ensure you are logged in to operations center as a user with the Administer permission.
-
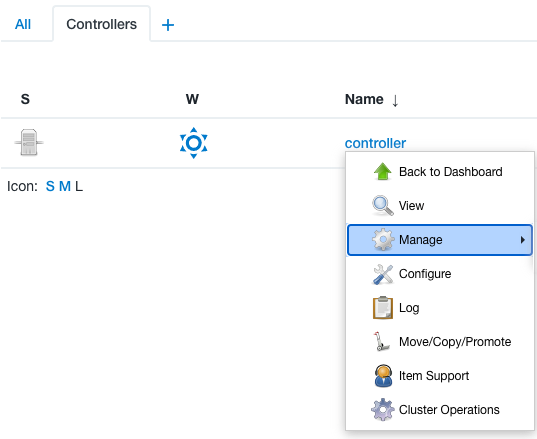
From the operations center dashboard, select the down arrow to the right of your controller’s name, and then select Manage.
 Figure 3. Controller dropdown menu
 -
Scroll down to Configuration as Code (linkfile).
-
Select Download linkfile to download the
casc-bundle-link.ymlfile. -
Save the file anywhere in the controller’s filesystem.
CloudBees recommends saving the casc-bundle-link.ymlfile in the controller’s$JENKINS_HOMEdirectory.
The casc-bundle-link.yml file contains the following properties:
| Property | Type | Description |
|---|---|---|
url |
String |
The URL where the bundle can be fetched. This URL references both the operations center server and the ID of the bundle. |
token |
String |
The access token to authenticate the request with the operations center server. |
The URL to access a particular bundle from an operations center server has a well-defined format:
http[s]://<oc-server>:<port>/config-bundle/<bundle directory>.
For example, for an operations center server on host oc.example.org and port 8080, the bundle that is placed in directory bundle-1 can be accessed as: https://oc.example.org:8080/config-bundle/bundle-1.
|
Configuring client controllers with the casc-bundle-link.yml file
The client controller is directed to use the casc-bundle-link.yml file by setting a Java system property. On startup, the client controller reads the casc-bundle-link.yml file, fetches its CasC bundle from the operations center using the details specified in the casc-bundle-link.yml file, and then initializes itself with the provided configuration.
To point the client controller at the casc-bundle-link.yml file, set the Java system property core.casc.config.bundle to the location of the link file. For example, to start a client controller using the casc-bundle-link.yml file at $JENKINS_HOME/casc-bundle-link.yml use the following command:
java -Dcore.casc.config.bundle=$JENKINS_HOME/casc-bundle-link.yml -jar jenkins.war
When you start the client controller with the Java system property, the client controller’s connection details are included in the client controller’s jenkins.yaml file and the client controller is automatically connected to the operations center.
|
Regenerating a bundle token
You can regenerate a bundle’s access token using the casc-bundle-regenerate-token CLI command. Re-generating the access token is not usually required and should only be done in certain situations, such as for security purposes. Any controller currently using the token will lose access to it after it is regenerated. For more information, refer to Configuration as Code (CasC) CLI.
For client controllers, if the token needs to be regenerated, the casc-bundle-link.yml file needs to be updated with the new token. For more information, see Configuring client controllers with the casc-bundle-link.yml file.
Adding the CasC bundle column to the operations center dashboard
Once you have set up your controller and assigned a bundle to it, you can add the CasC bundle column to the operations center dashboard to display the CasC bundle assigned to each controller.
To add the CasC bundle column to the operations center dashboard:
-
From the operations center dashboard, select Edit View in the left pane.
-
Scroll down to Columns.
-
Select Add column.
-
Select CasC bundle.
-
Select OK.
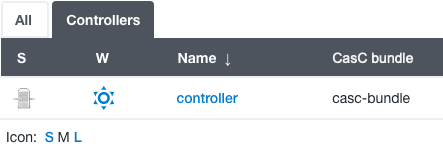
The CasC bundle column is now displayed in the operations center dashboard.
 Figure 4. CasC bundle column