|
Before you start recording test results to test sessions, consider your Test Session Layouts. |
CloudBees Smart Tests uses your test results from each Test Session to provide features.
After running tests, run the smart-tests record tests command tof record test results in your workspace.
The general structure of this command is as follows:
smart-tests record tests <BUILD OPTIONS> <TOOL NAME> <PATHS TO REPORT FILES>
-
<BUILD OPTIONS>can be one of the following: *--no-build, where no build information is captured with the test results. This is the best option for getting started quickly. The examples on this page all use this option. -
--build <BUILD NAME>, which you can use if you recorded a build before running tests (for Predictive Test Selection only). See Recording builds with the CloudBees Smart Tests CLI * Even if you plan to use Predictive Test Selection, you can always start recording tests without recording builds and then recording builds later. -
--session <SESSION ID STRING>, which you can use if you have a complex test session layout. See Managing complex test session layouts
This command varies slightly based on your test runner/build tool. See below for specific instructions.
After recording tests, you can see your recorded test sessions on the Test Sessions page of the CloudBees Smart Tests dashboard at app.launchableinc.com. You can click into each session to view details and failed tests.
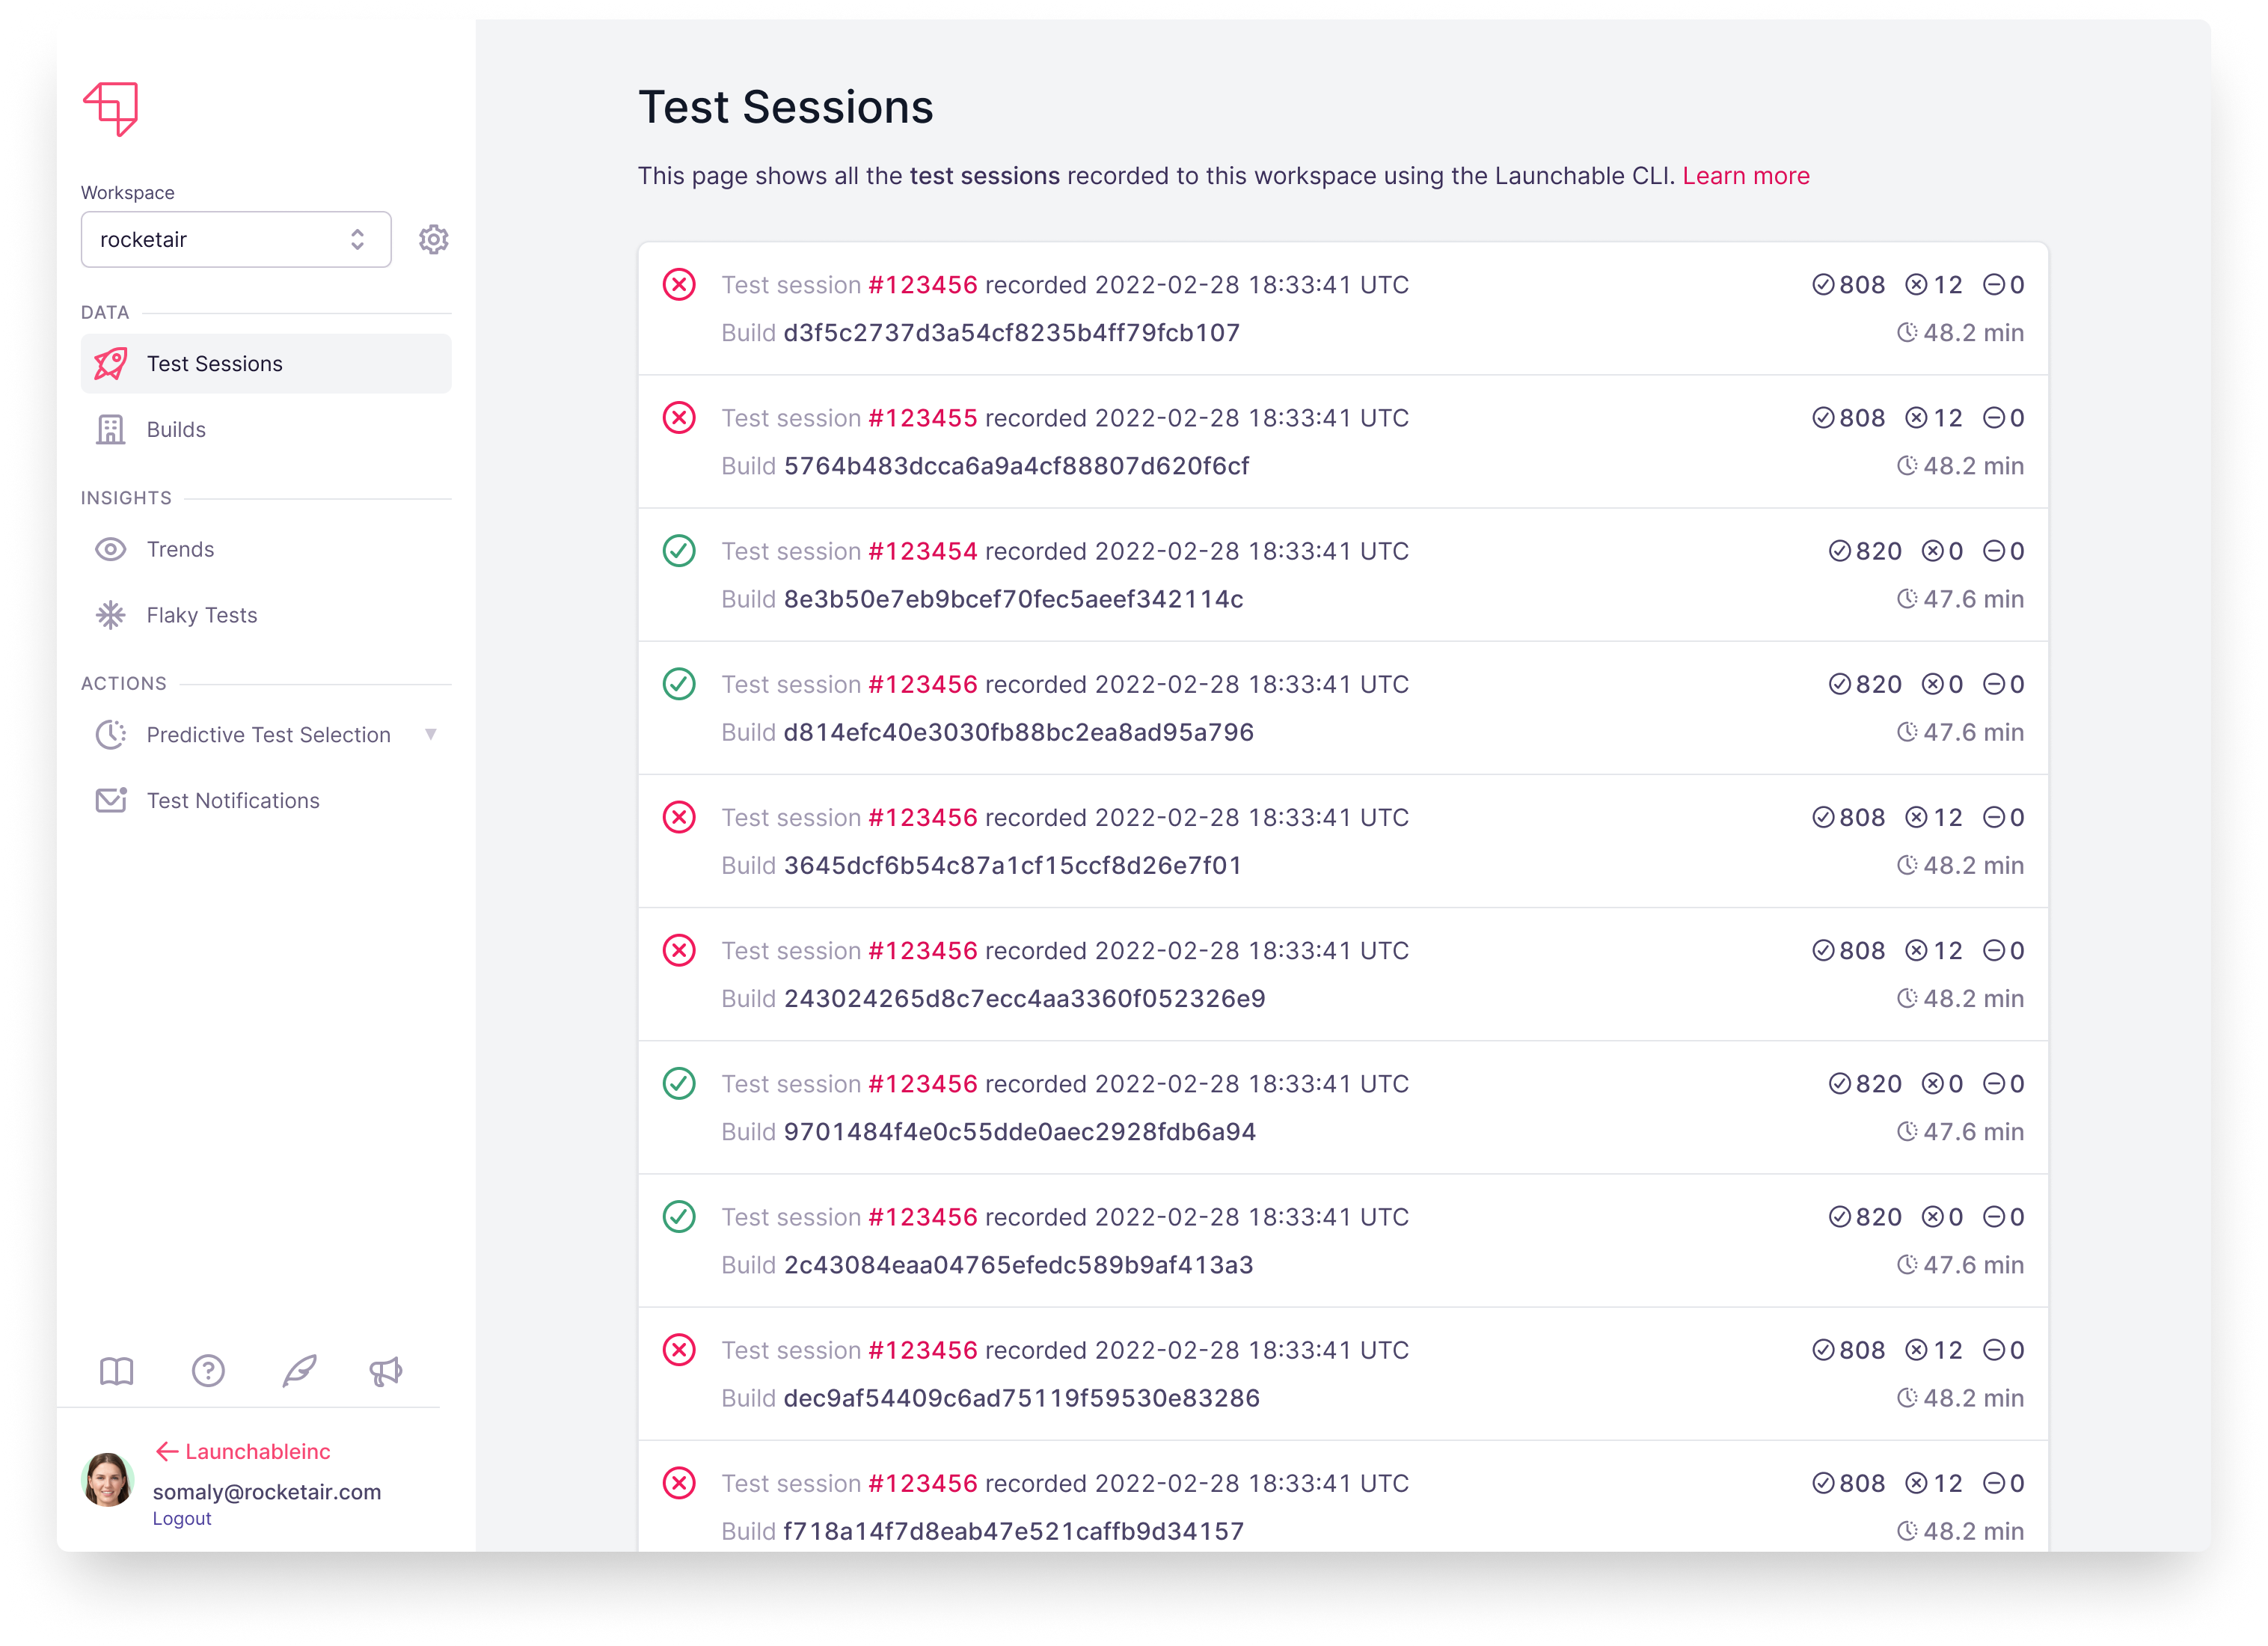
The CLI will also output a link to view each session’s details in the web app.
Instructions for test runners/build tools
Android Compatibility Test Suite (CTS)
After running tests, point the CLI to your test report file(s):
smart-tests record tests cts --no-build android-cts/results/*/.xml
Android Debug Bridge (ADB)
Currently, the CLI doesn’t have a record tests command for ADB. Use the command for #gradle[#gradle] instead.
Ant
After running tests, point the CLI to your test report file(s):
smart-tests record tests ant --no-build <PATH(S) TO JUNIT XML FILE(S)>
Then, follow the instructions for Ensuring record tests always runs.
Bazel
After running tests, point the CLI to your test report files to record test results:
smart-tests record tests bazel --no-build
Then, follow the instructions for Ensuring record tests always runs.
Behave
First, to generate reports that CloudBees Smart Tests can consume, add the --junit option to your existing behave command:
# run the tests however you usually do behave --junit
Then, after running tests, point the CLI to your test report files to record test results:
smart-tests record tests behave --no-build ./reports/*.xml
Then, follow the instructions for Ensuring record tests always runs.
CTest
First, run your tests with ctest -T test --no-compress-output . These options ensure test results are written to the Testing directory.
Then, after running tests, point the CLI to your test report files to record test results:
smart-tests record tests ctest --no-build "Testing/**/Test.xml"
Then, follow the instructions for Ensuring record tests always runs.
cucumber
CloudBees Smart Tests supports JSON and JUnit XML reports generated by cucumber (using -f junit or -f json . Follow the instructions for whichever one you use. JUnit XML is the default.
If you run cucumber with the -f junit option, like this:
bundle exec cucumber -f junit -o reports
After running tests, point the CLI to your test report files to record test results:
smart-tests record tests cucumber --no-build "./reports/*/.xml"
Then, follow the instructions for Ensuring record tests always runs.
If you run cucumber with the -f json option, like this:
bundle exec cucumber -f json -o reports
After running tests, point the CLI to your test report files to record test results (note the --json option):
smart-tests record tests cucumber --no-build --json "./reports/*/.json"
Then, follow the instructions for Ensuring record tests always runs.
Note: If you receive a warning message such as Cannot find test file Test-feature-example.xml , set the project’s root directory path with the --base option:
smart-tests record tests cucumber --no-build --base /example/project "/example/project/reports/*/.xml"
Cypress
After running tests, point the CLI to your test report files to record test results:
smart-tests record tests cypress --no-build ./report/*.xml
Then, follow the instructions for Ensuring record tests always runs.
dotnet test
First, configure dotnet test to product NUnit report files. Install the NunitXml.TestLogger package from NuGet via your preferred method, then the -l option to your dotnet test command to enable the logger:
dotnet test … -l nunit
Then, after running tests, point the CLI to your test report files to record test results:
smart-tests record tests dotnet --no-build "*/.xml"
Then, follow the instructions for Ensuring record tests always runs.
Flutter
Run tests with the --machine option and produce a test report as JSON (NDJSON) format.
flutter test --machine > report.json
Then, after running tests, point the CLI to your test report file to record test results:
smart-tests record tests \ --session $(cat smart-tests-session.txt) \ flutter \ report.json
GoogleTest
First, configure GoogleTest to produce JUnit-compatible report files. See their documentation for how to do this. You’ll end up with a command something like this:
# run the tests however you normally do ./my-test --gtest_output=xml:./report/my-test.xml
Then, after running tests, point the CLI to your test report files to record test results:
smart-tests record tests googletest --no-build ./report
Then, follow the instructions for Ensuring record tests always runs.
Go Test
First, to generate reports that CloudBees Smart Tests can consume, use go-junit-report to generate a JUnit XML file after you run tests:
# install JUnit report formatter go get -u github.com/jstemmer/go-junit-report # run the tests however you usually do, then produce a JUnit XML file go test -v ./... | go-junit-report -set-exit-code > report.xml
Then point the CLI to your test report file to record test results:
smart-tests record tests go-test --no-build report.xml
Then, follow the instructions for Ensuring record tests always runs.
Gradle
After running tests, point the CLI to your test report files to record test results:
smart-tests record tests gradle --no-build ./build/test-results/test/
Then, follow the instructions for Ensuring record tests always runs.
Notes:
-
By default, Gradle’s report files are saved to
build/test-results/test/, but that might differ depending on how your Gradle project is configured. -
You can specify multiple directories if you do a multi-project build.
-
A dedicated Gradle task to list all report directories might be convenient for a large project. See the upstream documentation for more details and insights.
-
Alternatively, you can specify a glob pattern for directories or individual test report files (this pattern might already be set in your pipeline script for easy copy-pasting), e.g.,
gradle /build//TEST-*.xml.
Jest
First, to generate reports that CloudBees Smart Tests can consume, use jest-junit to generate a JUnit XML file after you run tests.
# install jest-junit reporter npm install jest-junit --save-dev # or yarn add --dev jest-junit
You’ll need to configure jest-junit to include file paths in reports.
You can do this using environment variables:
Recommended config:
export JEST_JUNIT_CLASSNAME="{classname}" export JEST_JUNIT_TITLE="{title}" export JEST_JUNIT_SUITE_NAME="{filepath}"
Minimum config:
export JEST_JUNIT_SUITE_NAME="{filepath}"
Add the following lines to your package.json . The detail is the jest-junit section.
Recommended config:
"jest-junit": { "suiteNameTemplate": "{filepath}", "classNameTemplate": "{classname}", "titleTemplate": "{title}" }
Minimum config:
"jest-junit": { "suiteNameTemplate": "{filepath}" }
Then, run jest using jest-junit:
# run tests with jest-junit jest --ci --reporters=default --reporters=jest-junit
Then, after running tests, point the CLI to your test report files to record test results:
# send test results to {PRODUCT} smart-tests record tests jest --no-build your-junit.xml
Finally, follow the instructions for Ensuring record tests always runs.
Karma
To generate reports that CloudBees Smart Tests can consume, use karma-json-reporter to generate JSON test reports. See the linked page for more details, but your karma.conf.js change should look something like this:
module.exports = function (config) { config.set({ ... plugins: [ ... require('karma-json-reporter') ], jsonReporter: { outputFile: require('path').join(__dirname, 'test-results.json'), stdout: false }, reporters: [..., 'json'] }); };
Then, after running tests, point the CLI to your test report file to record test results:
smart-tests record tests karma --session $(cat session.txt) test-results.json
Finally, follow the instructions for Ensuring record tests always runs.
Maven
After running tests, point the CLI to your test report files to record test results:
smart-tests record tests maven --no-build "./**/target/surefire-reports"
You can pass multiple directories/patterns, e.g. _ smart-tests record tests maven --no-build '<pattern/directory 1>' '<pattern/directory 2>' _.
Then, follow the instructions for Ensuring record tests always runs.
minitest
First, use minitest-ci to output test results to a file. It may already be installed if you store your test results on your CI server.
Then, after running tests, point the CLI to your test report files to record test results:
smart-tests record tests minitest --no-build "$CIRCLE_TEST_REPORTS/reports"
Then, follow the instructions for Ensuring record tests always runs.
NUnit Console Runner
|
CloudBees Smart Tests CLI accepts NUnit3 style test report XML files produced by NUnit. |
After running tests, point the CLI to your test report file(s) to record test results:
smart-tests record tests nunit --no-build path/to/TestResult.xml
Then, follow the instructions for Ensuring record tests always runs.
prove for Perl
CloudBees Smart Tests supports JUnit XML report generated by TAP::Formatter::JUnit. Follow the instructions for generating a report.
prove -Ilib --formatter TAP::Formatter::JUnit-r t
The command will generate a JUnit XML report with the name junit_output.xml .
After running tests, point the CLI to your test report file to record test results:
smart-tests record tests prove --no-build junit_output.xml
Then, follow the instructions for Ensuring record tests always runs.
Playwright
CloudBees Smart Tests supports JSON and JUnit XML reports generated by Playwright official reporters (using --json ). Follow the instructions for whichever one you use. JUnit XML is the default but CloudBees Smart Tests recommends to use JSON reports and option. Because JUnit XML reports will consolidate multiple same test case results into one.
First, run tests with the --reporter=json option:
PLAYWRIGHT_JSON_OUTPUT_NAME=results.json npx playwright test --reporter=json
or pass options to the configuration file directly:
import { defineConfig } from '@playwright/test'; export default defineConfig({ reporter: [['json', { outputFile: 'results.json' }]], });
Then, after running tests, point the CLI to your test report file(s) to record tests results
smart-tests record tests playwright --no-build --json results.json
Then, follow the instructions for Ensuring record tests always runs.
If you use JUnit Reporter to generate reports, like this:
PLAYWRIGHT_JUNIT_OUTPUT_NAME=results.xml npx playwright test --reporter=junit
or pass options to the configuration file directly
import { defineConfig } from '@playwright/test'; export default defineConfig({ reporter: [['junit', { outputFile: 'results.xml' }]], });
After running tests, point the CLI to your test report files(s) to record test results:
smart-tests record tests playwright --no-build results.xml
Then, follow the instructions for Ensuring record tests always runs.
pytest
CloudBees Smart Tests supports JSON and JUnit XML reports generated by pytest (using --junit-xml or --report-log ). Follow the instructions for whichever one you use. JUnit XML is the default.
First, run tests with the --junit-xml option:
pytest --junit-xml=test-results/results.xml
|
pytest changed its default test report format from Thefore, if you are using pytest 6 or newer, you must also specify |
Then, after running tests, point the CLI to your test report file(s) to record test results (note the --json option):
smart-tests record tests pytest --no-build ./test-results/
Then, follow the instructions for Ensuring record tests always runs.
If you use the pytest-dev/pytest-reportlog plugin to generate reports, like this:
pytest --report-log=test-results/results.json
After running tests, point the CLI to your test report file(s) to record test results:
smart-tests record tests pytest --no-build --json ./test-results/
Then, follow the instructions for Ensuring record tests always runs.
Robot
After running tests with robot , point the CLI to your test report files to record test results:
smart-tests record tests robot --no-build output.xml
Then, follow the instructions for Ensuring record tests always runs.
RSpec
First, use rspec_junit_formatter to output test results to a file in RSpec. If you already have a CI server storing your test results, it may already be installed:
bundle exec rspec --format RspecJunitFormatter --out report/rspec.xml
Then, after running tests, point the CLI to your test report files to record test results:
smart-tests record tests rspec --no-build ./report
Then, follow the instructions for Ensuring record tests always runs.
Ruby test-unit
First, use test-unit-launchable to output test results to a file in test-unit.
ruby test/example_test.rb --runner=launchable --launchable-test-report-json=report.json
Then, after running tests, point the CLI to your test report files to record test results:
smart-tests record tests raw --no-build report.json
Then, follow the instructions for Ensuring record tests always runs.
TestNG
If you’re using the TestNG framework, check whether the tests are run with Gradle or Maven. Then, use the appropriate command for the corresponding tool.
Vitest
Run tests with the --reporter junit option and the --outputFile option to produce a test report in JUnit format.
vitest run --reporter junit --outputFile report.xml
Then, after running tests, point the CLI to your test report file to record test results:
smart-tests record tests \ --session $(cat smart-tests-session.txt) \ vitest \ report.json
XCTest
First, to generate reports that CloudBees Smart Tests can consume, use xcpretty to generate a JUnit XML file after you run tests:
# install xcpretty gem install xcpretty # run the tests however you usually do, then produce a JUnit XML file xcodebuild test -scheme <SCHEMA> -destination '<DESTINATION>' -parallel-testing-enabled | xcpretty -r junit
Then point the CLI to your test report file to record test results:
smart-tests record tests \ --session $(cat smart-tests-session.txt) \ xctest \ build/reports/junit.xml
Then, follow the instructions for Ensuring record tests always runs.
Other instructions
If you’re not using any of these, see raw profile for custom test runners or file profile for unsupported test runners.