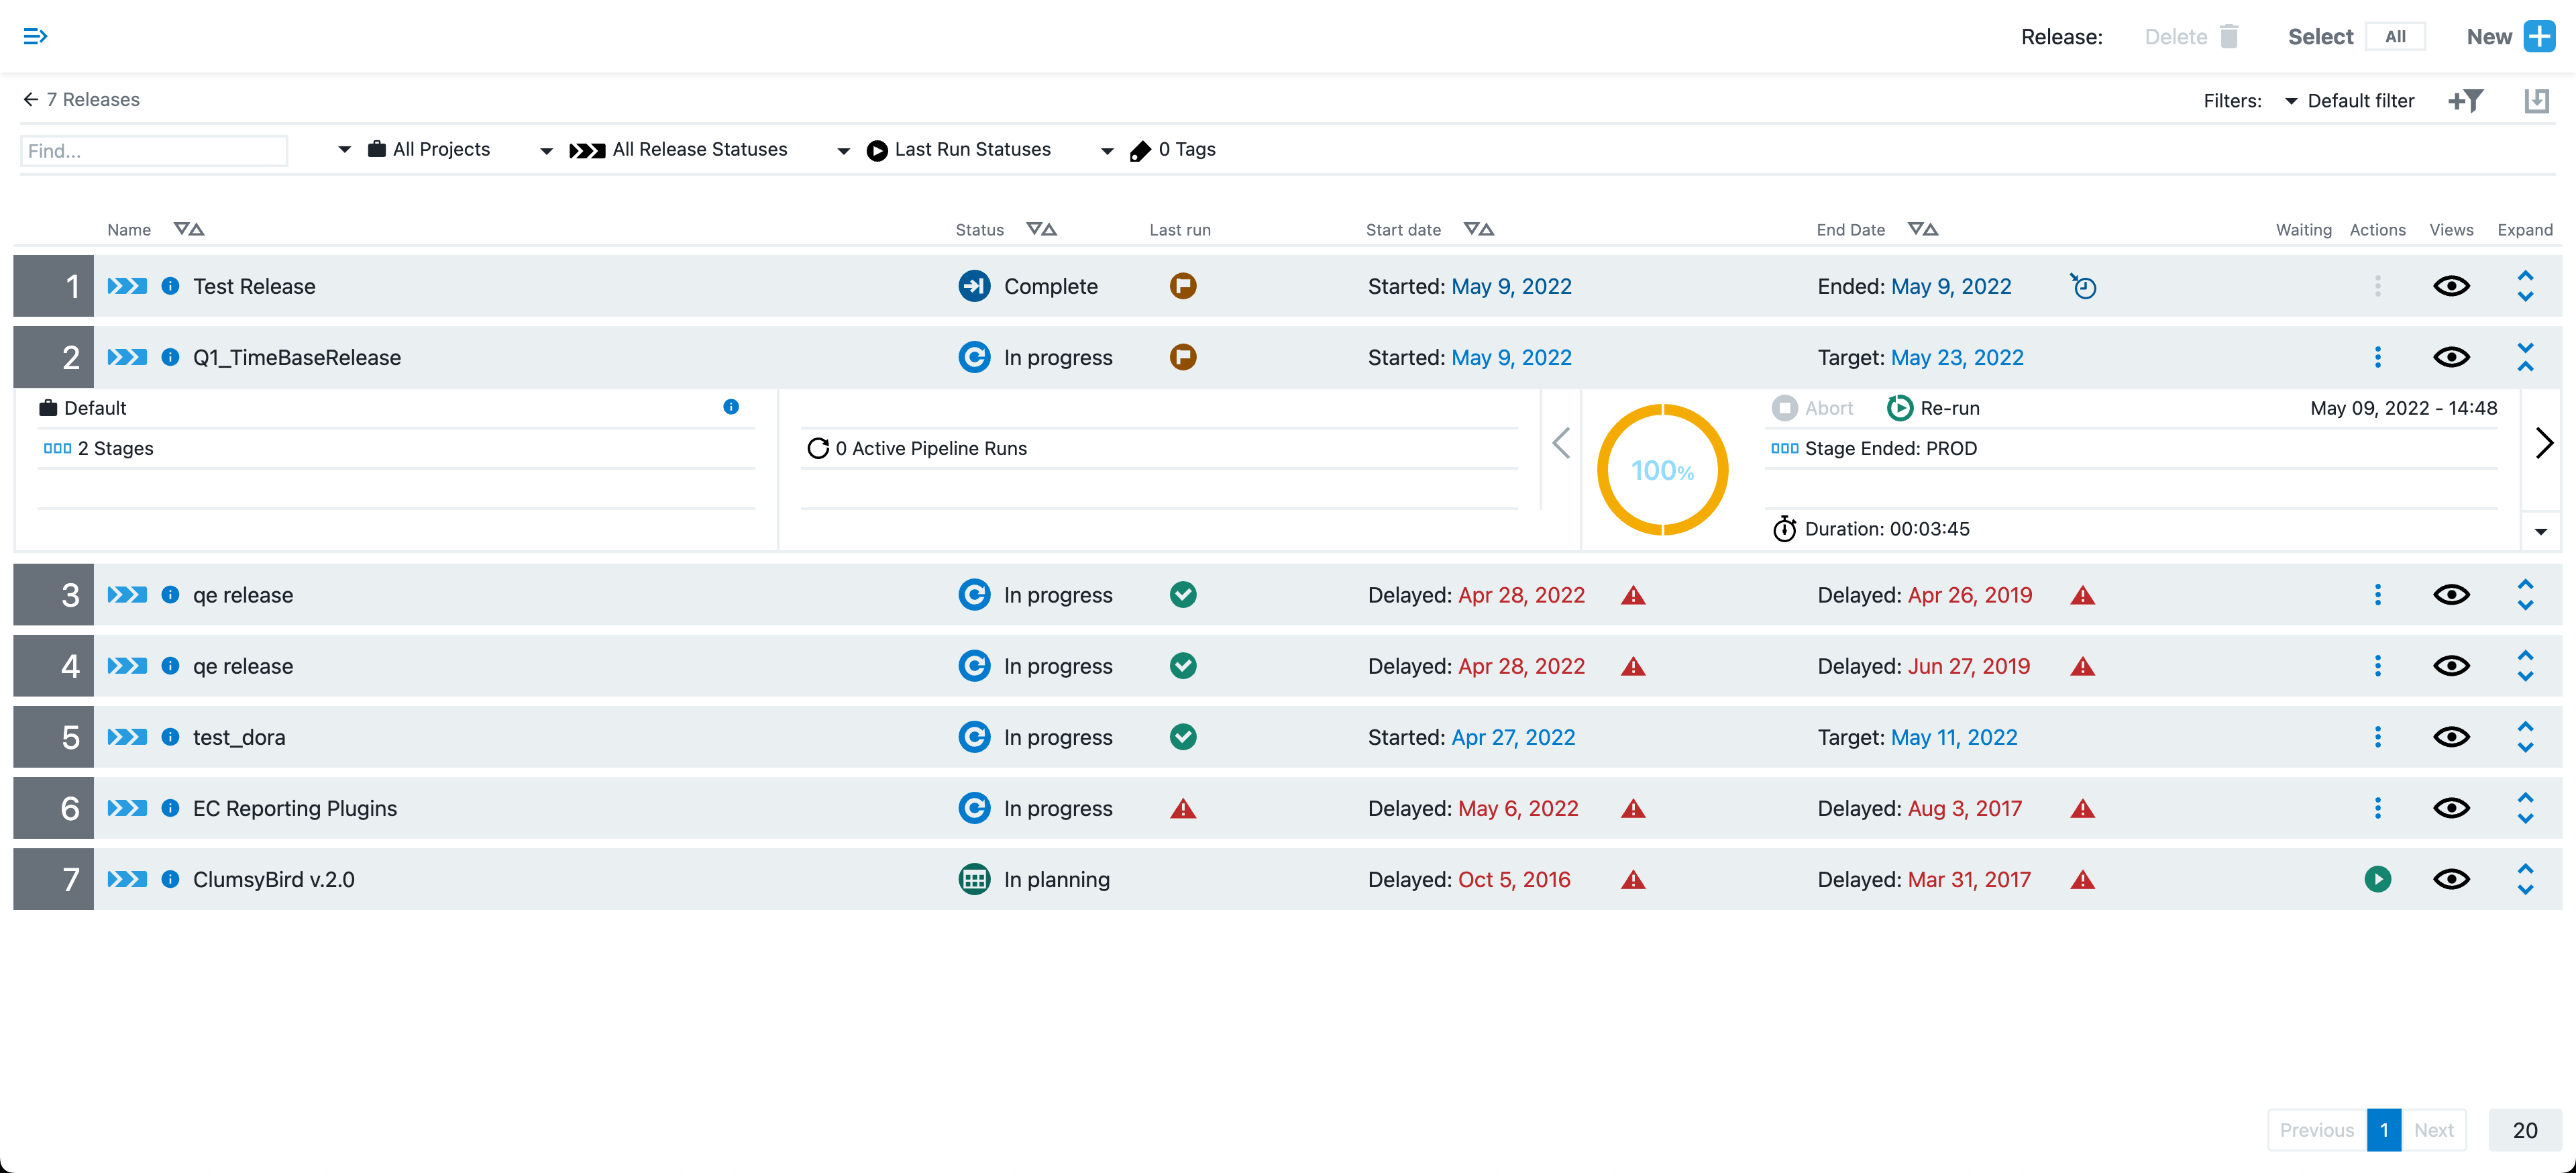
The Release Dashboard, also referred to as the Release List, provides a way for the release team, task assignees, and approvers to quickly see the status of all the planned, active, or completed releases at any time. They can quickly see the current status, specific tasks and who is assigned to them, and the start and end dates for the stages in one place on one platform.
Accessing the release dashboard
To open the Release Dashboard click the Main Menu button and select Releases.
Release dashboard
The Release Dashboard shows all the Releases that you have permission to view:

By default, the releases for all projects are displayed.
To see only the objects for a specific project, click the down arrow in the All projects field and then select one or more projects in one of these ways:
-
Click on the name of one or more projects.
-
Enter the search criteria in the Search field. The projects that match the criteria appear in the list.
If there are no matches, a message appears stating that there are no resource templates in the selected projects.
The Release Dashboard has this information:
Each row in the Release Dashboard contains this information : |
|
Name |
The name of the release. Click on the name to see the Release Editor view for the release. |
Status |
The status can be:
|
Last Run |
The status of the last run. Click on the icon to expand the row. |
Start Date End Date |
The default time frame between the start and target (end) dates is two weeks. The color of the dates indicates the Release status.
|
Waiting |
A hand icon in this column indicates the release is pending on manual input. Click on the icon for further information. |
Actions |
Either Run Release button or Actions button appears in this column. Click on green Run Release button to start the release. Otherwise, click on Actions to select one of these actions:
|
Views |
Click on Views button for other available views for this release. Choices are context sensitive based on status of the release. |
Expand |
Click on Expand button to see more details about the release. |
Release details in the expanded view |
|
Project to which the pipeline belongs, name of the pipeline underlying the software release, and the number of stages in this pipeline |
Example: 
|
Number of applications in the pipeline and any notifications for actions to be taken before the pipeline progresses |
Example: 
This pipeline requires human intervention to progress.The user named quincy needs to approve something at an entry or exit gate of a stage before the pipeline progresses. |
Visual indicator showing how far the Release has progressed with the percentage completed, the current stage, and how long the Release has been running. |
The visual indicator is split into sections equal to the number of stages in the pipeline. If pipeline has three stages, it is split into three segments. |
Creating a new release
To configure a new release:
-
Select
 New.
New. -
Select Create New.
-
Enter title for release in Name.
-
Select the project from the Select Project options.
-
Select Start and End dates.
-
Select
 add arrow to add tags. Refer to:
Object Tags
 -
Select Next.
-
Choose a pipeline.
-
Select
Create a new pipelineto create a custom pipeline. -
Select
Copy an existing pipelineto use an existing pipeline.
-
-
Select Next.
-
Use the
Release editorfeatures to configure the release pipeline. Refer to: Pipeline UI.
Copying an existing release
To duplicate an existing release:
-
Select
 New.
New. -
Select Copy Existing
-
Select the
Nameof the release to be copied. -
Enter title for release in Name.
-
Select the project from the Select Project options.
-
Select Start and End dates.
-
Select
 add arrow to add tags. Refer to:
Object Tags.
 -
Select Disable Pipeline Restart stop pipeline from automatically restarting.
-
Select Disable Multiple Active Runs to prevent the pipeline from having more than one active run.
-
Select Stage skipping to allow users or groups to skip pipeline stages.
-
Select Override Workspace use instead specific workspace in place of a procedure or process workspace.
-
-
Select Next.
-
Use the
Release editorfeatures to configure the release pipeline. Refer to: Pipeline UI.
Creating a new release from a template
To create a release template using the Self-Service catalog, edit the dsl code for the existing catalog item and change templateObjectType = 'none' to `templateObjectType = 'release'. Refer to Service catalog for more details.
|
To create a release based on a release template:
-
Select
 New.
New. -
Select Create from catalog item.
-
Select the release template
name. -
Select a project name from the Release Project menu.
-
Enter a release title into Release Name.
-
Enter a description into Release Description.
-
Select Start and End dates.
-
Select OK.
-
Use the
Release editorfeatures to configure the release pipeline. Refer to: Pipeline UI.