This page displays workflow details, including the workflow state, project name, workflow definition name, and any properties. The following links are provided for quick access to topic sections you may want to review again.
The name after the Workflow Details page title is the name of the workflow created after running a Workflow Definition. The number at the end of the workflow name is the workflow definition ID number. The ID number is auto-generated by CloudBees CD/RO. Your workflow name will be different, depending on the information you supplied in the workflow definition.
Links and actions at the top of the table
Additional links are available if the workflow is running. When the workflow is complete, some links are no longer available.
-
Run Again —Use this link to run the workflow definition again. When you select the Run Again button, you are requesting to re-run the workflow definition with the same parameter values as the original invocation. If you want to change the parameter values, you can select " Run… " from the dropdown menu (small down-arrow) next to the Run Again button.
-
Stop Workflow —Select this option to stop the workflow. Any unfinished processes will complete, but no new transitions will occur.
-
Delete —Deletes this workflow.
-
View Log —Use this link to view the log created by this workflow.
-
Access Control —Use this link to set privileges for this workflow. For more information, see Access control .
-
Stop Refresh —This link is available only if a workflow is currently running. Click this link if you do not want the page to refresh the page automatically while the workflow is running.
-
The "star" icon allows you to save this workflow information to your Home page.
Summary section—at the top of a running workflow page
-
Next to the icon, notice that the state name, "Approval needed", is a link. Click this link to open the State Details panel for this state.
-
The Manual Transitions section allows you select a manual transition if any were defined. However, if the manual transition contains any parameters whose values were not supplied at definition time, selecting that transition takes you to the Transition Workflow page to enter values.
-
The General Information section provides links from the Project name to the corresponding Project Details page and from the Workflow Definition name to its corresponding Workflow Definition Details page.
Links
This page can include a Links section also, which will appear on the far right-side of the Summary section. To add a link to this section:
-
Create a link to any file: To add a link, run a command in any job’s job step using this format (this works for both local [disconnected] and non-local workspaces):
ectool setProperty "/myJobStep/report-urls/<myReportName>" "/commander/jobSteps/<jobStepId>/<artifactDirectoryName>/<file-path>"
Example command:
ectool setProperty "/myJobStep/report-urls/Test Report" "/commander/jobSteps/$[/myJobStep/jobStepId]/testreport/index.html"
-
Create a link to any directory: To add a link, run the following style command in any job’s job step:
ectool setProperty "/myJobStep/report-urls/Main Job Workspace" "file:////WinStor2/scratch/chron55build/$[/myJob/jobName]"
When the workflow is complete…
-
When the workflow is complete, fewer links are available at the top of the table and the Manual Transitions section is no longer available.
-
The check mark icon indicates the workflow is complete.
Click the state shown under Final State ("Success" in our example), to open that state’s State Details panel.
-
The General Information section is the same as when the workflow was running.
Graph tab
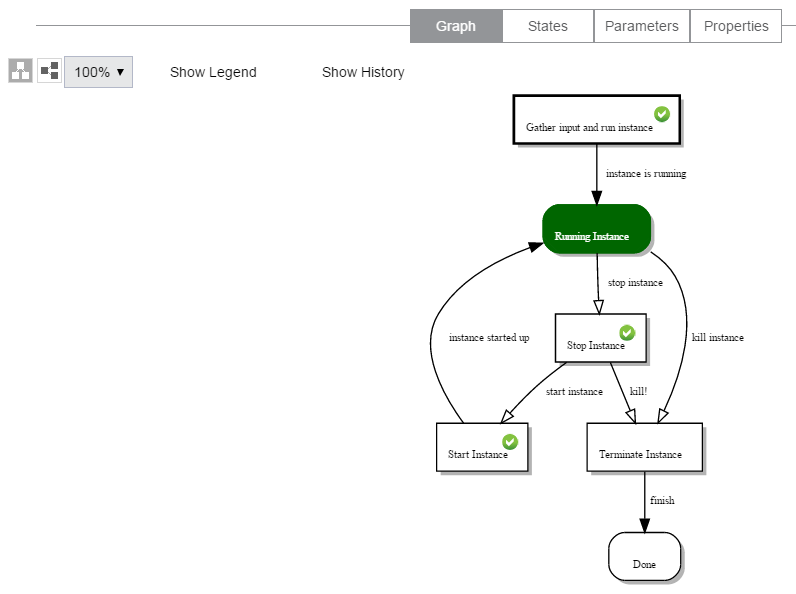
The Graph tab displays your workflow in a visual format. This format is the default view. The following screen is an example of a workflow graph. Depending on your workflow, your graph could be very simple or much more complex than the example below.
This graph updates in real time, which means you see the active state highlighted with a color. An icon on the state represents an action.
Use the icons below the Graph tab to rotate the graph for better use of your screen viewing area, and you can re-size the graph using the "%" drop-down menu to choose another size.

Show Legend tab
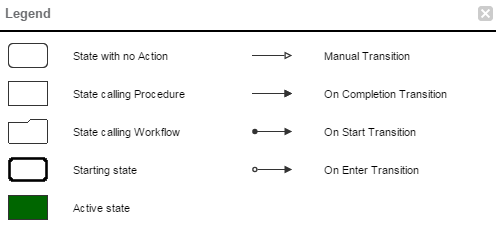
The graph above illustrates all state and transition types. The state and transition names in this graph are labels for the type of state or transition represented. Use the Show Legend tab to see a quick reminder of state shape and transition line-ending definitions.

Using the graph’s "quick-access" features
The following screen example is a portion of a workflow graph.
In the graph, states and transitions are links:
-
Clicking on a state takes you to the State Details panel to that state’s transitions, parameters, and properties.
-
Clicking on a transition takes you to the Transition Details panel to see details specifically about that transition, including its condition information. (Hover your mouse over the transition or transition name and click when the color changes.)
However, if you right-click on a state or transition, other link options are available. These options are different for a running or completed workflow versus the options on the Workflow Definition Details page that were available to you while you were defining your workflow.
Available pop-up context-sensitive links include:
-
For states, depending on which actions were defined for the state, you may have one or more of the following options:
-
Go to Action—opens the Workflow Details or Job Details page for that state.
-
Go to Action Definition—for states calling a procedure, the Procedure Details page is opened. For states calling a workflow, the Workflow Definition Details page for the "subworkflow" is opened.
-
Go to State Definition—opens the State Definition panel for that state.
-
For transitions, the only link available is: Go to Transition Definition, which opens the Transition Definition panel.
Show History
Selecting Show History allows you to see at-a-glance how your workflow progressed through its states and transitions, or for example, how many times the same state was visited and depending on outcome, which transitions were taken and then the outcome of those target states.
Notice the links displayed in the History panel. You can select links for completed jobs or workflows, which display the Job Details or Workflow Details page, respectively.
States tab
Selecting the States tab provides a table containing all state names and actions for this workflow.
The following links are available in the States table:
-
State Name—Click any state name in this column to go to that state’s State Details panel.
-
Action—Actions are available in this column only if you are using a subjob or a subworkflow. If so, links in this column connect you to the Job Details or Workflow Details page for the subjob or subworkflow, respectively.
-
[Show All] link—If the state executed multiple times during a workflow run, only the last subjob or subworkflow is displayed. However, clicking on Show All displays the results for all subjobs or subworkflows executed during a workflow run.
State Details panel
This panel displays state components, including transitions, parameters, and properties.
-
Use the Access Control link to set privileges for this state. For details, see Access control .
-
The state name, "Build" (in our example), is shown at the top of the panel.
-
Job or Workflow status links to the job or workflow created by the action.
-
The Transitions tab is open to display the transition table listing all transitions for this state.
Column descriptions
| Column Name | Description / Actions |
|---|---|
Name |
One or more names of transitions currently defined for this state. Click on a transition name to open the Transition Details panel. |
Trigger |
The type of trigger currently defined for this transition. |
Target |
The target state for this transition. Click on a target state name to open the State Details panel for that state. |
Condition |
This condition was specified when the transition was created. A condition specifies under which circumstances the transition is taken. You can edit this condition on the Transition Definition pane, but if you edit the condition during a running workflow, the change will not take effect until you run the workflow again. |
Actions |
Access Control —Use this link to set permissions on this transition. |
Parameters tab
The Parameters tab provides a table listing all defined parameters for this state. You see any parameters passed to this state the last time this state was entered, but only if parameters were created on the State Definitions Details panel. This table does not allow you to edit the parameter’s value. These parameters are copied automatically to the top-level property sheet and you will see them in the properties table also.
Properties tab
Select the Properties tab to see the Properties table. If no properties were defined for this workflow definition, this table is blank.
The Properties tab provides a table containing all defined properties for this state. If no properties were defined for this state definition, this table will be blank. All defined parameters are automatically copied to the top-level property sheet. Any custom properties defined for the state will be included in this table also.
Links at the top of the table
-
Create Property —Click this link to go to the New Property pop-up box to create a new property for this state.
-
Create Nested Sheet —Click this link to go the New Nested Property Sheet pop-up box to create a nested property sheet.
-
Access Control —Click this link to add or decrease access control on the property sheet.
Column descriptions
| Column Name | Description / Actions |
|---|---|
Property Name |
Select a property name to edit that property. You can change its name, value, or add or change its description. If the property name is preceded by a folder icon, this is a property sheet. Click on the property name to open the "folder". |
Value |
The value currently assigned to the property. |
Description |
(Optional) Plain text or HTML description for this object. If using HTML, you must surround your text with
|
Actions |
Delete —Click this link to delete the property on that row. |