This section describes creating and deploying a CloudBees CD/RO microservice application onto a Kubernetes cluster.
A microservice application consists of microservices and the underlying processes that orchestrate the deployment of these microservices to pre-provisioned Kubernetes clusters. Each application object has one or more microservices, where a microservice is a logical group of containers making up an artifact. An artifact refers to one more containers and other Kubernetes resources. For example. a cluster is an artifact containing one ore more containers along with other resources like an Ingress controller, secrets, and so on. Each microservice is mapped to at least one cluster within an environment.
Two deployment options are supported; Helm and YAML.
Prerequisites
These instructions assume you understand the tooling required for establishing a Kubernetes cluster, are familiar with Kubernetes concepts, and have provisioned your Kubernetes cluster or clusters onto which the microservice application is deployed.
-
The utility resource used to deploy the microservice must be a CloudBees CD/RO agent, v10.1 or greater, with the following binaries installed:
-
Helm, v3.4.1 or greater.
-
Kubectl, v1.16 or greater.
-
-
The Kubernetes clusters used for deployment must be v1.6 or greater.
-
For YAML, the EC-Kubectl plugin version 1.3.0 or later is required.
-
For Helm, the EC-Helm plugin is required.
For the instructions that follow, have the following information handy:
-
Application name
-
The
kubeconfigcontext -
Type of repository hosting the Helm chart: Git or Helm repository
-
Repository URL
-
Repository name
-
Repository credentials
-
Release name
-
Helm chart or YAML file to deploy
-
Additional options and values you wish to provide to the Helm command or Kubectl command
-
Name of your predefined cluster configuration. A cluster configuration is a CloudBees CD/RO object to hold common values, predefined parameter sets, and credentials for your cluster. Creating a cluster configuration leverages the EC-Helm and EC-Kubectl CloudBees CD/RO plugins. Navigate to and find EC-Helm or EC-Kubectl from the list of plugins. Select Configure
Creating an application
Microservice applications consist of application microservices that deploy to mapped Kubernetes cluster environments via Helm modeling. In overview, here are the steps to create the application:
-
Create a new application.
-
Define the microservice or copy an existing microservice from another application.
-
Define the environment and add a cluster based on a pre-provisioned Kubernetes cluster. Also add a utility resource with the prerequisites mentioned earlier.
-
Map the microservice to a cluster in an environment.
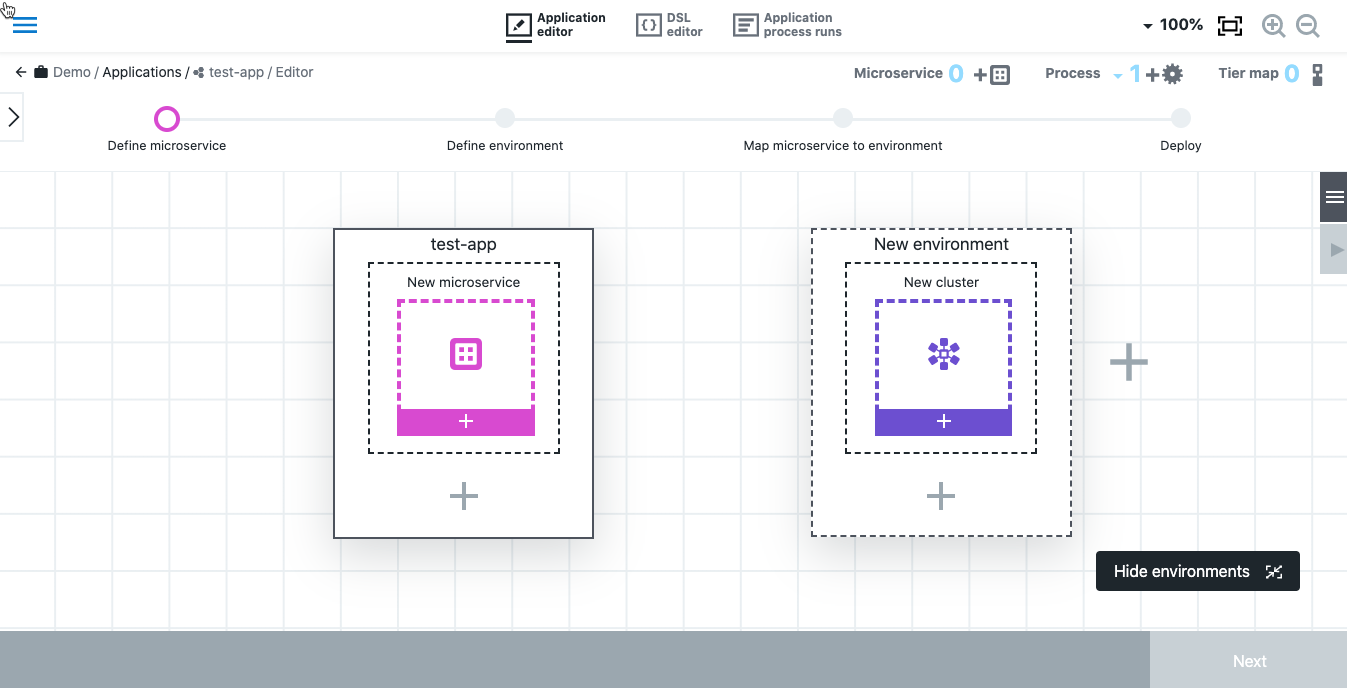
These steps take place within the application editor, where a stepper displays current progress of application creation.
To create a new application:
-
Navigate to the application list via . The applications list displays.
-
Select New in upper right corner. The New Application dialog displays.
-
Select either Create New or Copy Existing. The next page of the New Application dialog displays. If copying from an existing pipeline use the project selector and search box to help you find the existing microservice application.
-
Enter the following
Label Definition Application name
User-defined name for the application.
Project
The project in which this application is to reside.
Description
(Optional) User-defined information about this application. Not used by the system.
Application type
The application type. Select Microservice.
Tags
Tags let you group related objects by a user-defined term. To tag this object or to modify or delete a tag, click the Open Dialog arrow at right. See Object Tags for more information.
-
Click OK. The application editor displays.
Defining microservice details for Helm
When you create a new application, the new application is pre-populated with one microservice tile and one environment tile.
-
In the microservice tile, click New microservice. The New microservice dialog displays.
-
Either create a new microservice or select an existing microservice and then click Next. The New microservice dialog appears.
-
Enter details about this microservice.
Label Definition Name
User-defined name for the microservice.
Description
User-defined description. This is not used by the system.
Definition type
The service definition type. Select
Helm.Definition source:
The source of the microservice definition artifact.
Repository URL
The URL to the Helm chart repository.
Repository name
Name of the Helm chart repository.
Repository credentials
Credentials needed for repository connection. Select Browse to search for previously created credentials. See Credential management for information on creating credentials.
Release name
Name of the release to be deployed. If the release exists, it is upgraded.
Chart
Name of the chart to deploy.
Additional options
Additional options to be provided to the Helm cli.
Values
A list of values. Values in this file have lower priority than Additional options. The list supplied here is saved to a file and passed to the command with the
-f <fileName>option.Enable automatic rollback on failure?
Check this box if you want the deployment automatically rolled back on failure. If checked, a system generated rollback microservice process step is created in the microservice process and the
--atomicHelm option is added to the deployment command.Timeout
Available if rollback is enabled: the number of seconds for rollback timeout.
Defining microservice details for YAML
When you create a new application, the new application is pre-populated with one microservice tile and one environment tile.
-
In the microservice tile, click New microservice. The New microservice dialog displays.
-
Either create a new microservice or select an existing microservice and then click Next. The New microservice dialog appears.
-
Type a name and optional decription for the microservice.
-
In Definition type, select
YAML. -
In Definition source, select the source of the microservice definition artifact, either a Git repository or YAML content.
-
If you selected Git repository, the git repository will be cloned and deployed. Select the previously defined configuration, the URL for the git repository to use, and the name of the git branch to use.
If you want to deploy specific YAML files, add the relative path to those files in Relative path. -
If you selected YAML content, select the source type. Select Content to enter the YAML content directly in the YAML Content field. Select Path to enter the path to an existing YAML file or folder to use.
If you select Content or if you select Path and then enter a path to a YAML file, do not enter anything in the Relative path field.
-
-
(Optional) Enter additional options to be provided to the Kubectl deploy command. You cannot enter the namespace, context, cluster, or user as additional options. Entering those options as additional options may lead to failures. Instead, enter them in the plugin configuration or the cluster definition.
-
Click OK.
Defining the environment
Now you define the cluster environment into which the microservice is deployed. This cluster must have already been provisioned outside of CloudBees CD/RO. After following steps in this section, the environment specifies the Kubernetes cluster for your deployment.
-
In the environment tile, select New cluster. The New environment dialog displays.
-
Select either Create a new environment or Select an existing environment and click Next. If creating a new environment, the New environment dialog appears.
-
Enter details about this environment.
Label Definition Environment name
The name of the environment object in which this cluster resides.
Project
The project in which this environment is to reside.
Environment description
(Optional) User-defined information about this environment. Not used by the system.
Cluster name
The name of the cluster.
Cluster description
(Optional) User-defined information about this environment. Not used by the system.
Configuration provider
If you plan to use a Helm deployment, select Kubernetes {via Helm} (Supports microservice model). If you plan to use a YAML deployment, select Kubernetes {via Kubectl} (Supports microservice model).
Configuration Name
Create a new configuration or select the name of a previously defined configuration for the cluster.
Namespace
The name of the Kubernetes namespace. If not supplied, the default namespace is used.
Kubeconfig context
The name of the context to be used for this cluster deployment. If not specified, the one defined by the
current-contextinside kubeconfig file would be used.Utility resource name
The resource used to deploy the microservice. This must be a CloudBees CD/RO agent, v10.1 or greater, with the following binaries installed:
-
Helm, v3.4.1 or greater.
-
Kubectl, v1.16 or greater.
Resource
Select the resource or resource pool from the drop-down list.
-
-
Link a utility resource to the cluster. This defines the static environment to which the cluster is deployed.
-
Select the New+ resource button (with wrench and hammer) in upper right. The New dialog opens.
-
In the New dialog, select Add resources or Add resource pool. The Resources list or Resource Pools list, respectively, displays.
-
Select one or more enabled resources or resource pools for this environment and then select OK.
The new Utility Resource tile now appears in the editor field.
-
-
To create additional environment topologies:
-
To add another cluster to a given environment, select the + inside the environment tile. Provide cluster details.
-
To create another environment tier, select the + under and outside of the environment tiles. Proceed by providing environment and tier details.
-
Mapping the microservice to an environment
For CloudBees CD/RO to correctly deploy the microservice, the microservice needs to be mapped to the environment that defines the cluster.
-
From the three-dot menu on the microservice tile, select Add mapping. A mapping arrow appears.
-
Drag the tip of the mapping arrow inside the cluster tile. The arrow connects with the cluster and establishes the mapping.
Configuring the application
CloudBees CD/RO creates three process steps, by default:
-
Retrieve Artifact step
-
Deploy Microservice step
-
Rollback Microservice step
Using the hierarchy navigation menu, select a microservice process to see these individual steps.
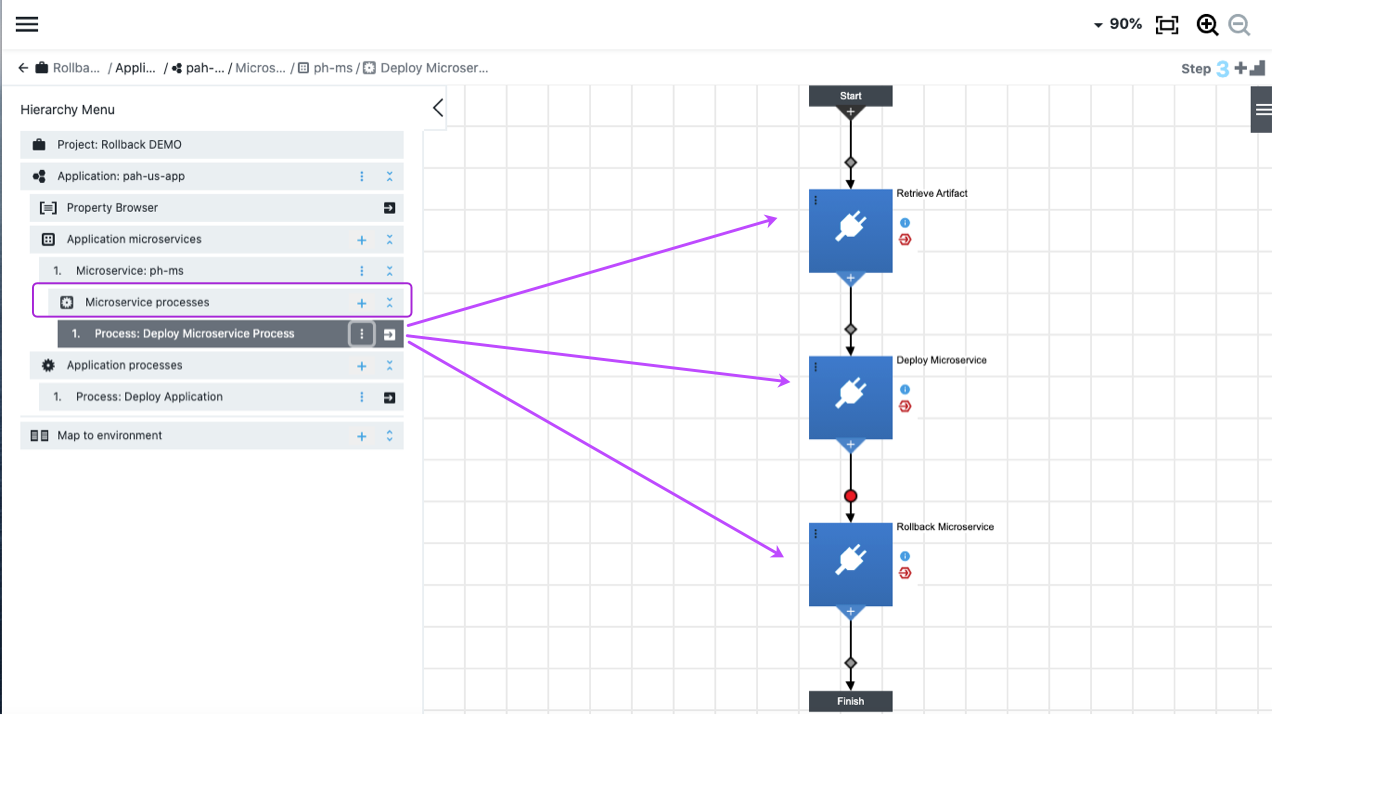
To configure an individual step, select Details from the three-dot menu in the upper left corner of the step tile. From here, you can define behavior on error, credentials, incoming conditions, and so on. See Process concepts for complete details about setting up your application processes.
Deploying the application
Once the application is created and configured, you can deploy it. Follow instructions here for information about deploying applications.
Additional considerations for Helm deployments
Microservice deployment uses the upgrade --install Helm command to support both fresh and upgrade deployments. Deployment parameters defined in the Additional options field at application create time is used to provide list of flags and options for the deployment command.
If automatic rollback is configured, the --atomic option is added to the deployment command.
Parameters are appended to the command in the following order, which means options that are appended later can override values set by previous options.
-
File containing list of values supplied with
Valuesparameter. -
Microservice definition configuration
Repository name,Repository credentials,Release name, andChart. -
Microservice definition
Additional options. -
Cluster definition
Namespaceparameter. -
Cluster definition
Kubeconfig Contextparameter.
Release manifests are parsed in order to get list of containers and other kubernetes resources that are deployed with this application. These containers and kubernetes resources are reported to the environment inventory.
Because different YAML libraries have different implementation of the YAML specification, some manifests accepted by Kubernetes may not be parsed. If you have warnings about a specific YAML file that has containers, and the chart is under your governance, you can provide proper formatting and linting for the chart template to fix parsing errors. For charts provided by a third party, file an issue with that provider.