You can use process branching to specify the path through an application or component process based on transition conditions other than out-of- the-box options. Decisions about the next step in the process are made while the process runs. This is similar to the transition conditions for workflows in the automation platform. If the application or component process applies to multiple use cases, you can design one process with two or more branches instead of designing multiple processes for each use case. You can also define steps that run in parallel.
For example, to install or upgrade software, you can define one process for multiple use cases and use the same steps except for the following:
-
The source files can be in .zip or .tar format. The steps to extract the files depend on the format.
-
The operating system can be Linux or Windows. The steps to download the files, install them on the server, and enter commands depend on the operating system.
CloudBees CD/RO supports the following branching conditions. The default is Always.
-
Completion status of the previous process step
-
A property set in another part of the system, not the in the previous step
-
Custom validation rules
Using Process Branching
You define process branching when authoring an application or component process.
Process Branching Example
This example shows an application process with process branching that deploys a .war file.
Combine the following two images and tables:
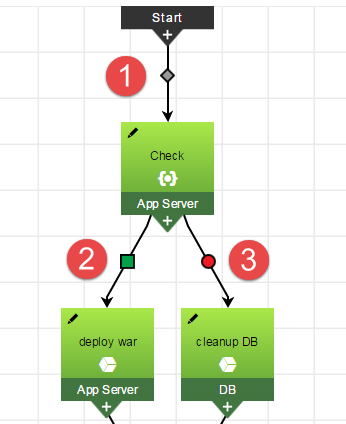
1 |
The branching condition is Always. |
2 |
The branching condition is Successful. If the Check step is run successfully, the next is the "deploy war" step . |
3 |
The branching condition is Failure. If the Check step is not run successfully, the application fails and the next step is to send an email to the administrator. |
The example has the following job-step branching dependencies:
| Source | Target | Branching Condition |
|---|---|---|
Check |
deploy war |
Successful |
Check |
cleanup DB |
Failure |
This example shows an application process with process branching. Get new image.
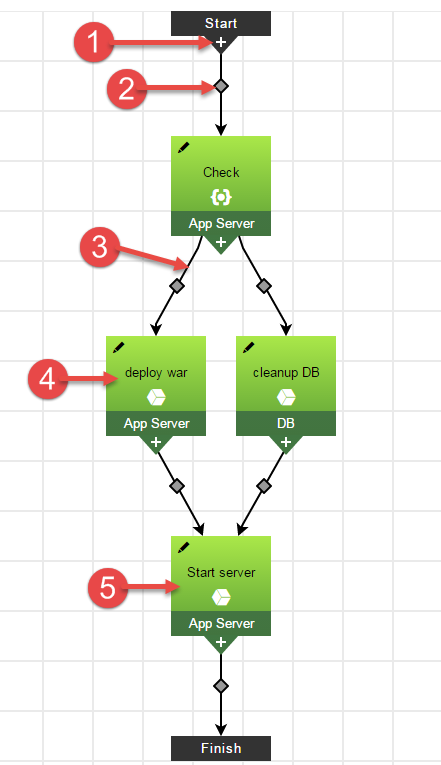
The process has these GUI objects:
1 |
Click the plus sign (+) to add a step after the selected step. |
2 |
Connector between two objects in the process. The default branching condition is Always. When you click the connector, the branching conditions menu opens. You can change the branching condition to:
|
3 |
Link between two steps in the process. The link goes from the source step to the target step. |
4 |
Source—The link starts at this step. The "deploy war" step is a source to the "Start server" step. |
5 |
Target—The link ends at this step. The "Start server" step is the target of the "deploy war" step. |
Clicking a connector in a link opens the branching conditions menu. Depending on the location of the connector, some or all of these options may be available (enabled):
-
Always –Always go to the next step, referred to as the target.
-
Successful –Go to the next step if the previous step, referred to as the source, is successful.
-
Failure –Go to the next step if the previous step fails.
-
Add Condition –Add a custom condition that must be met before going to the next step.
-
Add Connector –Add a connector from the source of the link to a new target by selecting one of the highlighted eligible steps. You can only select an eligible step.
-
Change Source –Change the source by selecting one of the highlighted eligible steps, which has a red outline. You can only select an eligible step.
-
Change Target –Change the target by selecting one of the highlighted eligible steps, which has a red outline. You can only select an eligible step.
-
Delete –Delete the selected connector and link.
When you select the connector between the Start step and first step after it, only some of conditions appear and only some are available. The condition between the Start and the next step is Always, the default branching condition.
When you select the connector between subsequent steps, all of the conditions are available.
Usage Guidelines
Follow these guidelines when the process includes process branching:
-
When you add a step, you must define it before adding another step.
-
You can only configure branching conditions on a connector between two process steps.
-
You cannot configure branching conditions between these objects:
-
The start of the process and the steps immediately after it.
-
The end of the process and the steps immediately before it.
-
-
When defining a step in an application or component process, you configure what CloudBees CD/RO does when an error occurs. This setting overrides any job-step-level branching condition.
You can select Stop running or Continue running in the On Error field in the Define Step dialog box. If an error occurs in a job step and Stop running is selected, CloudBees CD/RO aborts the process even if the branching condition is set to Failure.
Process Branching States and Conditions
State of the Branching Condition Connectors in the UI
In the CloudBees CD/RO UI, the status of the link is based on the shape and color of the connector.
| Shape | Color | Link Status |
|---|---|---|
Diamond |
Light gray |
Always |
Diamond |
Dark gray |
Disabled |
Square |
Green |
Successful |
Circle |
Red |
Failure |
Examples of Branching Conditions
These are examples of branching conditions that you can apply in your processes.
-
Based on the status of the previous step
Follow the branch based on the result of the previous step: Successful, Failure, or both (Always).
Example: Successful –If the file is downloaded successfully, the next step is to extract the files. Failure – If the file was not downloaded properly, the next step is to abort the process. * *Always —The next step is to always extract the files.
-
Based on a value of an operation during the step
Follow the branch that matches the result of an operation such as calculating a value or processing data during the step.
Example: The result of an operation is a file type. If the result is an XML zip file, the next step is open an XML text editor. If the result is a .htm file, open a web browser. ** If the result is a .mov file, open an application to play the movie.
-
Based on a property in another part of the system
Follow the branch based on a property set in another part of the system, not in the previous process step.
Example: If the property
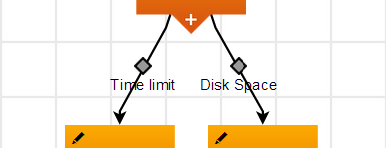
os_type = linuxis set on a resource, always follow the branch for Linux steps. If the propertyrelease_typeis set to minor in the application, always follow the branch for minor releases when running the process.
Custom Conditions in Process Branching
In a component or application process with branching, when you click the connector on a link between two steps, the Condition dialog box opens.
-
When you click the connector between the "Deploy War" and "Start Server" steps, these conditions appear:
-
Always –Always go to the next step, referred to as the target.
-
Successful –Go to the next step if the previous step, referred to as the source, is successful.
-
Failure –Go to the next step if the previous step fails.
-
Add Condition –Add a custom condition that must be met before going to the next step.
-
Add Connector –Add a connector from the source of the link to a new target by selecting one of the highlighted eligible steps. You can only select an eligible step.
-
Change Source –Change the source by selecting one of the highlighted eligible steps, which has a red outline. You can only select an eligible step.
-
Change Target –Change the target by selecting one of the highlighted eligible steps, which has a red outline. You can only select an eligible step.
-
Delete –Delete the selected connector and link.
-
When you configure a Property based condition, the fields in the Condition dialog box remain the same.
-
When you configure a Custom condition, the fields change. The property picker becomes available to you from the
 button.
After you configure your conditions, they appear near the affected connectors in the process.