Every company wants to make their software delivery processes as efficient as possible. To this end, native CI integration seamlessly provides CI job and build data access within CloudBees CD/RO. Tasks provided with this integration include:
-
Defining a CloudBees CD/RO pipeline task that triggers a CI job. See Triggering CI jobs.
-
Triggering a CloudBees CD/RO pipeline either as a post-build action from the CI job or as a pipeline task in a CI pipeline. See Triggering CloudBees CD/RO pipelines.
-
Sending Jenkins job or pipeline run information to CloudBees CD/RO pipelines. See Viewing pipeline build data.
Triggering CI jobs
CI jobs are triggered from CloudBees CD/RO pipelines via pipeline CI Job tasks. After one-time CI controller configuration, they become available to your pipeline tasks. Define the CI Job task to access the desired controller when creating your CloudBees CD/RO pipeline.
Defining the CloudBees CI Job task
Define a CloudBees CD/RO pipeline task as a CI Job specifying the CI configuration and other details about the CI job. See Pipeline Tasks for general information about creating tasks. The steps below show creating a task with type CI Job in an existing CloudBees CD/RO pipeline.
|
If you have upgraded to CloudBees CD/RO v10.1 from v10.0.x, your CloudBees CI operations center configurations may need to be reworked.
In order to maintain pre-v10.1 runtime compatibility, the v10.1 upgrade process modifies CloudBees CI operations center URLs in existing configurations by hardcoding the |
-
Create a new task in the CloudBees CD/RO pipeline stage.
-
Select Select Task Type in the New Task tile and choose CI Job from the Native list.
-
Back in the New Task tile, select Define, the Edit Task dialog displays.
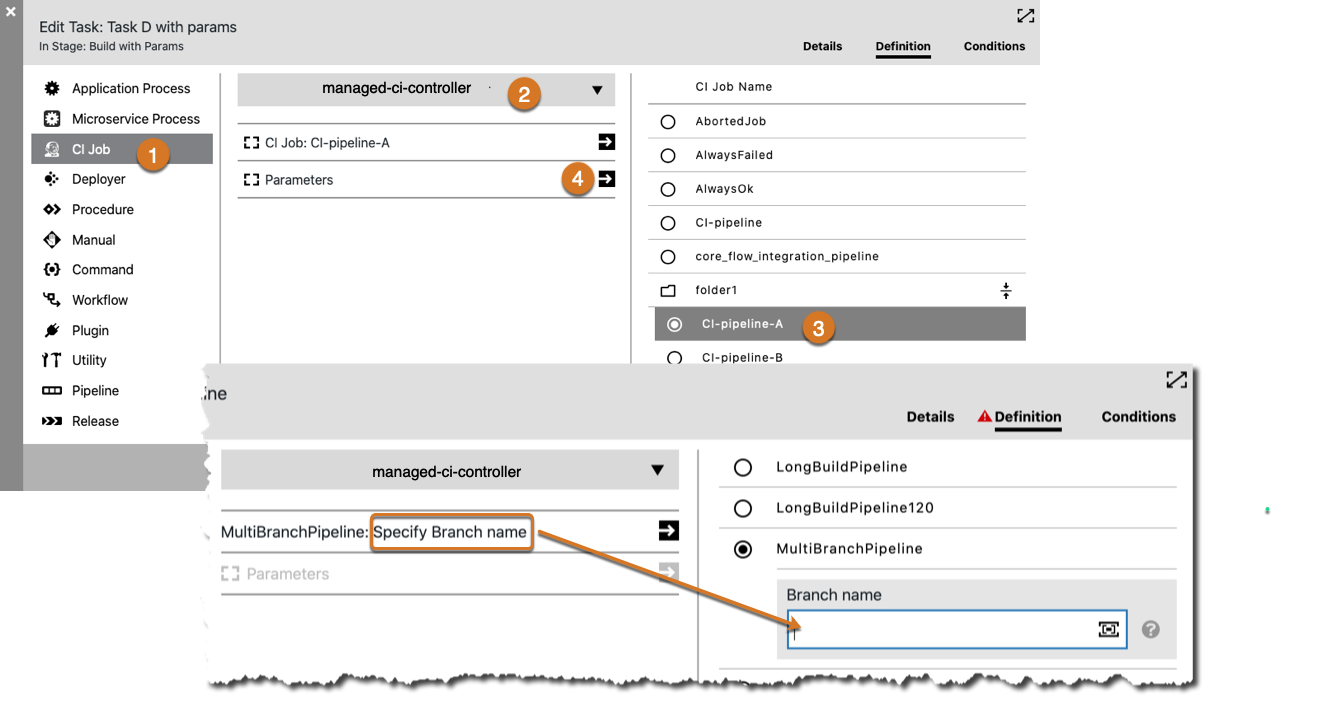
1
Select CI Job
2
Choose the CI controller configuration or CloudBees CI operations center configuration you previously created. Here,
managed-ci-controlleris selected.3
The CI Job Name column is automatically populated with jobs and folders already defined in the selected CI configuration or selected CloudBees CI operations center configuration. Here CI-pipeline-A from folder1 is selected.
If the selected CI job is configured with multiple branches, you must select a branch name that is already defined for that job. Branch name can be:
-
A case-sensitive string: special characters, including
/, are accepted. -
A parameter specified with the
$[]construct: the property is expanded at pipeline task run time to resolve the branch name.
4
If the selected CI job name defines parameters, the Parameters line is active. Click the arrow to see the list of parameters for the selected job.
From here, enter values for the parameters. They are passed to the CI job next time the CloudBees CD/RO pipeline is run.
-
Configure with the API
To define a CI job via the CloudBees CD/RO API, see the createTask command.
Configuring CI controllers
One-time setup on CloudBees CD/RO: configure connections to individual CI controllers and optionally, CloudBees CI operations centers. This provides CloudBees CD/RO the ability to call CI jobs managed by the controllers as if they are native, where job data and parameters from CI are automatically populated into CloudBees CD/RO.
-
On the CloudBees CD/RO main menu, select .
-
Select CI configurations from the left-hand menu to display the CI configuration list.
-
Select New. From here, create a new configuration or copy an existing one.
By default, a
CI controllerconfiguration is created.If the selected Type is
CloudBees CI operations center, check whether you want to use this operations center as the default. If checked and a default is already configured, it is replaced by this one. All CI controllers in that operations center are automatically discovered and populated into the configuration list.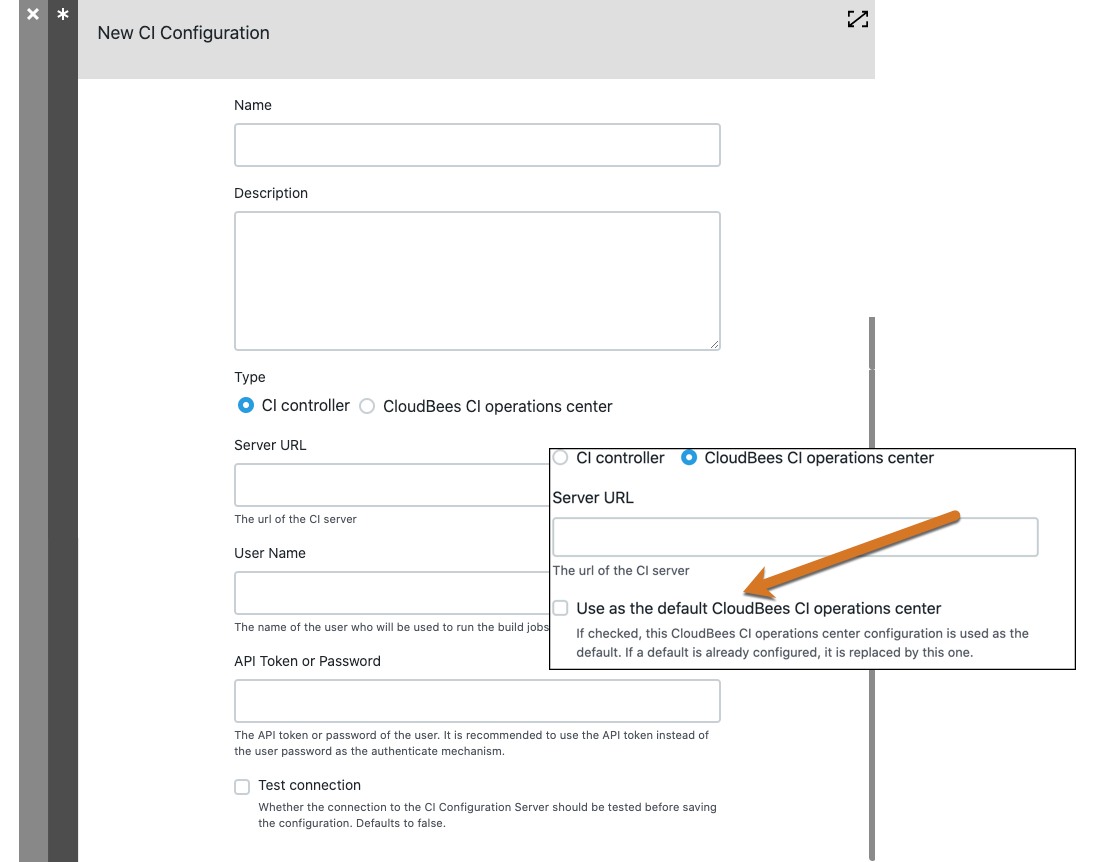
-
Under Credential type select either Local credential or External credential.
-
For a local credential, type the user name and API token or password.
-
For an external credential, select the credential project to use, and then the credential you want to use.
-
-
Optionally, select the option to test the connection to the CI configuration server.
-
Select OK when finished.
-
If the new configuration is for a CloudBees CI operations center:
-
Expand the list to discover all individual CI controllers.
-
Navigating into the list, select Copy for the controller you wish to move into the CI configurations list.
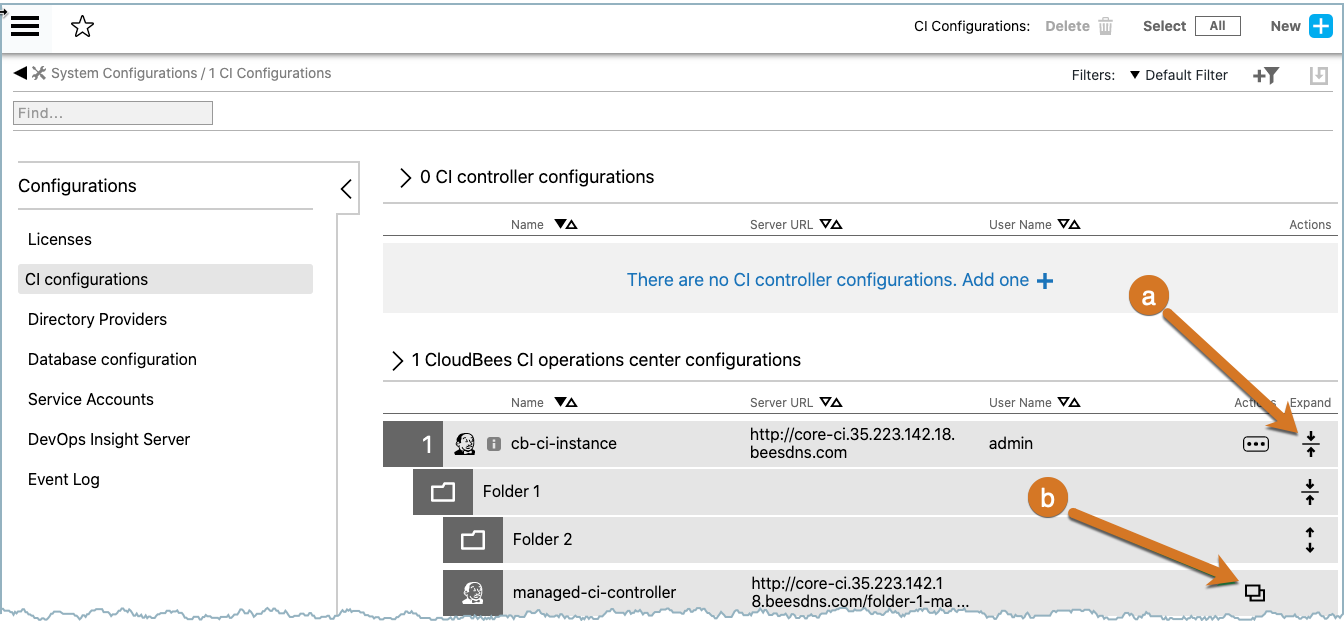
A New CI configuration dialog displays for that controller. Since Reuse the same credentials from the Operation Center CI Configuration is checked, the configuration pre-populates with sign-in credentials. Select OK to save.
-
Whether added directly or selected from a CloudBees CI operations center, the new configuration is added to the CI controller configurations list and is available for CI Job tasks in CloudBees CD/RO pipelines.
Configure with the API
To configure a CI controller via the CloudBees CD/RO API, see CI configuration commands.
Triggering CloudBees CD/RO pipelines
Using the CloudBees CD/RO Jenkins plugin, CI jobs can be configured to trigger a CloudBees CD/RO pipeline either as a post-build action from the CI job or as a pipeline task in a CI pipeline. In addition, the CI job can be configured to send job or pipeline build details to the CloudBees CD/RO pipeline.
Viewing pipeline build data
-
Build details for CI jobs triggered by CloudBees CD/RO is sent back after the job completes. To view the information:
-
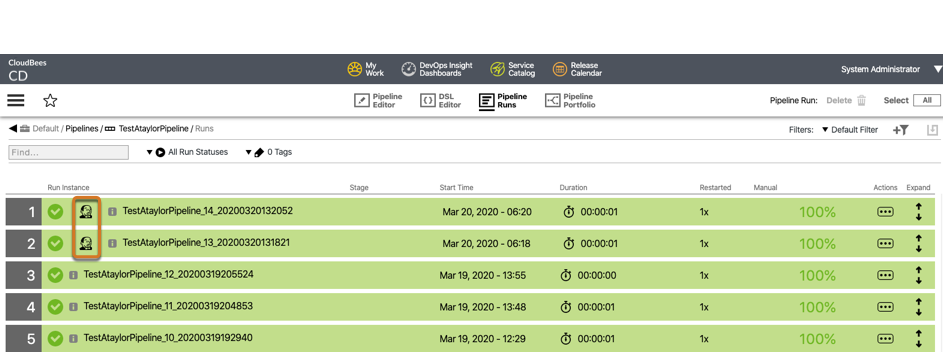
Navigate to the pipeline run of interest on the Pipeline Runs list.
-
Expand the run via expand icon on the right of the list entry to see the underlying stages.
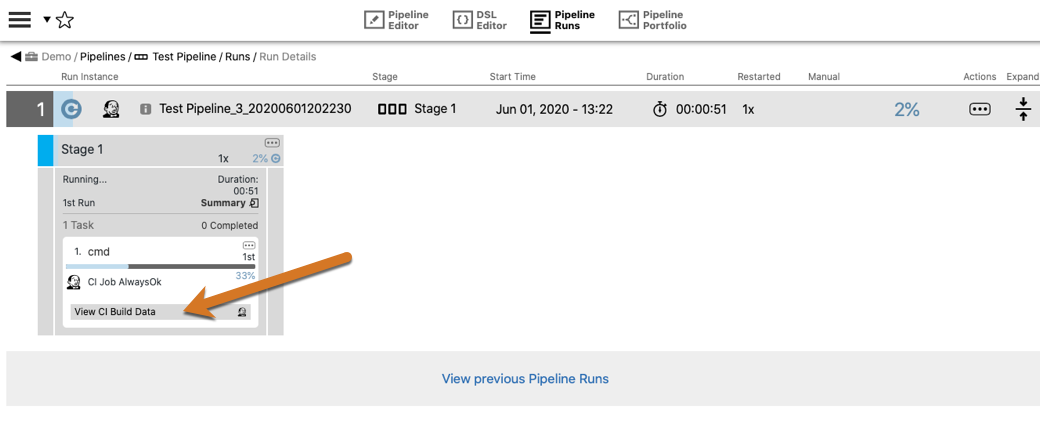
-
Click the View CI Build Data button.
-
-
Build Data for CloudBees CD/RO pipelines triggered by CI are denoted on the Pipeline Runs list with the Jenkins logo, as indicated in pipelines #1 and #2 below.
To view the information sent by the post-build action from the CI process: . Select the Jenkins logo on the CloudBees CD/RO Pipeline Runs list entry. The Jenkins Build Data screen appears. . Select the Details icon on the right of build entry.
Build data console UI
The console output summary for the CI job appears as shown below.

Also on this screen are tabs for Build Artifacts and Test Results.

Via the API
Use the getCIBuildDetail command to programmatically get build details.
Known limitations
This section describes situations to be aware of when calling CI jobs from CloudBees CD/RO.
Infinite triggering loop
Care must be taken so that a given CloudBees CD/RO job doesn’t invoke a CI job having a post-build action that triggers the same CloudBees CD/RO pipeline; otherwise, an infinite triggering loop ensues.