Use CloudBees CD/RO procedure management features to configure procedure components.
Accessing procedures
-
From the CloudBees CD/RO UI, browse to
https://<cloudbees-cd-server>/and select from the main menu. -
From the CloudBees CD/RO Flow UI, browse to
https://<cloudbees-cd-server>/flow/and select from the main menu. -
From the Automation Platform UI, browse to
https://<cloudbees-flow-server>/commander/and select Projects from the main menu. Locate the project of interest from the project list. Select the link in the Procedures column to get the list of procedures for that project.
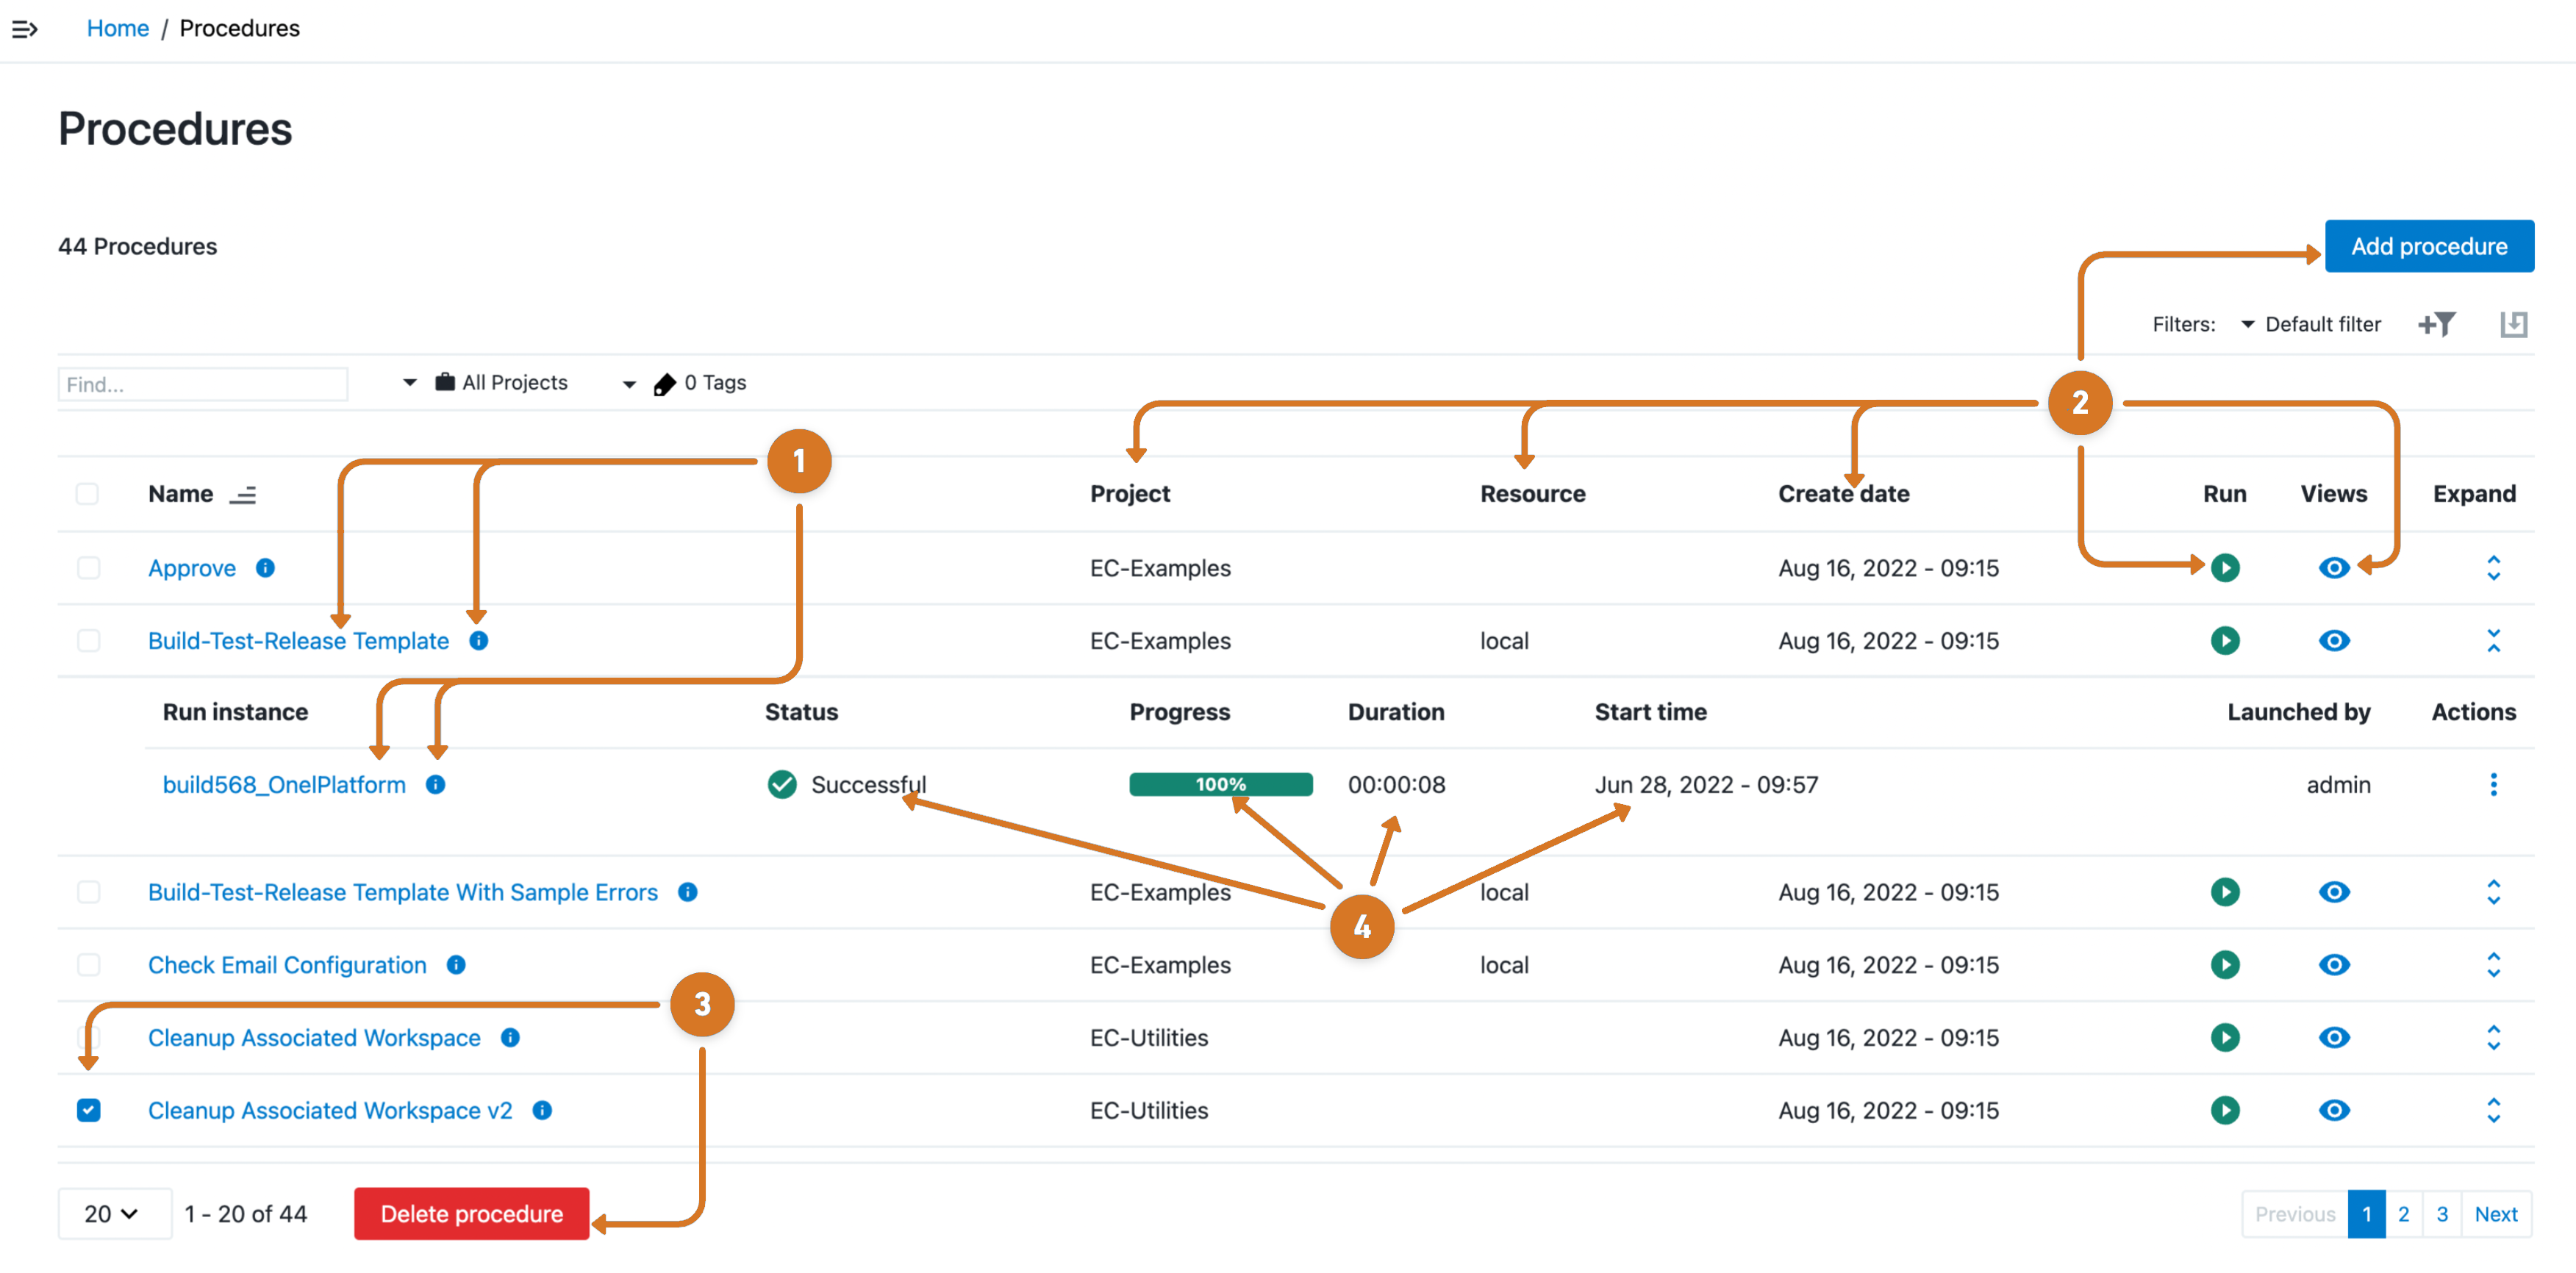
Use the information detailed below to view and manage procedure settings.

| 1 | Reconfigure a procedure
or run instance.
|
| 2 | Manage procedures data.
|
| 3 | Remove a procedure by:
|
| 4 | Use this data to monitor run instance progression and status. |
Modifying procedures
You can access the Procedure editor using one of the following methods:
-
Select the
procedure namelink on the Procedures page. -
Select
Procedure editorfrom the view menu on the Procedures page.
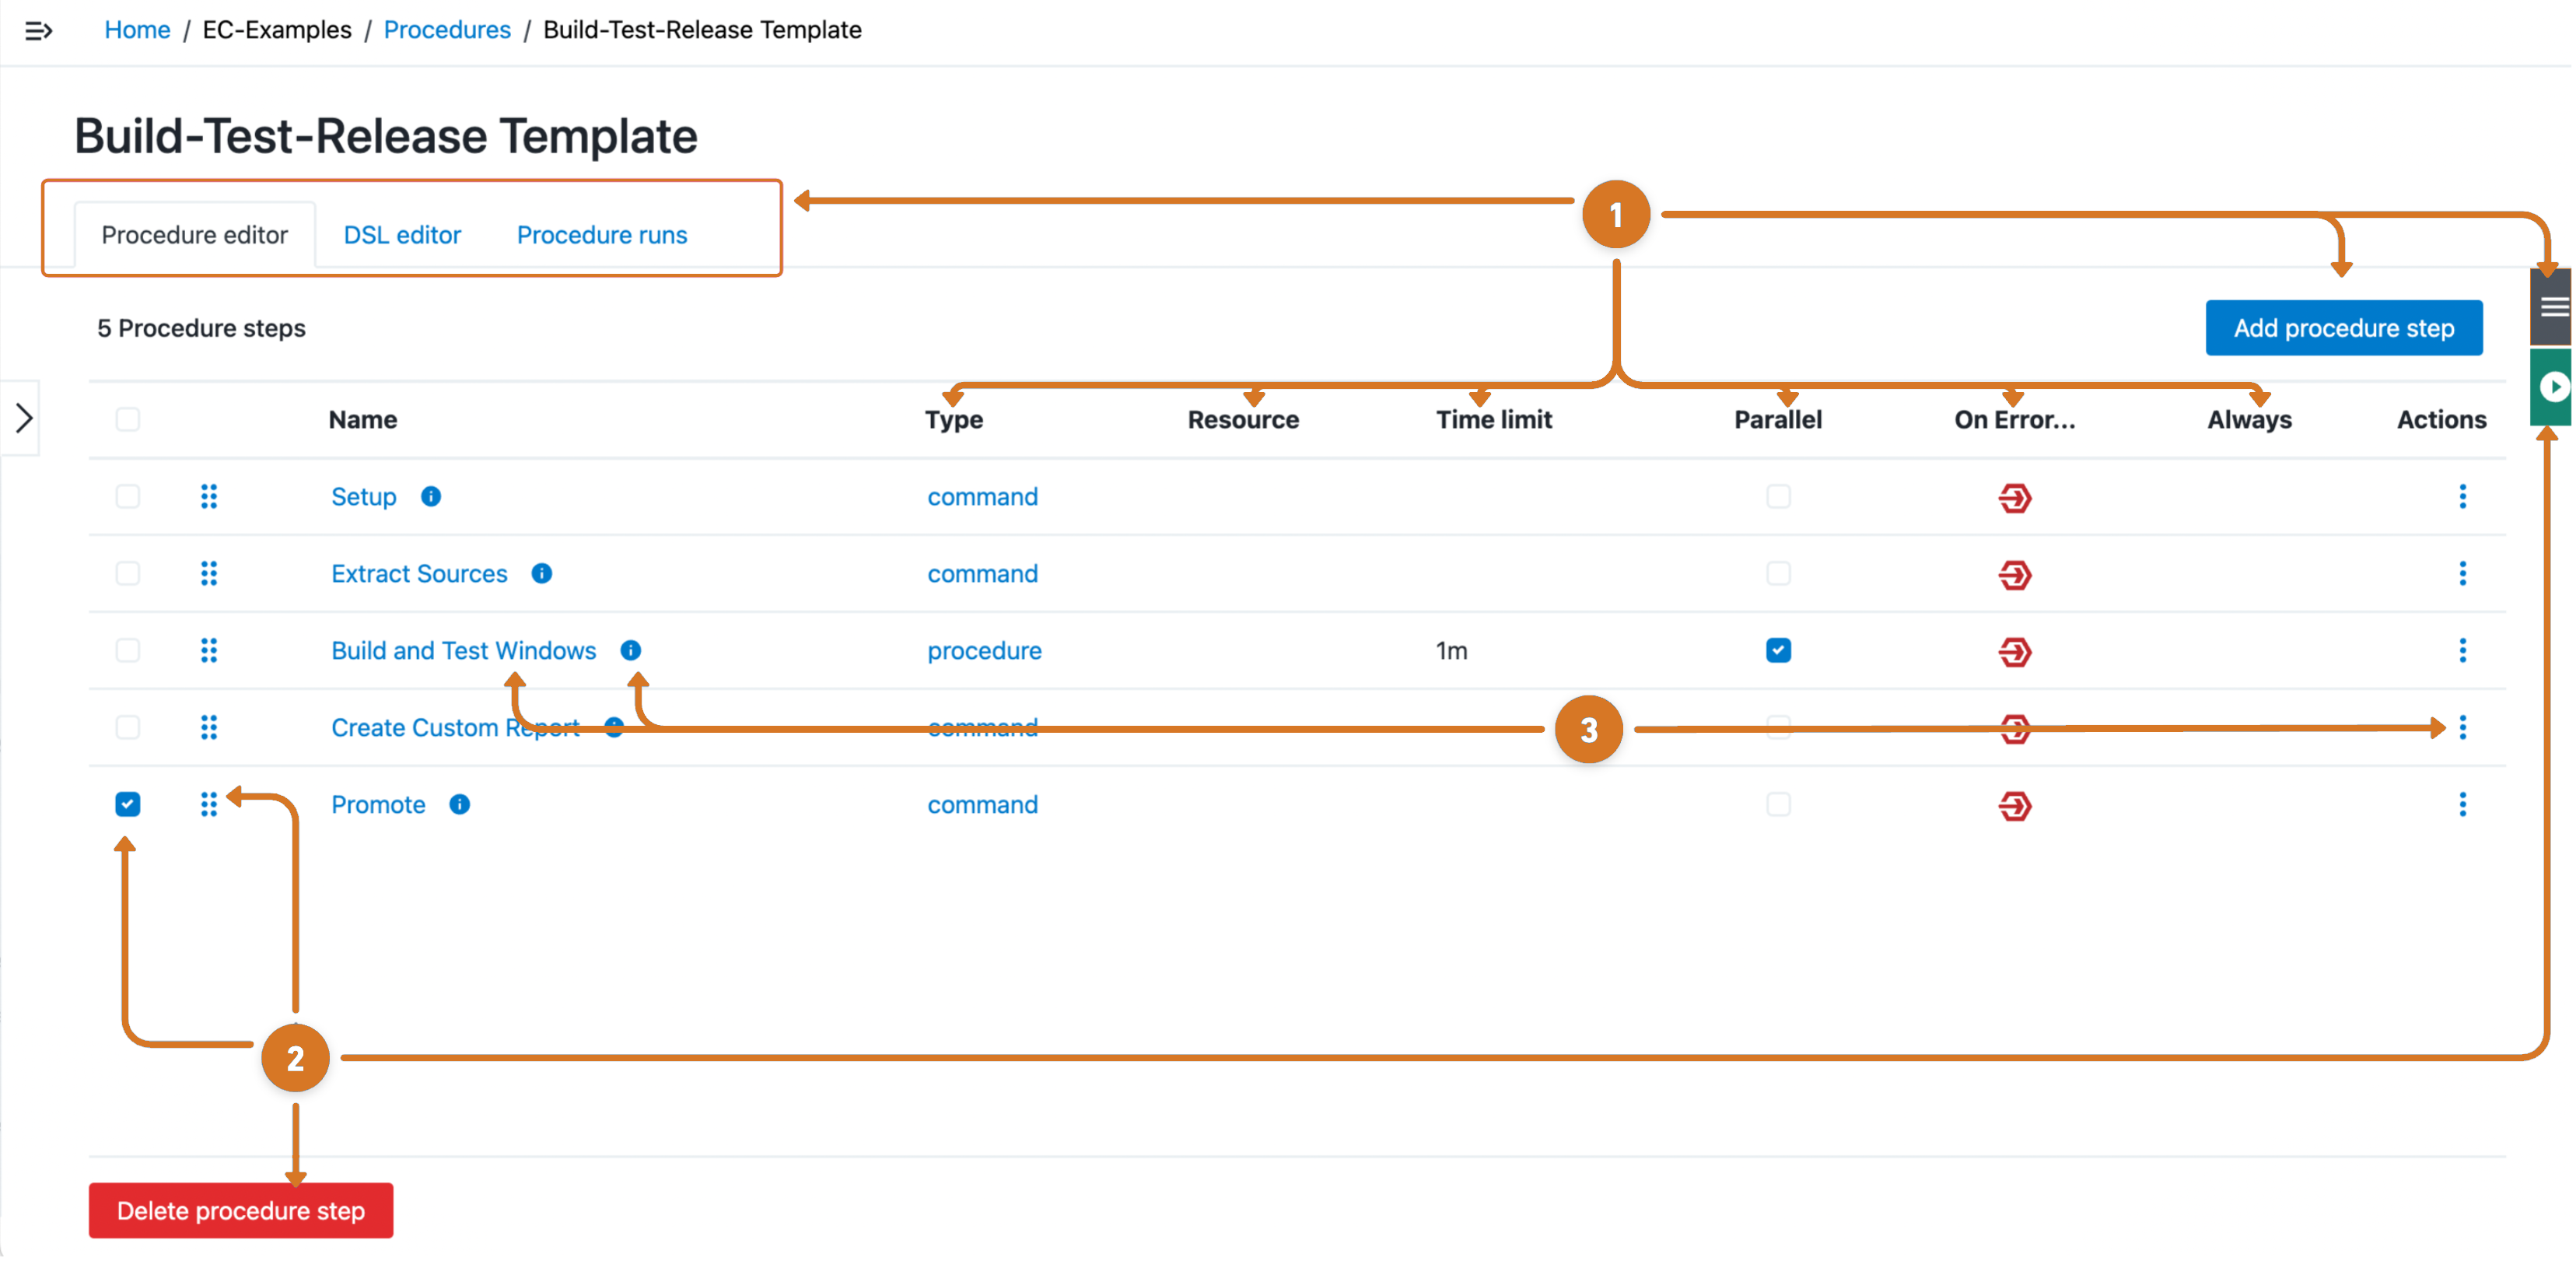
Use the information detailed below to view and manage procedure settings.

| 1 | Manage the procedure.
|
| 2 | Modify procedures steps.
|
| 3 | Edit step attributes by selecting the step name,
|
Creating a new step
|
Select |
The following list describes some of the more common steps that you can create.
-
Command —Takes you directly to the New Step page to write your own step.
A Command(s) text box is available to add a script. This step invokes a
bat,cmd,shell, Perl script, or similar. -
Subprocedure —The Choose Subprocedure Step dialog is displayed, allowing you to select a project or plugin from which you want to call an existing procedure to create a step.
This step invokes another CloudBees CD/RO procedure and will not complete until all subprocedure steps have finished.
-
Plugin —Opens the Choose Step panel. The left pane displays plugin categories, and the right pane displays available pre-configured steps for your left-pane selection.
To quickly find your application or plugin , type your selection name in the Search box. Select the step you want to create and CloudBees CD/RO takes you to the New Steps page.
-
On the New Step page, notice that the plugin step you selected is already displayed in the Subprocedure section.
-
Enter information in the Parameters section fields.
These fields are specific to the plugin you chose and are different for each plugin.
Enter information in any remaining fields to complete your step. See the New Step Help topic for more information.
A note about plugins
CloudBees CD/RO uses plugins to integrate source control systems (such as Subversion or Perforce), defect tracking applications (such as JIRA or MKS), reporting functionality, code analysis applications, build applications, and much more. To see the complete list of plugins bundled and installed with CloudBees CD/RO, see the Plugin Manager page (go to Administration > Plugins ).
| If you do not see the SCM system or defect tracking system you prefer, a Plugin Catalog is available from the Plugin Manager also. All plugins in the catalog are available for installation into CloudBees CD/RO. |
Parameters
Each procedure can define parameters, which are values provided to the procedure when it is invoked. Each parameter value is placed in a property associated with the job and the procedure can use the property to control its execution. For example, a parameter might specify a particular branch of a product to build; another parameter might indicate whether unit tests should be run during this build.
When you define a parameter, indicate whether the parameter is required (meaning the procedure will not run unless a value is provided for the parameter). Also, you can provide a default parameter value and a description to help callers understand how to use the parameter.
-
Click the Create Parameter link to go to the New Parameter page.
-
Or click the name of the parameter to edit its contents.
Output parameters
Each procedure can output parameters, which are values provided by the procedure during runtime. Each formal parameter value is placed in a property associated with the job. Procedures (as well as plugins and processes) in CloudBees CD/RO will generate output properties at runtime that can then be used in various ways in other places (such as for reporting, as input to other processes, or used in conditions or gates).
This functionality lets you easily determine what properties are generated by a process or procedure in order to use them. With output parameters defined at the procedure (or process) level, you do not need to look at the script under each step to determine what output properties will be created when the procedure is run. Creating output parameters is easier than running the process and then inspecting the output properties and values, reading through the plugin code to find the output properties, or reading the plugin documentation.
Output parameters and the property picker
Output parameters are available through a property picker in the UI to simplify how you use the output of a job or pipeline run in a different job or task execution. You can use the Property Picker to browse and select properties and see the absolute path for that property to be inserted. Intrinsic properties are included, which is helpful for writing conditions (or any other places where properties are referenced).
Usage scenarios for output parameters
The following scenarios provide examples of how output parameters are useful.
-
I wrote a procedure that creates a number of properties in property sheets that will be used in a later job creating a report. When writing the report procedure, I do not remember the exact name of property sheets and hierarchy that I am creating. I have to go back to the procedure code to copy and paste the names.
-
I am calling a plugin to run a set of tests from my pipeline task. In the automated exit gate condition, now I need to reference the result property generated by the plugin but do not know its name or how or where it is stored.
-
I am calling a common utility procedure written by other team members and need to use the output values.
Declaring an output parameter
Before you can use an output parameter with a runtime object (a pipeline, job, or deployment), you must declare it. You do this at the object level—for example, at the pipeline level.
To declare an output parameter:
-
Open the object in the CloudBees CD/RO Deploy UI.
-
Choose Parameters from the right-hand menu:
-
Enter a name and (optionally) a description for the parameter.
-
Click OK to save the parameter.
Creating or editing an output parameter
When you define a formal output parameter, you must indicate whether the parameter is required (meaning if the procedure will not run unless a value is provided for the parameter). Also, you can provide a default parameter value and a description to help callers understand how to use the parameter.
There are several ways to define or edit an output parameter as described below:
-
Click the Create Output Parameter link to go to the New Output Parameter page.
-
Click the name of the parameter to go to the Edit Output Parameter page to edit its contents.
-
Set the value of an output parameter by using the
setOutputParameterAPI command. The following DSL code provides an example:project "Test",{ procedure "Test",{ formalOutputParameter "param1" step "Test", command: 'ectool setOutputParameter param1 "output value 1"' } }For details about using the
setOutputParametercommand and other commands related to output parameters, refer to Parameter. -
Set the value of an output parameter in a command task in a pipeline.
| Adding output parameters to runtime objects lets you capture their data for sending to CloudBees Analytics. In this way, output parameters provide an extensible mechanism for adding fields for runtime objects to a CloudBees Analytics report. This data is sent in the same payload that is normally sent by CloudBees CD/RO. For details about using output parameters in CloudBees Analytics reports, refer to Creating a report. |
Creating email notifiers
Use the Create On Start Email Notifier or Create On Completion Email Notifier links to go to one of the respective pages to create an email notifier for this procedure. After creating an email notifier, click the "bread crumb" link at the top of the page to return to the Procedure Details page.
Adding custom procedure properties
-
To add new properties to this procedure, click the Create Property, Created Nested Sheet, or Access Control links.
-
Click the Property Name to edit its contents.
-
Nested property sheets appear in this table preceded by a folder icon.
| To rename this procedure or change its description, click the Edit link at the top of the page. |