How to configure CloudBees CD/RO for very large Helm deployments
A very large Helm deployment of CloudBees CD/RO is:
-
~ 100K jobs per day
-
~ 2000 running pipelines per day
-
~ 5M job steps per day
Active customers and partners can refer to the CloudBees CD/RO Level 2: Helm for Very Large Kubernetes Deployments training course for details.
The following tables summarize the changes to the default Helm chart for very large deployments:
CloudBees CD/RO server values
For the default CloudBees CD/RO Helm charts, refer to CloudBees CD/RO server values. You can find these cloudbees-flow values referenced in the values.yaml under the Flow server configuration section.
| Name | Value |
|---|---|
server.replicas |
4 |
server.ecconfigure |
"--serverInitMemory=70 --serverMaxMemory=85" |
server.resources.limits.cpu |
16 |
server.resources.limits.memory |
128Gi |
server.resources.requests.cpu |
4 |
server.resources.requests.memory |
16Gi |
CloudBees CD/RO web server values
For the default CloudBees CD/RO Helm charts, refer to CloudBees CD/RO web server values. You can find these cloudbees-flow values referenced in the values.yaml under the Flow web server configuration section.
| Name | Value |
|---|---|
web.replicas |
2 |
Repository values
For the default CloudBees CD/RO Helm charts, refer to Repository values. You can find these cloudbees-flow values referenced in the values.yaml under the Flow repository configuration section.
| Name | Value |
|---|---|
repository.resources.requests.memory |
768Mi |
CloudBees Analytics server values
For the default CloudBees CD/RO Helm charts, refer to CloudBees Analytics server values. You can find these cloudbees-flow values referenced in the values.yaml under the Flow DevOps Insight configuration section.
| Name | Value |
|---|---|
dois.replicas |
3 |
dois.esMinMasterNodes |
2 |
dois.esRam |
8192 |
dois.lsMaxRam |
2048 |
dois.resources.limits.cpu |
4 |
dois.resources.limits.memory |
16Gi |
dois.resources.requests.cpu |
4 |
dois.resources.requests.memory |
16Gi |
CloudBees CD/RO agent values
For the default CloudBees CD/RO Helm charts, refer to CloudBees CD/RO agent configuration values You can find these cloudbees-flow-agent values referenced in the agent values.yaml.
| Name | Value |
|---|---|
replicas |
2 |
How to configure load balancing with ingress
For the default CloudBees CD/RO Helm charts, refer to Ingress values. You can find these cloudbees-flow values referenced in the values.yaml under the Flow ingress configuration section.
|
An ingress controller typically does not eliminate the need for an external load balancer but adds a layer of routing and control behind the load balancer. However, you can configure the ingress controller so all service endpoints, such as web, server, and repository, may be exposed from the same domain name and load balancer endpoint. CloudBees recommends configuring your ingress controller so all CloudBees CD/RO services can be exposed through a single load balancer. |
By default, ingress is enabled in the CloudBees CD/RO chart. The following is a summary of the settings:
To run CloudBees CD/RO with Kubernetes 1.22 and later, you must use the ingress-nginx controller with the following required settings:
-
ingress-nginx.enabled=true -
ingress.class=nginx -
nginx-ingress.enabled=false
Kubernetes versions 1.21 and earlier
nginx-ingress.controller.ingressClass |
Default: |
nginx-ingress.controller.publishService.enabled |
Default: |
nginx-ingress.controller.scope.enabled |
Default: |
nginx-ingress.enabled |
Default: |
nginx-ingress.tcp.61613 |
CloudBees CD/RO server Default: |
nginx-ingress.tcp.8200 |
CloudBees CD/RO repository Default: |
nginx-ingress.tcp.8443 |
CloudBees CD/RO web server Default: {{ .Release.Namespace }}/flow-server:8443 |
nginx-ingress.tcp.9200 |
CloudBees Analytics Elasticsearch database Default: |
nginx-ingress.tcp.9500 |
CloudBees Analytics server Default: |
Kubernetes versions 1.22 and later
ingress-nginx.controller.ingressClass |
Default: |
ingress-nginx.controller.publishService.enabled |
Default: |
ingress-nginx.controller.scope.enabled |
Default: |
ingress-nginx.enabled |
Default: |
ingress-nginx.tcp.61613 |
CloudBees CD/RO server Default: |
ingress-nginx.tcp.8200 |
CloudBees CD/RO repository Default: |
ingress-nginx.tcp.8443 |
CloudBees CD/RO web server Default: |
ingress-nginx.tcp.9200 |
CloudBees Analytics Elasticsearch database Default: |
ingress-nginx.tcp.9500 |
CloudBees Analytics server Default: |
How to install CloudBees CD/RO on Kubernetes using an existing database
You can install CloudBees CD/RO using your existing database, if you are:
-
Performing an initial installation of CloudBees CD/RO.
-
Migrating from a traditional CloudBees CD/RO installation to Kubernetes.
-
Spinning up an additional testing or production environment.
-
Upgrading between CloudBees CD/RO versions.
The procedures to install your existing database with CloudBees CD/RO are nearly the same for each of these scenarios. However, if this is your initial installation, it may be easier to install CloudBees CD/RO using the instructions found in Install CloudBees CD/RO production server, and then update your installation with the steps listed here.
| If you only want to find the values needed to configure your existing database as part of the Helm chart customization process, you can also refer to Database values. |
Before you start
-
Ensure the CloudBees CD/RO version you are installing or upgrading to supports the database you want to integrate. For more information on which databases are supported by each CloudBees CD/RO release, refer to Supported platforms for CloudBees CD/RO on Kubernetes.
-
Always make backups of your project-specific resources prior to installing or upgrading your CloudBees CD/RO version. These backups may be vital to recovering your data if critical errors occur during upgrades.
-
Always perform adequate and thorough testing in a development environment before releasing any version installation or upgrade into your production environment.
-
To see an example of a complete CloudBees CD/RO installation (not upgrade) using an existing database, refer to Example installation of CloudBees CD/RO using an existing database.
If you do not already have a myvalues.yaml, refer to CloudBees CD/RO default Helm charts to set yours up before continuing these steps.
|
Installing CloudBees CD/RO with your existing database
To install your existing database:
-
Make backups of your deployment and database. These backups may be necessary to recover data if critical errors occurs during the upgrade process.
-
Set the variables for the current release’s name, its namespace, and version you want to install/upgrade to:
releaseName="<your-current-release>" namespace="<your-current-release-namespace>" # Example upgradeVersion value: "2.21.0" upgradeVersion="<version-of-upgrade-release>" -
Save the values from your current release to a values file by running:
helm get values $releaseName --namespace $namespace > old-values.yamlIf this is your initial installation, this step is not needed, you can continue and use the same steps for your myvalues.yamlas described forold-values.yaml. -
Ensure your
old-values.yamlcontains values, or set the values, for the following parameters:-
database.externalEndpoint -
database.dbPort -
database.dbType -
database.dbName -
database.dbUser -
database.dbPassword -
flowLicense -
flowCredentials.adminPasswordWhen using the helm installcommand, you can use the--setoption to specify these values.
-
-
If your
old-values.yamluses theimages.tag, you must update it with the image tag of the new CloudBees CD/RO release you want to upgrade to.If this is your initial installation, and you downloaded the latest version of the values file from SonaType Nexus, your values file already contains this information unless you removed it during customization. If you do not update the images.tagor update it with an incorrect value, your installation/upgrade will not succeed.
After you have performed these steps, set any additional values you need in your old-values.yaml for the CloudBees CD/RO installation. For more information refer to Configuring Helm charts.
| Once you have your values file ready for installation, ensure the network connection between your database instance and Kubernetes cluster is active before continuing. |
Next, you need your flow-server passkey and keystore files from your existing CloudBees CD/RO installation and to convert them to base64 format:
-
Copy and save your
flow-serverpasskey:# Get the flow-server pod name cdServerPod=$(kubectl get pod -l app=flow-server -o \ jsonpath='{.items[*].metadata.name}' -n $namespace); echo $cdServerPod # Get the passkey file name passkey=$(kubectl -n $namespace exec $cdServerPod -- ls /tmp/ | grep passkey); echo $passkey # Copy the passkey file from the flow-server pod to the local machine kubectl -n $namespace cp $cdServerPod:/tmp/$passkey ./passkey # Ensure the passkey file has been copied ls -l | grep passkey -
Convert your passkey to
base64format:base64 -i passkey -o passkey.b64 -
Copy and store the
flow-serverkeystore files:# Get the keystore file name keystore=$(kubectl -n $namespace exec $cdServerPod -- ls /tmp/ | grep keystore); echo $keystore # Copy the keystore file from flow-server pod to your local machine kubectl -n $namespace cp $cdServerPod:/tmp/$keystore ./keystore # Ensure the keystore file has been copied ls -l | grep keystore -
Convert your keystore to
base64format:base64 -i keystore -o keystore.b64 -
Install CloudBees CD/RO using your
old-values.yaml, passkey, keystore, andlicense.xml(if required):helm install $releaseName cloudbees/cloudbees-flow --namespace $namespace \ --values old-values.yaml \ --set-file server.customConfig.passkey\\.b64=passkey.b64 \ --set-file server.customConfig.keystore\\.b64=keystore.b64 \ # Helm upgrades exit when all tasks are complete, regardless of timeout. # However, if your database is very large, the timeout may need to be increased to prevent returning a FAILED status. # For instance: --timeout 10800s --timeout 4200s \ # If required include your license.xml --set-file flowLicense.licenseData=license.xmlIf you are installing a CloudBees CD/RO instance with an external database, do not use the --waitoption. Theflow-server-init-jobcannot be started if--waitis used.
Example installation of CloudBees CD/RO using an existing database
For your reference, the following shows a complete installation example of CloudBees CD/RO using an existing database:
Example CloudBees CD/RO installation using existing database
dbType=sqlserver dbEndpoint=mssql.k8s.xyz dbPort=1433 dbUser=dbadmin dbPass=mySecretDbPassword dbName=myexistingdb flowPassword=mySecretFlowPassword doisPassword=mySecretDoisPassword licenseFile=path/to/license.xml passkeyFile=path/to/passkey keystoreFile=path/to/keystore storageClass=nfs-client hostname=flow-server.k8s.xyz namespace=test-existing-db release=cloudbees-flow releaseVersion=2.21 base64 -i $passkeyFile -o passkey.b64 base64 -i $keystoreFile -o keystore.b64 kubectl create namespace $namespace kubectl -n $namespace create secret \ generic $release-cloudbees-flow-credentials \ --from-literal CBF_SERVER_ADMIN_PASSWORD=$flowPassword kubectl -n $namespace create secret \ generic $release-cloudbees-flow-dois \ --from-literal CBF_DOIS_ADMIN_PASSWORD=$flowPassword \ --from-literal CBF_DOIS_PASSWORD=$doisPassword helm repo add cloudbees https://charts.cloudbees.com/public/cloudbees helm repo update helm search repo cloudbees/cloudbees-flow --versions helm install $release cloudbees/cloudbees-flow --version $releaseVersion \ --namespace $namespace \ --set storage.volumes.serverPlugins.storageClass=$storageClass \ --set storage.volumes.repositoryStorage.storageClass=$storageClass \ --set storage.volumes.doisStorage.storageClass=$storageClass \ --set database.externalEndpoint=$dbEndpoint \ --set database.dbPort=$dbPort \ --set database.dbType=$dbType \ --set database.dbName=$dbName \ --set database.dbUser=$dbUser \ --set database.dbPassword=$dbPass \ --set flowCredentials.existingSecret=$release-cloudbees-flow-credentials \ --set dois.credentials.existingSecret=$release-cloudbees-flow-dois \ --set serverName=$hostname \ --set ingress.host=$hostname \ --set ingress.class=$release-nginx \ --set ingress-nginx.controller.ingressClassResource.name=$release-nginx \ --set ingress-nginx.controller.ingressClassResource.enabled=true \ --set ingress-nginx.controller.ingressClassResource.default=false \ --set ingress-nginx.controller.ingressClassResource.controllerValue="k8s.io/$release-ingress-nginx" \ --set-file flowLicense.licenseData=$licenseFile \ --set-file server.customConfig.passkey\\.b64=passkey.b64 \ --set-file server.customConfig.keystore\\.b64=keystore.b64 \ --timeout 4200s
How to install custom ingress controllers with CloudBees CD/RO
To configure CloudBees CD/RO to use your custom or existing ingress controller:
-
Configure your ingress controller manifest to expose the following required TCP ports:
-
TCP port
8200is required byflow-repository. -
TCP ports
8443and61613are required byflow-server. -
(Optional) If you are using CloudBees Analytics, TCP ports
9200and9500are required byflow-devopsinsight.If you need help configuring the ingress controller manifest, refer to Exposing TCP and UDP services in the NGINX Ingress Controller documentation. Ensure you follow the example for TCP/UDP proxy support.
-
-
Update your
myvalues.yamlwith your custom ingress controller values:ingress: enabled: true host: <your-host> annotations: <your-annotations> class: <your-custom-ingress-class>For a reference, refer to CloudBees CD/RO Helm chart ingress example. -
In your
myvalues.yaml, ensureingress-nginx.enabledis configured asfalsefor your installation.ingress-nginx: enabled: falseIf you do not have the ingress-nginx.enabledentry in yourmyvalues.yaml, by default, it is set tofalsein thecloudbees-flowvalues file. -
If you have not already, apply your ingress controller manifest to your Kubernetes CloudBees CD/RO cluster.
-
To apply the custom ingress controller configuration, update your CloudBees CD/RO installation:
helm upgrade <server-releasename> cloudbees/cloudbees-flow \ -f <myvalues.yaml> \ --namespace <server-namespace> \ --timeout 10000s
How to autoscale server pods
A HorizontalPodAutoscaler (HPA) automatically updates a workload resource to scale the workload to match demand. HPA deploys additional pods in response to an increased load.
For more information, refer to Horizontal Pod Autoscaling.
CloudBees CD/RO includes horizontal pod autoscaling support for the following deployment components:
-
CloudBees CD/RO server
-
Web server
-
Repository server
CloudBees CD/RO server
The CloudBees CD/RO server supports HPA only when clusteredMode is true.
To enable HPA for the CloudBees CD/RO server, add the following parameter values:
server: autoscaling: enabled: true # enable: true to enable HPA for server minReplicas: 1 # Min Number of Replicas maxReplicas: 3 # Max Number of Replicas to scale targetCPUUtilizationPercentage: 80 # CPU Threshold to scale up targetMemoryUtilizationPercentage: 80 # Memory Threshold to scale up templates: [] # Custom or additional autoscaling metrics # ref: https://kubernetes.io/docs/tasks/run-application/horizontal-pod-autoscale/#support-for-custom-metrics # - type: Pods # pods: # metric: # name: repository_process_requests_total # target: # type: AverageValue # averageValue: 10000m
server.autoscaling.minReplicas must match server.replicas.
|
Web server
The web server supports scaling in both cluster and non-cluster modes.
To enable HPA for the web server, add the following parameter values:
web: autoscaling: enabled: true # enable: true to enable HPA for web minReplicas: 1 # Min Number of Replicas maxReplicas: 3 # Max Number of Replicas to scale targetCPUUtilizationPercentage: 80 # CPU Threshold to scale up targetMemoryUtilizationPercentage: 80 # Memory Threshold to scale up templates: [] # Custom or additional autoscaling metrics # ref: https://kubernetes.io/docs/tasks/run-application/horizontal-pod-autoscale/#support-for-custom-metrics # - type: Pods # pods: # metric: # name: repository_process_requests_total # target: # type: AverageValue # averageValue: 10000m
web.autoscaling.minReplicas must match web.replicas.
|
Repository server
The repository server supports scaling in both cluster and non-cluster modes.
To enable HPA for the repository server, add the following parameter values:
repository: autoscaling: enabled: true # enable: true to enable HPA for repository minReplicas: 1 # Min Number of Replicas maxReplicas: 3 # Max Number of Replicas to scale targetCPUUtilizationPercentage: 80 # CPU Threshold to scale up targetMemoryUtilizationPercentage: 80 # Memory Threshold to scale up templates: [] # Custom or additional autoscaling metrics # ref: https://kubernetes.io/docs/tasks/run-application/horizontal-pod-autoscale/#support-for-custom-metrics # - type: Pods # pods: # metric: # name: repository_process_requests_total # target: # type: AverageValue # averageValue: 10000m
repository.autoscaling.minReplicas must match repository.replicas.
|
How to add additional container values for sidecar injectors
For the default CloudBees CD/RO Helm charts, refer to cloudbees-flow chart configuration values for each component. You can find these cloudbees-flow values referenced in the values.yaml under the *.additionalContainers tag for the corresponding component.
| Key | Description/Default |
|---|---|
server.additionalContainers |
To add additional containers for the server, uncomment the name, image, and command in your values file.
|
web.additionalContainers |
To add additional containers, uncomment the name, image, and command in your values file.
|
dois.additionalContainers |
To add additional containers, uncomment the name, image, and command in your values file.
|
repository.additionalContainers |
To add additional containers, uncomment the name, image, and command in your values file.
|
boundAgent.additionalContainers |
To add additional containers, uncomment the name, image, and command in your values file.
|
How to add additional volume values for sidecar injectors
For the default CloudBees CD/RO Helm charts, refer to cloudbees-flow chart configuration values for each component. You can find these cloudbees-flow values referenced in the values.yaml under the *.additionalVolume and *.additionalVolumeMounts tags for the corresponding component.
| Key | Description/Default |
|---|---|
server.additionalVolume server.additionalVolumeMounts |
You can use
|
web.additionalVolume web.additionalVolumeMounts |
To add an additional volume and mount, update the settings in the
|
repository.additionalVolume repository.additionalVolumeMounts |
To add an additional volume and mount, update the settings in the
|
boundAgent.additionalVolume boundAgent.additionalVolumeMounts |
To add an additional volume and mount, update the settings in the
|
How to configure internal and external agents
CloudBees CD/RO installation on Kubernetes uses internal services within the cluster to communicate between components, which ensures that communication within the cluster is efficient and secure. A common method for deploying CloudBees CD/RO on Kubernetes is to install CloudBees CD/RO components inside the Kubernetes cluster while installing worker agents such as deployment targets outside the cluster, such as on VMs and traditional platforms.

In a mixed inside and outside deployment use case, communications with the CloudBees CD/RO components happen with internal services installed on Kubernetes, while communication with CD agents happen outside the cluster. These external agents can communicate with the internal components using a pair of gateway agents.
Gateway agent pairs can be installed using one of these methods:
-
Using the CloudBees CD/RO Helm chart
-
Using the CloudBees CD/RO agent Helm chart
Installing gateway agent pairs using the CloudBees CD/RO Helm chart
-
Enable both
internalGatewayAgentandexternalGatewayAgentto enable the CloudBees CD/RO chart to install the agent sub-chart as gateway agents. Make sure you setingress.hostandexternalGatewayAgent.service.publicHostNameboth as the same value:ingress: host: my-flow.example.com internalGatewayAgent: enabled: true externalGatewayAgent: enabled: true service: publicHostName: my-flow.example.com -
Ensure your default values file has
nginx-ingress(Kubernetes versions 1.21 and earlier) oringress-nginx(Kubernetes versions 1.22 and later) tcp config map settings uncommented, to expose the 7800 gateway agents service:nginx-ingress or ingress-nginx: tcp: 8200: "{{ .Release.Namespace }}/flow-repository:8200" 8443: "{{ .Release.Namespace }}/flow-server:8443" 7800: "{{ .Release.Namespace }}/gateway-external-agent-flow-agents:7800" -
If you are not creating an ingress controller as part of the CloudBees CD/RO chart because you already have an existing ingress controller make sure you have
tcpconfigmap added to expose above ports and services (for more details, refer to the Kubernetes documentation):helm repo add cloudbees https://public-charts.artifacts.cloudbees.com/repository/public/ helm repo update helm install releaseName cloudbees/cloudbees-flow \ -f valuesFile --namespace nameSpace --timeout 10000s
Installing gateway agents using the CloudBees CD/RO agent Helm chart
To create the gateway agent using the agent chart:
-
Create the server secret:
# Flow server credentials to use in order to register # with agent as a resource on the Flow server. kubectl create secret generic flow-agent-secret \ --from-literal=CBF_SERVER_USER='admin' \ --from-literal=CBF_SERVER_PASSWORD=<flow-server-password> \ -n <namespace> -
Create a values file for the internal agent called
gateway-default-agent.yaml:resourceName: gateway-default-agent replicas: 1 flowCredentials: existingSecret: flow-agent-secret service: publicHostName: gateway-default-agent-flow-agents -
Install the gateway internal agent using
gateway-default-agent.yaml:helm install gateway-default-agent cloudbees/cloudbees-flow-agent \ -f gateway-default-agent.yaml -n <namespace> -
Create a values file for the external agent called
gateway-external-agent.yamlthat addszoneName,publicHostNameand gateway configuration:resourceName: gateway-external-agent zoneName: external service: # External DNS hostname that the external agents would use to communicate # with the external gateway agent publicHostName: my-flow.example.com # configure gateway using external gateway agent gateway: # configure gateway using this agent enabled: true # Name of the gateway to create name: external # Name of gateway agent to pair with as gateway resource 2 pairedResourceName: gateway-default-agent flowCredentials: existingSecret: flow-agent-secret -
Install the gateway external agent using
gateway-external-agent.yaml:helm install gateway-external-agent cloudbees/cloudbees-flow-agent \ -f gateway-external-agent.yaml -n <namespace>
Autoscaling gateway agents
External gateway agents allow connectivity to be routed through gateways internally within your Kubernetes cluster or externally via an external endpoint. Typically, agents are included within the gateway configuration. As each pod replica is registered individually as a resource, and their gateway agents created 1:1, this creates a single point of failure within each replica.
This model is shown in the following example Kubernetes cluster using an external gateway agent:

Although this model generally provides internal and external connectivity, it doesn’t promote the goal of high availability. However, horizontally autoscaling your gateway agents allows your cluster to dynamically handle workloads or the loss of a gateway agent. CloudBees CD/RO provides this option for horizontal pod autoscaling (HPA) with HPA gateway agents.
| By default, the CloudBees CD/RO server does not include HPA gateway agents. You must manually configure gateway agent autoscaling. |
Configuring HPA gateway agents
Using HPA gateway agents allows you to distribute the cluster workload over one or many agent replicas and provides availability if one fails. The following steps allow your HPA gateway agents to be registered as services, using a service name, instead of the resource name of individual pods.
The CloudBees CD/RO cloudbees-flow Helm chart is available in the public cloudbees-examples repository. CloudBees recommends you save this in a local myvaules.yaml to retain it within your environment.
|
-
In your CloudBees CD/RO cloudbees-flow Helm chart, add the following:
internalGatewayAgent: enabled: true autoscaling: enabled: true minReplicas: 1 maxReplicas: 2 targetCPUUtilizationPercentage: 80 targetMemoryUtilizationPercentage: 80 # cloudbees-flow-agent chart configurations used for creating the # external agent for the gateway externalGatewayAgent: enabled: true autoscaling: enabled: true minReplicas: 1 maxReplicas: 2 targetCPUUtilizationPercentage: 80 targetMemoryUtilizationPercentage: 80 -
For
internalGatewayAgent, configure the following for your cluster:-
minReplicas -
maxReplicas -
targetCPUUtilizationPercentage -
targetMemoryUtilizationPercentageFor HPA gateway agents to work, internalGatewayAgent.enabledandinternalGatewayAgent.autoscaling.enabledmust be set totrue.
-
-
For
externalGatewayAgent, configure the following for your cluster:-
minReplicas -
maxReplicas -
targetCPUUtilizationPercentage -
targetMemoryUtilizationPercentageFor HPA gateway agents to work, externalGatewayAgent.enabledandexternalGatewayAgent.autoscaling.enabledmust be set totrue.
-
How to use Kubernetes Pod Security Standards
As of Kubernetes version 1.25, Pod Security Standards (PSS) are a built-in feature you can use to enforce hardening policies in your cluster. Acting as a built-in admission controller, PSS allows you to apply consistent baselines by adding labels to your Kubernetes namespaces, as shown in the following cluster example:
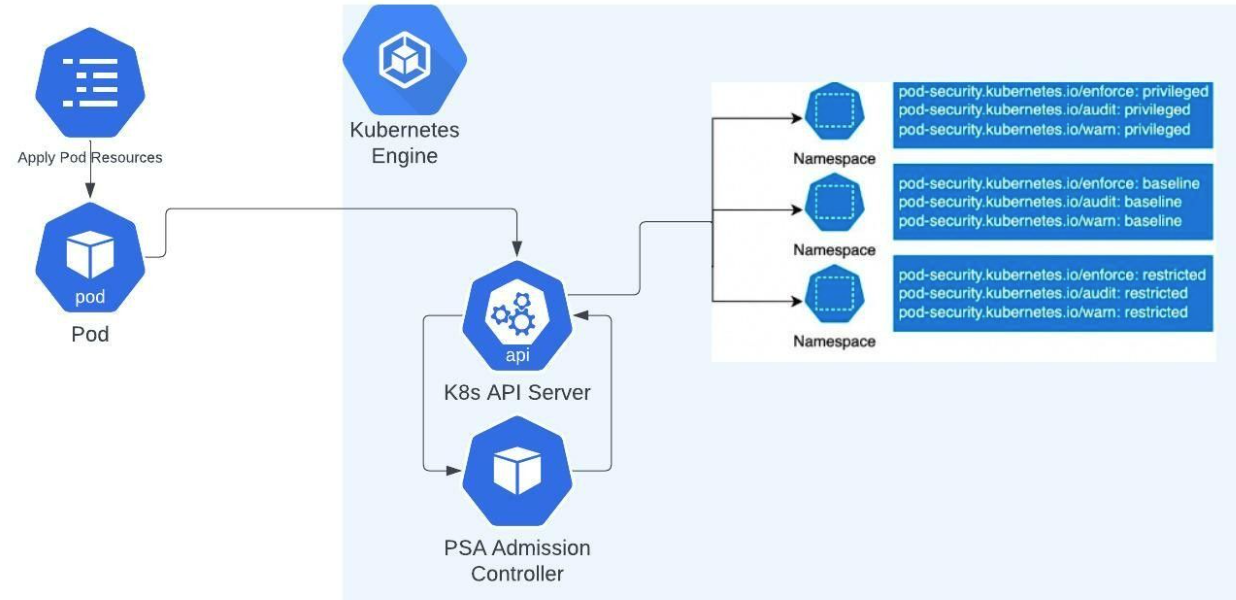
| PSS replaces deprecated Pod Security Policies to enforce restrictions on pod behavior and should be implemented with Kubernetes clusters with version 1.25 and above. |
Pod Security Standards
There are three standards/levels you can configure for pods using the pod security admission controller:
-
Privileged: An allow-by-default policy that provides the widest possible level of permissions. This policy allows known privilege escalations and is typically reserved for privileged, trusted users.
-
Baseline: A minimally restrictive policy that prevents known privilege escalations. This policy allows the minimally-specified default pod configuration and typically is used in relation to non-critical applications.
-
Restricted: A heavily restricted policy that follows current pod hardening best practices. This policy is typically used in relation to security-critical applications and lower-trust users.
For more information, refer to the Kubernetes Pod Security Standards documentation.
These policies are applied to namespaces using labels via different monitoring modes, enforce, warn, and audit. Depending on your needs, you can configure namespace labels with multiple modes, each with their own policies. For example, you can configure namespaces to warn against using restricted policies, but to only enforce baseline policies. This approach allows you to enforce minimal protections, while identifying areas you can improve before enforcing restricted standards.
Applying pod security context in CloudBees CD/RO Helm charts
Security contexts provide parameterization configured for pods at runtime. To use security context in CloudBees CD/RO, you must configure the securityContext in the CloudBees CD/RO server and agent Helm charts.
By default, securityContext.enabled=false is used in CloudBees CD/RO server and agent Helm charts must be configured.
|
To enable this setting:
-
Open your
myvalues.yamlforcloudbees-floworcloudbees-flow-agent. -
Change
securityContext.enabled=falsetosecurityContext.enabled=true. -
Configure additional project-specific settings for
securityContextas needed. Refer to the Kubernetes Pod Security Standards documentation for more information.
Applying Policy Security Admission to namespaces
To add or modify Kubernetes Policy Security Admissions labels use:
kubectl label --overwrite ns <namespace-to-modify> pod-security.kubernetes.io/<mode-of-coverage>=<policy-level>
Where:
-
<namespace-to-modify>: Is the namespace you want to add or modify the label. -
<mode-of-coverage>: Is the mode you want to apply,enforce,warn, oraudit. -
<policy-level>: Is the PSS policy you want to apply,privileged,baselineorresricted.
For example, if you create a new namespace called mynamespace to enforce a baseline level and warn at restricted levels:
kubectl create namespace mynamespace kubectl label --overwrite ns mynamespace pod-security.kubernetes.io/enforce=baseline kubectl label --overwrite ns mynamespace pod-security.kubernetes.io/warn=restricted
Applying different Pod Security Standards versions
By default, when a PSS is applied to a mode using pod-security.kubernetes.io/, the latest version of PSS is used. However, you can also specify a specific Kubernetes version of PSS to use for your mode with:
kubectl label --overwrite ns mynamespace pod-security.kubernetes.io/<mode-of-coverage>-version=<K8s-version>
Where:
-
<mode-of-coverage>: Is the mode you want to apply,enforce,warn, oraudit. -
<K8s-version>: Is the Kubernetes version of PSS to use, such asv1.25.
For example, if you create a new namespace called mynamespace to enforce a baseline level using the PSS enforce mode of Kubernetes version 1.25:
kubectl create namespace mynamespace kubectl label --overwrite ns mynamespace pod-security.kubernetes.io/enforce=baseline kubectl label --overwrite ns mynamespace pod-security.kubernetes.io/enforce-version=v1.25
How to configure agent resource name templates
Generally, you set the name for the agent resource with the value agent.resourceName , but this only works when the agent deployment has only one replica. If there are multiple replicas, then each of them tries to register itself using the same resource name. As a result, only one replica from the entire deployment will be registered as a resource.
The resource name defaults to hostname, but other template values are available to fully qualify the resource:
-
Ordinary Helm template values. For example:
{{ .Release.Name }},{{ .Release.Namespace }}, and so on. -
In addition, two special template values are allowed :
-
{{ hostname }}: The actual resource hostname. -
{{ ordinalIndex }}: The serial replica index in the StatefulSet.
-
For example:
resourceName: "myResource - {{ .Release.Name }} - {{ ordinalIndex }}"
How to pre-provision volume snapshots as a PVC in StatefulSets
This how-to describes using a pre-provisioned volume snapshot as a PersistentVolumeClaim (PVC) within a PersistentVolume (PV) for a Kubernetes StatefulSet. The instructions on how to perform these actions may differ depending on your cloud provider, however the general steps are:
-
Create a PVC manifest.
-
Create a PV manifest that references your PVC and snapshot.
-
Apply these manifests to your cluster.
-
Test your cluster to ensure the PV and PVC are present with the desired values.
Even though this how-to describes specific steps for CloudBees Analytics (flow-devopsinsight/dois), you can modify the steps here to apply to other CloudBees CD/RO components.
|
-
Create a PVC manifest (
pvc.yaml):apiVersion: v1 kind: PersistentVolumeClaim metadata: name: PVCNAME spec: storageClassName: STORAGE_CLASSS accessModes: - ReadWriteOnce resources: requests: storage: STORAGE_SIZEFor your
metadata.nameused with a CloudBees Analytics PVC, CloudBees recommends:-
elasticsearch-data-flow-devopsinsight-0
This is based on the convention
<volume-name>-<pod-name-with-index>, where:-
<volume-name>iselasticsearch-dataas the default.Values.storage.volumes.doisStorage.name. -
<pod-name-with-index>isflow-devopsinsight-0as the default pod name for the CloudBees Analytics server with its0index.
-
-
Create a PV manifest (
pv.yaml) that references thePVCNAMEfrom your PVC manifest and your snapshot:The following example is based on using GCP’s gcePersistentDisk. Use the format required by your provider to create a reference for your snapshot.apiVersion: v1 kind: PersistentVolume metadata: name: PVNAME spec: storageClassName: STORAGE_CLASSS capacity: storage: STORAGE_SIZE accessModes: - ReadWriteOnce claimRef: namespace: NAMESPACE name: PVCNAME # Use the directive from your provider to reference your snapshot gcePersistentDisk: pdName: CLOUD_DISK_NAME fsType: ext4 -
Update your cluster with the manifest files:
# Apply the PVC (pvc.yaml) and # PV (pv.yaml) to your cluster: kubectl apply -f pvc.yaml -f pv.yaml -
Assign the following variables:
pvcName ="<PVCNAME-from-pvc.yaml>" pvName ="<PVNAME-from-pv.yaml>" -
Check if the PV is available in your cluster and has the desired values:
kubectl get pv $pvName -
Check if the PVC is available in your cluster and has the desired values:
kubectl get pvc $pvcName
How to configure SMTP proxy servers for CloudBees CD/RO on Kubernetes
For CloudBees CD/RO installations on Kubernetes, you can configure an SMTP proxy server by passing its configuration as server.ecconfigure values in the cloudbees-flow Helm chart. These configurations are added to the CloudBees CD/RO wrapper.conf and applied during installation.
In the wrapper.conf, Kubernetes configurations are located in the 10000 range, and your SMTP proxy configuration must be configured in the 10000 range.
|
This is an example of an SMTP proxy configuration being passed as server.ecconfigure values in the cloudbees-flow Helm chart:
server: ecconfigure: "--wrapperJavaAdditional=10001=-Dmail.smtp.proxy.host=<your-host> \ --wrapperJavaAdditional=10002=-Dmail.smtp.proxy.password=<your-password> \ --wrapperJavaAdditional=10003=-Dmail.smtp.proxy.user=<your-user> \ --wrapperJavaAdditional=10004=-Dmail.smtp.proxy.port=<your-port>"
How to increase VM memory maps
The default configuration of your Linux kernel’s vm.max_map_count may not support the needs of your of Docker containers. There are multiple scenarios, such as logging and analytics, where you may need to increase the vm.max_map_count.
To increase the vm.max_map_count in a Docker container, run:
helm upgrade --install node-level-sysctl node-level-sysctl -n kube-system \ --set "parameters.vm\.max_map_count=<replace_with_your_value>"
How to deploy monitoring support
Use Grafana to visualize the Elasticsearch metrics. Issue the following commands to deploy it at your site:
helm install --name prometheus stable/prometheus helm install --name grafana stable/grafana # Note that username is admin and password is the result of following command kubectl get secret --namespace default grafana -o jsonpath="{.data.admin-password}" | \ base64 --decode ; echo RandomPassword
How to deploy logging support
In general, each object in a Kubernetes cluster produces its own logs. And usually the user has their own mechanism in place to manage logs from different services in the cluster. Logs from CloudBees CD/RO services and pods can be captured with standard log shipper tools. A sample configuration file for the FileBeat log shipper is provided here.
How to configure agents to share a workspace
Once the first agent is deployed with ReadWriteMany access mode, subsequent agents deployed for the same workspace with storage.volumes.agentWorkspace.existingClaim to true share the first agent’s workspace. The following example shows how to set up flow-agent-1 and flow-agent-2 to share the same workspace, MyWorkspace.
-
Deploy the first agent with
storage.volumes.agentWorkspace.accessModeset toReadWriteMany. This creates the persistent volume claim, setting up the scenario where agents can use theflow-agent-workspaceshared workspace.helm install flow-agent-1 cloudbees-flow-agent -f <valuesFile> \ --set storage.volumes.agentWorkspace.accessMode=ReadWriteMany \ --set storage.volumes.agentWorkspace.name=MyWorkspace \ --namespace <nameSpace> --timeout 10000 -
Deploy subsequent agents to the same workspace with
storage.volumes.agentWorkspace.existingClaimtotrue.helm install flow-agent-2 cloudbees-flow-agent -f <valuesFile>\ --set storage.volumes.agentWorkspace.existingClaim=true \ --set storage.volumes.agentWorkspace.name=MyWorkspace \ --namespace <nameSpace> --timeout 10000
The following table summarizes parameters used to configure a shared agent workspace. You can also refer to Persistent storage for more information.
| Parameter | Description |
|---|---|
|
Define the workspace access mode. Possible values include For shared workspaces use |
|
The agent workspace name. Use the same name across all agents sharing the same workspace. If not specified, Specify the same name across all agents that share the workspace. |
|
The amount of storage to allocate. For shared workspaces, allocate approximately 5 GiB per agent. Increase based on the agent’s requirements. |
|
Whether to use the existing claim for a previously deployed agent to share its workspace. Set to |
How to increase memory limits for CloudBees CD/RO components
During periods of high work load, a server component could run out of memory if it requests more memory than is allocated to the JVM. To increase the memory for a component, we have to allocate more memory to the component’s container. Then, depending on the component, the memory allocation for the component running in the container needs to be increased accordingly. Refer to Cluster capacity for default container memory settings.
The following configurations can be used to change the memory allocation for each container and component.
| Component | Container memory limit | Component memory setting | Example |
|---|---|---|---|
CloudBees CD/RO server |
|
server.ecconfigure |
|
CloudBees CD/RO web server |
|
N/A |
|
Repository server |
|
repository.ecconfigure |
ecconfigure: " --repositoryInitMemoryMB=256 --repositoryMaxMemoryMB=512" |
CloudBees Analytics server |
|
|
|
Bound agent |
|
|
|
Inject new memory limits using helm . Update your local values file (here it is called myvalues.yaml ) with the new values and issue the Helm `upgrade ` command.
helm upgrade <chartName> --name <releaseName> \ -f <valuesFile> --namespace <nameSpace> --timeout 10000
How to resolve an ingress class name conflict
If you have an ingress class name conflict during your upgrade:
-
Update the default ingress class name for the
ingress-nginxcontroller with the additional values below in yourmyvalues.yaml.ingress: enabled: true host: <your-host.example.com> class: <ingress-class-name> ingress-nginx: enabled: true controller: ingressClassResource: name: <ingress-class-name> nginx-ingress: enabled: false -
After you update the class name, patch the existing ingress by running:
kubectl patch ingress/flow-ingress -p '{"spec": {"ingressClassName":"<ingress-class-name>" }}' -n <namespace>
If this does not resolve the naming conflict, ensure the ingress-nginx.ingressClassResource.name tag matches the ingress.class and both are correct. If you update the myvalues.yaml to correct the class names, run the previous command again to resolve the conflict.
How to resolve DSN/SSL issues after resolving ingress class name conflicts
If you have a DNS/SSL issue after resolving the ingress class name conflict, restart your ingress-nginx pod to mount the local certificates:
-
Get the deployment of the
ingress-nginx:kubectl get deployments -n <namespace> | grep ingress-nginxThis returns the
ingress-nginxdeployment, such as:<your-deployment>-ingress-nginx-controller 1/1 1 1 56m -
Restart the
ingress-nginxdeployment:kubectl rollout restart deployment <your-deployment>-ingress-nginx-controller -n <namespace>
Your upgrade is complete.
How to resolve volume note affinity conflicts
Sometimes pods can hang in the `pending ` stage with the following error:
x/y nodes are available: y node(s) had volume node affinity conflict.
This can happen when the availability zone for the persistent volume claim is different from the availability zone of the node on which the pod gets scheduled.
A cluster administrator can address this issue by specifying the WaitForFirstConsumer mode, which delays the binding and provisioning of a PersistentVolume ` until a pod using the `PersistentVolumeClaim is created. PersistentVolume s are selected or provisioned conforming to the topology that is specified by the pod’s scheduling constraints.
For more information see this article: https://kubernetes.io/docs/concepts/storage/storage-classes/#volume-binding-mode
How to configure a MySQL database
Use these instructions to use CloudBees CD/RO with a MySQL database.
-
Configure the following database parameters in your Helm chart values file:
database.clusterEndpoint
Use this option if your database is residing in the same Kubernetes cluster as CloudBees CD/RO. The notation is
db-service.namespace. If deploying into the same namespace, the.namespacecomponent can be omitted.Default: null
database.externalEndpoint
The database endpoint residing outside of the CloudBees CD/RO Kubernetes cluster; this can be the DNS for a cloud hosted database service. The
databaseorschemaprincipal must have full read/write access on that schema.Default: null
database.dbName
The database instance name.
Default: null
database.dbPassword
The database password.
Default: null
database.dbPort
The port on which the database server is listening.
Default: null
database.dbType
The database type with which CloudBees CD/RO persistence works. For MySQL, use
mysql.Default: null
database.dbUser
Username that the CloudBees CD/RO server uses to access the database on the database server.
Default: null
database.existingSecret
Use this option if you have or are planning to deploy the credential’s secret yourself. The layout has to be the same as that of
server-secrets.yaml::dbSecretDefault: null
-
Make the MySQL connector jar available during a Helm install or upgrade:
--set database.mysqlConnector.externalUrl="<connector-url>" --set database.mysqlConnector.enabled=trueAlternatively, place the following configuration into your Helm chart values file:
mysqlConnector: enabled: true/false externalUrl: <connector url>
How are data backups and disaster recovery addressed
Kubernetes backup tools such as Heptio’s Velero (previously known as Ark) are used to backup and restore Kubernetes clusters. CloudBees CD/RO services and pods deployed in the cluster can be backed using those standard backup tools. Application data maintained in persistent volumes needs to be backed up at the same time. Tools such as Velero support persistent volume backups.
Here is the list of volumes associated with the CloudBees CD/RO pods:
| Container | Volumes |
|---|---|
flow-server |
efs-deployment, logback-config,init-scripts |
flow-agent |
flow-agent-workspace, logback-config |
flow-devopsinsight |
elasticsearch-data |
flow-repository |
efs-repository, logback-config |
flow-web |
efs-deployment |