Rolling deployment use case
Rolling Deployment is one of the core strengths of the CloudBees CD/RO. You can develop your application model independent of the deployment strategy and the environment model. When you model an environment, you can enable rolling deployment. You can also enable rolling deployment on an environment by selecting the rolling deployment option when you deploy an application.
In the list of application run details, CloudBees CD/RO filters out any component process step that has no resource to execute in a particular phase of the rolling deployment. (The platform job details page continues to show all steps in the process.)
This example shows how an e-commerce company uses the rolling deployment strategy to deploy its shopping cart application to production. The shopping cart application consists of three tiers: the Web, App, and DB tiers. The company wants to deploy this application to the PROD environment in four phases:
-
First phase: Deploy only to the DB tier and verify the DB upgrade.
-
Second phase: Deploy to a few resources in the App and Web tiers and verify that the application was deployed successfully.
-
Third phase: Deploy to a few more resources in the App tier based on some rules.
-
Fourth phase: Deploy to the remaining resources.
Here are the overall steps for modeling a rolling deployment for this use case:
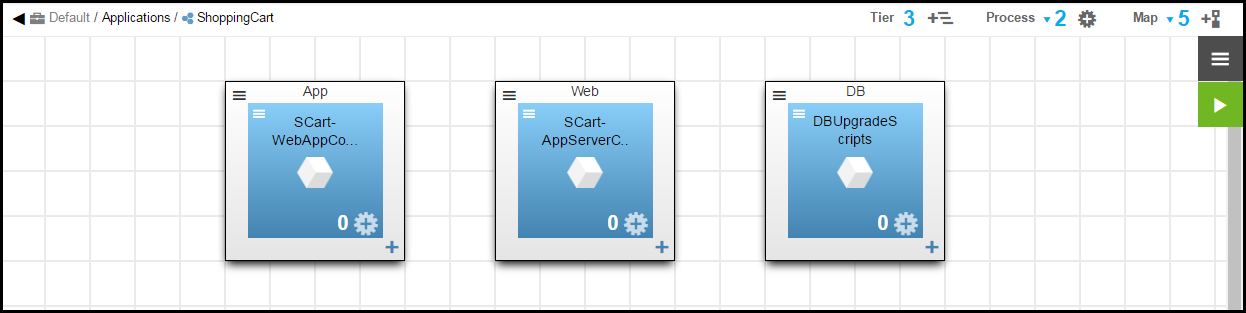
Creating the shoppingcart application
Create the ShoppingCart application with three tiers that map to the following components.
| You can develop your application model based only on business requirements without special considerations of the deployment strategy. |
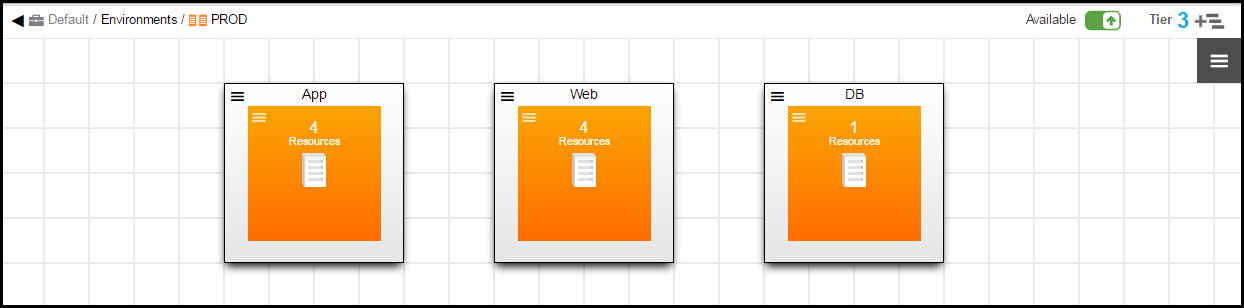
Creating the PROD environment
Create an environment named PROD with tiers corresponding to the applications tiers.
Configuring the PROD environment
Configure the PROD environment to support rolling deployment.
To enable rolling deployment on the environment:
Click the menu button in the upper right corner of the Environment Editor and select Rolling Deploy. The Rolling Deploy dialog box opens. There are two rolling deployment strategies that are supported out of the box:
-
Phasing: Phases are the preferred option when you want to control the resources and specify the order in which they are used.
-
Batching: Batch Sizes are the preferred option when you do not need to control the resources. The resources are selected at random based on the specified batch size.
You can configure both these strategies on the environment, but only one can be active at a time
Defining the rolling deployment phases
In this example, the phasing strategy will be used during the rolling deployment.
What you need to know about phases:
-
Phases are ordered, and rolling deployment relies on this phase order.
-
There are three types of phases:
-
Tagged: Tagged phases are useful when you want to explicitly control the resources used during a rolling deployment
-
Expression: Expression is useful when you want to pick resources for a phase dynamically at run time using conditions. This is done using JavaScript expressions. This is useful when you do not want to tag individual resources and instead want to apply an expression to pick the resources.
-
Broadcast: This type of phase can be used where you want the deployment to run on all the unused resources in environment.
While not mandatory, the broadcast phase will most likely be the last phase in the phase order. The broadcast phase combined with the expression will provide flexibility during the rolling deployment.
There can be only one broadcast phase for an environment.
-
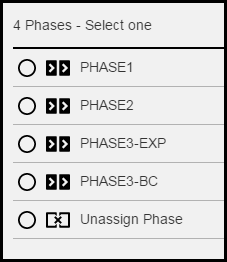
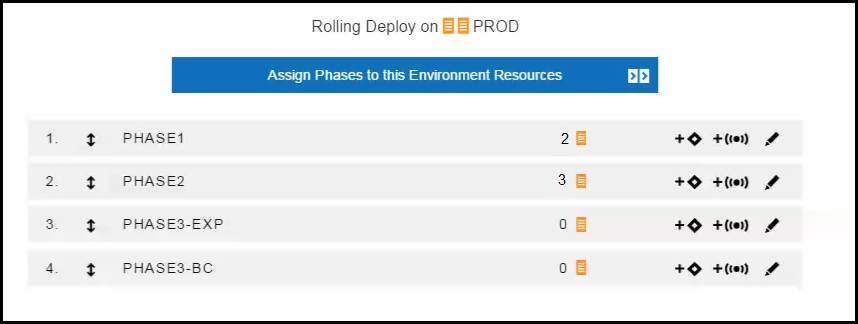
In this example:
-
PHASE1 is a tagged phase.
-
PHASE2 is a tagged phase.
-
PHASE3-EXP is an expression phase.
-
PHASE3-BC is the broadcast phase.
To add phases:
-
In the Rolling Deploy dialog box, click Phases to use phasing as the rolling deployment strategy.
-
In the Phases dialog, click Add+ in the upper right corner to add a phase.
-
Enter the name of the first phase (PHASE1) and click Save.
-
Enter the name of the second phase (PHASE2) and click Save.
-
Enter the name of the third phase (PHASE3-EXP) and click Save.
-
Enter the name of the fourth phase (PHASE-BC) and click Save.
To assign resources to the phases
-
In PHASE1, assign the only resource in the DB tier to PHASE1.
-
Select PHASE1.
-
Click Assign Phases to this Environment Resources.
A dialog box showing all the resources across all the tiers opens.
-
Select the resources that you want for this phase, and then click Assign Phase in the upper right corner.
For PHASE1, select the DB resource:

-
Select PHASE1.
-
Click OK.
-
-
In PHASE2, repeat the same steps described for PHASE1 and assign a few resources from the App and Web tiers to PHASE2.
-
For PHASE3-EXP, enter an expression to deploy a few more resources in the App tier based on the rules.
-
Select PHASE3-EXP and select
 to define the phase with an expression phrase.
 -
Enter the expression phrase.
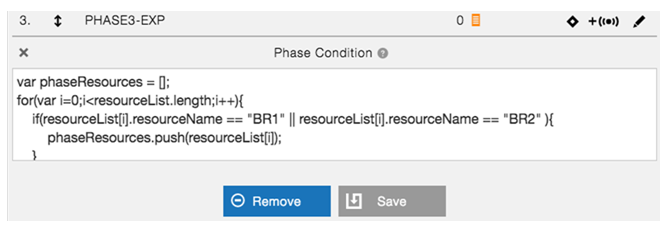
When you select ?, a pop-up window opens to show sample code for phase conditions:
Sample code with phase descriptions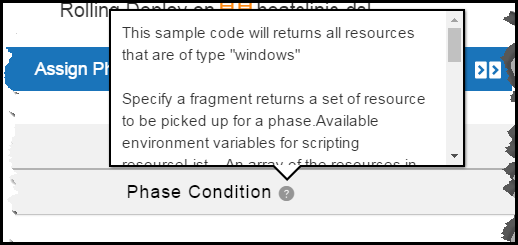
-
Click Save.
-
-
For PHASE3-BC, select
 to make this a broadcast phase to deploy to the remaining resources.
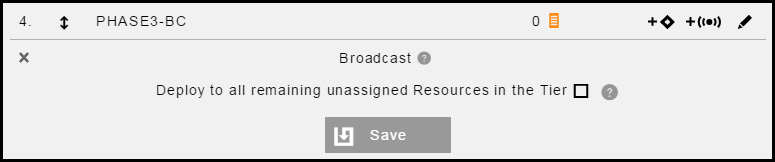
-
Click Save to save the definition.
| You can name the phases in your rolling deployment any name you want, such as ORANGE, YELLOW, EAST, WEST, and so on. What is important when defining the phases is the order and type of the phases. |
At this point, rolling deployment is enabled on the environment with phasing as the default strategy, and phases are defined as follows:
| This is an example setup explaining the available options. It is not necessary to use all the different types of phases. For your deployment, choose the phase types that apply to your use case. |
Running the Application on the PROD Environment Using Rolling Deployment
When you are ready to run the application, go to the dialog box to set the runtime settings for the deployment. When you select the PROD environment, the option to enable Rolling Deployment is available because rolling deployment was enabled on the PROD environment. If you select another environment where Rolling Deployment is not enabled, the rolling deploy option will not be available. This way, the same application process can automatically behave in different ways based on the chosen environment, giving you the benefit of the model-driven approach.
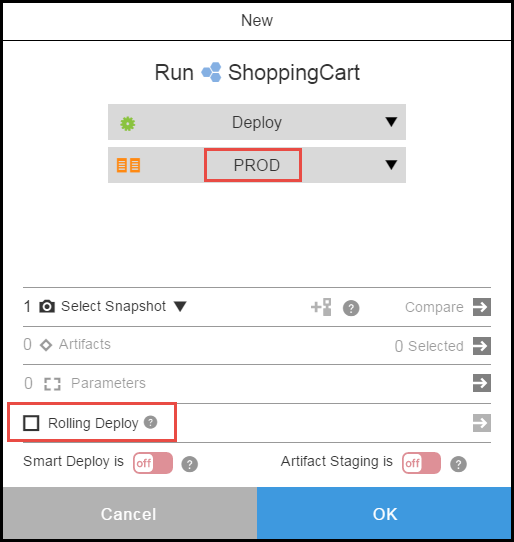
Rolling deployment is now enabled.

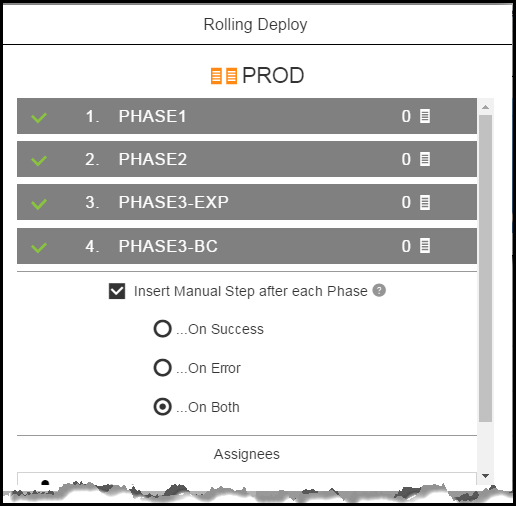
Selecting ![]() shows the rolling deployment details.
shows the rolling deployment details.
You can enable or disable phases and to insert a manual step after each phase. When you click Insert Manual Step after each Phase, the options to run the manual step and the field to assign users who can perform the step are available.
Viewing the Application Deployment Details
Once the rolling deployment starts on the PROD environment, you can view the job details to see the breakdown and progress of the deployment. You will notice the job step breakdown corresponding to PHASE1, PHASE2, PHASE3-EXP, and PHASE3-BC. You will also see the automatically inserted manual step after each phase.
Any phase that is skipped because there is no resource associated with it is not shown.
You can also use property references to access the current rolling deployment type or the iteration that is in progress:
-
To return the rolling deployment type (
phaseorbatch), use$[/myJob/rollingDeployType]. -
To return the rolling deployment iteration that is in progress (such as
PHASE1,PHASE2, and so on for batch rolling deployment strategy or phase name for phase strategy), use$[/myJob/currentRollingDeployIteration].
Summary
-
The deployment ran in four phases.
-
In the first phase, deploy only to the DB tier and verify the DB upgrade.
-
In the second phase, deploy to a few resources in the App and Web tiers and verify that the application was deployed successfully.
-
In the third phase, deploy to a few more resources in the App tier based on some rules.
-
In the fourth phase, deploy the remaining resources.
Blue/Green deployment use case
This example shows how an e-commerce company can use the blue/green deployment strategy to deploy its shopping cart application to production. The current deployment process requires that the application is tested in development and QA environments before it is deployed to the production environment where the blue/green strategy is used.
Here are the overall steps for modeling a blue/green deployment for this use case:
Creating four environments (DEV, QA, BLUE, and GREEN)
Create four environments named DEV, QA, BLUE, and GREEN.
| DEV, QA, BLUE, and GREEN are names for the environments in this use case. You can use any names you want for them as long as it is clear how they map to BLUE and GREEN. |
Mapping the environments to the shoppingcart application
Select the ShoppingCart application, and then map the application tiers to the corresponding environment tiers in DEV, QA, BLUE, and GREEN.
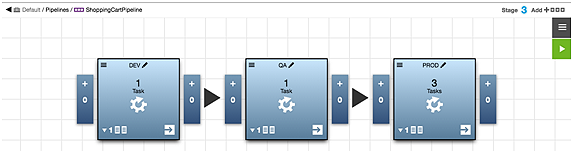
Creating three tasks for the PROD stage
In the PROD stage, create three tasks:
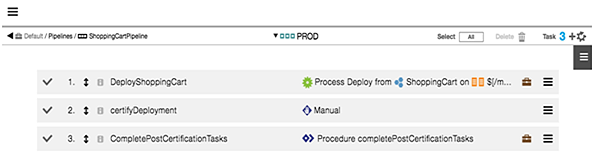
These are the task details:
| Task Number | Task Name | Description |
|---|---|---|
1 |
DeployShoppingCart |
This is another process task similar to what is in the DEV and QA stages that the environment name is parameterized. The system will automatically switch deployments between the BLUE and GREEN environments. |
2 |
CertifyDeployment |
This is a manual step to review and certify the deployment. |
3 |
completePostCertificationTasks |
This is an automation task to run any post certification tasks such as updating the load balancer and switching the environment in preparation for the next pipeline run (for example, update the TargetEnv parameter) 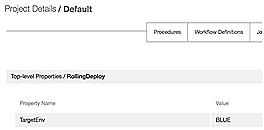
|
Running the pipeline
In a blue/green deployment, before you run the pipeline, the GREEN environment is serving all of the production traffic, and the BLUE environment is ready to be upgraded to the new software version.
Before starting the deployment, set the RollingDeploy/TargetEnv property on the project to the first environment to which you want to deploy. RollingDeploy/TargetEnv will be set to BLUE because the GREEN environment is currently catering to end-user traffic.
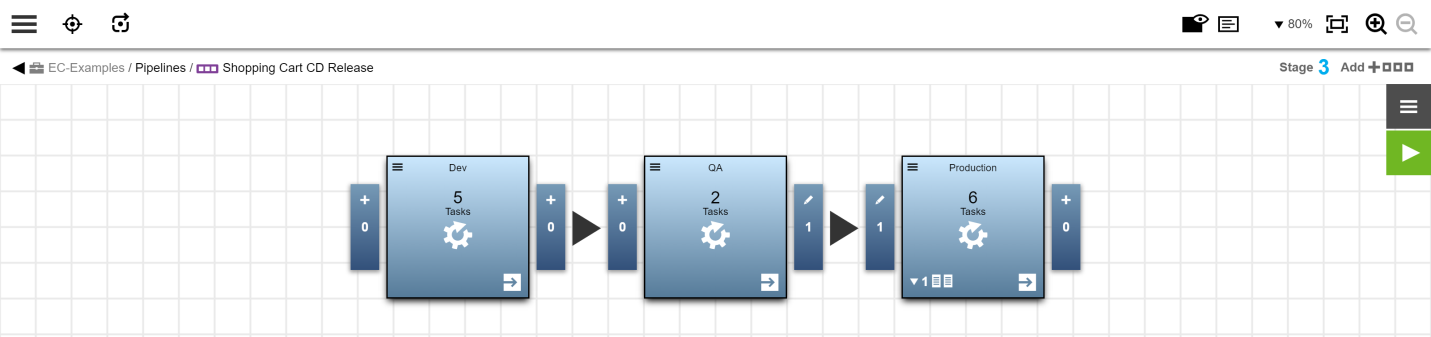
When the pipeline starts:
-
The pipeline will start at the DEV stage and continue to the PROD stage.
-
Once the deployment reaches the PROD stage, the application process task will deploy to the BLUE environment based on the property value
$[/myProject/RollingDeploy/TargetEnv], which was set toBLUEat the beginning of the run. -
Once the deployment task has completed, there is a manual step to functionally verify the deployment.
If there was a need for some automated testing, those tasks can easily be added to the pipeline stage.
-
Once the deployment completes successfully, switch the user traffic to the BLUE servers, and update the
RollingDeploy/TargetEnvproperty toGREEN.Setting the property value to
GREENwill ensure that the next deployment will happen to the GREEN environment while the BLUE environment serves all of the production traffic.
Canary deployment use case
The purpose of a canary deployment is to deploy an application to a small set of servers for validation by a subset of users to reduce the risk of a new version rollout. After user validation, the application is rolled out to a larger set of users.
This example shows how an e-commerce company can use canary deployment to deploy its Shopping Cart application to production. In this example, the release process requires that the application is tested in the development and QA environments before the application is deployed to the production environment where the canary strategy is used.
Here are the overall steps for modeling a canary deployment for this use case:
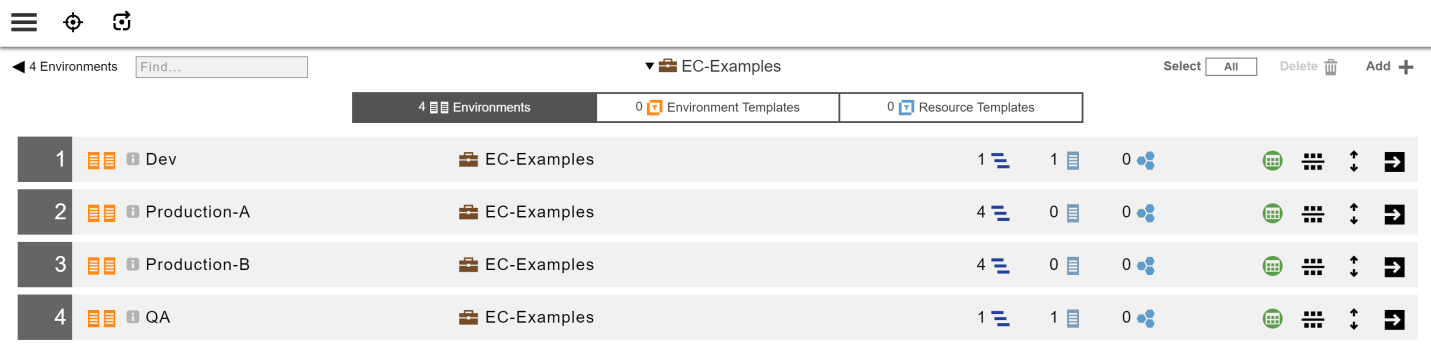
Create four environments (Dev, QA, Production—A, and Production—B)
Create four environments named Dev, QA, Production—A, and Production—B.
Map the environments to the application
Select the application and map the application tiers to the corresponding environment tiers in Dev, QA, Production—A, and Production—B.
Create multiple tasks for the production stage
In the Production stage, create tasks as follows:
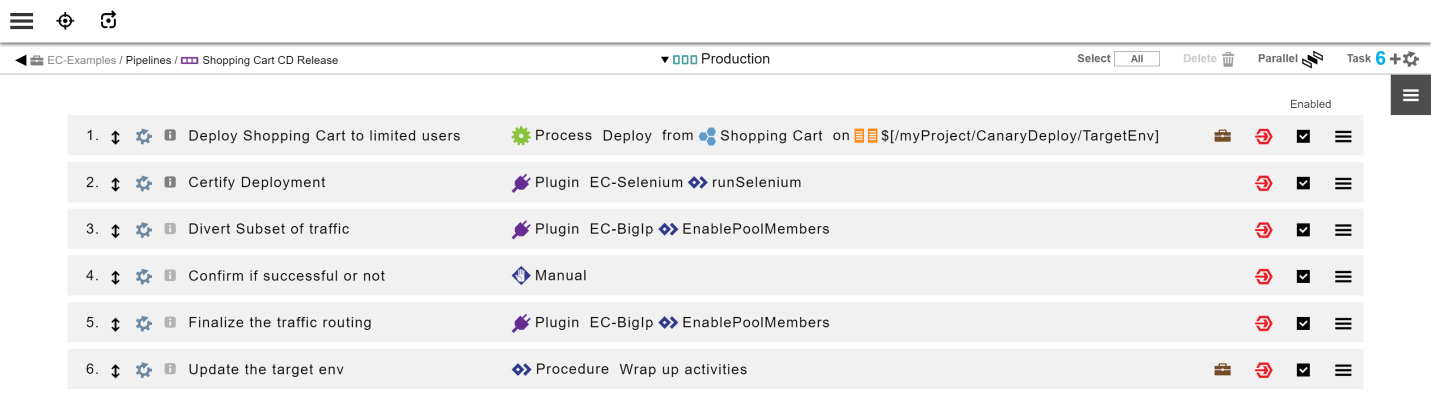
These are the task details:
| Task Number | Task Name | Description |
|---|---|---|
1 |
Deploy Shopping Cart to limited users |
This task deploys the Shopping Cart application to environments in the production stage. This uses a deployment process where the target environment is parameterized using a |
2 |
Certify Deployment |
This task can run any test automation tool using plugins included with CloudBees CD/RO or can even be a manual step to review and certify the deployment. If needed, you can add steps to certify the deployment. |
3 |
Divert Subset of traffic |
This is an automation task to interact with the load balancer to divert a subset of end user traffic to this just-deployed version. This task can use the CloudBees F5 plugin or can even point to an existing script or a custom automation. |
4 |
Confirm if successful or not |
This can be a manual or automated task to confirm if the rollout to the subset of end users is successful. |
5 |
Finalize the traffic routing |
This is an automated task to interact with the load balancer to divert the remaining traffic to
This task can use the F5 plugin or can even point to an existing script or custom automation. |
6 |
Update the target env |
This is a wrapup automated task to ensure that the 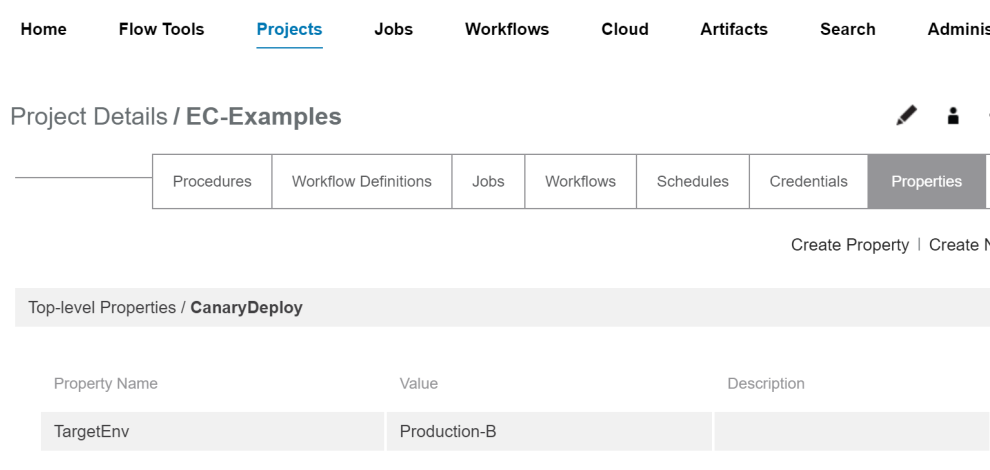
|
Running the pipeline
In a canary deployment, before you run the pipeline, either the Production—A or the Production—B environment is serving all production traffic. Let’s assume that Production—B is serving the production traffic currently.
Before starting the rollout, ensure that the $[CanaryDeploy/TargetEnv] property on the project is set to value Production—A. When the pipeline starts:
-
The pipeline runs the Dev stage and continues to the Production stage.
-
Once the deployment reaches the Production stage, the application process task deploys to the Production—A environment based on the
[/myProject/CanaryDeploy/TargetEnv]property value, which was set to Production—A at the start of the run. -
Once the deployment task completes, the deployment is certified using a test automation tool or manual testing. This task (number 2 above) ensures that the new version is functionally verified to work in the Production—A environment.
-
Once the deployment is certified, a subset of traffic is automatically diverted to the Production—A environment as task 3 updates the load balancer configurations. The application is now in a canary state in which a fraction of users are tested on the newer version, whereas the larger portion still uses the safe current version.
-
Once sufficient time is allowed and testing is done, step 4 asks for user confirmation of success or failure of the new version.
-
If the new version in the Production—A environment is working satisfactorily, all traffic is diverted to it automatically. But if the user input in task 4 indicates failure, all traffic is routed back to the Production—B environment. (If you want to gradually move traffic to the newer version instead of moving the entire traffic at this time, just add additional tasks to the pipeline.)
-
The system automatically updates the
$[CanaryDeploy/TargetEnv]property to Production—B if the rollout is successful, so that the next time, canary deployment begins on it. If the rollout failed as indicated by user input in task 4, the$[CanaryDeploy/TargetEnv]property is kept as Production—A.
Dark Launch Deployment Use Case
Here are the overall steps to use CloudBees CD/RO to model a Dark Launch deployment:
Creating Feature Flags
Before CloudBees CD/RO can orchestrate dark launch deployments, you must create a flag for each feature that you want to enable or disable. Feature flags are a software development best practice for gating functionality. With feature flags, you can manage the entire lifecycle of a feature.
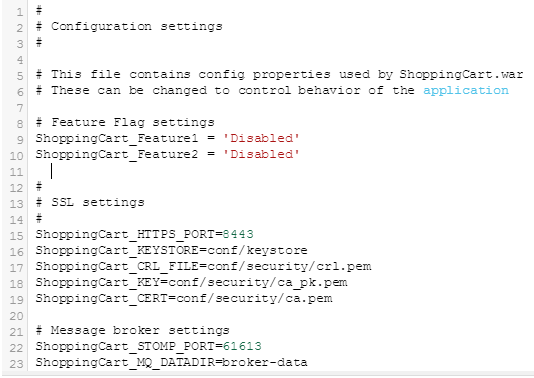
You should add the flags to a configuration file and write your application source code to check for values in that file. Following is sample code for a new version of the shoppingCart.war file. It uses a configuration file named config.properties as shown below to control the feature flag values.
In this example, the config.properties file has two feature flags: ShoppingCart_Feature1 and ShoppingCart_Feature2. These flags are disabled by default:
Typically the shoppingCart.war file and its configuration file are deployed together. You publish the appropriate versions of the shoppingCart.war file and the config.properties file to an artifact repository (such as EC-Artifact, which is included with CloudBees CD/RO).
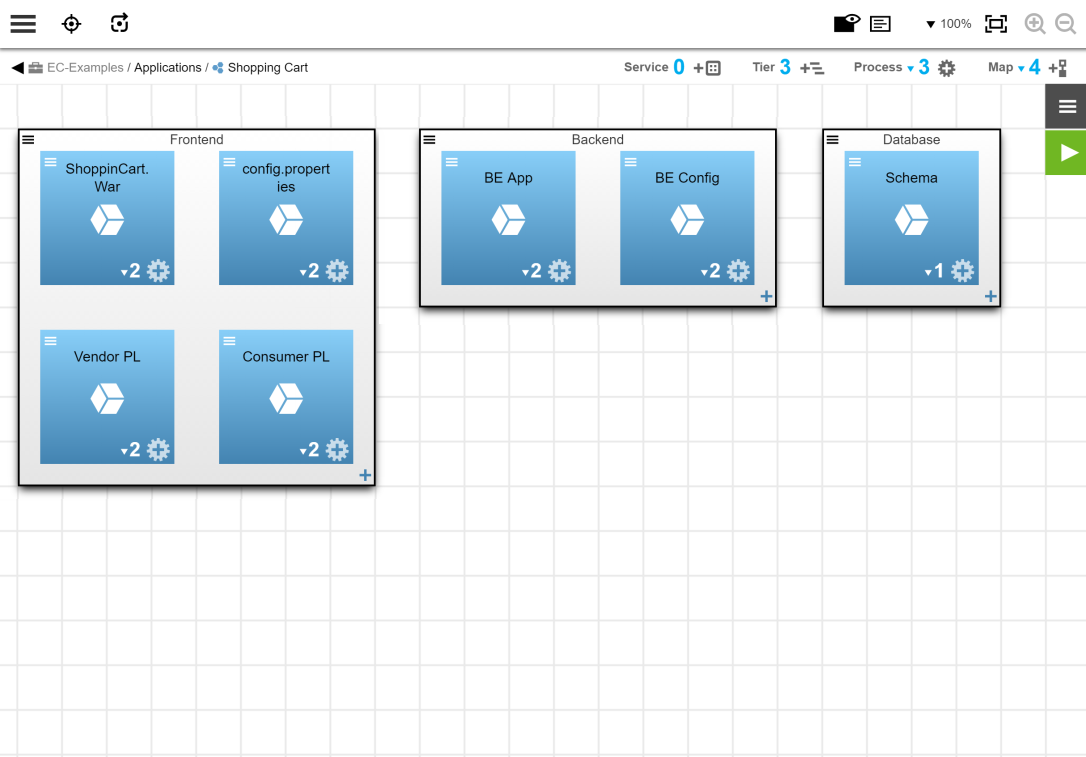
Creating an Application Model
You model the Shopping Cart application so that it has components that point to the shoppingCart.war and config.properties artifacts along with other components.
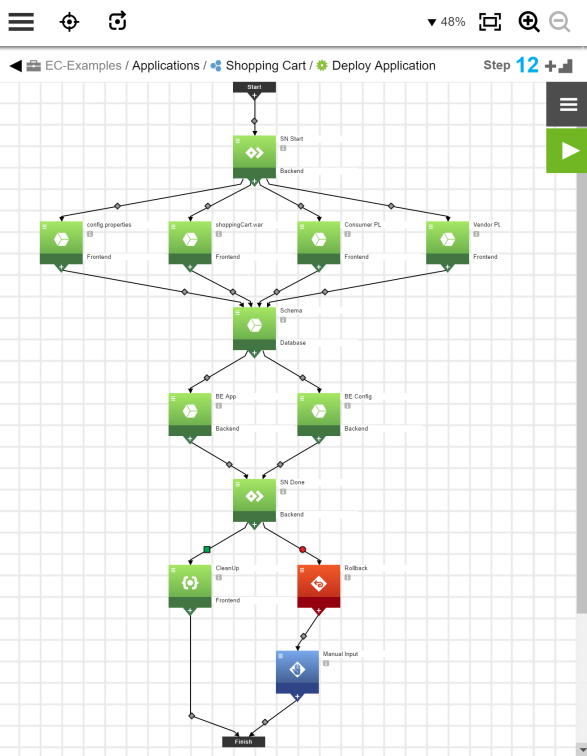
Creating an Application Process to Deploy the Entire Shopping Cart Application
This is a typical process needed to deploy any application.
Creating Another Application Process to Enable or Disable Feature Flags
For example, create a process named “Toggle feature flags” for the Shopping Cart application:
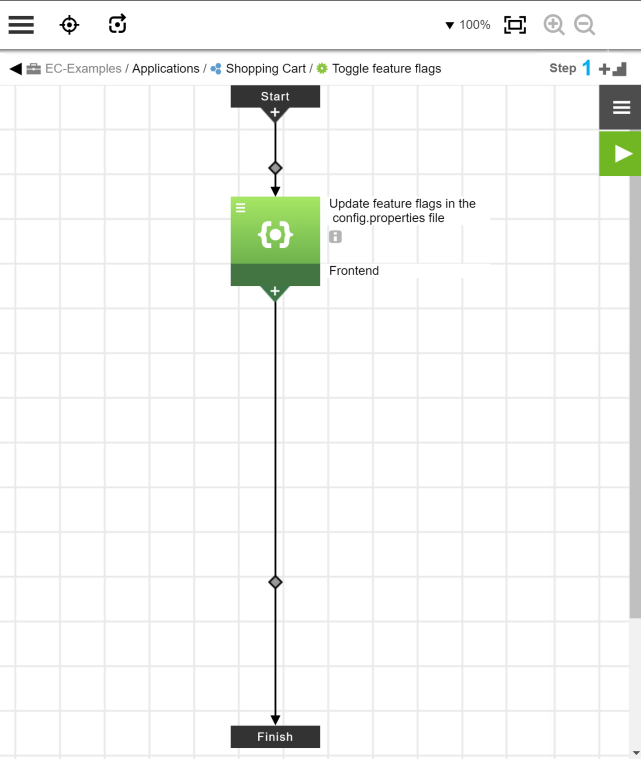
This process has a simple command step that takes end user input using the parameters defined below and then updates the config.properties file on each target machine. Parameters are a way to take dynamic input from end users or from other automations in CloudBees CD/RO.
Creating Input Parameters for the Process
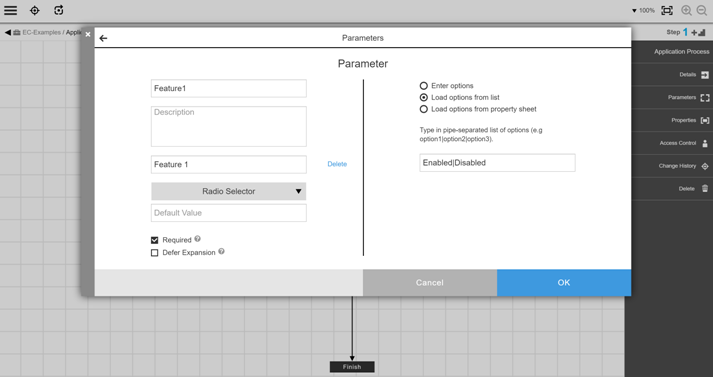
You create two parameters for this process. For example, create parameters named Feature1 ` and `Feature2, each with a possible value of Enabled ` or `Disabled.
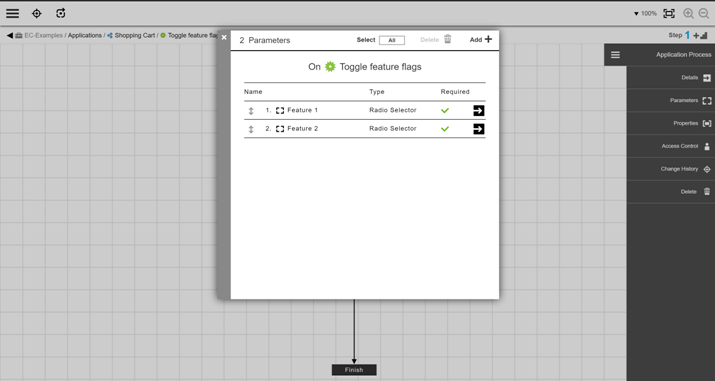
These parameters gather end user input to enable or disable feature flags. The command step in the “Toggle feature flags” process uses values from these parameters dynamically. When the process is run, the user input to enable or disable the parameters is used to update the configuration file.
Deploying with Feature Flags Initially Disabled
Once you model the application, its processes, and its production environment, you deploy the latest version to the production environment. By default, the features are turned off, because the default values for the ShoppingCart_Feature1 and ShoppingCart_Feature2 settings in the config.properties file are set to Disabled.
Once this deployment is done, the new features are launched darkly. This means that they are now in production, but end users cannot access them because they are turned off.
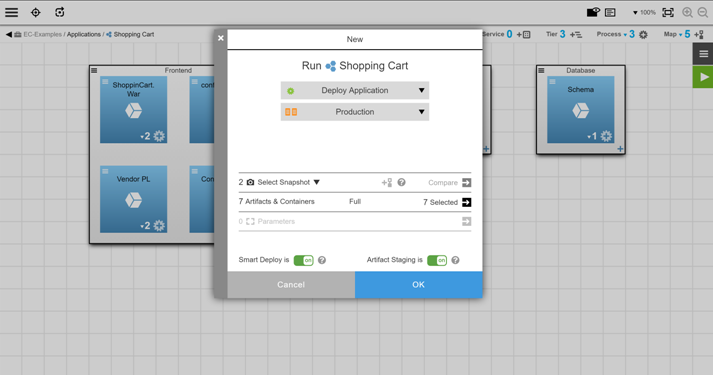
Enabling the Features After Deployment
To enable one or both features, users run the “Toggle feature flags” process. When that process is run, users are asked to select the values for the feature flags. The process takes the end user input for both parameters and updates the config.properties file to set the feature flags:

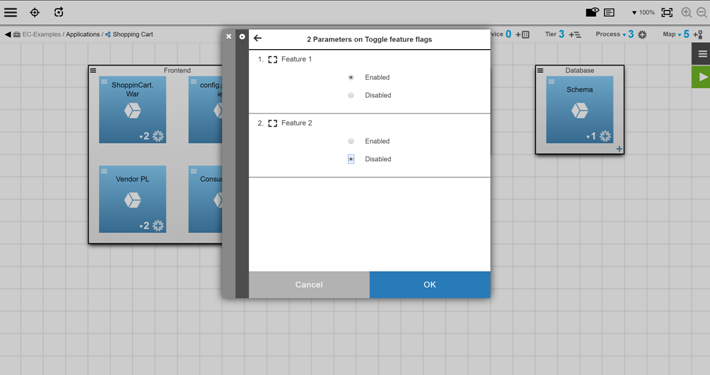
As shown in the images above, if the process is run, the values in the config.properties file are set as follows:
-
ShoppingCart_Feature1 = Enabled -
ShoppingCart_Feature2 = Disabled
With the change in place, only Feature 1 is now activated, and end users can use it. Any authorized user can turn that feature off or turn the second feature on just by rerunning the “Toggle feature flags” process.
Hot Deployment Use Case
CloudBees CD/RO lets you build your component or application processes to cater to hot deployment practices easily. Every application server plugin in CloudBees CD/RO has functions to stop or start servers, deploy applications, and many more.
CloudBees CD/RO lets you decide which functions to call and the order in which to call them when you build deployment processes. With hot deployment, you do not need to call the functions that ‘stop’ the server but instead directly call the deploy application-related function. This ensures the application updates occur in a “hot” manner. Also, you can create a process that decides hot or not-hot deployment based on a parameter, so that a single process can serve both scenarios. Following are examples of how to set up hot deployment in CloudBees CD/RO.
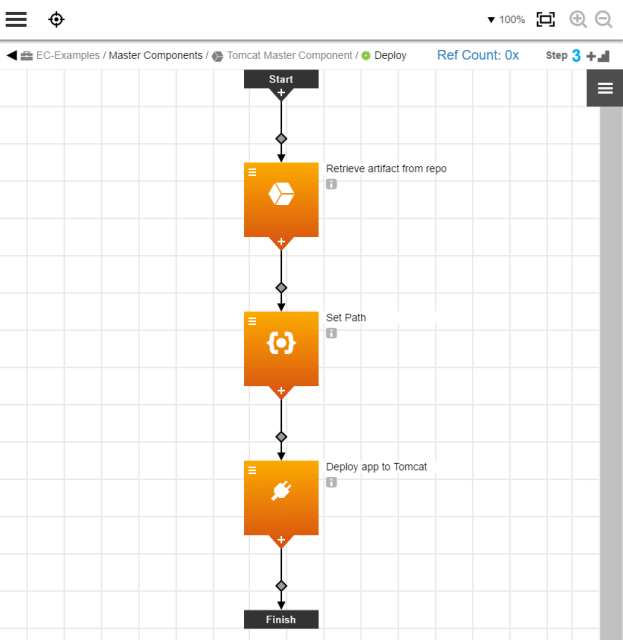
Example: Hot Deployment with a Component Process Without the Steps to Stop the Server
For example, you are deploying components that are always deployed in a hot fashion to a Tomcat server. You can create a component process similar to the one in the diagram below, which contains no steps to stop or start the server. Any new version or change is deployed directly to the right path in Tomcat, and any update occurs in a hot fashion. This component is created as a master component so that it can be used in any application.
Example: Optional Hot/Not-Hot Deployment With a Parameterized Component Process
Sometimes the same master component can be used to model both hot as well as regular (not hot) deployments that require a restart. You can create a single component process that conditionally skips the stop and restart steps based on a parameter.
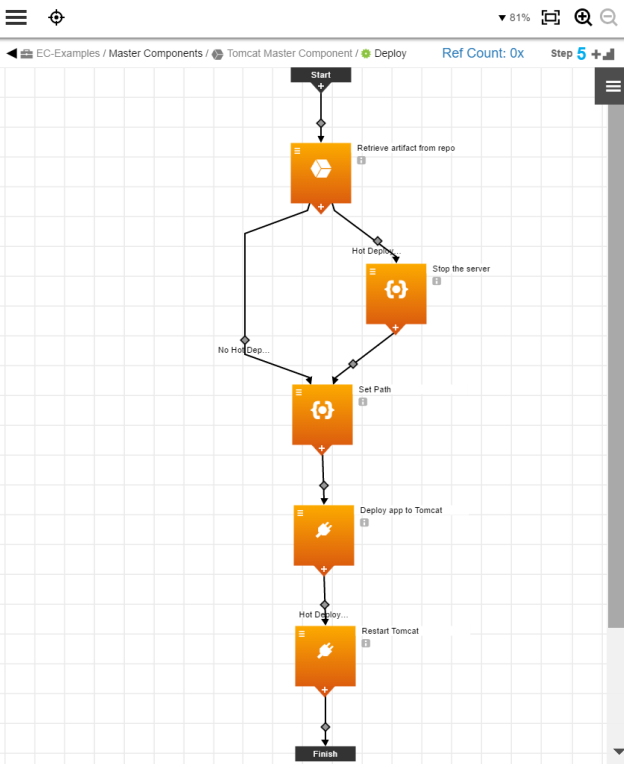
In this example, the steps to stop and start the Tomcat service are executed only when you do a hot deployment. If you do a regular (not hot) deployment, the Tomcat service is stopped and restarted at the right time. This user input is gathered from a process parameter.
Thus, CloudBees CD/RO provides complete flexibility to execute hot deployments easily depending on the application server technology of choice.