This section shows how to define and run a pipeline and view the results.
Parts of a pipelines list
Following are the key parts of a pipeline list:
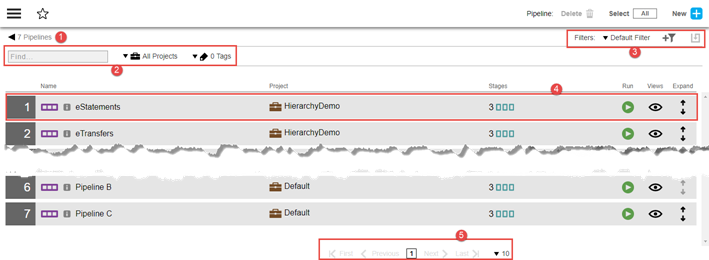
1 |
Breadcrumbs—Provide context for the current page and links to previous pages. |
2 |
Default filter criteria—Configure the default filter. Refer to Searching and Filtering for filter details; refer to Object Tags for configuring tags. |
3 |
Filter selector—Select the filter to use on this page. Create custom filters here; refer to Searching and Filtering for details. |
4 |
Pipeline definition—a description of the pipeline, the project to which it belongs, and the number of stages in the pipeline.
|
5 |
Pagination controls—Refer to Pagination for details. |
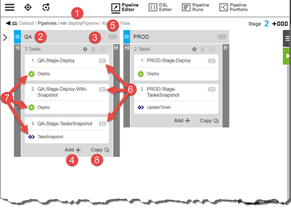
Parts of a pipeline
Following are the key parts of a pipeline. This pipeline has four stages.

1 |
Stage—the first stage among four in this pipeline. |
||
2 |
Tasks—this stage has four tasks.
|
||
3 |
Entry gate (defined, indicated by dark grey shading) |
||
4 |
Exit gate (undefined, indicated by light grey shading) |
| When an application, a pipeline, or a release is cloned across different projects, you might need to fix the references after the objects are cloned. For example, if a pipeline with an application reference in the "default" project is cloned to a different project, the application reference needs to be fixed after the pipeline is cloned. |
Creating a pipeline
You can create a pipeline from scratch or based on an existing pipeline. To create a pipeline component from scratch:
-
Open the home page of the CloudBees CD/RO web UI by browsing to https://<cloudbees-flow-server>/flow/.
-
Go to the pipelines list in one of these ways:
-
Select Pipelines.
-
Select User Menu in the upper left corner, and then select Pipelines > All Pipelines.
The pipelines list opens.
-
-
Select New to create a new pipeline. The New Pipeline dialog opens.
-
Select either Create New or Copy Existing and select a pipeline. The next page of the New Pipeline dialog displays. If copying from an existing pipeline use the project selector and search box to help you find the existing pipeline.
-
Enter the following
-
Pipeline name.
-
Project in which this pipeline is to reside.
-
Description (optional)—User-defined information about this pipeline. Not used by the system.
-
Name Template (optional)—Template used to determine the default name for pipeline runs that are launched from this pipeline. Providing a template lets you customize pipeline run names to make them more descriptive and makes specific pipeline runs easier to find.
-
Configure the following:
-
Disable Pipeline Restart —Determines whether this pipeline can restart. Pipeline restart enabled by default.
-
Disable Multiple Active Runs —Determines whether this pipeline can have multiple active runs. Multiple active runs enabled by default.
-
Stage skipping —Determines whether stage skipping is allowed and specifies which users or groups are allowed to skip. stages. Stage skipping is enabled by default.
-
Tags —Tags let you group related objects by a user-defined term. To tag this object or to modify or delete a tag, select the Open Dialog arrow at right. Refer to Object Tags for more information.
-
Override Workspace —If this is checked, workspace specified at the invoking procedure or process is ignored.
-
-
-
Select OK. The Pipeline Editor appears showing a pipeline with one stage.
Editing pipeline stage details
When you create a new pipeline from scratch (not from an existing one), it adds one stage automatically. You can change the stage name and add a description of the stage. To do so:
-
Select Actions and choose Stage Details. The Edit Stage dialog opens.
-
Enter information about the stage.
-
Name
-
Description
-
Place : The position of this stage with respect to other stages in the pipeline.
-
Set Start and End Dates : The start and end dates and times for this stage.
-
Assign a Resource or Resource Pool : Resource where this stage executes. Refer to Setting Up Resources for details.
-
Completion status update : The manner in which the stage is marked as complete. Refer to Release Concepts for more details.
-
Assign Color : The color in which a stage appears in the Planned vs Actual view. Refer to Release Dashboard for details.
-
Tags : Add one or more tags to this stage object. Refer to Object Tags for details.
-
-
Select OK.
Defining Pipeline Stage Tasks
This section describes how to define the tasks in a stage. You can add any number of tasks, reorder tasks, run tasks in parallel, delete tasks, and so on.
Parts of a task list in a pipeline stage
Following are the key parts of a task list:
1 |
Breadcrumbs showing the path to the pipeline. |
2 |
Name of the stage. |
3 |
|
4 |
Add +: select to add a task to the stage. |
5 |
Stage-level Actions: select to view details about the stage or to take action on the stage. |
6 |
Task-level Actions: select to view details about the task or take action on the task. Refer to Pipeline Tasks for further information. |
7 |
Icon signifying the type of task such as an Application Process task or a Manual task. |
8 |
Copy: select to create a task by copying an existing task. The Copy from Existing dialog box appears, where you select an existing task to copy: |
Adding pipeline tasks
Starting in the Pipeline Editor :
-
Select Add+ in the stage in which the new task is to reside. A task is added to the stage represented by the New Task block.
-
Enter the name of the new task in the New Task field.
-
Select Select Task Type.
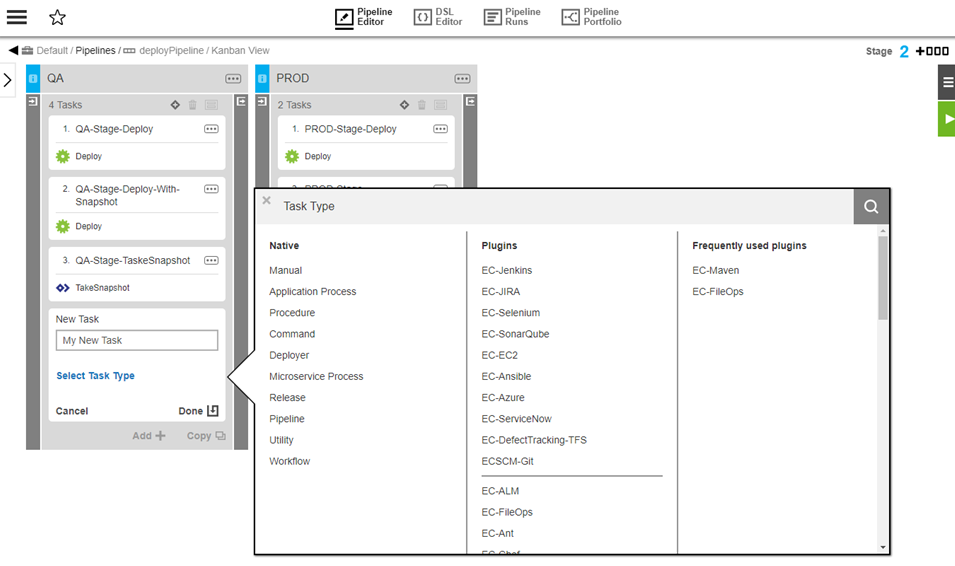
The Task Type dialog box appears.
-
Native —List of standard task types such as Command or Application Process.
-
Plugins —The top ten plugins followed by the rest of the list. The ec_preferred_integrations property sheet determines the plugins to appear in this list and their order.
-
To manually modify this list, navigate to the property sheet
/ec_deploy/ec_preferred_integrationsfrom User Menu > Administration > Server, and then edit the list.
-
-
Frequently used plugins— The list of up to ten frequently used pipeline plugins. The
ec_frequently_used_pipeline_pluginsproperty sheet determines the plugins to appear in this list and their order.-
It is populated by local plugin usage statistics collected by a watch dog thread run every five days. To change the watch dog schedule modify the Default background plugin statistics thread schedule server property via Settings on the User Menu > Administration > Serve r page.
-
To manually modify this list, navigate to the property sheet
/ec_deploy/ec_frequently_used_pipeline_pluginsfrom User Menu > Administration > Server, and then edit the list.
-
-
-
Select the task type.
The dialog box closes, and the task now displays the selected task type. Select Done to continue.
-
If you want to add another task, select Add + and repeat the previous steps.
The list shows the tasks in the order that they are to be executed.
Defining new pipeline tasks
Once a task is created, you must define it.
-
Select Define in the task tile.
The Edit Task dialog box opens. For more information about the task types, refer to Pipeline Tasks .
-
Enter the settings to define the task, and select OK.
Example: .. Select Application Process to define the task as an application process. .. In the Select Project field, select the Default project. .. Select the ShoppingCart application, and then select Use Snapshot
+ When you click in the Select a Snapshot field, a Search field opens where you can enter the criteria to search for a snapshot as well as the names of existing snapshots.
-
Select SC-S1 as the snapshot to use.
-
Select the Deploy process and the QA environment where application will be deployed.
Go to Pipeline Tasks for more information about the different ways to define a stage task.
-
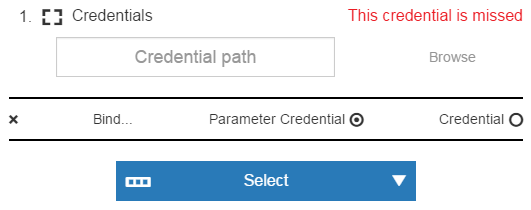
The Parameters field is disabled because the Deploy process does not have any required parameters.
If the process has a required parameter for the pipeline run, such as a credential parameter, a message with the number of required parameters (such as 1 Required ) appears in the Parameters field. You can enter the path to the credential, browse to it, select the Parameter Credential or Credential binding, or select a user-defined credential that is attached to the project associated with the pipeline.
-
-
Select Define for the second task in the list, define the task, and select OK.
The Edit Task dialog opens.
Example: .. Select Command to define the task as a command or script to run.
+ This command or script is passed to the task’s shell for execution.
-
(Optional) In the Post Processor field, enter the name of the postprocessor that you want to use.
This field specifies a command (passed to the task’s shell for execution) that analyzes the log file for the step and collects diagnostic information for reporting. If this field is blank, no postprocessor runs for the step. The default packaged postprocessor simply requires you to enter “postp,” but for details on modifications to this default or other aspects of using a postprocessor, refer to Postprocessors .
-
(Optional) In the Shell field, enter the shell to be used to execute the commands.
For example,
ec-perl. If you do not specify a shell on a task, at task run-time the server looks at the resource shell. If a resource shell is not set, the shell line used by the agent is platform dependent: Windows:cmd /q /c "{0}.cmd"Linux or UNIX:sh -e "{0}.cmd" -
In the Command field, enter the command or script to execute. For example:
use strict;# Print a message.print "Hello World!\n"; -
(Optional) Select Open Dialog for Assign a Resource or Resource Pool. Configure as required—refer to Resource Pool — Create a New Pool or Edit Existing Pool for details.
-
-
Select Define for the third task in the list, define the task, and select OK.
Example: .. Select Procedure. .. When you click in the Select Project field, a drop-down list of available projects opens. Select the Utilities project. .. When you click in the Select Procedure field, a drop-down list of available procedures opens. Select the TakeSnapshot procedure.
+ If the TakeSnapshot procedure has required parameters for the pipeline run, the Parameter field is enabled. Go here for more information.
Parallel task groups
By default, tasks are executed in order. You can group tasks without dependencies to run in parallel to reduce runtimes and make a stage more efficient. You can also group tasks to run in serial order.
Defining a parallel task group
To make a set of sequential tasks run in parallel:
-
Select at least two tasks in the stage that you want to run in parallel.
-
Select Group. A parallel task group, labeled Group 1 below, is created that contains the tasks to run in parallel:
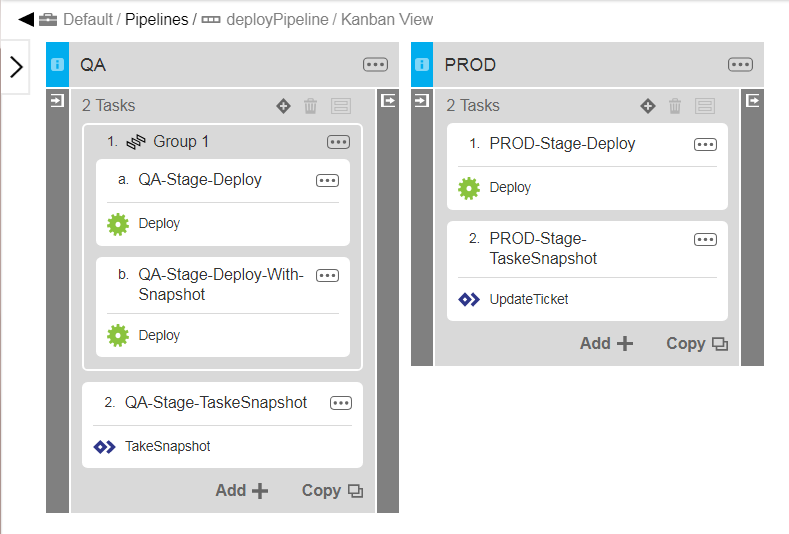
| You can add new tasks to an existing parallel tasks group. To do so, drag the task to move the task to the group. You can rename a parallel tasks group by Details from the group’s Action button. |
Setting the error or rejection handling
When defining a group of parallel tasks, you can specify whether the pipeline continues or stops if any task in the group fails because of an error or rejection. By default, if any task fails or is rejected, the pipeline aborts. This behavior is usually used in Continuous Delivery pipelines.
To set the error or rejection handling:
-
Select Details from the group’s Actions menu. The Edit Group dialog box appears.
-
Select one of the following options from the drop down list:
-
Continue on Error : If any task fails or is rejected, the pipeline continues to the next gate or stage task.
-
Stop on Error : If any task fails or is rejected, the pipeline aborts.
-
Manual Retry on Error : An approver or assignee reviews the error and retries, skips, or fails the task. The test failure is caught (and the name of the task turns red to indicate the failure). Then, the pipeline prompts an operator with
Test failed. Do you want to fail the pipeline or rerun the tests?. If the operator choosesrerun, the pipeline reruns the last task. -
Automate Retry on Error : The task is automatically retried at specific time intervals for a specific number of times, after which you can specify whether the pipeline stops or continues.
-
-
Select Always Run. Enabling this option guarantees that the tasks run before the pipeline execution ends. Note that if this option is selected, and any individual task in the group that has error handling set to Stop on Error fails, then all the running tasks are aborted.
-
Select OK.
Adding conditions
For a parallel task group, you can specify Run if and Wait until conditions to control the group behavior based on a precondition of your choice. Skipping a group causes all of its tasks to be skipped.
We recommend not using /increment when setting preconditions for pipeline objects or procedures.
|
You can specify preconditions by entering a JavaScript expression. To do so:
-
Select Conditions from the group’s Actions menu. The Conditions dialog box appears.
-
Enter a JavaScript expression into the Run if field, the Wait until field, or both.
For more examples of Javascript expressions for Run if and Wait until conditions, refer to the KBEC-00360 - Using Context-Relative Shortcuts to Properties on Pipelines and related objects KB article.
-
Configure Wait Dependency choices. Refer to Wait Dependencies for more information.
-
Select OK.
Unparallelizing pipeline tasks
You can unparallelize tasks, which means returning parallel tasks in a group to sequential execution. To do so:
-
Select Remove Group from the group’s Actions button. A confirmation popup appears
-
Select OK.
The tasks revert to run in sequence.
| You can also use this method to delete a parallel task group and all of its tasks. |
Editing a pipeline definition
To edit a pipeline definition, you edit its tasks.
-
Go to the Pipelines list and select the pipeline containing the task you want to edit. The pipeline opens in the Pipeline Editor.
-
Change the settings that you wish to modify. Some common actions are listed below.
Moving pipeline tasks
Select the task you want to move and drag it to the new position. Use this to change task order within a stage or group, move a task into or out of a group, or move a task to a different stage.
| To reorder stages, select Reorder: After or Reorder: Before from the stages Action menu for the stage. |
Moving pipeline gate rules
You can drag a pipeline gate rule from a gate to another gate. To do so, click to open both gates and drag the rule to move it to its new position in the other gate.
Deleting a pipeline task from a stage
You can delete a pipeline task from a stage. To do so:
-
Select
 for the task, and then select Delete. A confirmation popup appears.
 -
Select OK.
Starting a pipeline run from tasks or stages
With the required privileges, you can start a pipeline run from a single task, group tasks, or a stage.
The task from which you start the pipeline run must have a status of not-run.
When you start a pipeline run from a task, the pipeline has a warning status and message in the stage summary.
Restarting a stage with from a task restarts the run from the starting task. Any tasks that have not completed will not run.
You cannot start a pipeline run from a gated task, a subtask that is part of a group, or start from a task with startingStage specified in the run command.
|
To start a pipeline run from a single task:
-
Select the three vertical dots, then select Run from task.
 Figure 1. Run a pipeline from a task
 -
Enter your run details.
-
Select Run.
To start a pipeline run from a group tasks:
-
Select the three vertical dots, then select Run from group.
-
Enter your run details.
-
Select Run.
| You cannot start a pipeline run from a group subtask. |
To start a pipeline run from a stage:
-
Select the three vertical dots, then select Run from stage.
-
Enter your run details.
-
Select Run.
DSL example
// data variables def projName = 'Test Start pipeline at a task' def pipelineName = 'test pipeline' def stageNames = [s1: 'stage_1', s2: 'stage_2', s3: 'stage_3'] def taskNames = [t1 : 'task_1', t2 : 'task_2', t3 : 'task_3', subTask1: 'sub_task_1', subTask2: 'sub_task_2', group : 'group_task', gt1 : 'gate_task_1', gt2 : 'gate_task_2'] def gateConditionValue = '''/* Sample code to set the evidence on the task and pass the condition */ $[/javascript setProperty("/myTaskRuntime/evidence", "test value") true; ]''' // pipeline structure project projName, { pipeline pipelineName, { stage stageNames.s1, { gate 'PRE', { task taskNames.gt1, { gateType = 'PRE' gateCondition = gateConditionValue taskType = 'CONDITIONAL' } } gate 'POST', { task taskNames.gt2, { gateType = 'POST' gateCondition = gateConditionValue taskType = 'CONDITIONAL' } } task taskNames.t1, { actualParameter = [ 'commandToRun': 'echo success', ] subpluginKey = 'EC-Core' subprocedure = 'RunCommand' taskType = 'COMMAND' } task taskNames.t2, { actualParameter = [ 'commandToRun': 'echo success', ] subpluginKey = 'EC-Core' subprocedure = 'RunCommand' taskType = 'COMMAND' } task taskNames.group, { subproject = 'Default' taskType = 'GROUP' task taskNames.subTask1, { groupName = taskNames.group actualParameter = [ 'commandToRun': 'echo success', ] subpluginKey = 'EC-Core' subprocedure = 'RunCommand' taskType = 'COMMAND' } task taskNames.subTask2, { groupName = taskNames.group actualParameter = [ 'commandToRun': 'echo success', ] subpluginKey = 'EC-Core' subprocedure = 'RunCommand' taskType = 'COMMAND' } } task taskNames.t3, { actualParameter = [ 'commandToRun': 'echo success', ] subpluginKey = 'EC-Core' subprocedure = 'RunCommand' taskType = 'COMMAND' } } stage stageNames.s2, { gate 'PRE', { task taskNames.gt1, { gateCondition = gateConditionValue gateType = 'PRE' taskType = 'CONDITIONAL' } } gate 'POST', { task taskNames.gt2, { gateType = 'POST' gateCondition = gateConditionValue taskType = 'CONDITIONAL' } } task taskNames.t1, { actualParameter = [ 'commandToRun': 'echo success', ] subpluginKey = 'EC-Core' subprocedure = 'RunCommand' taskType = 'COMMAND' } task taskNames.t2, { actualParameter = [ 'commandToRun': 'echo success', ] subpluginKey = 'EC-Core' subprocedure = 'RunCommand' taskType = 'COMMAND' } task taskNames.group, { subproject = 'Default' taskType = 'GROUP' task taskNames.subTask1, { groupName = taskNames.group actualParameter = [ 'commandToRun': 'echo success', ] subpluginKey = 'EC-Core' subprocedure = 'RunCommand' taskType = 'COMMAND' } task taskNames.subTask2, { groupName = taskNames.group actualParameter = [ 'commandToRun': 'echo success', ] subpluginKey = 'EC-Core' subprocedure = 'RunCommand' taskType = 'COMMAND' } } task taskNames.t3, { actualParameter = [ 'commandToRun': 'echo success', ] subpluginKey = 'EC-Core' subprocedure = 'RunCommand' taskType = 'COMMAND' } } stage stageNames.s3, { gate 'PRE', { task taskNames.gt1, { gateCondition = gateConditionValue gateType = 'PRE' taskType = 'CONDITIONAL' } } gate 'POST', { task taskNames.gt2, { gateCondition = gateConditionValue gateType = 'POST' taskType = 'CONDITIONAL' } } task taskNames.t1, { actualParameter = [ 'commandToRun': 'echo success', ] subpluginKey = 'EC-Core' subprocedure = 'RunCommand' taskType = 'COMMAND' } task taskNames.t2, { actualParameter = [ 'commandToRun': 'echo success', ] subpluginKey = 'EC-Core' subprocedure = 'RunCommand' taskType = 'COMMAND' } task taskNames.group, { subproject = 'Default' taskType = 'GROUP' task taskNames.subTask1, { groupName = taskNames.group actualParameter = [ 'commandToRun': 'echo success', ] subpluginKey = 'EC-Core' subprocedure = 'RunCommand' taskType = 'COMMAND' } task taskNames.subTask2, { groupName = taskNames.group actualParameter = [ 'commandToRun': 'echo success', ] subpluginKey = 'EC-Core' subprocedure = 'RunCommand' taskType = 'COMMAND' } } task taskNames.t3, { actualParameter = [ 'commandToRun': 'echo success', ] subpluginKey = 'EC-Core' subprocedure = 'RunCommand' taskType = 'COMMAND' } } } } // start pipeline at a task runPipeline projectName: projName, pipelineName: pipelineName, startingTaskStage: stageNames.s2, startingTask: taskNames.t2
