Pipelines List
The Pipelines List shows all the pipelines that you have permission to view. To open it from the Home page (https://<cloudbees-flow-server>/flow), select Pipelines > All Pipelines.
This is a Pipelines List:
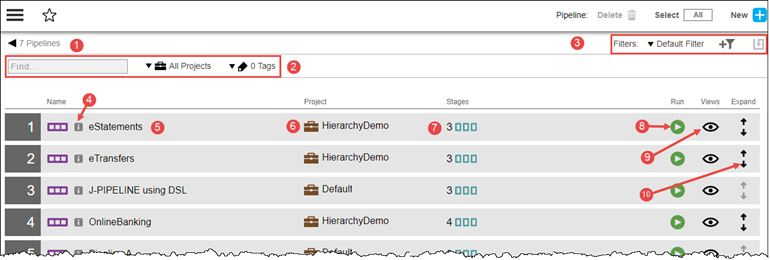
Each row in the list is a pipeline definition , consisting of the pipeline name, the project to which the pipeline belongs, and the number of stages in the pipeline. Selecting All or None and then selecting Delete removes the selected pipelines from the list. Selecting the blue + button in the upper-right corner adds a pipeline.
1 |
Breadcrumb identifying the object you are viewing and the total number of pipelines. |
2 |
Default filter criteria—Configure the default filter here. Refer to Searching and Filtering for filter details; refer to Object Tags for configuring tags. The default is to show the applications and microservices for all projects. To see only the objects for a specific project, click the down arrow in the All projects field and then select one or more projects in one of these ways:
If there are no matches, a message appears stating that there are no resource templates in the selected projects. |
3 |
Filter selector: select the filter to use on this page. Create custom filters here; refer to Searching and Filtering for details. |
4 |
Help: select to show information about the object. |
5 |
Name of the pipeline. |
6 |
The project to which the pipeline belongs. |
7 |
Number of stages in the pipeline. |
8 |
Run: select to run the pipeline. |
9 |
View: select to select the Pipeline Editor. |
10 |
Expand: select to view previous pipeline runs. |
The Pipeline Editor
Select a pipeline in the pipeline object list to open it in the pipeline editor, providing a task-centric representation of the selected pipeline. This view option provides you the step-by-step details of the pipeline within the context to let you:
-
See a birds-eye view of the sequence of all tasks.
-
Make all edits from an optimized, single-view UI.
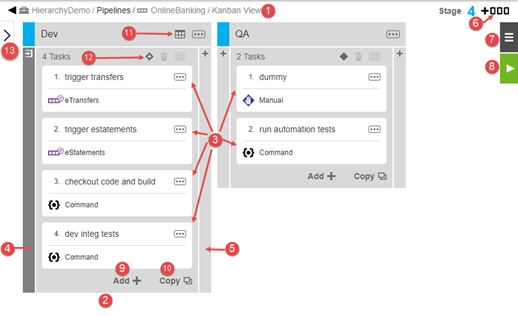
In the pipeline editor, you can author and edit a pipeline as well as view the underlying platform-level details. Consider the following pipeline with two stages: Dev and QA:
You can perform these actions:
-
Select Add Stage (6) to add a new stage to the pipeline.
-
Select Object Menu (7) to open a menu where you can get more details about the pipeline and take actions on the pipeline.
-
Select Run (8) to start a pipeline run.
-
In a stage, select Add Task (9) to open a dialog box where you can define tasks for the stage.
1 |
Breadcrumbs showing the object hierarchy, path to the pipeline, and the pipeline name. |
2 |
Stage in the pipeline, a milestone or checkpoint in the software delivery process. |
3 |
Tasks in the stage, which is the automation logic for a stage. Refer to Tasks . |
4 |
Entry gate, consisting of the approvals to enter a stage. If a gate contains rules, it appears in gray and becomes expandable via mouse click so that you can view or edit the rules. If it has no rules, it appears in white (and is not expandable). For more information, refer to Entry and Exit Gates. |
5 |
Exit gate, consisting of the approvals to exit a stage. If a gate contains rules, it appears in gray and becomes expandable via mouse click so that you can view or edit the rules. If it has no rules, it appears in white (and is not expandable). For more information, refer to Entry and Exit Gates. |
6 |
Add new stage: select to add a stage. |
7 |
Object Menu: select to open the object menu to get more details about the pipeline and to take actions on the pipeline.
|
8 |
Run: select to run the pipeline. This initiates a pipeline run and opens the Pipeline Runs list showing the real-time progress of the pipeline run. You can also view the results of previous pipeline runs from here. |
9 |
Add Task: select to create a new task from the beginning. |
10 |
Copy Task: select to create a task by copying another task. |
11 |
Calendar: select to view or set the start and end dates for this stage. This button only displays when there are start and end dates set. |
12 |
Stage Conditions: select to view or set “run if” and “wait until” conditions and pipeline or release wait dependencies for this stage. |
13 |
Hierarchy menu toggle: select to slide open and to slide close the pipeline hierarchy menu. |
Creating and managing tasks
To create a task, select Add Task or Copy, then follow the prompts.
-
Enter a name for the task.
-
Click Select Task Type. The Task Type dialog box displays.
-
Native —List of standard task types such as Command or Application Process.
-
Plugins —The top ten plugins followed by the rest of the list. The ec_preferred_integrations property sheet determines the plugins to appear in this list and their order. For more information about property sheets, refer to Properties .
-
Frequently used plugins — The list of up to ten frequently used pipeline plugins. The ec_frequently_used_pipeline_plugins property sheet determines the plugins to appear in this list and their order.
-
It is populated by local plugin usage statistics collected by a watch dog thread run every five days. To change the watch dog schedule modify the Default background plugin statistics thread schedule server property via Settings on the Administration > Serve r page.
-
To manually modify this list, open the Automation Platform at https://<cloudbees-flow-server>/flow/, then select Administration > Server > ec_deploy > ec_frequently_used_pipeline_plugins, and then edit the list.
-
-
The rest of the list—to edit the list open the Automation Platform at https://<cloudbees-flow-server>/flow/and select Administration > Server > ec_deploy > ec_preferred_integrations t.
Select the task type. The dialog box closes, and the task now displays the selected task type.
-
-
Select Define. Add details for this task’s type. Subsequent dialog varies based on task type.
-
If you want to add another task, select Add + and repeat the previous steps to add it. The resulting task list shows the tasks in the order that they will be executed.
Starting a pipeline run from tasks or stages
With the required privileges, you can start a pipeline run from a single task, group tasks, or a stage.
The task from which you start the pipeline run must have a status of not-run.
When you start a pipeline run from a task, the pipeline has a warning status and message in the stage summary.
Restarting a stage with from a task restarts the run from the starting task. Any tasks that have not completed will not run.
You cannot start a pipeline run from a gated task, a subtask that is part of a group, or start from a task with startingStage specified in the run command.
|
To start a pipeline run from a single task:
-
Select the three vertical dots, then select Run from task.
 Figure 1. Run a pipeline from a task
 -
Enter your run details.
-
Select Run.
To start a pipeline run from a group tasks:
-
Select the three vertical dots, then select Run from group.
-
Enter your run details.
-
Select Run.
| You cannot start a pipeline run from a group subtask. |
To start a pipeline run from a stage:
-
Select the three vertical dots, then select Run from stage.
-
Enter your run details.
-
Select Run.
DSL example
// data variables def projName = 'Test Start pipeline at a task' def pipelineName = 'test pipeline' def stageNames = [s1: 'stage_1', s2: 'stage_2', s3: 'stage_3'] def taskNames = [t1 : 'task_1', t2 : 'task_2', t3 : 'task_3', subTask1: 'sub_task_1', subTask2: 'sub_task_2', group : 'group_task', gt1 : 'gate_task_1', gt2 : 'gate_task_2'] def gateConditionValue = '''/* Sample code to set the evidence on the task and pass the condition */ $[/javascript setProperty("/myTaskRuntime/evidence", "test value") true; ]''' // pipeline structure project projName, { pipeline pipelineName, { stage stageNames.s1, { gate 'PRE', { task taskNames.gt1, { gateType = 'PRE' gateCondition = gateConditionValue taskType = 'CONDITIONAL' } } gate 'POST', { task taskNames.gt2, { gateType = 'POST' gateCondition = gateConditionValue taskType = 'CONDITIONAL' } } task taskNames.t1, { actualParameter = [ 'commandToRun': 'echo success', ] subpluginKey = 'EC-Core' subprocedure = 'RunCommand' taskType = 'COMMAND' } task taskNames.t2, { actualParameter = [ 'commandToRun': 'echo success', ] subpluginKey = 'EC-Core' subprocedure = 'RunCommand' taskType = 'COMMAND' } task taskNames.group, { subproject = 'Default' taskType = 'GROUP' task taskNames.subTask1, { groupName = taskNames.group actualParameter = [ 'commandToRun': 'echo success', ] subpluginKey = 'EC-Core' subprocedure = 'RunCommand' taskType = 'COMMAND' } task taskNames.subTask2, { groupName = taskNames.group actualParameter = [ 'commandToRun': 'echo success', ] subpluginKey = 'EC-Core' subprocedure = 'RunCommand' taskType = 'COMMAND' } } task taskNames.t3, { actualParameter = [ 'commandToRun': 'echo success', ] subpluginKey = 'EC-Core' subprocedure = 'RunCommand' taskType = 'COMMAND' } } stage stageNames.s2, { gate 'PRE', { task taskNames.gt1, { gateCondition = gateConditionValue gateType = 'PRE' taskType = 'CONDITIONAL' } } gate 'POST', { task taskNames.gt2, { gateType = 'POST' gateCondition = gateConditionValue taskType = 'CONDITIONAL' } } task taskNames.t1, { actualParameter = [ 'commandToRun': 'echo success', ] subpluginKey = 'EC-Core' subprocedure = 'RunCommand' taskType = 'COMMAND' } task taskNames.t2, { actualParameter = [ 'commandToRun': 'echo success', ] subpluginKey = 'EC-Core' subprocedure = 'RunCommand' taskType = 'COMMAND' } task taskNames.group, { subproject = 'Default' taskType = 'GROUP' task taskNames.subTask1, { groupName = taskNames.group actualParameter = [ 'commandToRun': 'echo success', ] subpluginKey = 'EC-Core' subprocedure = 'RunCommand' taskType = 'COMMAND' } task taskNames.subTask2, { groupName = taskNames.group actualParameter = [ 'commandToRun': 'echo success', ] subpluginKey = 'EC-Core' subprocedure = 'RunCommand' taskType = 'COMMAND' } } task taskNames.t3, { actualParameter = [ 'commandToRun': 'echo success', ] subpluginKey = 'EC-Core' subprocedure = 'RunCommand' taskType = 'COMMAND' } } stage stageNames.s3, { gate 'PRE', { task taskNames.gt1, { gateCondition = gateConditionValue gateType = 'PRE' taskType = 'CONDITIONAL' } } gate 'POST', { task taskNames.gt2, { gateCondition = gateConditionValue gateType = 'POST' taskType = 'CONDITIONAL' } } task taskNames.t1, { actualParameter = [ 'commandToRun': 'echo success', ] subpluginKey = 'EC-Core' subprocedure = 'RunCommand' taskType = 'COMMAND' } task taskNames.t2, { actualParameter = [ 'commandToRun': 'echo success', ] subpluginKey = 'EC-Core' subprocedure = 'RunCommand' taskType = 'COMMAND' } task taskNames.group, { subproject = 'Default' taskType = 'GROUP' task taskNames.subTask1, { groupName = taskNames.group actualParameter = [ 'commandToRun': 'echo success', ] subpluginKey = 'EC-Core' subprocedure = 'RunCommand' taskType = 'COMMAND' } task taskNames.subTask2, { groupName = taskNames.group actualParameter = [ 'commandToRun': 'echo success', ] subpluginKey = 'EC-Core' subprocedure = 'RunCommand' taskType = 'COMMAND' } } task taskNames.t3, { actualParameter = [ 'commandToRun': 'echo success', ] subpluginKey = 'EC-Core' subprocedure = 'RunCommand' taskType = 'COMMAND' } } } } // start pipeline at a task runPipeline projectName: projName, pipelineName: pipelineName, startingTaskStage: stageNames.s2, startingTask: taskNames.t2
