This section describes how to create rules for stage entry and exit gates. A gate rule can be one of the following types:
-
Approval —Use when an approver must physically select the approval to move to the next rule or stage.
-
Procedure —Use this to run a set of best practices, subroutines, modules, or functions that you can create and reuse at the platform level. Examples are scripts, command sets, or other automation logic objects.
-
Custom —Use this to define user-defined gate conditions.
-
Plugin —Use this to run third-party procedures that interface with external systems. Plugin tasks let you integrate and orchestrate third-party tools. For example, you can run Selenium automation at the right time by using the Selenium plugin.
You can configure multiple rules in a single gate, change the rule order, run rules in parallel, sequentially, or a combination.
Parts of a Gate in a Stage Gate Rule
The following image shows expanded entry and exit gates, and their rules, for Dev stage. The entry gate for QA stage is shown collapsed.
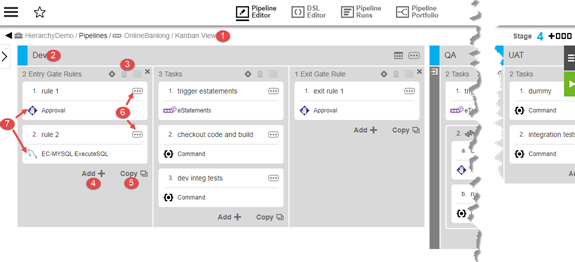
1 |
Breadcrumbs showing the path to the pipeline. |
2 |
Name of the stage. |
3 |
Gate Condition button: used to add a PRE-gate condition. Delete button: used to delete the selected rules. Group button: used to put multiple rules into a group. |
4 |
Add + button: select to add a rule to the gate. |
5 |
*Copy button: select to create a rule by copying an existing one. The Copy from Existing dialog box displays, where you select an existing rule to copy.* |
6 |
Rule-level Actions button: select to access details about the rule or to take action on the rule. |
7 |
Icon signifying the type of rule such as an Approval rule or a Plugin rule. |
Adding Gate Rules
Starting in the Pipeline Editor :
-
Select Add in the gate in which the new rule is to reside. A rule is added to the gate represented by the New rule block.
-
Enter the name of the new rule in the New Rule field.
-
Click Select Rule Type. The Rule Type dialog box opens.
-
Native —List of standard rule types.
-
Plugins —The top ten plugins followed by the rest of the list. The
ec_preferred_integrationsproperty sheet determines the plugins to appear in this list and their order.-
To manually modify this list, navigate to the property sheet
/ec_deploy/ec_preferred_integrationsfrom User Menu > Administration > Server, and then edit the list.
-
-
Frequently used plugins— The list of up to ten frequently used gate rule plugins. The
ec_frequently_used_pipeline_pluginsproperty sheet determines the plugins to appear in this list and their order.-
It is populated by local plugin usage statistics collected by a watch dog thread run every five days. To change the watch dog schedule modify the Default background plugin statistics thread schedule server property via Settings on the User Menu > Administration > Serve r page.
-
To manually modify this list, navigate to the property sheet
/ec_deploy/ec_frequently_used_pipeline_pluginsfrom User Menu > Administration > Server, and then edit the list.
-
-
-
Select the desired rule type.
The dialog box closes, and the rule now displays the selected rule type. Select Done to continue.
-
If you want to add another rule, select Add + and repeat the previous steps.
The list shows the rules in the order that they are to be executed.
Defining Gate Rules
Once a rule is created, you must define it. This section describes the four types of gate rules and how to define them: Approval, Procedure-based, Condition-based rules, and Plugin-based rules.
-
Select Define in the rule tile. The Edit Rule dialog box opens.
-
Enter the settings to define the rule based on rule type, and select OK.
Approval rules:
-
Select Approval to define the rule as an approval rule.
-
Click in the Assignees field and enter the name of the users or groups authorized to approve this rule, and select one or more users or groups. You can also use the
$[ ]parameter notation to parameterize this field, for example:$[myGroup/userName]. If you use the$[ ]parameter notation for the approvers definition, only users and groups can be resolved from the property as task approvers. If there are only email addresses in the property, emails are sent to those addresses and any user is able to approve a task. If there are email addresses and user/group name(s) in the property, emails are sent to those addresses and to resolved users/groups, but only users/groups are able to approve a task. -
(Optional) Set the following, as appropriate:
-
Minimum users to approve : enter a positive integer.
-
Use approver’s permissions for the further Pipeline execution: override access control already defined for the rule.
-
Allow to skip this rule: if checked, rule approval options include Skipped and Completed (or custom labels, if so configured) instead of Rejected and Completed. Use when rejecting a rule is not necessary or appropriate; a skipped rule does not record an error.
-
Use Custom Labels : if checked, define custom labels for Completed, Failed, and Skipped approval choices that match the rule at hand.
-
Notification : if this is on, select a Default Manual rule notification template from the pulldown. Edit and create notification templates from here. Delete notification templates directly from the property page,
/server/ec_deploy/ec_pipelineNotifierTemplates, available from User Menu > Server > Custom Server Properties. -
Advanced Email Configuration : select the email configuration corresponding to the context of the notifier you wish the notification to have. Note this feature requires one or more email configurations defined for your CloudBees CD/RO site. Refer to Email Configuration—create new or edit existing email configuration for further information.
Procedure-based rules:
-
Select Procedure.
-
Click in the Select Project field and select the project to which the desired procedure exists.
-
Supply any input parameters required by the procedure and assign a resource to it.
Condition-based rules:
-
Select Custom.
-
Supply the boolean logic for this rule via a property. Click the property picker button for a list of available properties. For example, the following sets the evidence on the task,
evidence, totrue, thus passing the condition: -
To check the outcome of the previous task in the same stage using the task name:
$[/javascript myStageRuntime.tasks.test.outcome =="skipped"] -
To set the evidence property in the task, which displays in the comment after the task has completed:
$[/javascript setProperty("/myTaskRuntime/evidence", "test value") true; ]Plugin-based rules:
-
Select Plugin.
-
Select category, plugin, and plugin procedure.
-
Supply any input parameters required by the procedure and assign a resource to it.
Refer to Plugin Pipeline Tasks for more information about plugin-based tasks.
-
For more examples of Javascript expressions for conditions, refer to the KBEC-00360 - Using Context-Relative Shortcuts to Properties on Pipelines and related objects KB article.
Parallel Rule Groups
By default, rules are executed in order. You can group rules without dependencies to run in parallel to reduce runtimes and make a stage more efficient. You can also group rules to run in serial order.
Defining a Parallel rule Group
To make a set of sequential rules run in parallel:
-
Select at least two rules in the stage that you want to run in parallel.
-
Select Group. A parallel rule group, labeled Group 1 below, is created that contains the rules to run in parallel:
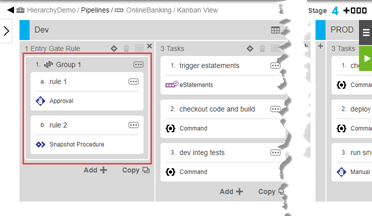
| You can add new rules to an existing parallel rules group. To do so, drag the rule to move the rule to the group. You can rename a parallel rules group by Details from the group’s Action button. |
Setting the Error or Rejection Handling
When defining a group of parallel rules, you can specify whether the Stage Gate continues or stops if any rule in the group fails because of an error or rejection. By default, if any rule fails or is rejected, the Stage Gate aborts.
To set the error or rejection handling:
-
Select Details from the group’s Actions menu. The Edit Group dialog box displays.
-
Select one of the following options from the drop down list:
-
Continue on Error : If any rule fails or is rejected, the Stage Gate continues to the next gate or stage rule.
-
Stop on Error : If any rule fails or is rejected, the Stage Gate aborts.
-
Manual Retry on Error : An approver or assignee reviews the error and retries, skips, or fails the rule. The test failure is caught (and the name of the rule turns red to indicate the failure). Then, the Stage Gate prompts an operator with
Test failed. Do you want to fail the Stage Gate or rerun the tests?. If the operator choosesrerun, the Stage Gate reruns the last rule. -
Automate Retry on Error : The rule is automatically retried at specific time intervals for a specific number of times, after which you can specify whether the Stage Gate stops or continues.
-
-
Select Always Run. Enabling this option guarantees that the rules run before the Stage Gate execution ends. Note that if this option is selected, and any individual rule in the group that has error handling set to Stop on Error fails, then all the running rules are aborted.
-
Select OK.*
Adding Conditions
For a parallel rule group, you can specify Run if and Wait until conditions to control the group behavior based on a precondition of your choice. Skipping a group causes all of its rules to be skipped.
We recommend not using /increment when setting preconditions for pipeline objects or procedures.
|
You can specify preconditions by entering a JavaScript expression. To do so:
-
Select Conditions from the group’s Actions menu. The Conditions dialog box displays.
-
Enter a JavaScript expression into the Run if field, the Wait until field, or both.
For more examples of Javascript expressions for Run if and Wait until conditions, refer to the KBEC-00360 - Using Context-Relative Shortcuts to Properties on Pipelines and related objects KB article.
-
Configure Wait Dependency choices. Refer to Wait Dependencies for more information.
-
Select OK.
Unparallelizing Stage Gate rules
You can unparallelize rules, which means returning parallel rules in a group to sequential execution. To do so:
-
Select Remove Group from the group’s Actions button. A confirmation popup displays.
-
Select OK. The rules revert to run in sequence.
| You can also use this method to delete a parallel rule group and all of its rules. |
Editing a Stage Gate Definition
To edit a Stage Gate definition, you edit its rules.
-
Go to the Pipelines list and select the pipeline containing the stage you want to edit. The pipeline opens in the Pipeline Editor.
-
Locate the pipeline stage containing the gate.
-
Change the settings that you wish to modify. Some common actions are listed below.