This section shows how pipelines are represented in the CloudBees CD/RO user interface.
Pipelines list
The Pipelines list shows all the pipelines that you have permission to view. Access CloudBees CD/RO Pipeline list by navigating to .
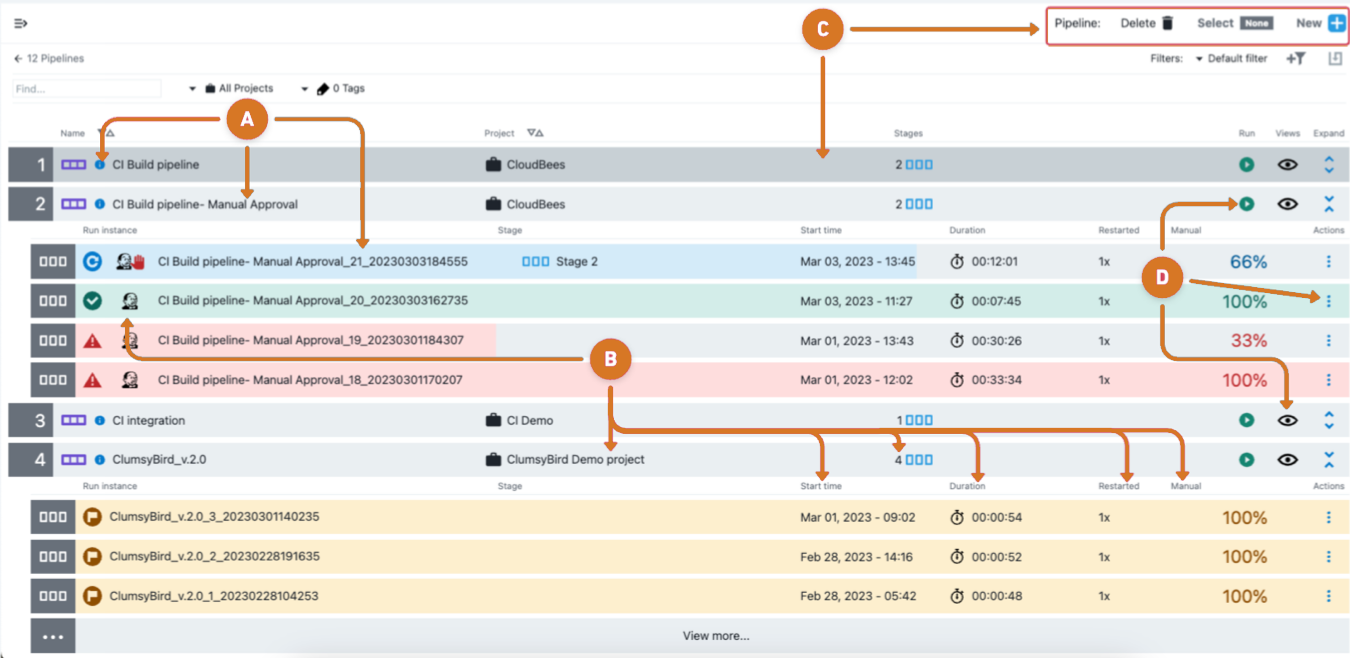
-
Access pipeline and pipeline run data.
-
Modify pipeline description and tags by selecting the Kubernetesblue-info-h-icon.png[Information] information icon.
-
Edit a pipeline by selecting the pipeline
namelink. -
Modify a pipeline run by selecting the
namelink for the Run instance.
-
-
Manage run instances.
-
Access pipeline CloudBees CI build data by selecting the
 CloudBees CI view build data icon.
 -
Choose to proceed or abort a CloudBees CI pipeline task by selecting the
 CloudBees CI pipeline approval icon.
 -
Review pipeline run data in the Project, Stage, Start time, Duration, and Restarted columns.
-
-
Add or remove pipelines.
-
Create a new or copy an existing pipeline by selecting
 New icon.
 -
Remove a pipeline.
-
Select the pipeline to be deleted.
-
Select the
 Delete icon.
-
-
Deselect chosen pipelines by selecting the
 None icon.
-
-
Manage pipelines.
-
Run the pipeline by selecting the
 Run icon.
 -
Select the
 Views icon to navigate to one of the following pipeline features.
-
Pipeline editor
-
Pipeline run
-
DSL editor
-
Pipeline portfolio
-
Pipeline portfolio list
-
-
| You can narrow the pipelines list to display specific pipeline runs using the filter function at the top of the screen. Refer to search and filter and view pipeline runs for more information about using filters. |
Pipeline Editor
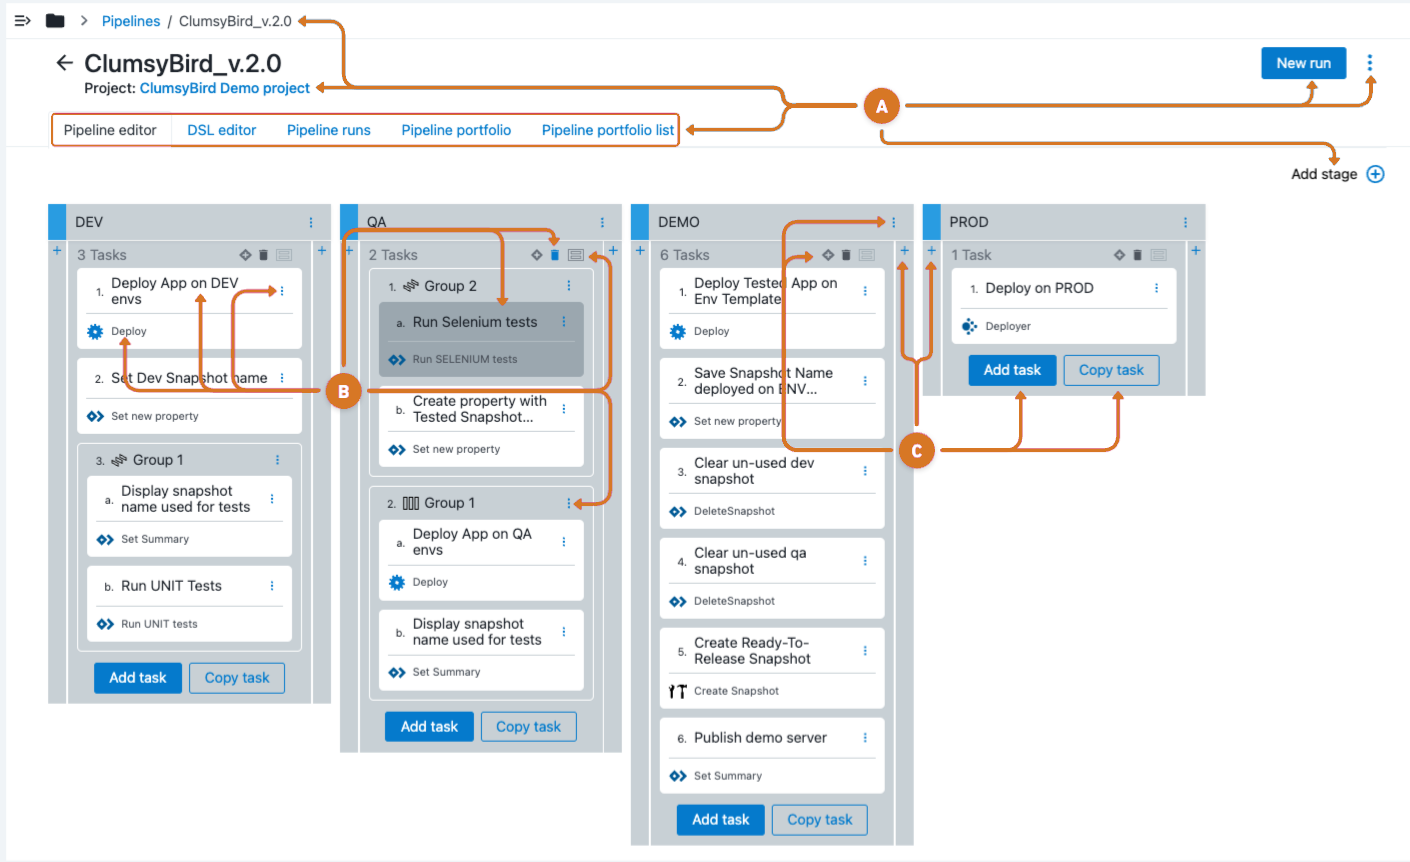
Use the pipeline editor to configure pipeline attributes. Access the CloudBees CD/RO Pipeline editor one of following ways:
-
Navigate to . Then select the pipeline
namelink. -
Navigate to . Then select the pipeline run instance
namelink.
-
Access pipeline data.
-
Select the
 folder icon to access the full parent to child path.
 -
Select the navigation link to access the associated project.
-
Navigate between pipeline management features by selecting one of the following tabs:
-
DSL editor: Use to configure pipeline using DSL.
-
Pipeline runs: Use to manage release pipeline runs. Refer to Pipeline runs.
-
Pipeline portfolio: Use to review portfolio basic details.
-
Pipeline portfolio list: Use to review the portfolio list.
-
-
Run the pipeline by selecting New run.
-
Configure the pipeline by selecting the pipeline
 three-dots and a configuration option.
View options.
-
Pipeline details: Opens the Edit Pipeline dialog box where you can edit pipeline details.
-
Schedules: opens pipeline scheduler which allows you to set a time for future pipeline runs.
-
Triggers: opens trigger configuration which allows you to configure pipeline triggers.
-
DSL export: Select to download DSL corresponding to the current object.
-
Parameters: opens the Parameters dialog box where you can view, add, and delete the parameters attached to the pipeline.
-
Properties: opens the Properties screen. You can view, add, and delete the properties associated with the pipeline. Refer to Configure properties or property sheets for more information.
-
Access Control: Opens the access control page where you can view, add, and edit the privileges for the pipeline.
-
Change History: Shows the change history for the pipeline and the objects in it. CloudBees CD/RO tracks the changes to tracked objects including applications and microservices, procedures, workflows, workspaces, resources, and project-owned components.
-
Previous run: Opens a listing of previous pipeline runs.
-
Delete: Deletes the pipeline.
-
-
Use
 to create a new pipeline stage.
-
-
Configure pipeline tasks.
-
Edit task details, definitions or conditions using one of these methods:
-
Task procedure
namelink. -
Task
namelink. -
Task
 three-dots. The task context menu opens.
View task options.
-
Details: Choose settings related to tags, pipeline restart, active runs, stage skipping, and workspace.
-
Parameters: Use to view, add, and delete the parameters attached to the pipeline task.
-
Properties: Modify task properties. Refer to Configure properties or property sheets for more information.
-
Conditions: Configure the settings for these task conditions: run if, wait until and wait dependency.
-
Access Control: Configure access privileges for a task.
-
Change history: Review a list of release configuration modifications.
-
Delete: Remove the task.
-
-
-
Remove pipeline tasks.
-
Select the tasks to be deleted.
-
Select Delete
 icon.
icon.
-
-
Group task(s) within a stage.
-
Select one or more tasks for grouping.
-
Select Group
 three-dots. Refer to Group tasks within a stage for more details.
-
-
Modify group settings by selecting Group
 three-dots and a configuration option.
View group options.
-
Details: Choose settings related to tags, pipeline restart, active runs, stage skipping and workspace by selecting Details.
-
Properties: Set one property that applies to all tasks within the group.
-
Run from group: Start the release pipeline at the grouped task.
-
Make Serial or Make Parallel: Set grouped task to run all at once or sequentially.
-
Conditions: Configure group Run if, Wait until and Wait dependency settings.
-
Remove from group: Remove selected task from group.
-
Delete: Remove from group.
-
-
-
Manage stage components.
-
Access stage conditions by selecting
 . Refer to Pipeline objects and conditions for more details.
 -
Modify stage settings by selecting stage
 three-dots.
View stage options.
-
Details: Use to a modify task details.
-
Add task: Use to a create a new task.
-
Copy task: Create a copy of the selected task.
-
Run from stage: Start pipeline run from selected stage.
-
Duplicate: Clones the entire stage.
-
Re-order: After
-
Re-order: Before
-
Properties: opens the Property list Refer to Configure properties or property sheets for more information.
-
Conditions: select to view or set “run if” and “wait until” conditions and pipeline or release wait dependencies for this stage.
-
Access control: opens the Access Control page where you can view, add, and edit the privileges for the stage.
-
Change history: Display the change history for the stage.
-
Delete: Deletes the stage.
-
-
Configure stage entry or exit gates by selecting the
 gate expand icon. Refer to Entry and exit gates for more information.
 -
Use the Add task to add a task to the stage.
-
Use the Copy task to copy a task and add it to the stage.
-
Create a new task
-
Access the pipeline editor by navigating to Release Orchestration > Pipelines. Then select the pipeline
namelink. -
Do one of the following:
-
Select
 three-dots at the top of the stage, and select Add Task.
 -
Select Add task at the bottom of the stage. The pipeline view refreshes and a new task is added to the bottom of the stage.
-
-
Enter a title for the task in the Task
namefield. -
Select Define. The Edit Task panel opens on the Definition tab.
Create a new project, application process, procedure or release from Edit Task > Definition and follow these steps:
-
Type the name of a new object in the Select object field. The
Create: "name"link appears. -
Select the
Create: "name"link. The is enabled.
 -
Select
 to access the object-specific editor.
-
-
Select the type of task in the Task type field. For more information, refer to Pipeline tasks. The Definition tab refreshes and displays the conditional task type fields based on the type selected.
-
Complete the applicable conditional fields.
-
Do one of the following.
-
Select the Details or Conditions tab to further configure the task.
-
Save your changes by selecting Save changes.
-
Copy an existing task
-
Access the pipeline editor by navigating to Release Orchestration > Pipelines. Then select the pipeline
namelink. -
Do one of the following.
-
Select Copy Task from the stage
 three-dots.
 -
Select the Copy task at the bottom of the stage. The Copy task panel opens.
-
-
Use the following fields to locate the task to be copied.
-
Project: Use the drop-down to select an available project.
-
Pipeline or Release: Select an available pipeline or release.
-
Choose the name of a pipeline or release.
-
Task: Select a task to copy.
-
-
Select Next. The Copy task panel displays containing the selected task configuration.
-
Do one of the following to continue defining the task:
-
Review the Details, Definition, and Conditions tabs and make adjustments as needed.
-
Save your changes by selecting Save changes.
-
Move a task or stage
You can drag and drop a task to any stage within the pipeline. Use this to change task order within a stage or group, move a task into or out of a group, or move a task to a different stage.
Additionally, you can move a stage to a different location within the pipeline.
To move a task:
-
Select the task to be moved.
-
Drag the task to a new location within the stage, or to another stage within the pipeline.
To move a stage:
-
Select the stage header for the stage to be moved.
-
Drag the stage to a new location within the pipeline.
Group tasks within a stage
Group tasks within a stage to organize, control, and optimize the execution of tasks within a pipeline. Tasks are grouped to run in parallel or in serial.
For example, a web application’s "Deploy" stage might be divided into groups that represent a specific set of tasks such as:
| Group name | Description |
|---|---|
Preparation |
A group of tasks that use conditional logic to generate build artifacts and run tests within the "Deploy" stage. |
Deployment tasks |
Tasks configured to run in parallel such as, "Deploy to staging," and "Smoke tests". These tasks execute concurrently to deploy to staging and run smoke tests simultaneously. Refer to Author and run pipelines for more information about parallel tasks. |
Promote to production |
Serial tasks grouped together to promote the application from the "Deploy" stage to the production environment. |
To group tasks:
-
Use your mouse to select one or more tasks.
When multiple tasks are selected,  Group is available.
-
Select
 Group at the top of the stage to group the selected tasks together.
The selected tasks now appear within a Group window.
 -
Manage configurations by selecting
 three-dots within the Group. The Group context menu opens. Refer to Pipeline Editor for more details.
By default, grouped tasks are set to run in parallel. To run sequentially, select Group  three-dots and Make Serial.
Starting a pipeline run from tasks or stages
With the required privileges, you can start a pipeline run from a single task, group tasks, or a stage.
The task from which you start the pipeline run must have a status of not-run.
When you start a pipeline run from a task, the pipeline has a warning status and message in the stage summary.
Restarting a stage with from a task restarts the run from the starting task. Any tasks that have not completed will not run.
You cannot start a pipeline run from a gated task, a subtask that is part of a group, or start from a task with startingStage specified in the run command.
|
To start a pipeline run from a single task:
-
Select the three vertical dots, then select Run from task.
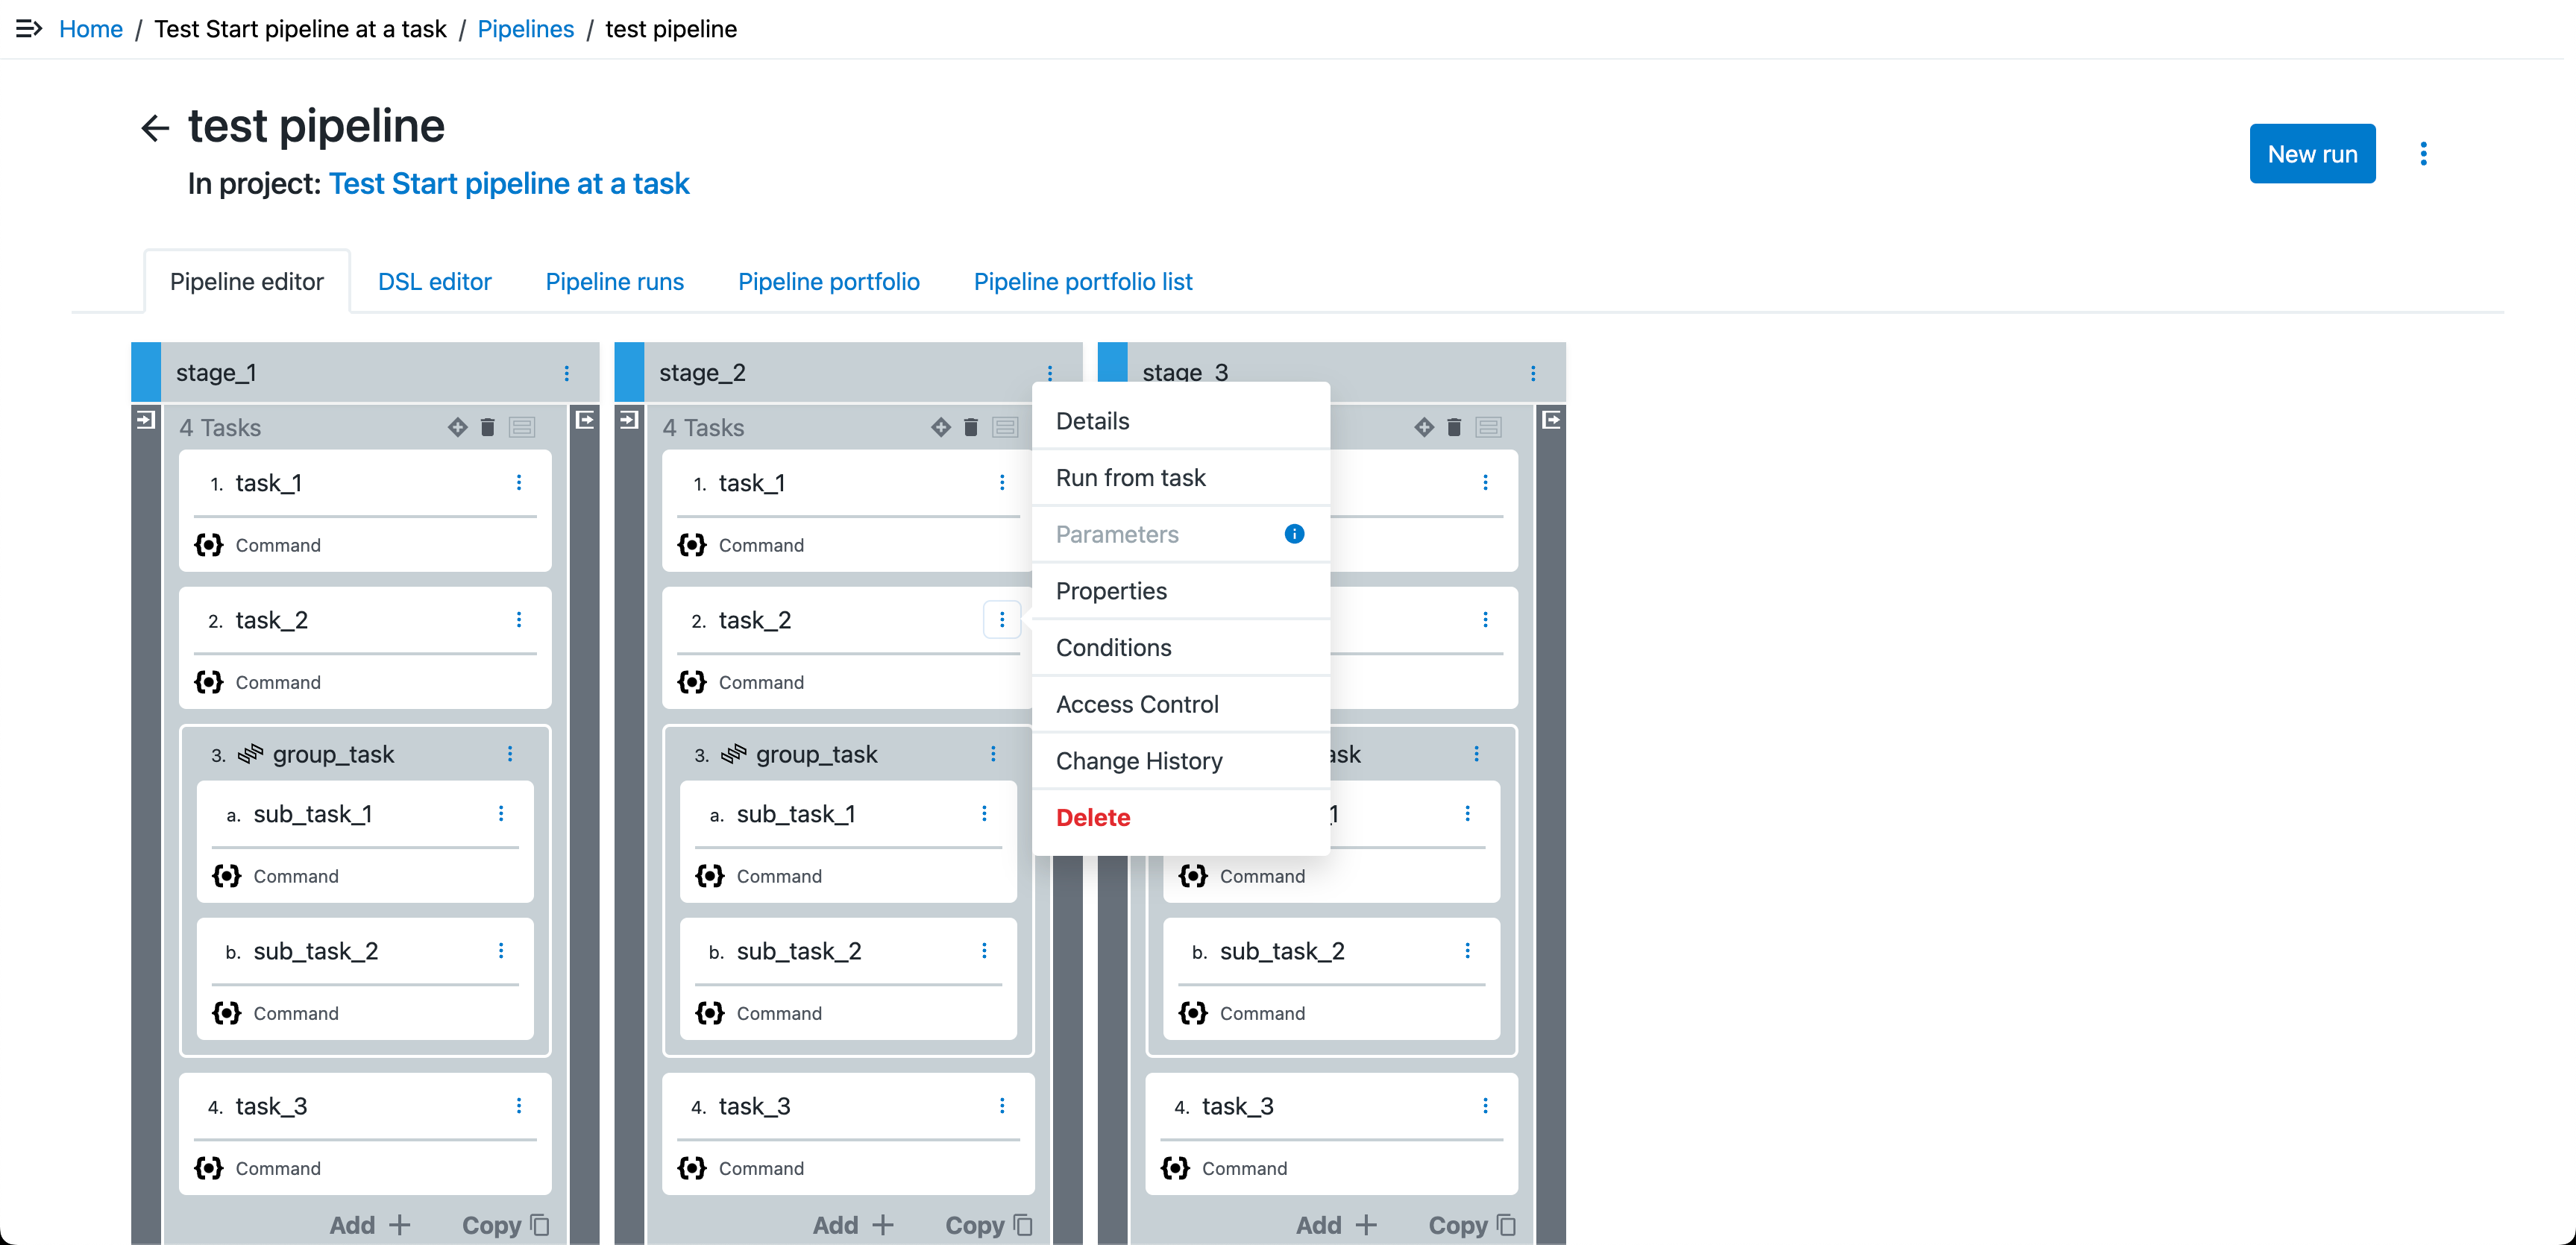 Figure 3. Run a pipeline from a task
 -
Enter your run details.
-
Select Run.
To start a pipeline run from a group tasks:
-
Select the three vertical dots, then select Run from group.
-
Enter your run details.
-
Select Run.
| You cannot start a pipeline run from a group subtask. |
To start a pipeline run from a stage:
-
Select the three vertical dots, then select Run from stage.
-
Enter your run details.
DSL example
Click to view DSL example
// data variables def projName = 'Test Start pipeline at a task' def pipelineName = 'test pipeline' def stageNames = [s1: 'stage_1', s2: 'stage_2', s3: 'stage_3'] def taskNames = [t1 : 'task_1', t2 : 'task_2', t3 : 'task_3', subTask1: 'sub_task_1', subTask2: 'sub_task_2', group : 'group_task', gt1 : 'gate_task_1', gt2 : 'gate_task_2'] def gateConditionValue = '''/* Sample code to set the evidence on the task and pass the condition */ $[/javascript setProperty("/myTaskRuntime/evidence", "test value") true; ]''' // pipeline structure project projName, { pipeline pipelineName, { stage stageNames.s1, { gate 'PRE', { task taskNames.gt1, { gateType = 'PRE' gateCondition = gateConditionValue taskType = 'CONDITIONAL' } } gate 'POST', { task taskNames.gt2, { gateType = 'POST' gateCondition = gateConditionValue taskType = 'CONDITIONAL' } } task taskNames.t1, { actualParameter = [ 'commandToRun': 'echo success', ] subpluginKey = 'EC-Core' subprocedure = 'RunCommand' taskType = 'COMMAND' } task taskNames.t2, { actualParameter = [ 'commandToRun': 'echo success', ] subpluginKey = 'EC-Core' subprocedure = 'RunCommand' taskType = 'COMMAND' } task taskNames.group, { subproject = 'Default' taskType = 'GROUP' task taskNames.subTask1, { groupName = taskNames.group actualParameter = [ 'commandToRun': 'echo success', ] subpluginKey = 'EC-Core' subprocedure = 'RunCommand' taskType = 'COMMAND' } task taskNames.subTask2, { groupName = taskNames.group actualParameter = [ 'commandToRun': 'echo success', ] subpluginKey = 'EC-Core' subprocedure = 'RunCommand' taskType = 'COMMAND' } } task taskNames.t3, { actualParameter = [ 'commandToRun': 'echo success', ] subpluginKey = 'EC-Core' subprocedure = 'RunCommand' taskType = 'COMMAND' } } stage stageNames.s2, { gate 'PRE', { task taskNames.gt1, { gateCondition = gateConditionValue gateType = 'PRE' taskType = 'CONDITIONAL' } } gate 'POST', { task taskNames.gt2, { gateType = 'POST' gateCondition = gateConditionValue taskType = 'CONDITIONAL' } } task taskNames.t1, { actualParameter = [ 'commandToRun': 'echo success', ] subpluginKey = 'EC-Core' subprocedure = 'RunCommand' taskType = 'COMMAND' } task taskNames.t2, { actualParameter = [ 'commandToRun': 'echo success', ] subpluginKey = 'EC-Core' subprocedure = 'RunCommand' taskType = 'COMMAND' } task taskNames.group, { subproject = 'Default' taskType = 'GROUP' task taskNames.subTask1, { groupName = taskNames.group actualParameter = [ 'commandToRun': 'echo success', ] subpluginKey = 'EC-Core' subprocedure = 'RunCommand' taskType = 'COMMAND' } task taskNames.subTask2, { groupName = taskNames.group actualParameter = [ 'commandToRun': 'echo success', ] subpluginKey = 'EC-Core' subprocedure = 'RunCommand' taskType = 'COMMAND' } } task taskNames.t3, { actualParameter = [ 'commandToRun': 'echo success', ] subpluginKey = 'EC-Core' subprocedure = 'RunCommand' taskType = 'COMMAND' } } stage stageNames.s3, { gate 'PRE', { task taskNames.gt1, { gateCondition = gateConditionValue gateType = 'PRE' taskType = 'CONDITIONAL' } } gate 'POST', { task taskNames.gt2, { gateCondition = gateConditionValue gateType = 'POST' taskType = 'CONDITIONAL' } } task taskNames.t1, { actualParameter = [ 'commandToRun': 'echo success', ] subpluginKey = 'EC-Core' subprocedure = 'RunCommand' taskType = 'COMMAND' } task taskNames.t2, { actualParameter = [ 'commandToRun': 'echo success', ] subpluginKey = 'EC-Core' subprocedure = 'RunCommand' taskType = 'COMMAND' } task taskNames.group, { subproject = 'Default' taskType = 'GROUP' task taskNames.subTask1, { groupName = taskNames.group actualParameter = [ 'commandToRun': 'echo success', ] subpluginKey = 'EC-Core' subprocedure = 'RunCommand' taskType = 'COMMAND' } task taskNames.subTask2, { groupName = taskNames.group actualParameter = [ 'commandToRun': 'echo success', ] subpluginKey = 'EC-Core' subprocedure = 'RunCommand' taskType = 'COMMAND' } } task taskNames.t3, { actualParameter = [ 'commandToRun': 'echo success', ] subpluginKey = 'EC-Core' subprocedure = 'RunCommand' taskType = 'COMMAND' } } } } // start pipeline at a task runPipeline projectName: projName, pipelineName: pipelineName, startingTaskStage: stageNames.s2, startingTask: taskNames.t2 -
Select Run.
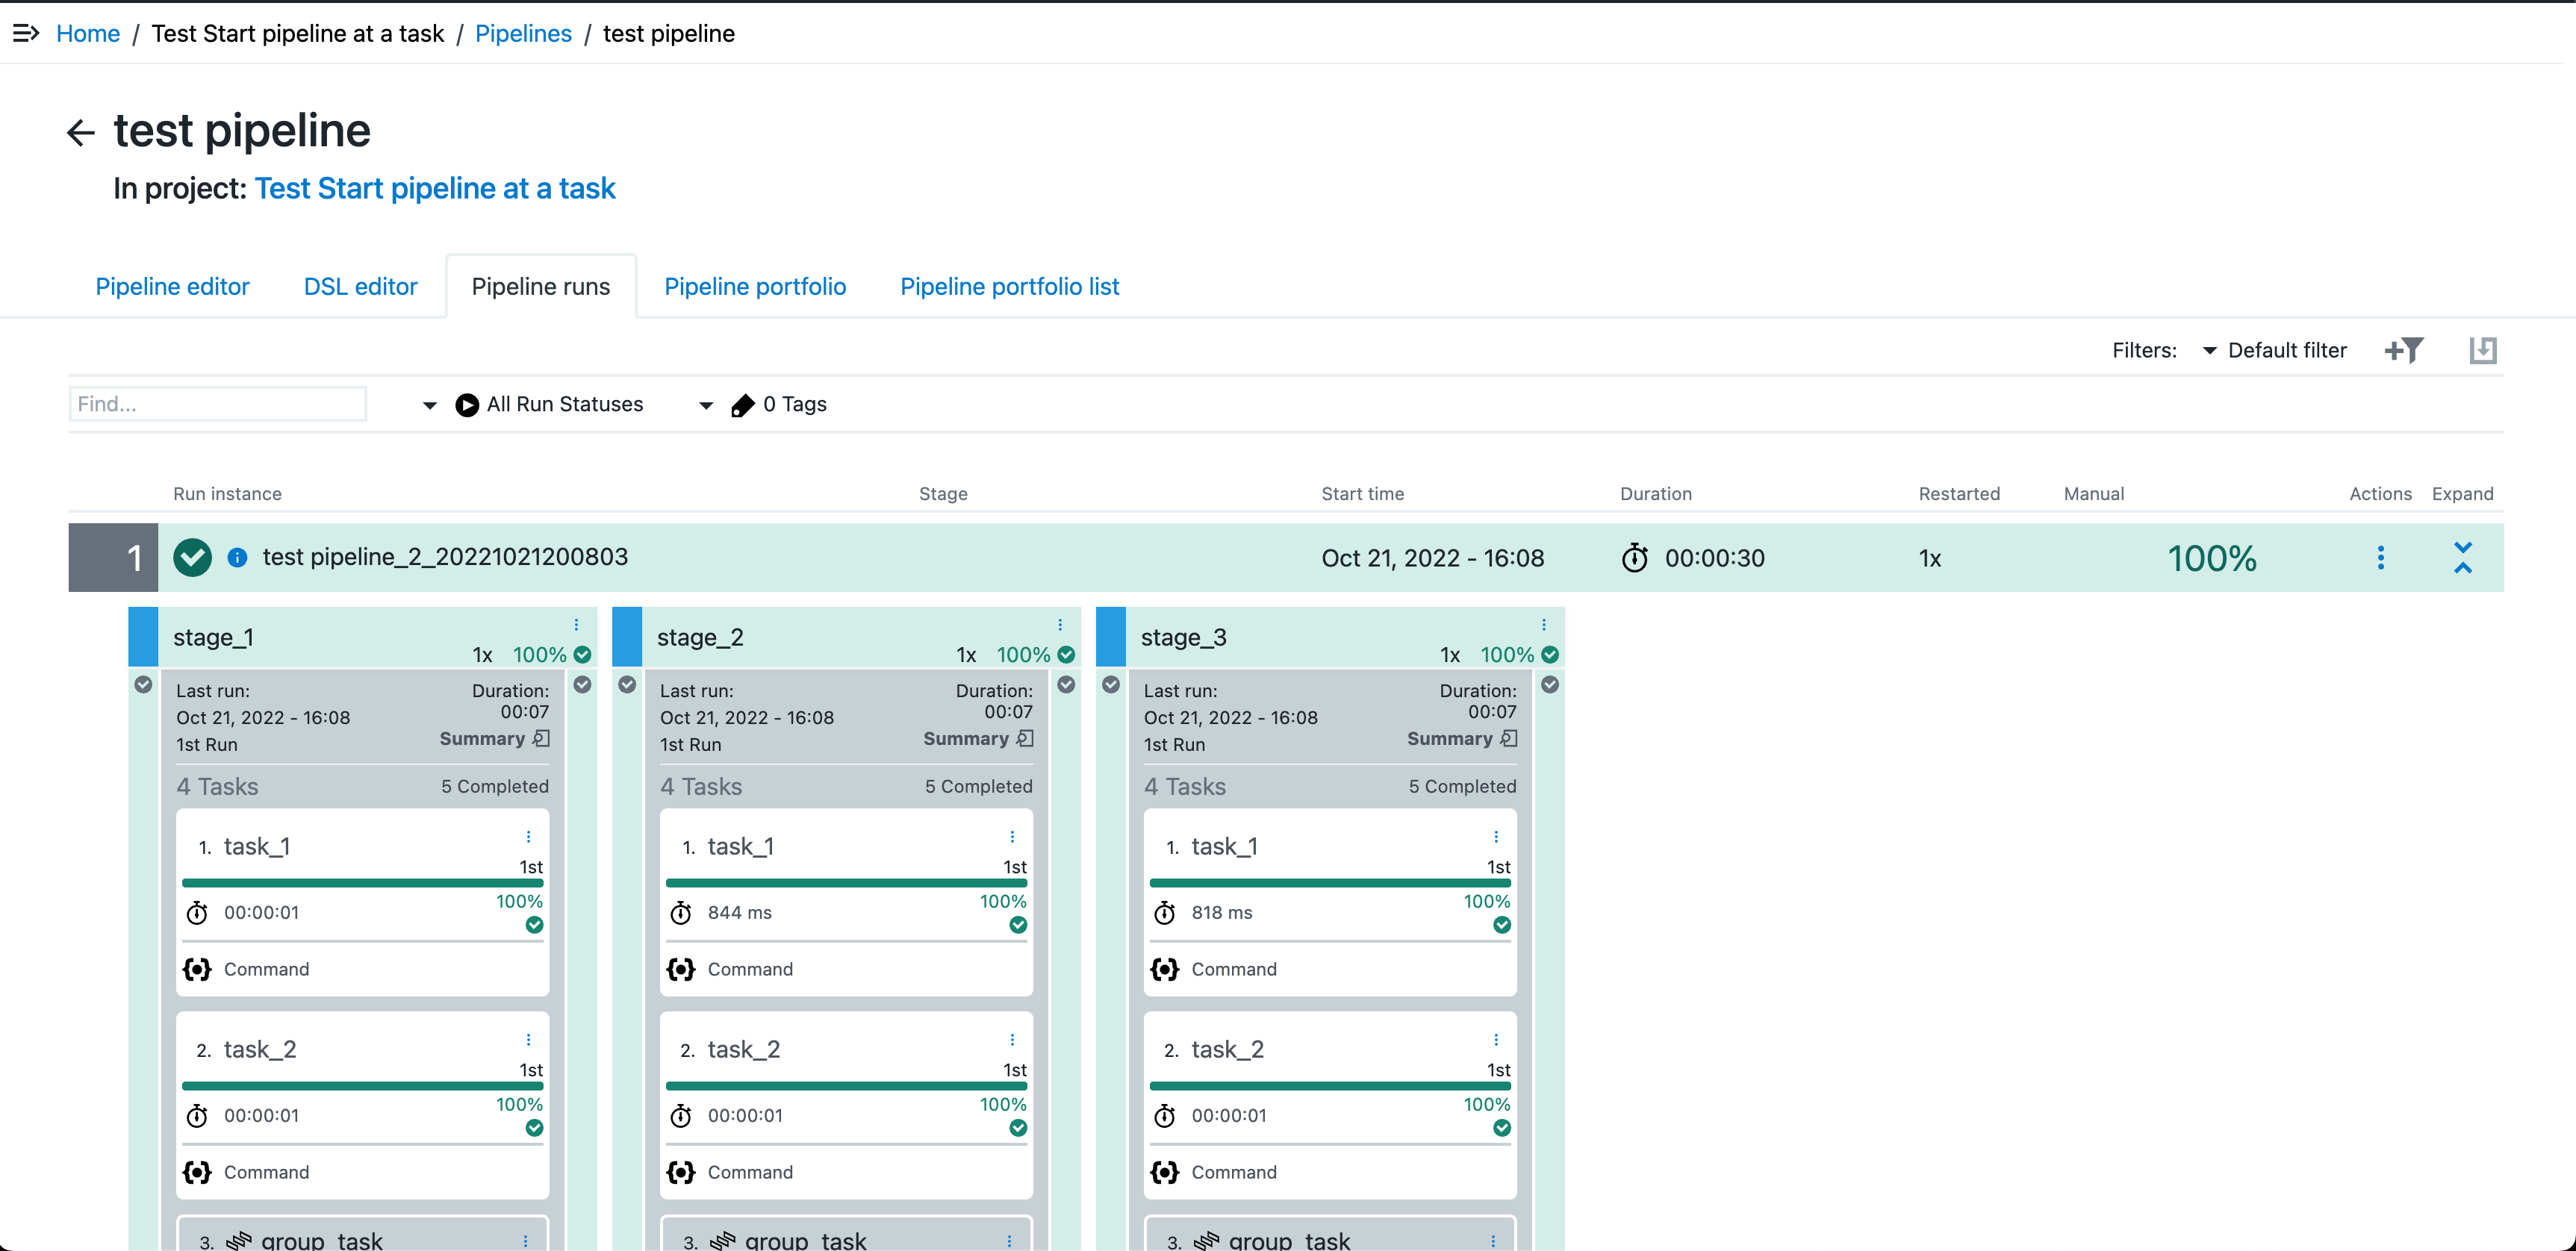 Figure 4. Run result
The resulting dialog varies based on the action menu selection and the task type.
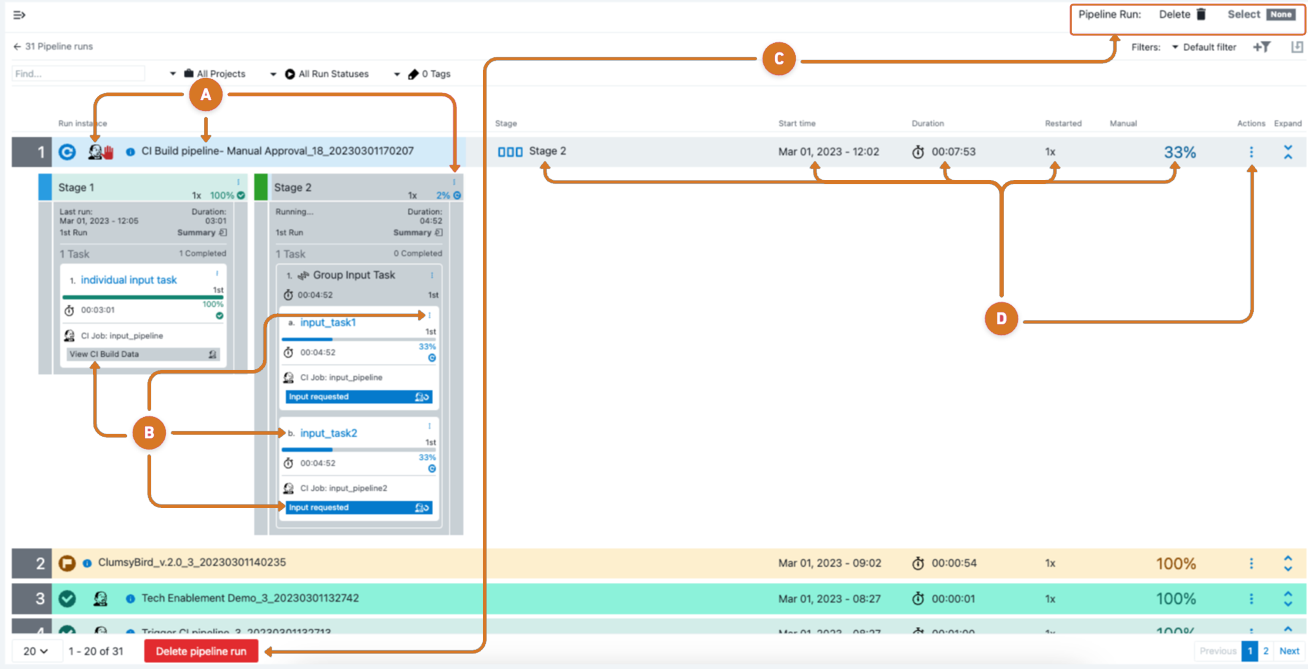
Pipeline runs
The Pipeline runs screen displays a listing of all pipelines that have been run. Access the Pipeline runs screen one of the following ways:
-
From the Release editor or Pipeline editor select the Pipeline runs tab.
-
Navigate to . Then select the pipeline
namelink.
-
Manage pipeline run instances.
-
Manage CloudBees CI pipeline tasks.
-
Choose to proceed or abort a pipeline run instance task by selecting
 CloudBees CI approval icon.
 -
Review CloudBees CI build data for a run instance by selecting the
 CloudBees CI build data icon.
-
-
Edit the pipeline run instances by selecting the instance
namelink. -
Modify a run instance stage by selecting
 three-dots and a configuration option.
Select to view options.
-
Restart: Use to restart the stage.
-
Properties: opens the Properties screen. You can view, add, and delete the properties associated with the stage. Refer to Configure properties or property sheets for more information.
-
Access control: opens the Access Control page where you can view, add, and edit the privileges for the stage.
-
-
-
Configure run instance pipeline task.
-
Modify task properties by selecting
 three-dots and a configuration option.
Select to view options
-
Properties: opens the Properties screen. You can view, add, and delete the properties associated with the task. Refer to: Configure properties or property sheets for more information.
-
Parameters: opens the Parameters dialog box where you can view, add, and delete the parameters attached to the task.
-
View previous runs: opens the Parameters dialog box where you can view, add, and delete the parameters attached to the task.
-
Access control: opens the Access Control page where you can view, add, and edit the privileges for the task.
-
-
-
Remove pipeline run instances.
-
Delete pipeline run instances.
-
Select the pipelines to be removed.
-
Select the
 delete icon or Delete pipeline runs
-
-
Deselect chosen run instances by selecting the
 select none icon.
-
-
Manage run instances.
-
Review pipeline run instance data in the Stage, Start time, Duration, and Restarted columns.
-
Modify a run instance pipeline by selecting
 three-dots and a configuration option.
Select to view options.
-
Run again: Restarts the pipeline.
-
Restart from failure: Restarts the pipeline from execution failure.
-
Properties: opens the Properties screen. You can view, add, and delete the properties associated with the pipeline. Refer to: Configure properties or property sheets for more information.
-
Parameters: opens the Parameters dialog box where you can view, add, and delete the parameters attached to the pipeline.
-
Access control: opens the Access Control page where you can view, add, and edit the privileges for the pipeline.
-
Change history: Displays the change history for the pipline.
-
Audit reports: Displays the Audit and compliance reports for the pipeline.
-
Delete: Deletes the pipeline.
-
-