Use the generic OIDC flow to authenticate a pipeline that runs on GitHub Actions, Jenkins (via the oidc-provider plugin), GitLab, or any other OpenID Connect (OIDC) identity provider that the CI system can act as. The CI issues a short-lived, signed OIDC id-token for each pipeline run, and CloudBees Smart Tests verifies it against that issuer, with no API key to rotate or leak.
This is the same flow for every CI system. The only provider-specific pieces are how the id-token is obtained and what the sub claim looks like (which you register once as a Trusted OIDC subject in the web app). For the shared verification mechanism (JWT claims and JWKS), refer to Authenticate without an API key (OIDC).
|
If your GitHub Actions workflow currently sets |
How key discovery works
To verify a token, CloudBees Smart Tests needs the issuer’s public keys (its JWKS). There are two ways it obtains them, and which one applies depends only on whether CloudBees Smart Tests can reach the issuer over the network:
| Mode | How CloudBees Smart Tests gets the issuer’s public keys | When to use |
|---|---|---|
AUTO |
CloudBees Smart Tests fetches them live from the issuer’s |
Your issuer’s OIDC discovery URL is reachable from the public internet (a cloud Jenkins, a public issuer, or a private issuer that exposes only its public JWKS path through a proxy). |
MANUAL |
An admin registers the issuer’s JWKS once, ahead of time, in the CloudBees Smart Tests web app. No outbound network call is made to your issuer. |
Your issuer is on a private network that CloudBees Smart Tests cannot reach, and its signing key is stable. |
|
A JWKS contains only public keys, no secret is exposed by registering or copying it. If a private issuer rotates its keys frequently, prefer exposing just its public JWKS path and using AUTO over re-pasting the JWKS for MANUAL mode. |
Once the token is verified, CloudBees Smart Tests checks that its normalized sub has been registered as a trusted OIDC subject for your workspace. This registration is what authorizes a specific pipeline to send data and it is a one-time, self-service step described below.
The two things you register
| What | Where (web app) | Scope |
|---|---|---|
Trusted OIDC subject - authorizes one pipeline ( |
Settings → Trusted OIDC subjects |
Per workspace. Always required. |
Trusted OIDC issuer - pre-registered JWKS for an unreachable issuer |
Settings → Trusted OIDC issuers |
Platform-wide trust anchor. Only for MANUAL mode; must be done by an organization admin. |
Prerequisites
-
A CloudBees Smart Tests organization and workspace. Navigate to https://cloudbees.io and sign up if you have not already.
-
A CI system that can issue OIDC id-tokens (GitHub Actions has this built in; for Jenkins, install the OpenID Connect Provider plugin).
-
The CloudBees Smart Tests CLI installed in your pipeline. For more information, refer to Getting started. Use the latest CLI, older releases do not support the generic flow for GitHub.
Step 1: Issue an OIDC id-token
Pick the section for your CI provider. Each one ends with an id-token available to the CLI in the SMART_TESTS_OIDC_TOKEN environment variable.
GitHub Actions
GitHub Actions can mint an id-token per workflow run without any plugin. Enable it by:
-
Granting the workflow the
id-token: writepermission (GitHub docs). -
Setting
SMART_TESTS_GITHUB_OIDC_TOKEN_AUTH=1. The CLI then fetches the id-token from the runner (with the correct audience) and uses it as its credential.
|
Do not set |
Jenkins
Configure Jenkins to act as an OIDC issuer and bind a per-build id-token into your pipeline.
-
Install the OpenID Connect Provider plugin (Manage Jenkins → Plugins).
-
Confirm your Jenkins root URL is set to a stable, correct value under Manage Jenkins → System → Jenkins Location. The issuer string is derived from this URL (
{root}/oidc), and it must match for verification, so avoidlocalhostin anything other than local testing. -
Create an OpenID Connect id token credential (Manage Jenkins → Credentials):
-
Audience:
https://app.cloudbees.io/smart-tests -
Give it an ID you will reference in the pipeline, e.g.
smart-tests-oidc.
-
-
In your pipeline, bind the credential to the
SMART_TESTS_OIDC_TOKENenvironment variable. The CLI reads the id-token from this variable.
pipeline { agent any stages { stage('Smart Tests') { steps { // Bind the credential to a Jenkins-scoped variable (JENKINS_OIDC_TOKEN), then re-export it // as SMART_TESTS_OIDC_TOKEN inside the shell. Binding directly to SMART_TESTS_OIDC_TOKEN // does not always propagate into the CLI's environment (Jenkins masks/scopes the variable // for Groovy, not necessarily for every child shell), so the explicit export is required. withCredentials([string(credentialsId: 'smart-tests-oidc', variable: 'JENKINS_OIDC_TOKEN')]) { sh ''' export SMART_TESTS_OIDC_TOKEN="$JENKINS_OIDC_TOKEN" # Resolve the org/workspace this pipeline is registered to, and export the # environment the rest of the commands need. eval "$(smart-tests verify --oidc)" smart-tests record build --build "$BUILD_TAG" # ... record session / subset / record tests as usual ... ''' } } } } }
|
|
Step 2: Register the pipeline (first run)
The first time the pipeline runs, its identity is not yet registered, so smart-tests verify --oidc verifies the token but reports that the subject is unknown:
This pipeline's OIDC identity is not yet registered with Smart Tests. Please copy and paste the block below into your workspace settings (Trusted OIDC subjects) to authorize this pipeline: ########## start ########## { "issuer": "https://jenkins.example.com/oidc", "normalized-sub": "https://jenkins.example.com/job/my-team/job/my-app/" } ########## end ##########
This pipeline's OIDC identity is not yet registered with Smart Tests. Please copy and paste the block below into your workspace settings (Trusted OIDC subjects) to authorize this pipeline: ########## start ########## { "issuer": "https://token.actions.githubusercontent.com", "normalized-sub": "repo:my-org/my-app" } ########## end ##########
|
The GitHub Actions raw |
This is expected on first setup. To authorize the pipeline:
-
Copy the block between the
start/endmarkers from the pipeline log. -
In the CloudBees Smart Tests web app, open your workspace Settings and navigate to the Trusted OIDC subjects section.
-
Select Add, paste the block, and submit.
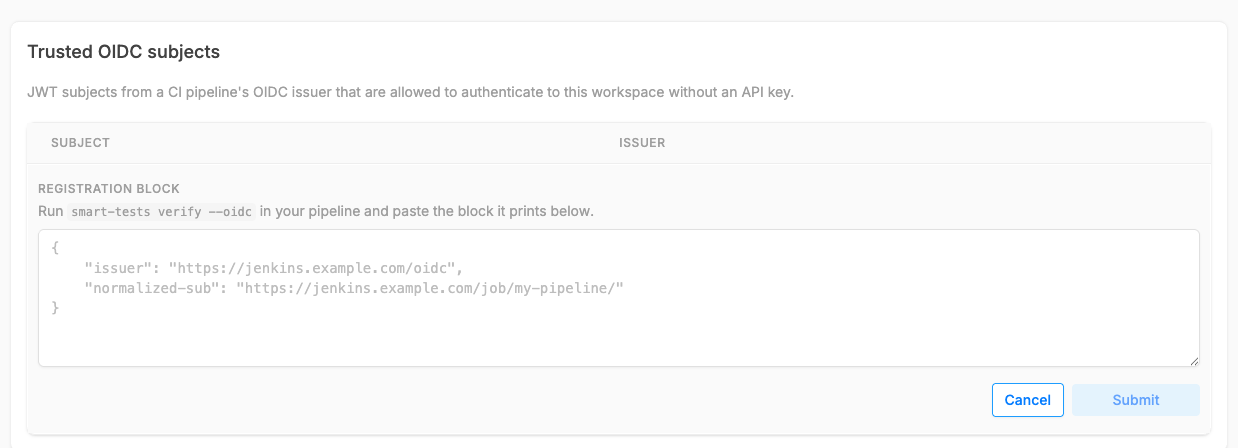 Figure 1. Trusted OIDC subjects
 -
Re-run the pipeline.
smart-tests verify --oidcnow succeeds:OIDC authentication verified for organization 'my-org', workspace 'my-workspace'
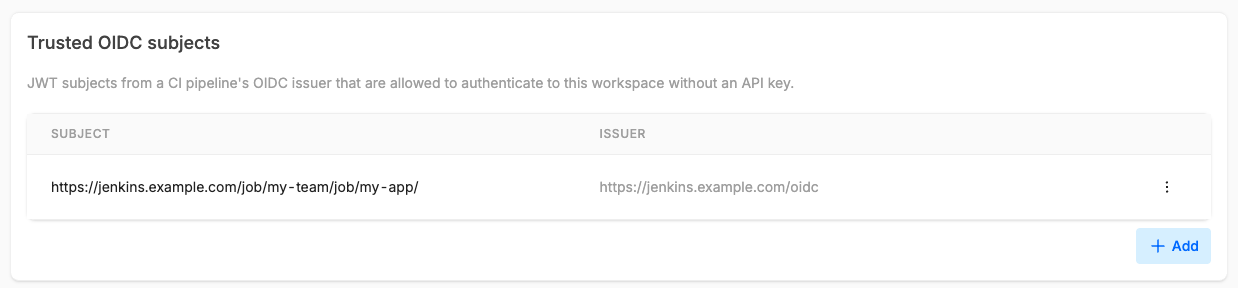
After the subject is registered, every subsequent pipeline run authenticates automatically, no further manual steps.
Private / unreachable issuers (MANUAL mode)
Use this only when CloudBees Smart Tests cannot reach your issuer’s OIDC discovery endpoint (for example, a Jenkins server on an isolated corporate network). Instead of CloudBees Smart Tests fetching the keys, an admin registers the issuer’s public keys (JWKS) once.
-
From a host inside the private network where the issuer is reachable, run the CLI with the
--oidc-fetch-issuerflag and the id-token available inSMART_TESTS_OIDC_TOKEN:smart-tests verify --oidc-fetch-issuerThe CLI reads the issuer from the token, fetches that issuer’s public JWKS via standard OIDC discovery, and prints an
{issuer, jwks}block. This flag authenticates nothing and contacts only the issuer that never sends the JWKS to CloudBees Smart Tests; registration is a separate, authenticated admin action.Copy the block below and paste it into the WebApp (Settings -> Trusted OIDC issuers). ########## start ########## { "issuer": "https://jenkins.internal/oidc", "jwks": { "keys": [ ... ] } } ########## end ########## -
An organization admin opens the CloudBees Smart Tests web app Settings → Trusted OIDC issuers, selects Add, and pastes the block.
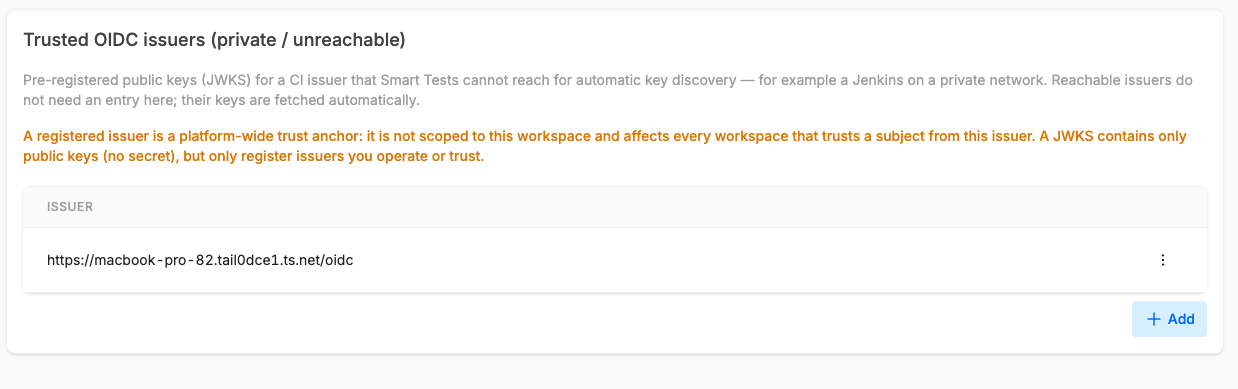 Figure 3. Trusted issuer
 -
Continue with Step 2 to register the pipeline’s subject as usual.
|
Registering a trusted OIDC issuer establishes a platform-wide trust anchor: any pipeline whose token is signed by that issuer can then be verified. Only an organization admin who trusts the issuer’s keys should do this. MANUAL mode does not survive key rotation. If the issuer rotates its signing key, tokens signed with the new key fail verification until an admin re-pastes the updated JWKS. If your issuer rotates keys often, expose only its public JWKS path and use AUTO mode instead. |
Using other OIDC providers
The generic flow works for any provider (GitLab, CircleCI, a custom IdP) as long as:
-
Your CI can mint an id-token for the pipeline with the audience set to
https://app.cloudbees.io/smart-tests. -
The token is placed in the
SMART_TESTS_OIDC_TOKENenvironment variable before calling the CLI. (GitHub Actions is a shortcut for this: settingSMART_TESTS_GITHUB_OIDC_TOKEN_AUTH=1lets the CLI fetch the token from the runner itself.) -
CloudBees Smart Tests can obtain the issuer’s public keys either automatically (AUTO, issuer reachable) or via a registered JWKS (MANUAL).
The only provider-specific details are how you obtain the token (Step 1) and what the sub claim looks like (which you register verbatim in Step 2). To document a new provider, add a subsection here mirroring the Jenkins or GitHub Actions steps.
|
To add a provider (for example, GitLab or a custom IdP):
|
Troubleshooting
| Symptom | Cause and fix |
|---|---|
|
Expected on first run. Register the printed subject in Settings → Trusted OIDC subjects (Step 2). |
|
The token is invalid, expired, from an unrecognized issuer, or the audience does not match. Confirm the credential’s audience is |
Verification fails only for a private Jenkins |
CloudBees Smart Tests cannot reach the issuer to fetch keys. Use MANUAL mode to register the JWKS, or expose the issuer’s public JWKS path and use AUTO. |
Worked before, now fails after a key change |
A MANUAL-mode issuer rotated its signing key. Re-run |
|
The id-token was not bound into the environment. In Jenkins, wrap the step in |
GitHub Actions: |
The id-token was minted for the wrong audience. |
Identify the sub claim
For CloudBees Smart Tests to authorize a pipeline, register its normalized sub claim. Common shapes:
| CI provider | sub shape you register |
|---|---|
GitHub Actions |
|
Jenkins |
The job URL, e.g. |
GitLab and others |
Provider-specific. Run the pipeline once to see the |
Frequently asked questions
Do I still need an API key?
No. Once a pipeline authenticates with smart-tests verify --oidc, its subsequent commands present the same short-lived OIDC token as their credential. There is no SMART_TESTS_TOKEN to manage.
Is registering a JWKS a security risk?
No. A JWKS contains only public keys. It lets CloudBees Smart Tests verify signatures; it cannot be used to mint tokens. The trust decision is that you vouch for the issuer which is why registering a trusted issuer is an admin action.
What identifies my pipeline?
The normalized sub claim. For Jenkins this is the job URL (used as-is); for GitHub Actions, repo:OWNER/REPO (normalized from the branch-specific raw sub); for other providers, whatever the CI mints. Whatever the value, smart-tests verify --oidc prints the exact normalized-sub on the first run, so register it verbatim.
What is the difference between SMART_TESTS_OIDC_TOKEN and SMART_TESTS_GITHUB_OIDC_TOKEN_AUTH?
They are two ways to supply the id-token to the CLI, and only use one of them, not both.
-
SMART_TESTS_OIDC_TOKENis the raw token itself. Set it directly (Jenkins does this throughwithCredentials, other providers similarly bind a per-run credential to this variable). -
SMART_TESTS_GITHUB_OIDC_TOKEN_AUTH=1is a GitHub-Actions-only shortcut: the CLI reads the runner’sACTIONS_ID_TOKEN_REQUEST_URLandACTIONS_ID_TOKEN_REQUEST_TOKENand fetches the id-token itself, with the correct audience. You do not need to setSMART_TESTS_OIDC_TOKENwhen this is on.
I have GitHub Actions using EXPERIMENTAL_GITHUB_OIDC_TOKEN_AUTH. What do I do?
That is the deprecated legacy flow. It still works with the latest CLI, but you should migrate to the generic flow described on this page. For more information, refer to Migrate from the legacy GitHub Actions OIDC flow.