DSL automation as code refers to the end-to-end process, or round-trip capability, of maintaining the domain specific language (DSL) representation of CloudBees CD/RO objects in a nested file structure. It is available for all CloudBees CD/RO objects.
Topics in this section:
Access this round-trip capability from the CloudBees CD/RO UI via the Export DSL and Import DSL service catalog items.
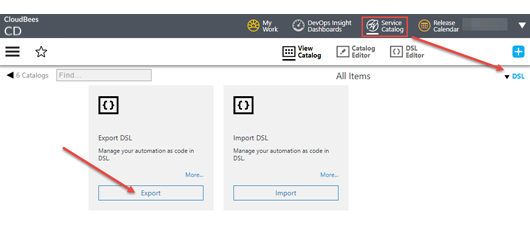
Navigate to the catalog items as follows:
-
Select the Service Catalog tab in the topmost CloudBees CD/RO banner.
-
Select DSL from the All Catalogs dropdown in the upper right of the Service Catalog page.
From here, you access the Export DSL and Import DSL catalog items.
Example: Copy a pipeline
This example shows how to copy an existing pipeline from an established project to a new project.
-
Consider the pipeline below, both the visual representation on the left and the file hierarchy on the right.
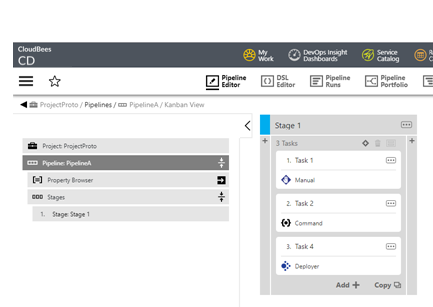
└───projects └───ProjectProto │ project.dsl │ └───pipelines ├───PipelineA │ │ pipeline.dsl │ │ │ └───stages │ └───Stage 1 │ └───tasks │ Task 2.cmd │ └───PipelineB pipeline.dsl -
Use the Export DSL catalog item to create the DSL representation of the object hierarchy.
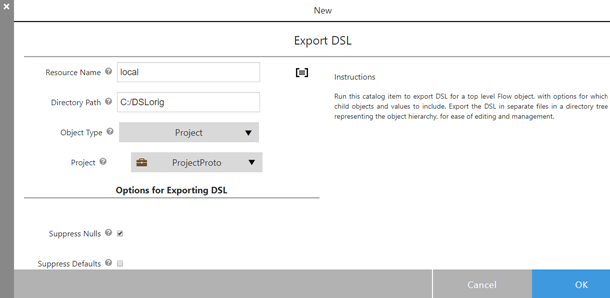 Figure 2. Export the pipeline
 -
On the first part of the UI enter:
-
Resource: the resource on which to export the DSL. Enter a resource name from the Main Menu > Resources list. Here, `local ` is used to indicate the CloudBees CD/RO server system itself.
-
Directory Path: the directory path on Resource into which DSL is exported. In this case
C:/DSLorig. -
Object Type, select the top-level object type. In this case, Project.
-
Project: select the source project. In this case, ProjectProto is the project housing the pipeline.
-
-
Then, set options as detailed below, noting required options important for this example.
Option Setting Notes Options for Exporting DSL
Suppress Nulls
checked
Optional. Check to exclude fields with null values in the exported DSL to reduce bulk of resulting DSL file.
Suppress Defaults
checked
Optional. Check to suppress the default values for API arguments. Consider the
failProcedureprocedure step; it has a default value for itserrorHandlingargument. With Suppress Defaults checked for a procedure that includes thefailProcedureprocedure step withouterrorHandlingspecified, the exported DSL suppresses the value forerrorHandling. This option is not meant to suppress the formal parameter defaults.Suppress Parent
checked
Required. Check to suppress information about the top-level project. Checking this creates a project-agnostic DSL file.
Include ACLs
as required
Optional. Include access control lists as required.
Options for Child Objects
Include All Child Objects
unchecked
Required. Uncheck in order to restrict export just to pipelines.
Child Object Types to Include
pipelinesRequired. Export just pipelines to DSL file.
Include all Child Objects in a Single DSL File
unchecked
Required. Export into a single DSL file.
Child Object Types to Export to Separate DSL files
pipelinesAll pipeline information is exported to separate files in order to aid in cherry-picking files connected with pipeline to be copied.
-
Create a new folder representing the project into which you copy the PipelineA file hierarchy, and copy the files, highlighted in violet. In this example,
C:/DSLtest/projects/MyNewProjectis the folder representing the new project.C:DSLorig └───projects └───ProjectProto │ project.groovy │ └───pipelines ├───PipelineA │ │ pipeline.dsl │ │ │ └───stages │ └───Stage 1 │ └───tasks │ Task 2.cmd │ └───PipelineB pipeline.dslC:DSLtest └───projects └───MyNewProject └───pipelines └───PipelineA │ pipeline.dsl │ └───stages └───Stage 1 └───tasks Task 2.cmd -
Use the ImportDSL catalog item to import PipelineA copy into project MyProject.
-
Enter the resource name and directory path to the DSL hierarchy. In this case,
localandC:/DSLtestare entered, respectively. -
Select OK. The Job Details page displays ongoing status during the import.
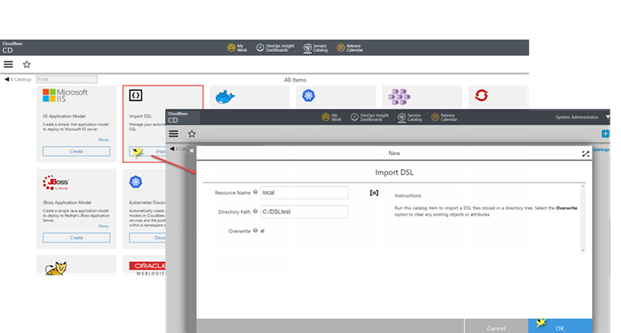 Figure 3. Import the pipeline
 -
View the new pipeline.
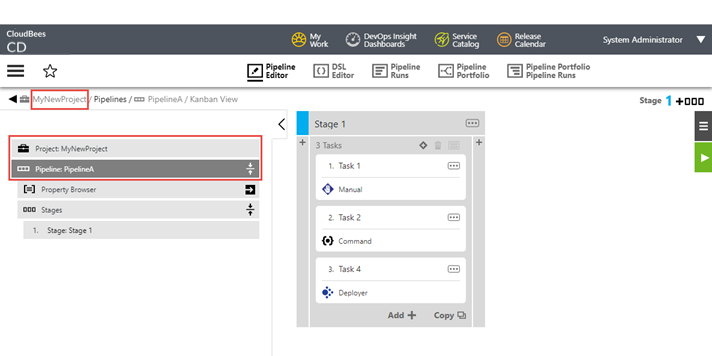 Figure 4. View the pipeline
Use the export DSL catalog item
Use the Export DSL catalog item to create the DSL representation of the object hierarchy. With this UI, you can specify details about the top-level object and desired nested objects you wish to export to the file system. By default, the DSL is exported into separate files in a directory tree representing the object hierarchy, for ease of editing and management.
Select Export on the Export DSL tile to get started. The New Export DSL dialog displays. Refer to the table below for configuration details. When finished, select OK to save your preferences and initiate the export.
| Label | Description |
|---|---|
Resource Name |
(Required) The resource where the DSL files are to be written. Enter a resource name from the Main Menu > Resources list. |
Directory Path |
(Required) The directory on the resource where the DSL files are to be written. In cluster mode, and as an overall best practice, specify a path on a shared drive. |
Object Type |
(Required) The top-level object type of the exported DSL hierarchy. Choose one from the dropdown. |
<object name> |
(Required) The specific top-level object name The label and contents of this pull down is context-sensitive based on the Object Type. |
Options for exporting DSL These options control what is emitted in the exported DSL for each child object. |
|
Suppress Nulls |
Select to suppress both object and custom properties with null values in the exported DSL. If not selected, all properties are returned, subject to Suppress Defaults setting. To override null values for custom properties from being suppressed, set the server setting,
|
Suppress Defaults |
Select to suppress object and custom properties with default values in the exported DSL. |
Suppress Parent |
Select to exclude the object’s parent references in the exported DSL. |
Include ACLs |
Select to include each object’s access control list in the exported DSL. |
Options for child objects These options control how the hierarchy is stored in the file structure. |
|
Include All Child Objects |
Select to include all child objects in the top-level object hierarchy specified by <object name>. If not selected, the Child Object Types to Include box opens. Enter a comma-separated list of child object types to include. Use the describeObjectTypeDslStructure command to get a list of the hierarchy for a given top-level object type. Peruse the hierarchy for the child object of interest and use its Example: |
Include all Child Objects in a Single DSL File |
Select to include all child objects into a single DSL file. If not selected, the Child Object Types to Export to Separate DSL files box opens. Enter a comma-separated list of child object types.
Example: Refer to Specify child object lists for more details about specifying lists. |
Specify child object lists
Use information in this section to help you formulate child object lists when you wish to export your objects into separate DSL files. That is, when Include all Child Objects in a Single DSL File is not selected.
Use the describeObjectTypeDslStructure command to get a list of the hierarchy for a given top-level object type. Peruse the hierarchy for the child object of interest and use its objectType.collectionName as the value to include in the comma-separated list.
For example, to get the hierarchy of child objects for the project top-level type, use:
ectool describeObjectTypeDslStructure --objectType project --topLevelOnly 1
This returns a project object detail and the list of its child objects. Choose any combination of child types and pass them as a comma-separated list. Listing a child type generates DSL for all entities of that type and for all its child entities. Only types listed are included in DSL generation process.
-
Wildcard characters are accepted.
-
Qualify the object as needed to uniquely specify it.
For example:
-
pipelines,releases:-
Each pipeline and release full hierarchy placed into its own file.
-
-
pipelines.stages:-
Each pipeline partial hierarchy down to the stage level placed into its own file.
-
Each stage and all nested hierarchy placed into its own file, nested under its pipeline in the file structure.
-
-
pipelines.stages.tasks:-
Each pipeline partial hierarchy down to the stage level placed into its own file.
-
Each stage and task placed into its own file, nested under its pipeline in the file structure.
-
-
pipelines.*:-
Each pipeline and every nested component, down to gate tasks and pre- and post-gate elements, placed under it in its own file, nested under its pipeline in the file structure.
-
Use the import DSL catalog item
Use the Import DSL catalog item to run the specified domain-specific language script, thus creating a new or overwriting an existing object hierarchy. With this UI, you specify details about the file system location from which the import takes place.
| All information at the specified Directory Path is imported, so make sure you have made desired changes to the DSL scripts before you initiate the import. Otherwise, you could unintentionally overwrite your current objects. |
Select Import on the Import DSL tile to get started. The New Import DSL dialog displays. When finished, select OK to save your preferences.
| Label | Description |
|---|---|
Resource Name |
(Required) The resource where the DSL files are read from. Enter a resource name from the Main Menu > Resources list. Specify `local ` to work with a local directory. |
Directory Path |
(Required) The directory on the resource from which the DSL files are read. In cluster mode, and as an overall best practice, specify a path on a shared drive. |
Overwrite |
(Required) Select to enable overwrite mode.
|
Use the import DSL from Git catalog item
You can use the Import DSL from Git catalog item to run the specified domain-specific language script from a Git repository; creating a new or overwriting an existing object hierarchy. With this UI, you can specify details about the Git repository, the branch name, and the location in the checked-out directory from which the import takes place.
| All information at the specified Directory Path is imported, so make sure you have made desired changes to the DSL scripts before you initiate the import. Otherwise, you could unintentionally overwrite your current objects. |
Select Import on the Import DSL from Git tile to get started. The New Import DSL from Git dialog displays. When finished, select OK to save your preferences.
| Label | Description |
|---|---|
Git Plugin Configuration |
(Required) The name of the ECSCM-Git plugin configuration for the Git repository. To create the Git repository configuration, from the CloudBees CD/RO main menu select . From the displayed Plugins page, select ECSCM-Git > Create Configuration. |
Git Repository |
(Required) The Git repository URL from which to import the DSL. For example, https://github.com/my-github-org/demo-project.git. |
Repository Branch |
The Git repository branch to use. If not specified, |
Resource Name |
(Required) The resource from where the DSL files are read. Enter a resource name from the Main Menu > Resources list. Specify |
Checkout Directory |
(Required) The directory on |
Relative path to DSL files |
The relative path within |
Overwrite |
Select to enable overwrite mode.
|
Delete directory after import |
Select to delete the |