Scenario requirements: Before you begin this scenario, CloudBees CD/RO needs to be able to access your Source Control Management (SCM) system.
To set up a Source Control system (SCM) to use with CloudBees CD/RO, you need:
-
A running SCM system.
-
An active source depot in your SCM system.
-
A CloudBees CD/RO agent that can communicate with your SCM server.
If the machine where you installed CloudBees CD/RO can communicate with your Source Control (SCM) server, this requirement is met. If not, return to the installation executable file and run the CloudBees CD/RO Agent install program on a machine that has access to your SCM system.
To install CloudBees CD/RO agent software on another machine, copy the installation executable file to that machine, then double-click on the file to run the installation program. Select Express Agent when the install window opens.
When installation is complete, configure this new agent as a CloudBees CD/RO Resource. See the beginning of Scenario 4 for more information.
-
Configure CloudBees CD/RO to communicate with your SCM system.
-
Select the Administration tab, then the Source Control subtab.
The Source Control Configurations page displays a table listing Source Control configurations after you create them. Click the Create Configuration link to display the New Source Control Configuration page.
-
On the New Source Control Configuration page, use the drop-down menu to choose your SCM type. For our example, we chose Perforce.
Depending on which SCM you choose, the page expands to display appropriate fields for entering values to configure your SCM.
Enter information into the fields as follows:
-
Configuration Name—For our example, we use the name,
p4. You can choose any name for your SCM Configuration.Note this name, you need it later. A configuration name is important because you may want to create more than one source control configuration. -
P4PORT—For our example, we use p4:3710 to designate the P4PORT. Your specification will be different.
| Any blank fields use the defaults, but you may need to specify some or all information in the remaining fields depending on how your internal systems are set up to access your SCM system. |
Click OK after filling in the fields.
For additional help with this CloudBees CD/RO web page, click the Help link in the top-right corner of the web page.
Overview
This scenario guides you through creating a common build process integrated with your SCM system and build utility. And you will learn how to navigate and modify the procedure definition using the CloudBees CD/RO Procedure Details web page.
At the end of this scenario, you will be familiar with the following CloudBees CD/RO concepts and features:
-
Source control configuration
-
Creating more complex steps
-
Creating a build process
-
Navigating the Procedure Details web page
Begin Scenario 2
Step 1. Select the Projects tab
On the Projects page, select the project name you created in Scenario 1 (in the first column) to go to the Project Details page, then select the Create Procedure link to begin.
Step 2. Create a procedure
On the New Procedure page, enter a Procedure Name (required).
You can use any unique name you choose. Do not use the same procedure name you chose for Scenario 1. Procedure names within the same project must be unique.
-
Name—For this scenario, we use
Basic Buildfor the procedure name. -
Default Resource—Use
localfor the resource name.
Click OK to go to the Procedure Details page.

You can use the DSL Export ![]() button to download the objects as a DSL file.
button to download the objects as a DSL file.
Step 3. Create a parameter
On the Procedure Details page (illustrated above), click the Create Parameter link to go to the New Parameter page.
-
Name—For our example, the parameter name is
target. You can choose any unique name of your choice for your parameter name—parameter names must be unique within a procedure. -
Default Value—We chose
jarfor this value.
Click OK to continue and to return to the Procedure Details page to see the parameter you just created.
Step 4. Create a step to checkout source files from your SCM system
From the same Procedure Details page, click the Plugin link to create a New Step.
-
In the Choose Step dialog, select Source Code Management from the left pane.
-
Next, select
ECSCM-Perforcefrom the list, then selectPerforce—Checkoutfrom the right pane. -
Click Close to go to the New Step page, which will be populated with the fields you need to enter for the Perforce SCM.
Both the Subprocedure and the Parameters sections are populated with fields to enter information so CloudBees CD/RO can communicate with your Perforce SCM system, using the CloudBees CD/RO Perforce plugin.
Depending on the SCM you chose to work with, including Perforce, the New Step screen you see may be different than the following example. If you need additional help configuring your SCM, see the corresponding SCM plugin on the Plugin Manager page. Each plugin has its own Help topic.
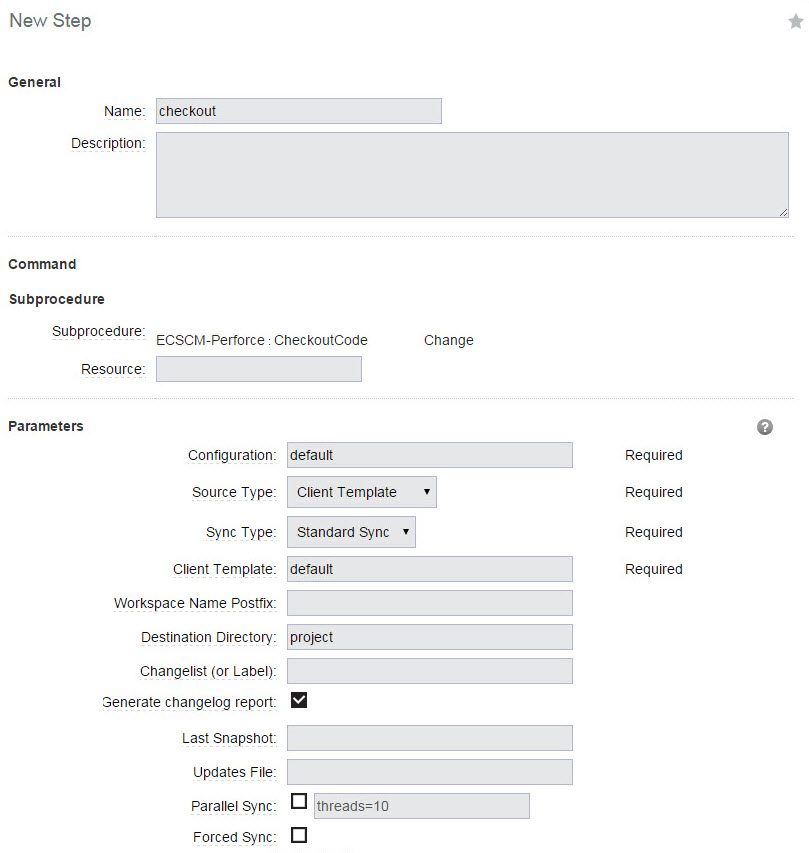
Enter information into the fields as follows:
| Field Name | Description |
|---|---|
Name |
Enter a unique name for your subprocedure step. For this scenario, the step name we supplied is |
Description |
(Optional) Enter a text description for this step. |
In the Subprocedure section: This section displays the subprocedure name or a plugin name because the plugin is being called as subprocedure. The plugin name component, EC, is for CloudBees, SCM identifies the plugin as belonging to the Source Control Management category, and Perforce identifies the name of the source control system. Our example illustrates the fields for the Perforce SCM plugin. Your fields are different if you are using a different SCM. These parameter fields request some of the same values you already specified when you created the Source Control Configuration. |
|
ECSCM-Perforce |
Clicking this link takes you to the Project Details page for the plugin. Generally, and for this scenario, you do not need to access this page to make changes—it is for your reference only. |
CheckoutCode |
Clicking this link takes you to the Procedure Details page for this procedure. Generally, and for this scenario, you do not need to access this page to make changes—it is for your reference only. |
Change |
Clicking this link displays a dialog that allows you to change the project, plugin, or subprocedure. If you make a change in the Change Subprocedure dialog, the Subprocedure and Parameters sections on the New Step page will update automatically with corresponding fields for your new choice. All SCM plugins that can checkout code contain the |
Resource |
The |
The following two parameter fields are common among all SCM plugins: |
|
Configuration |
The name of your Source Control Configuration. |
dest |
The destination where you want to put your checked-out code—it is the directory within your job workspace. Each job adds a new directory to the workspace. At this point, you have not defined multiple workspaces, so the CloudBees CD/RO default workspace is used. |
For more information about workspaces, see Workspaces and Disk Space Management .
Click OK after entering values to continue to the Procedure Details page, which should now look similar to the following example:
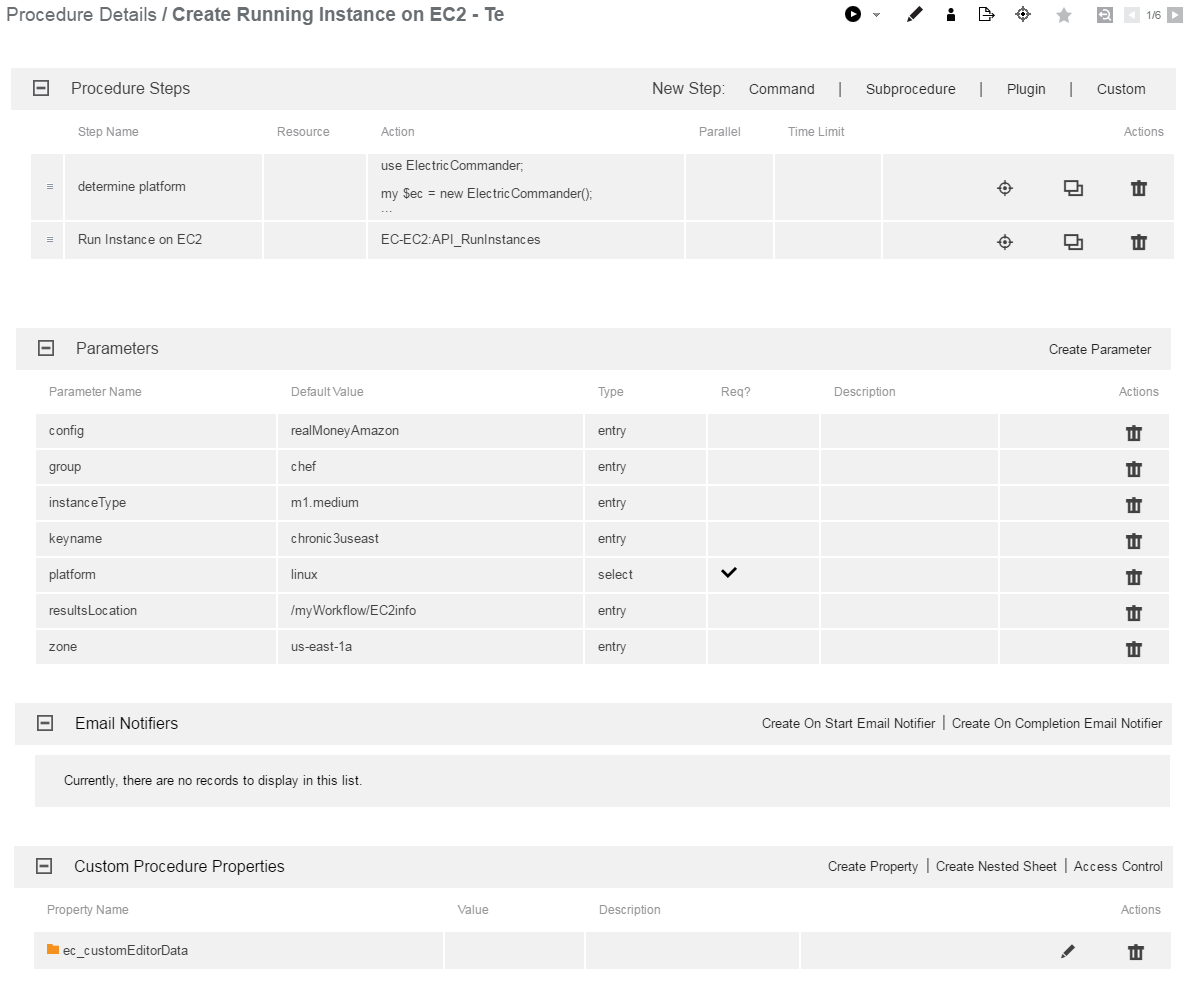
The Procedure Details page now displays the name of our new procedure, Basic Build, and its new checkout step using the Perforce SCM, and the target parameter with the jar value.
Step 5. Create a step to run the build
This step can be another subprocedure step, a command step, or a custom step. Any procedure can contain multiple types of steps, any of which may be either simple or complex.
Steps can contain or use:
-
Parameters or properties
-
mMany of your existing scripts, including shell scripts
For this step example to run the build, we create an Ant step. To invoke Ant, you could write a script that calls Ant directly, or you could call the CloudBees CD/RO Ant plugin to invoke the runAnt procedure. For this example, we will use the CloudBees CD/RO Ant plugin.
-
From the Procedure Details page, click the Plugin link to see the Choose Step dialog and select the Build category.
-
Select the EC-Ant plugin to see and select the
Ant—RunAnt step. -
When the New Step page is displayed, notice the Subprocedure section is populated with the chosen EC-Ant plugin, and the Parameters section provides the appropriate fields for this Ant step.
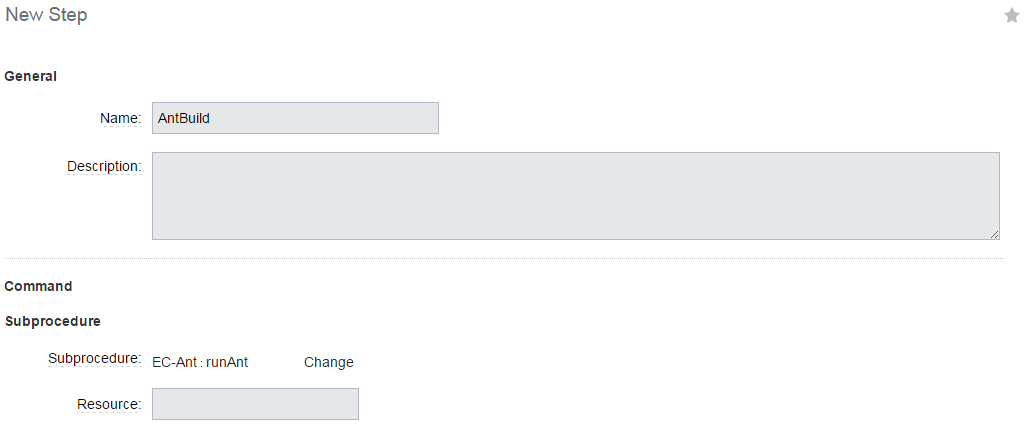
Enter information into the fields as follows:
| Field Name | Description |
|---|---|
Name |
For this example, we specified |
Subprocedure section: Note the EC-Ant plugin project name and the |
|
Resource |
Leave this field blank to continue using the local resource. |
Parameters section: |
|
Build File |
Use |
Target |
For this example, we used |
Working Directory |
For this example, we used |
For this scenario, we leave the remaining fields blank, but you may need to enter additional information depending on your Ant invocation.
Click OK to continue and return to the Procedure Details page.
The following screen example illustrates the two steps we created for this scenario.

Step 6. Running the procedure
On the Procedure Details page, hover your mouse over the small down-arrow on the right-side of the Run link, choosing Run.
-
Run Immediately—This option runs the procedure immediately as set.
-
Run—This option displays the Run Procedure web page where you may alter any existing parameters for this procedure, or set an existing credential.
Note: This scenario does not introduce you to the Advanced section of the Run Procedure page. For more information on these topics, click the Help link in the top-right corner of the Run Procedure page.
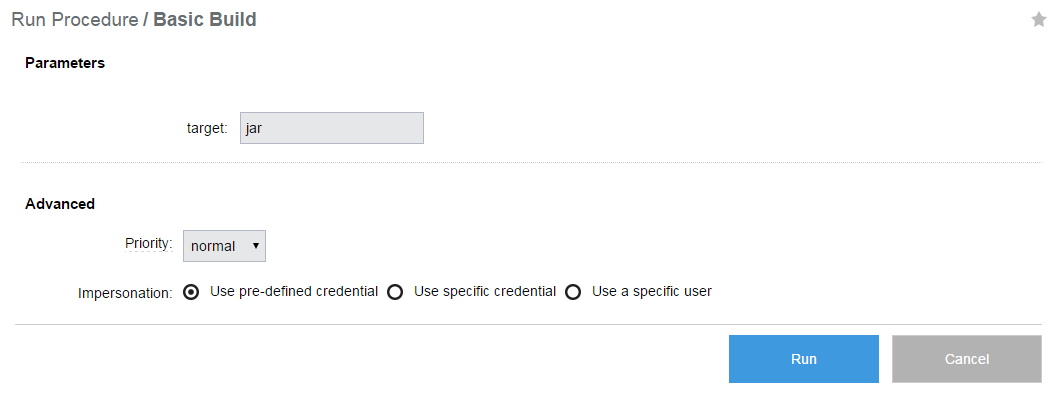
Click Run to run the procedure and continue to the Job Details page to see the status of your running job.
Step 7. On the Job Details page
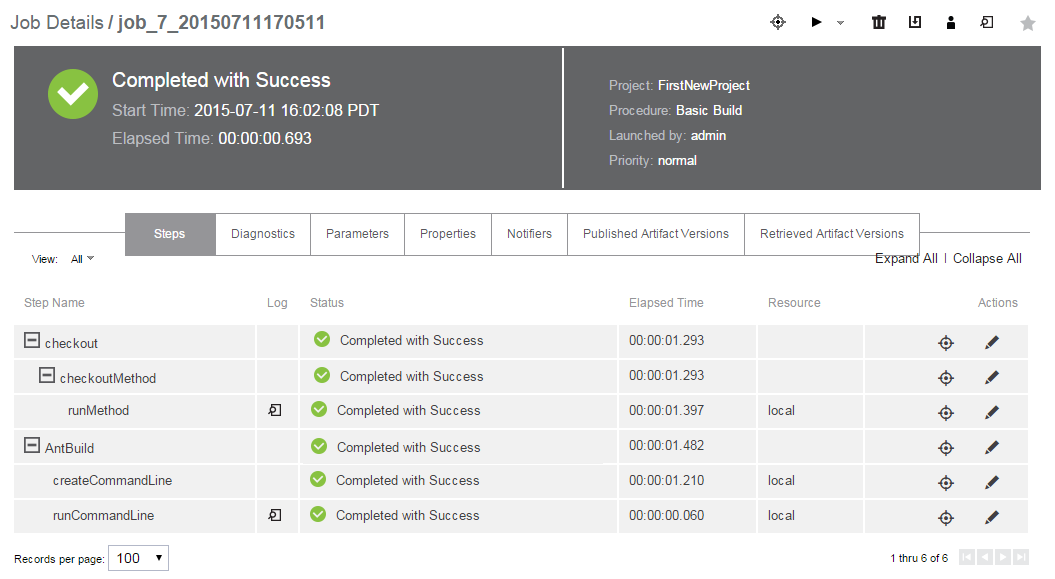
The Job Details page now displays the status and results of running the Basic Build procedure.
Your Job Details page may look somewhat different if you supplied other values in this scenario.
More about the Job Details page
-
The General Information section at the top of the table provides links back to the Project>Procedure that was launched to create this job.
-
Click on a Step Name to go to its Job Step Details page.
-
Click the Parameters tab to see parameters in this job.
-
If there are errors, the Diagnostics tab has specific information.
More about the Procedure Details page
To go to the Procedure Details page at any time:
-
Select the Projects tab.
-
Select the Project name (that contains the procedures you want to see) to go to the Project Details page.
-
Select a Procedure name to go to the Procedure Details page.
You may want to review to the Procedure Details page frequently because it displays the steps that make up your procedure, the parameters contained in the procedure, email notifiers, and so on. Full edit capabilities are available by selecting any object (step, parameter, and so on).
Also, you can run this procedure again on demand by clicking the Run link at the top of the page.
For more information about the Procedure Details page functions, click the Help link in the top-right corner of the Procedure Details page.
Scenario extension—Add a step to show workspace contents
If you are curious about what your current default workspace contains at this point, you can create a step to see the workspace.
-
Select the Projects tab, select FirstNewProject (or your project name if you used something different), select the Basic Build procedure name.
-
Click the Command link to create a New Step—a new command step.
-
The New Step page is displayed with a Command text box.
-
For Name, use
seeWorkspace. -
In the Command(s) text box:
-
for Windows—type
dir /s -
for Linux—type
ls -r -
Click OK to create the step and go to the Procedure Details page.
-
Click Run to create the job and to go to the Job Details page.
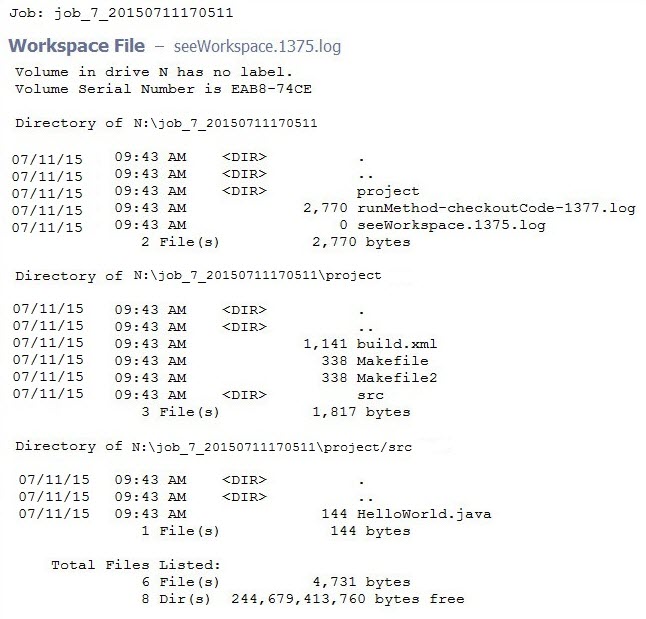
When the job is completed, click the log icon in the Log column to see the contents of the current workspace for this procedure. Your Workspace File will be similar to the following example:
Summary
This scenario demonstrated how easily CloudBees CD/RO can integrate with your SCM system and build utilities.
Go to Scenario 3