Environments are logical grouping of machines to which various applications can be mapped and deployed. Using environments and templates, you can model the infrastructure and the middleware available for various applications. Environments consist of logical groups of resources with a similar function or role called environment tiers. An environment tier can be a group of machines with a similar function or role, such all the web servers or application servers or database servers for an environment. Resources are actual target end point machines (such as physical servers), virtual machines, or mobile devices.
Environments can be static, dynamic, or hybrid. A static environment has resources that are already provisioned and managed at the platform level. Each resource has its own logical name to identify it from the other resources in the system. It also can be assigned to one or more resource pools or to a zone (a collection of agents). Several resources can correspond to the same physical host or agent machine. Resources can also be configured as standard or proxy.
-
Standard resources are machines running the CloudBees CD/RO agent on a supported agent platform while
-
Proxy resources (agents and targets) are on remote platforms or hosts that exist in your environment and requires SSH keys for authentication. The CloudBees CD/RO agent does not need to run on the remote platform or host.
See Configuring Resources for more information about to create, configure, and manage resources.
This example shows to how model a static environment to which the application will be deployed. For information about dynamic environments and how to model them, see Deploying Applications in Dynamic Environments.
Creating an environment
In the Environments List:
-
Select New + to add an environment. The Environment dialog box displays.
-
Select CreateNew or From Application based on your requirements. If you selected From Application choose an application from the list presented to you. In either case, the New Environment dialog displays.
-
Enter a name into the Name field.
-
Select a project to which the new environment belongs and enter a description of the environment.
You can include hyperlinks as part of an object description for any CloudBees CD/RO object. -
Select OK.
The Environment Editor opens.
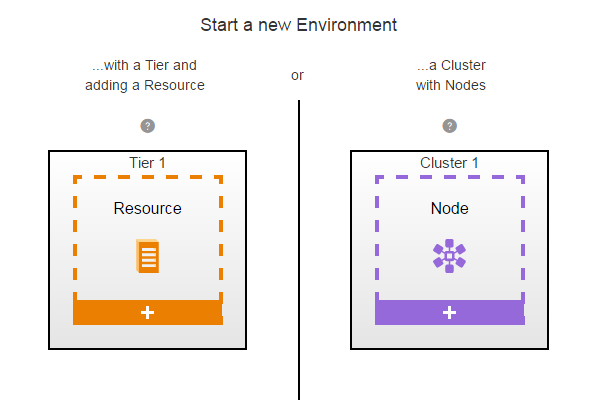
From here, you create a tier with resources or a cluster with nodes.
Creating an environment tier
Environment tiers are used with traditional applications.
-
Define Tier 1:
-
Select Details from the vertical dots menu.
-
On the Details tab, enter the name and optional description.
-
On the Capabilities tab, optionally define a capability.
-
Select OK.
-
-
Assign resources it:
-
Select + in Resources block.
-
In the New dialog box, click Add resources or Add resource pool. The Resources list or Resource Pools list, respectively, displays.
-
Select one or more enabled resources or resource pools for this environment and then click OK.
-
The Environment editor now has an environment tier called mysql with one resource. Example:

mysql environment tierCreating an environment cluster
Environment clusters are used with microservice applications.
-
Click + at the bottom of Cluster 1. The Cluster Definition dialog box appears:
-
In the Cluster Definition dialog box, select a platform. For a microservice application choose Kubernetes (via Helm).
-
Enter the cluster attributes as needed. The following table describes the available attributes. Select OK when finished.
Label Definition Configuration Name
The name of the previously defined configuration for the cluster.
Namespace
The name of the Kubernetes namespace. If not supplied, the default namespace is used.
Kubeconfig context
The name of the context to be used for this cluster deployment. If not specified, the one defined by the
current-contextinsidekubeconfigfile is be used. -
Link a utility resource to the cluster. This defines the static environment to which the cluster is deployed.
-
Select the new resource button (with wrench and hammer) in upper right. The New dialog opens.
-
In the New dialog, click Add resources or Add resource pool. The Resources list or Resource Pools list, respectively, displays.
-
Select one or more enabled resources or resource pools for this environment and then click OK.
The new Utility Resource tile now appears in the editor field.
-