This section describes creating and deploying a CloudBees CD/RO traditional application using application tiers and components.
When defining a component or container, you specify the artifact repository and the artifact version that you want to use. CloudBees CD/RO supports artifacts from a variety of artifact repositories, such as the EC-Artifact repository, Maven based repositories such as Nexus (using EC-Nexus) or Artifactory (using EC-Artifactory), or artifacts on any file system (using EC-FileSysRepo). These artifacts could point to any build outputs, configuration scripts, database, scripts, and so on. The information that you enter in the component or container definition depends on the artifact repository that you select. For more information about artifacts, see Artifact Management and Artifacts .
Creating a new application
Traditional applications consist of components and the processes that orchestrate the deployment of these components. Each application object has one or more application tiers, where a tier is a logical group of components.
A component is based on an artifact, and the component definition contains a reference to this artifact.
This example shows how to create a traditional application consisting of an application tier with a component.
Authoring component processes
In a component process, you define a set of actions that are to be executed on a specific component during the deployment. A component process step can be defined as a call to a CloudBees CD/RO plugin or procedure, a direct command or script in any scripting language, a manual task, or a utility function (a higher-order operation than a plugin).
In the Cleanup DB component of the DB application tier:
-
Click + to start authoring a component process. The New Component Process dialog box appears.
-
In the New Component Process dialog box, enter the following details:
-
Enter `updateDB ` in the Name field.
-
Enter an optional description in the Description field.
-
Keep the selection as Deploy in the Type field. This value determines track what is built, tested, and deployed during the application deployment. The default is Deploy.
-
Deploy –Enables Inventory Tracking. The CloudBees CD/RO server tracks artifacts deployed to environments.
-
Undeploy –After the first successful job step in a component process with this setting, the automation platform removes the environment inventory record.
-
Other –Disables Inventory Tracking.
-
-
Select a workspace.
-
Check Time limit as required. This allows you to configure a maximum amount of time that the step can execute; abort if it exceeds this time.
-
Add credentials as required. This allows the process to run in the context of the selected credential. See Attaching Credentials to Application and Component Processes for more information.
-
-
Click OK.
The Component Process Visual Editor opens.
The process model shows a process with Start and Finish steps with a New Step in between them.
-
Click + in the first step.
-
Define the first step in the Component Process Step dialog box:
-
Enter `getScript ` in the Name field.
-
Enter
Retrieve the new sql filein the Description field. -
Use the Continue on Error setting in the On Error field. Go here for more information.
-
Use the all setting in the Run if field. Go here for more information.
-
Select a workspace.
-
Check Time limit as required. This allows you to configure a maximum amount of time that the step can execute; abort if it exceeds this time.
-
Check Time limit as required. This allows you to configure a maximum amount of time that the step can execute; abort if it exceeds this time.
-
Click Next.
-
-
Define the first step in the Step Type dialog box based on a component operation, select Component Operations as the Step Type. The parameters for this process step are automatically inherited from the "update.sql" component.
-
Click OK.
-
Click + on the bottom of the first step to add a new step below it.
-
Click + in the second step.
-
Define the second step in the Component Process Step dialog box:
-
Define the second step in the Component Process Step dialog box based on a component operation by selecting Procedure as the Step Type. The parameters for this process step are automatically inherited from the "update.sql" component.
-
Click OK.
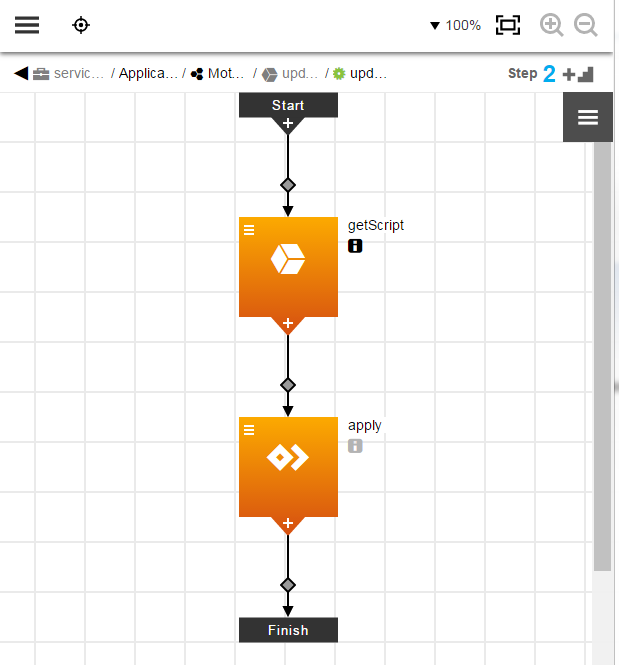
This is the resulting component process:
-
You can get details about each step by clicking i under the step name.
-
The first step is a component operation.
The second step is a procedure.
-
These steps are deployed in series.
The second step can only start after the first step is completed.
-
Selecting
 displays a menu where you can select the following options:
-
Details –View step details
-
Properties –View step properties.
-
Access Control –View access control settings.
-
Add Connector –Add another connector to the step.
-
Track Changes –View the Change History.
-