Electric Agent/EFS software must be installed on each machine in the cluster. This includes any machines in a cloud service such as Amazon EC2 or Kubernetes.
Electric File System (EFS) and the Electric Agent are installed simultaneously on each host machine during Electric Agent/EFS installation. Multiple instances of Electric Agent/EFS pairs can be set up to run in parallel on a host. For example, if you have a multiprocessor machine, you might want to set up an Electric Agent for each processor. For details about running multiple agents, see Modifying the Number of Agents per Host.
If you are upgrading a previously-installed CloudBees Accelerator version, follow the upgrade instructions before attempting to install the new version.
Your toolchain should be installed on each agent host. You can virtualize the toolchain in some cases, but this can be problematic especially when the Windows registry is involved. For performance reasons, you should install the toolchain on each agent host. Many companies use “ghosting” software for this purpose.
| “Ghosting” with the Electric Agent already installed is not recommended. |
If Norton antivirus software is installed on your intended agent machines, disable it before installing Electric Agent/EFS to avoid serious file system conflicts. If Norton antivirus cannot be disabled, put C:\ECloud in an exclusion list or disable the AutoProtect feature. CloudBees generally considers agent machines safe, because they are internal machines behind a firewall. For assistance, go to the CloudBees technical support site at https://support.cloudbees.com/ and submit a support request.
|
include:partial$benefit-of-install-all-components-on-same-machine-localhost-set.adoc[]
Installation Procedure
-
Sign in as Administrator. (You must be a member of the Administrator group—Administrator privileges are not sufficient.) If you are running rdp on the Cluster Manager server, ensure that rdp is in installation mode:
change user/install. -
Double-click the
CloudBeesAccelerator-<version>-<platform>-Installinstaller file.(For Windows Server 2012 or later, the administrator user must right-click the file and select Run as administrator.)
If you have not already downloaded the Accelerator installer, see Downloading the Accelerator Software. The installation packages might need a few minutes to extract. If a security alert pop-up appears, click unblock and continue. ** CloudBees Accelerator requires the Microsoft Visual C++ 2005 SP1 Redistributable. If it is already installed, select the checkbox.
-
Click Next to continue.
-
When the Welcome screen appears, click Next.
-
On the Which components do you want to install? screen, select Electric Agent, then click Next.
-
On the What type of install? screen, select Custom, then click Next.
-
On the Choose Destination Location screen, accept the default installation directory or click Browse… browse to select an alternative directory.
Do not select an alternative directory that includes spaces in the name. Spaces can create problems when configuring connections with other command-line-based components. -
Click Next.
-
On the Base Setup screen, modify the following settings as needed, and then click Next :
-
(Optional) Unselect Install Electric Runner client applications to decline installation of the tools to manage and administer an Accelerator host cluster (this is selected by default).
For a description of these tools, see Using Cluster Manager Administration Tools.
-
(Optional) Unselect Install Visual Studio Plugin to decline installation of the CloudBees Accelerator Visual Studio Integration (this is selected by default).
-
(Optional) Select Initialize Visual Studio for ECloudInternalUsers to initialize Visual Studio automatically for these users on your agent hosts (this is unselected by default).
For details, see Initializing Visual Studio.
Using this checkbox can add up to 30 minutes to the installation time (depending on the number of agents and the number of installed Visual Studio versions). The Configuring the Electric Agent screen appears:
-
-
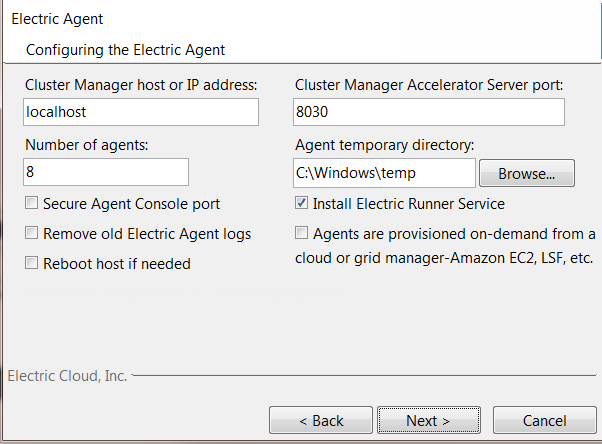
On the Configuring the Electric Agent screen, enter options for the locally-installed Electric Agent/EFS:
-
Type in the Cluster Manager host or IP address.
-
Accept the default Cluster Manager Accelerator Server port 8030 or type in the alternative port that you supplied during the Cluster Manager server installation.
-
Enter the Number of agents to run. The installer calculates the default number of agents based on the effective number of CPUs on the machine. The default is 1, if one CPU is present.
On Windows platforms, you cannot start more agents automatically than were set during installation. If you plan to use auto, you should set the number of agents during installation to ensure enough agents for this feature.If more than one CPU is present, the default value is the number of effective CPUs. The maximum number of agents allowed on one 64-bit machine is 64.
-
Accept the default Agent temporary directory, or choose an alternative.
-
Accept the default for the Secure Agent Console Port checkbox if you will not use the secure port, or select the checkbox to use the secure port.
-
If this agent machine is part of a cloud service and is to be used to create an image for cloud bursting, check the Agents are provisioned on-demand from a cloud - Amazon EC2 etc. checkbox.
When using cloud bursting in a cloud environment such as Amazon EC2 or Kubernetes, agents are not bound to a Cluster Manager during installation. Instead, the cloud management software tells the agents which Cluster Manager to use.
-
(Optional) Select the Remove old Electric Agent logs checkbox.
-
(Optional) Select the Reboot host if needed checkbox.
-
(Optional) Unselect the Install Electric Runner Service checkbox (this is selected by default).
Electric Runner (eRunner) is a “helper” service normally installed on all agent machines. This service listens for commands to execute on agents to facilitate administration tasks. For example, with eRunner, you can upgrade all agents at the same time remotely.
-
-
On the Windows Agent Users screen, select the user accounts that you will use to run agents. Accept the default ECloud internal user, or select Existing User. If you select Existing User, click Add User to add a user account, then click Next.
-
On the Configuring the Electric Runner Server screen, select options for the Electric Runner server:
-
Accept the default Electric Runner Server port or type in an alternative.
-
(Optional) Check the Remove old Electric Runner logs checkbox.
-
-
Click Next.
-
When the Start Copying Files screen appears, review your settings and click Next.
The Installing screen displays while the installation proceeds.
-
When installation is finished, the Complete screen appears, click Finish.
-
When the Really Reboot? popup appears, click Yes to reboot your system.
Installation is complete. The installation log file is in the install directory’s root by default.
Agent Communication and Firewall Settings
Because the ports used to communicate with agents are dynamic, you might experience issues on Windows agent hosts depending on your firewall settings.
If you experience installation issues, exclude the following programs from the block list during agent host installation:
-
C:\ecinst\ecinstconf.exe -
C:\ecinst\eclouduninst.exe -
C:\ecinst\fsize.exe -
C:\ecinst\Setup.exe -
C:\ecinst\SetupErunnerTmp.exe -
C:\ERunnerTmp\i686_win32\bin\erunnerdtmp.exe
These programs exist only during Accelerator installation. You might find it easier to disable communication restrictions with the agent host during agent installation. If you do not want to do this:
-
Create folders
C:\ecinstandC:\ErunnerTmp\i686_win32\bin. -
Move files with those specified names into these directories.
-
Exclude these programs from the “blocked programs” list.
-
Delete the directories
C:\ecinstandC:\ErunnerTmp. -
Install agents.