This section describes the steps for configuring CloudBees CD/RO for single sign-on. You can use either Kerberos or SAML 2.0. You perform these steps within the CloudBees CD/RO Automation Platform UI.
Selecting the SSO provider type
Before you can configure CloudBees CD/RO to use Kerberos or SAML, you must open the Single Sign-On administration page in the Automation Platform web UI and then specify that CloudBees CD/RO should use that provider.
| In the Automation Platform web UI, either SAML or Kerberos can be configured (but not both). (However, you can use the Perl API commands to configure both.) |
To open the Single Sign-On administration page and select the provider type:
-
Open the Automation Platform UI and log in.
To do so, browse to
https://<cloudbees-flow-server>/commander/, where<cloudbees-flow-server>is the CloudBees CD/RO server IP address or host name. -
Click Administration > Single Sign-On. The Single Sign-On page appears.
Following are the descriptions of the fields, menus, and buttons that apply to both single sign-on provider types:
Item Description Enable Single Sign On
Checkbox to enable CloudBees CD/RO to use single sign-on. The default is unchecked (disabled).
Single Sign-On Provider
Authentication protocol to use for single sign-on.
 (SSO configuration) button
Opens the Access Control settings page for the current SSO configuration.
-
Choose either Kerberos or SAML from the Single Sign-On Provider pulldown menu, and click OK.
-
Proceed to either Kerberos SSO or SAML SSO depending on your preferred provider type.
Kerberos SSO
Prerequisites
Before you can configure CloudBees CD/RO for Kerberos SSO, you must complete the following prerequisites.
Systems Administration Tasks
Systems administration tasks for Kerberos include installing Kerberos software and configuring Kerberos with Active Directory. For instructions, see Configuring Kerberos SSO.
Client configuration
Kerberos SSO requires that each CloudBees CD/RO end user’s browser is configured for Kerberos. For instructions, see Client configuration.
Centralized agent management prerequisites
Configuring CloudBees CD/RO for Kerberos single sign-on requires that you deploy a Kerberos key table (keytab) file to every CloudBees CD/RO server and every CloudBees CD/RO web server. This process uses the underlying CloudBees CD/RO Centralized Agent Management (CAM) feature, which significantly simplifies this step. For information about the prerequisites for CAM, see Installing or Upgrading Remote Agents.
CloudBees recommends creating keytab files manually using the procedure found here: Generating a keytab file.
Configuring CloudBees CD/RO for Kerberos SSO consists of the following main steps:
Following are the descriptions of the Kerberos fields, menus, and buttons in this page:
| Item | Description |
|---|---|
Service Keytabs |
List of Kerberos key tables (”keytabs”) that have been created for the CloudBees CD/RO server and CloudBees CD/RO web server components. These keytabs ensure that the services that CloudBees CD/RO end users are connecting to (the CloudBees CD/RO server service and the CloudBees CD/RO web server service) are valid services that those users are authenticated to use. You deploy a keytab of the appropriate type ( CloudBees CD/RO Server or CloudBees CD/RO Web Server ) to each of these servers. |
Keytab Name |
Name of each existing keytab. |
Server Type |
Type of server that was specified when the keytab was created. The possible values are CloudBees CD/RO Server and CloudBees CD/RO Web Server. |
Description |
Description of each existing keytab. This description was provided when the keytab was created. |
Deployment Status |
The possible values are Never Deployed, Success, and Failure. |
|
Opens a dialog box for editing the keytab. |
|
Opens a dialog box for deploying the keytab to the target host machines for one or more CloudBees CD/RO servers or CloudBees CD/RO web servers. |
|
Displays the deployment log for this keytab. |
|
Downloads this keytab to your local system. |
|
Deletes the keytab. A popup appears that asks you to confirm the deletion. |
Create Keytab |
Opens a dialog box for creating a new keytab. |
Creating a keytab
To use Kerberos single sign-on, you must create Kerberos keytabs and set them up for the CloudBees CD/RO server and CloudBees CD/RO web server components. These keytabs are needed for authentication of Kerberos tickets that are sent to CloudBees CD/RO services. You can create keytabs yourself, or you can upload a keytab file that contains the keys.
A keytab file needs to be generated for the CloudBees CD/RO web server and CloudBees CD/RO server services. This file stores the encryption keys for the Kerberos Services Principals (for example, HTTP/ efwebserver.example.com@example.com for a web server). The service account’s password is used to encrypt the entries in this file.
To create the keytabs:
-
In the Automation Platform UI, click Administration>Single Sign-On.
-
Click Create Keytab. The Create Keytab dialog box appears.
Enter the details for the keytab as follows:
Item Description Keytab Name
Name of the keytab to create.
Server Type
Type of server for which to create the keytab. You can choose CloudBees CD/RO Server or CloudBees CD/RO Web Server.
Description
Description of the keytab. This text is not interpreted by CloudBees CD/RO.
Keytab File (optional)
File containing the keytab if you are not creating the keytab yourself.
-
Click OK.
If you did not specify a keytab file, the Kerberos Keytab Details page for the new keytab appears.
-
Click Create Keytab Entry. The Create Keytab Entry page appears.
-
Enter the details for the new key table entry (”keytab entry”) as follows:
Item Description Service Principal Name
Unique identifier of a service instance (CloudBees CD/RO Web Server or Server). These are used by Kerberos authentication to associate a service instance with a service logon account.
Select either field to create keytab entry
Radio buttons that determines which of the following is used to create the keytab entry:
-
Domain Service User Account —Service logon account that is associated with the Service Principal Name specified above.
-
Key Version Number —Key version number (KVNO) where you enter the version of the key that was used to encrypt the service ticket.
This key version number would be stored with the service’s keytab, and it must match the key version number in the Kerberos database (such as KDC in Active Directory).
Domain Service User Account Password
Password for the domain service user account.
Validate with Directory Server
Checkbox that determines if data entered above will be validated against the Directory Server. The default is unchecked (do not validate).
-
-
Click OK.
The new keytab with a new keytab entry is added to the Service Keytabs list on the Single Sign-On page.
Deploying a keytab
You must deploy the keytabs to your CloudBees CD/RO server(s) and CloudBees CD/RO web server(s). This includes all nodes in a cluster. To do so:
-
In the Automation Platform UI, click Administration>Single Sign-On.
-
Click the
 (deploy Kerberos keytab) button for the keytab that you want to deploy. The Deploy Keytab Deployment Targets popup appears.
 -
Enter the details for the target host machines for installation as follows:
Item Description Keytab Name
Name of the keytab that will be deployed.
Server Type
Type of keytab that will be deployed. Either CloudBees CD/RO Server or CloudBees CD/RO Web Server is displayed.
Target Server Operating System
A simple template used to provide control over a resource name. You can choose Linux (the default) or Windows.
Target Server Hostnames or IP Addresses
One or more hostnames or IP addresses for the server(s) on which to deploy the keytab. For more information about specifying these hostnames or IP addresses, see Installing or Upgrading Remote Agents.
Driving Resource
Resource to perform all actions for installing a host on behalf of the server. This is the agent that installs the agents on the remote hosts. On Windows systems containing the driving resource, Windows PowerShell 3.0 or newer must be installed on older Windows versions.
For more information about specifying a driving resource, see Installing or Upgrading Remote Agents.
Server Install Directory
Installation directory for the server on the target host machines for the keytab. This directory is prepopulated with the default installation directory. If you have used a nondefault directory, enter it here.
The keytab file is deployed into the following directory on the target host machines:
-
(CloudBees CD/RO server)
INSTALL_DIR/conf/ -
(CloudBees CD/RO web server)
INSTALL_DIR/apache/conf/
For more information about specifying a server installation directory, see Installing or Upgrading Remote Agents.
Restart Server
Checkbox that determines whether to restart the target server after keytab deployment. A restart is required for changes to take effect.
-
-
Click Next. One of two Deploy Keytab Authentication Options popups appear depending on the platform that you chose in the prior popup.
Windows: 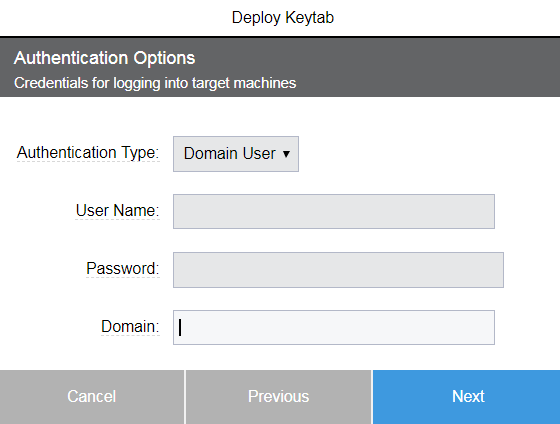
Linux: 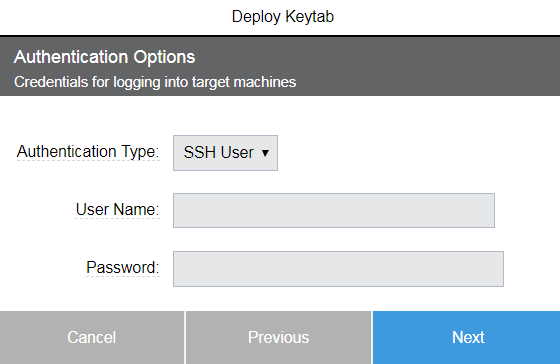
-
Enter the authentication options for logging into the target machines.
For details, see Installing or Upgrading Remote Agents.
-
Click Next. The Ready to Deploy Keytab popup appears.
-
Review your settings, and then click Finish.
-
If you need to change any settings, click Previous, then make your changes, and then proceed.
The deployment job starts to execute on the target machines, and the Job Details page appears.
-
-
Repeat the previous steps for the other server(s).
Managing Kerberos SSO
Editing a Kerberos keytab
You can change the settings for any existing keytab. such as the name and server type. To edit a keytab:
-
In the Automation Platform UI, click Administration>Single Sign-On.
-
Click the
 (Edit) button for the keytab that you want to edit. The Edit Keytab page appears.
 -
Update the details for the keytab as follows:
Item Description Keytab Name
(Read-only) Name of the keytab.
Server Type
Type of server for which to create the keytab. You can choose CloudBees CD/RO Server or CloudBees CD/RO Web Server.
Description
Description of the keytab. This text is not interpreted by CloudBees CD/RO.
Keytab File (optional)
File containing the keytab if you are not creating the keytab yourself.
-
Click OK.
Viewing a Kerberos keytab deployment log
You can view the deployment log for any keytab deployment that has occurred. To view the log for a keytab:
-
In the Automation Platform UI, click Administration > Single Sign-On.
-
Click the
(deploy Kerberos keytab) button for the appropriate keytab.For example:
The Deploy kerberos keytab log page for the keytab appears. Follow is an example of a deployment log file:
[INFO] commandToRun: '/opt/cloudbees/sda//bin/ecconfigure' --serverCopyKeytabFile='/tmp/Test1';rm '/tmp/Test1' [INFO] Hosts pointed for keytab deploy: ecbuild-lin10 Credential is connectionCredential Attempting to retrieve password SUCCESS: Retrieved password Attempting to connect via SSH to ecbuild-lin10 SUCCESS: Connected via SSH to ecbuild-lin10 Attempting to authenticate via password based authentication to ecbuild-lin10 SSH User is: build SUCCESS: SSH Authorization successful File: /tmp/uatWorkSpace/SSO_Configurator_Deploy_Keytab_a87c9e9f-2317-11e9-92d8-0050568f29b0/Test1 Transferring on target server: /tmp/Test1 Transferred file /tmp/uatWorkSpace/SSO_Configurator_Deploy_Keytab_a87c9e9f-2317-11e9-92d8-0050568f29b0/Test1 of size %.2f MB in %.2f seconds
Deleting a Kerberos keytab
You can delete existing Kerberos keytabs. To delete a keytab:
-
In the Automation Platform UI, click Administration>Single Sign-On.
-
Click the
 (delete) button for the keytab that you want to delete. The following warning appears:
Permanently delete kerberos keyetabName
-
Click OK.
The keytab is removed from the keytab list.
Configuring CloudBees CD/RO for SAML SSO
Configuring CloudBees CD/RO for SAML SSO consists of the following main steps:
Following are the descriptions of the fields, menus, and buttons in the Single Sign-On page when SAML is selected from the Single Sign-On Provider pulldown menu:
| Item | Description |
|---|---|
Service Provider |
List of SAML key tables (”keytabs”) that have been created for the CloudBees CD/RO server and CloudBees CD/RO web server components. These keytabs ensure that the services that CloudBees CD/RO end users are connecting to (the CloudBees CD/RO server service and the CloudBees CD/RO web server service) are valid services that those users are authenticated to use. You deploy a keytab of the appropriate type ( CloudBees CD/RO Server or CloudBees CD/RO Web Server ) to each of these servers. |
Identity Provider |
Name of each existing keytab. |
Server Type |
Type of server that was specified when the keytab was created. The possible values are CloudBees CD/RO Server and CloudBees CD/RO Web Server. |
Description |
Description of each existing keytab. This description was provided when the keytab was created. |
Deployment Status |
The possible values are Never Deployed, Success, and Failure. |
|
Opens a dialog box for editing the keytab. |
|
Opens a dialog box for deploying the keytab to the target host machines for one or more CloudBees CD/RO servers or CloudBees CD/RO web servers. |
|
Displays the deployment log for this keytab. |
|
Downloads this keytab to your local system. |
|
Deletes the keytab. A popup appears that asks you to confirm the deletion. |
Create Service Provider |
Opens a dialog box for creating a new keytab. |
Create Identity Provider |
Opens a dialog box for creating a new keytab. |
Configuring a SAML service provider
To use SAML single sign-on, you must create a SAML service provider ( in this case, the service provider is the CloudBees CD/RO application) and set it up for the CloudBees CD/RO server and the CloudBees CD/RO web server components.
| Before configuring a SAML service provider, you must configure CloudBees CD/RO with either an existing Active Directory provider or existing LDAP directory provider. See Directory providers for details. |
To create a SAML service provider:
-
In the Automation Platform UI, click Administration > Single Sign-On.
-
If SAML is not already selected in the Single Sign-On Provider pulldown menu, select it and click OK.
-
Click the Service Provider subtab if it is not already selected.
The Service Provider subtab shows a list of the existing SAML service providers. The New Service Provider dialog box appears. Enter the details for the service provider as follows:
| Item | Description |
|---|---|
Web Server URL |
URL for the service provider host |
Entity ID |
Service provider entity ID (usually URI) |
Assertion Consumer Service Endpoint |
Location at the service provider to which the SSO tokens are sent. This location accepts |
Single Logout Service Endpoint |
URL of the single logout service endpoint for the service provider |
AuthnRequestsSigned |
Metadata will have AuthnRequestsSigned="true/false" in descriptor |
WantAssertionsSigned |
Metadata will have WantAssertionsSigned="true/false" in descriptor |
Service Provider Public Certificate and Private Key section: |
|
Service Provider Public X.509 certificate (same certificate for signing and encryption) |
Service provider’s public certificate |
SP Private Key |
Service provider’s private key |
Passphrase |
Passphrase use for service provider’s private key |
Public Certificate and Private Key for signing the Service Provider Metadata section: |
|
Sign Service Provider Metadata |
If true, sign service provider metadata |
-
Click OK. The new service provider appears in the list of service providers in the Service Provider subtab.
Configuring a SAML identity provider
You can configure one or more SAML identity providers. These include identity providers such as Okta, OneLogin, SiteMinder, or Active Directory Federation Services (ADFS).
To configure an identity provider:
-
In the Automation Platform UI, click Administration > Single Sign-On.
-
If SAML is not already selected in the Single Sign-On Provider pulldown menu, select it and click OK.
-
Click the Identity Provider subtab.
The Identity Provider subtab shows a list of the existing SAML identity providers.
The New Identity Provider dialog box appears. Enter the details for the identity provider as follows:
Item Description IDP Name
Name of the SAML identity provider
Enabled
Whether the connector is enabled. If true, then any previously enabled archive connector will be disabled
Description
Comment text describing this object. This is not interpreted at all by CloudBees CD/RO
IDP Metadata XML File
Metadata of the SAML identity provider
Label
Display label text
Color
Hexadecimal value of the color to be used with an entity
-
Click OK.
The new identity provider appears in the list of identity providers in the Identity Provider subtab.
Managing Access Control
The access control functionality in CloudBees CD/RO determines who can modify the single sign-on configuration settings for Kerberos or SAML. You perform this task in the Access Control page in the Automation Platform UI. Several special system objects contain access control lists related to overall CloudBees CD/RO system administration. This page lets you view and modify access privileges for a particular CloudBees CD/RO object, including the SSO Configuration system object.
To view or modify Access Control for these settings:
-
In the Automation Platform UI, click Administration>Single Sign-On.
-
Click the
(SSO Configuration) button. The Access Control settings page for the current SSO configuration appears. -
Change the necessary settings as described in the following sections:
-
Access Control : Help topic that describes the parts of the Access Control page, which you use to view and modify access privileges for a particular CloudBees CD/RO object.
-
Configuring Access Control: Main section that describes access control concepts.
These include privilege types such as “read” and “modify,” details about adding permissions for specific users and groups, access control lists (allow or deny), and inheritance of access control information from parent objects. This section also contains examples that illustrate how you can use access control to increase CloudBees CD/RO security.
-