This is the high-level process to provision cloud resources that can be dynamically spun up during the application deployment.
-
Create and define one or more resource templates.
The resource template has the information required to spin up the resources on an on-demand basis an d to provision dynamic resource pools. It has the following information:
-
Cloud provider and cloud instance details
-
Configuration management settings
-
Both cloud provider and configuration management settings
-
Environment capabilities (see Full-Stack Dependency View for more information)
-
-
Create and define one or more environment templates.
-
When modeling an environment template, you define the environment tiers and then add resources to the tiers. You can either add static resources or a resource template to an environment tier.
-
When adding static resources, you can select one or more resources to add to the tier.
-
When adding resource templates, you can select only one to add to the tier and then enter the number of resources to provision.
Environment templates have this information:
-
Name and description
-
Environment tier details and properties
-
Resources assigned to the environment tiers
-
Cloud resource details from the resource templates
-
Usage Guidelines and Best Practices
Review the following information before creating and using dynamic environments.
-
This matrix shows the resource types that are allowed in environments and environment templates.
Resource Type Origin Environment Tier Environment Template Tier Use Rules Static resources
–
Yes
Yes
You may only add them to one environment. You cannot reuse them in more than one environment.
You can add one or more static resources to an environment tier or an environment tier template.
Static resource pool
–
Yes
No
You may only add it to one environment. You cannot reuse it in more than one environment.
You can add only one resource pool to an environment tier.
Resource pool provisioned in the resource template
Platform
Yes
No
You may only add it to one environment. You cannot reuse it in more than one environment.
You can add only one resource pool to an environment tier.
Resource pool provisioned in an environment template
CloudBees CD/RO
No
No
You cannot reuse the resource pools provisioned in an environment template.
You can only use it in the dynamic environment created by the environment template.
Resource template
–
No
Yes
You may only add one resource template to an environment template tier.
In environments and environment templates, you can create a tier with static resources, a static resource pool, or a static resource template. When you are editing the tier, CloudBees CD/RO maintains the initial resource-type association.
For example, if you initially add static resources to an environment tier, you can add only static resources to it. You are not allowed to add a resource this environment tier.
-
CloudBees CD/RO validates the information you provide for configuring and provisioning the cloud provider.
For instance, when you configure Amazon EC2 as the cloud provider, CloudBees CD/RO validates the Service URL using the Access ID and Access Key. The configuration information that you provide is also used to retrieve and display the available options from the cloud provider service for the provisioning parameters such as the Image or the Security group to use.
However, if your CloudBees CD/RO server is unable to access external services such as the Amazon EC2 service, you may disable this validation and the dynamic options retrieval capability for the cloud provider plugin by setting the plugin property
ec_disable_dynamic_operationsto1.
Creating AMIs
Before creating a resource template, you must create an Amazon Machine Image (AMI) with a pre-installed agent for the cloud provider. In CloudBees CD/RO 5.4, Amazon EC2 and OpenStack are the supported cloud providers.
AMIs with CloudBees CD/RO Agents
-
Install agents on CloudBees CD/RO server node machines.
See the following sections for detailed instructions:
-
Create the AMI on the Amazon EC2 or OpenStack platform.
-
See \https://aws.amazon.com/amazon-linux-ami/ for Amazon EC2.
-
See \https://docs.openstack.org/image-guide/content/index.html for OpenStack.
-
-
Create a resource template in CloudBees CD/RO.
When you set the cloud provider, you can select Amazon or OpenStack and enter information in the fields in the dialog boxes. The fields that you see depend on the cloud provider that you select. For detailed Amazon EC2 instructions, see Configuring Amazon EC2 as the Cloud Provider . For detailed OpenStack instructions, see Configuring OpenStack as the Cloud Provider .
AMIs with CloudBees CD/RO Agents and Chef Configuration Management
-
Install agents on CloudBees CD/RO server node machines.
See the following sections for detailed instructions: Supported platforms for CloudBees CD/RO Server and Agent Compatibility Express Agent Command-Line Non-Server Platform Installation Method for UNIX Agents ** Configuring Proxy Agents
-
Configure a Chef server with run-lists that will be applied to your cloud resources.
See \https://docs.chef.io/ for details.
-
Create the AMI on the Amazon EC2 or OpenStack platform.
-
See \https://aws.amazon.com/amazon-linux-ami/ for Amazon EC2.
-
See \https://docs.openstack.org/image-guide/content/index.html for OpenStack.
-
-
Create a resource template in CloudBees CD/RO.
-
When you set the cloud provider, you can select Amazon or OpenStack and enter information in the fields in the dialog boxes. The fields that you see depend on the cloud provider that you select. For detailed instructions, see Modeling Dynamic Environments.
-
When you set the configuration management tool, select Chef.
For detailed instructions, see Configuring Chef as the Configuration Management Tool.
-
Creating Resource Templates
-
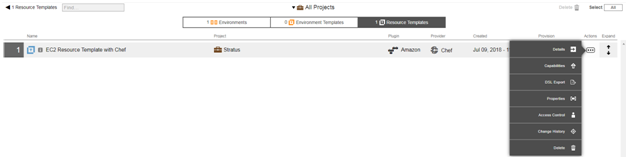
Open the Resource Templates list.
If there are no defined resource templates, the Resource Templates list is empty. For example:

-
Add a resource template.
To do so, do one of the following:
-
If the Resource Templates list is empty, click either There are no Resource Templates yet. Add one + or click the Add + button.
-
If the Resource Templates list is not empty, click the Add + button. The New dialog box opens.
-
-
In the New dialog box, click Resource Template.
-
Click Create New to create a new resource template. The New Resource Template Name dialog box opens.
-
Enter a name, select a project to which it will belong, and (optional) enter a description.
-
Click Next. The New Cloud Provider dialog box appears:
-
Choose a cloud provider from the Select Cloud Provider pulldown menu.
-
Click Next. The New Cloud Provider dialog box becomes populated with additional settings for the cloud provider that you selected.
-
Enter your settings into the New Cloud Provider dialog box.
-
To use Amazon EC2 as the cloud provider, see Resource Template for Infrastructure using Amazon EC2 for detailed instructions.
Before configuring the cloud provider, you must have an Amazon Machine Image (AMI) with a pre-installed agent available.
-
After you complete these steps, the Resource Templates list now shows the template that you just created. The breadcrumb in the upper left corner shows the object hierarchy.

By default, the resource templates for all projects are displayed.
To see only the objects for a specific project, click the down arrow in the All projects field and then select one or more projects in one of these ways:
-
Click on the name of one or more projects.
-
Enter the search criteria in the Search field. The projects that match the criteria appear in the list.
If there are no matches, a message appears stating that there are no resource templates in the selected projects.
Example: Resource Template using Amazon EC2
To enter the cloud provider settings:
-
Choose Select Cloud Provider>Amazon.
-
Enter or select the provisioning settings:
-
Configuration—The name of the configuration that holds the connection information. This must reference a valid existing configuration. This menu is prepopulated with the available configurations.
-
Number of Instances—The number of instances to start. The default is 1.
-
Security Group—The default is default .
-
Image—Select the EC2 image to deploy. The drop-down menu displays the images that you own in your current region. (Required)
-
Instance Type —You get the list of instance types at runtime. The default is Small(m1.small).
-
Key name —Select the name of the key pair to use. (Required)
-
Results Location —Location where the output properties will be saved. If not specified, it defaults to
/myParent/parent. -
User Data —User data passed to the newly launched instance in Amazon EC2 for performing common automated configuration tasks and running scripts after the instance starts.
-
Availability Zone —The zone where the instance will be created. (Required) Selecting a zone causes CloudBees CD/RO to find a subnet in the selected zone.
-
Subnet Id —The ID of the subnet in which the instances are launched. This parameter is used with VPCs. After selecting the zone where the instance will be created, you can select a subnet in that zone.
-
Private IP —The private IP address to assign. If you specify a value, it must be from the IP address range of the subnet. If no value is specified, an available IP address from the IP address range of the subnet is selected. This parameter is used with VPCs.
-
Use Private IP for subnet? —If this check box is selected, the private IP address assigned to the instance will be used for the newly created resource. This is enabled by default.
-
Instance Initiated Shutdown Behavior —Specify the instance behavior when an OS-level shutdown is performed. Instance can be either terminated or shut down.
-
Tenancy —Each instance that you launch into a VPC has a tenancy attribute to indicate what it runs on. Choose one: default (shared hardware), dedicated (single-tenant hardware), or host (dedicated host, which is an isolated server with configurations that you can control).
-
Resource Pool —The name of the resource pool. If you enter a name, a new resource pool is created, and new resources are added to the pool for the instances created in Amazon EC2.
-
Resource Port —If you specify a resource pool name in 'Resource Pool' field, this is the port that will be used when creating the resource. If no value is specified, port 7800 will be used by default when creating the resource.
-
Commander Workspace —If you specify a resource pool name in Resource Pool field, this is the workspace that will be used when creating the resource.
-
Resource Zone Name —The zone to which the newly created resources will belong. The default zone is default .
-
-
Click Next to enter the configuration management settings. The New Configuration Management dialog box appears.
-
If you do not want to enter the configuration management settings, click OK.
The Resources Templates list now shows the resource template that you created.
Example: Resource Template using Chef
This section shows how to configure Chef as the configuration management tool for a resource template after you have entered the cloud provider settings.
Select configuration management
To enter the configuration management settings:
-
In the New Configuration Management dialog, choose Chef and select Next.
-
Enter these settings:
-
Configuration –Name of the Chef configuration. This is required.
-
Chef-client Path —The path to the chef-client executable. The default value is
/usr/bin/chef-client. (Required) -
Run as user with full system privileges –If this check box is selected, chef-client is run as a user with elevated privileges on Unix systems (using sudo).
-
Run List —The ordered list of Chef recipes to run. This is required.
-
Node Name –Unique name for the node that will be maintained by the chef-client. If not specified, Chef will use the Fully Qualified Domain Name of the node as the node name. (Required)
-
Additional Arguments –Any additional arguments that need to be passed to the chef-client.
-
-
Click OK.
The Resource Templates list now shows the resource template that you created. For example:
-
See Creating Resource Templates to complete the process of creating the resource template.
Resource Template Details
Starting in the Resource Templates list, follow these steps to view and edit the resource template details:
-
Choose a resource template and click the Menu button.
A list of menu options appears. For example:
To see only the objects for a specific project, click the down arrow in the All projects field and then select one or more projects in one of these ways:
-
Click on the name of one or more projects.
-
Enter the search criteria in the Search field. The projects that match the criteria appear in the list.
-
If there are no matches, a message appears stating that there are no resource templates in the selected projects. . Select Details.
+ The Edit Resource Template Details dialog box opens. For example:
+
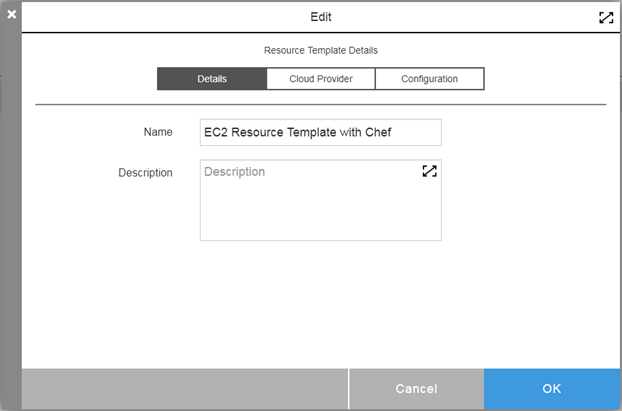 . In the Details tab, edit the name and description of the resource template.
. In the Cloud Provider tab, edit the cloud provider account information.
. In the Converge tab, view and edit the details about how the virtual instances are converged in the defined configuration.
. Click OK to save your changes.
. In the Details tab, edit the name and description of the resource template.
. In the Cloud Provider tab, edit the cloud provider account information.
. In the Converge tab, view and edit the details about how the virtual instances are converged in the defined configuration.
. Click OK to save your changes.
Accessing the Resource Templates in the Automation Platform
A resource template has the required information to provision and spin up cloud resources on an on-demand basis to model a dynamic environment. You set the cloud provider and configuration management details in the resource template. Then you define the environment tiers and add resource templates to these tiers in an environment template to complete the dynamic environment configuration.
You can generate new resource pools in CloudBees CD/RO by accessing the resource templates from the automation platform UI.
-
Go to Cloud > Pools.
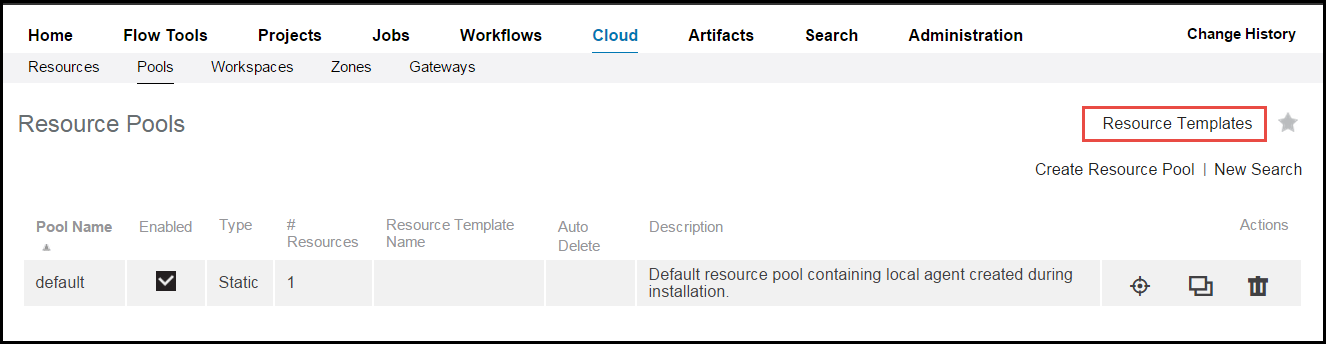
-
Click Resource Templates.
The Resource Templates list opens.

-
(Optional) To view details about a resource template, choose a template and click the Menu button (
 ) for it.
The Context menu opens.
-
Click one of these options:
-
Details —The Edit Resource Template Details dialog box opens.
The tabs that appear in the dialog box depend on the cloud provider specified in the resource template.
-
Properties —The Properties dialog box opens.
You can view and edit the properties that apply to the resource template.
-
Access Control —The Access Control page opens.
-
Track Changes —The Change History for the resource template opens.
-
-
To provision the resource template, choose a resource template, click the Menu button (
), and select Details > Provision.The Provision Cloud Resources dialog box opens.
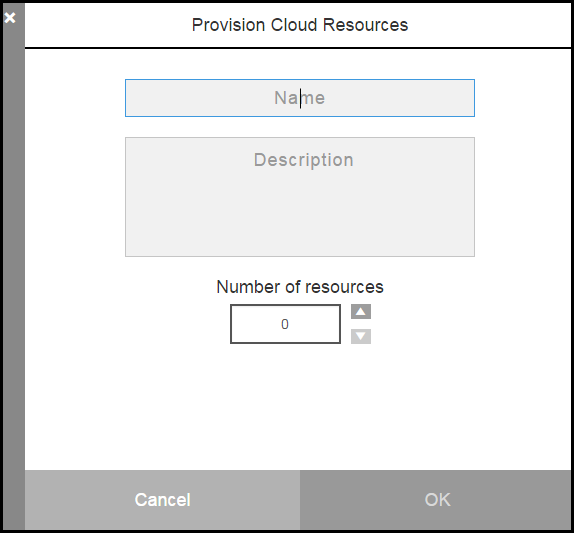
-
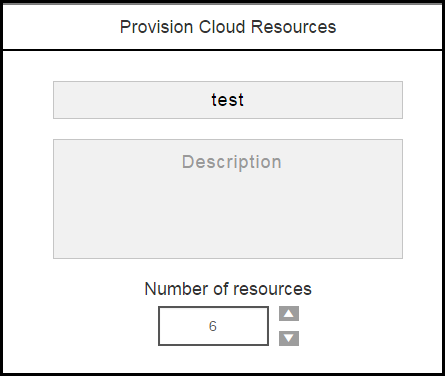
Enter the resource pool name, an optional description, and the number of resources in the pool, and then click OK.
You go to the Job Details page in the automation platform.
Creating Environment Templates
You can create a new environment template from scratch or create one based on an existing template.
Creating a New Environment Template
Starting from the Environment Templates List, follow these steps to create an environment template from scratch:
-
Go to the Environment Templates List. If there are no defined environment templates, the Environment Templates List is empty.
-
Add an environment template. If the Environment Templates List is empty, click There are no Environment Templates yet. Add one + or click the Add + button.
-
In the New dialog box, click Environment Template. The New dialog box opens.
-
If the Environment Templates List is not empty, click the Add + button. The New dialog box opens.
-
-
Click Create new to create a new environment template. The New dialog box opens.
-
Enter a name for the environment template, select a project to which it belongs, and enter an optional description.
-
Click OK.
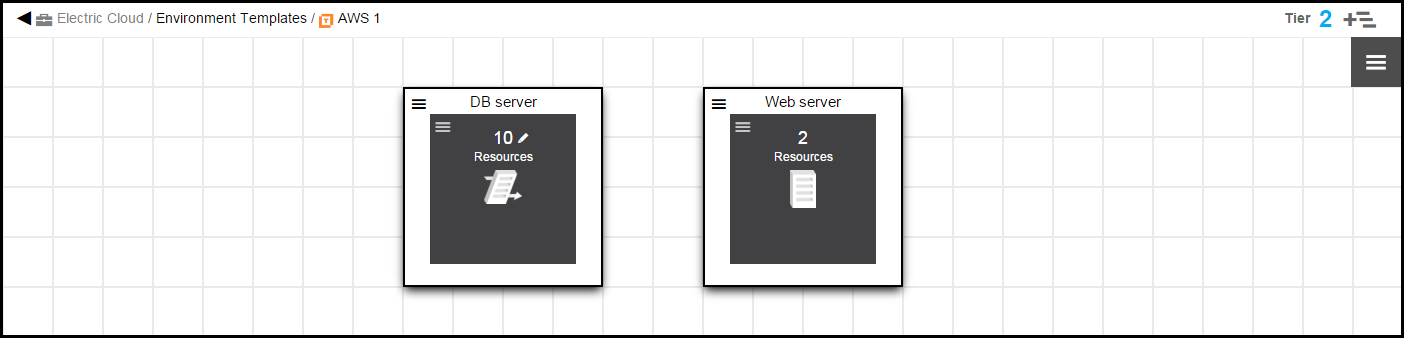
The Environment Templates Visual Editor opens. The environment template has one tier with no assigned resources.
-
In Tier 1, click the
 button and select Details.
 -
In the Environment Tier Details dialog box, enter a new name for the environment tier and an optional description, and then click OK to save the settings.
-
In the tier, click the + button to add a resource to it. The New dialog box to add resources opens.
-
Click Add resource template to select a resource template.
The Resource Templates List opens.
-
Select a resource template, and click OK. The dialog box to select a resource template opens.
It shows the list of available environment templates. The default is to show the environment templates for all projects.
If you want to see only the environment templates for a specific project, click the down arrow in the All projects field to select one or more projects one of these ways:
-
Click on the name of one or more projects.
-
Enter the search criteria in the Search field. The projects that match the criteria appear in the list.
You can also search for one or more environment templates by entering the search criteria in the Search field next to the All projects field. If there are no matches, a message appears stating that there are no environment templates in the selected projects.
+ The New dialog box to select the number of resources to provision opens. . Enter the number of resources to provision, and click OK. You must provision at least one resource ( 1 ).
+ NOTE: You cannot override the number of resources when deploying an application with an environment template.
+ The Environment Templates Visual Editor now shows the amount of dynamic cloud resources set to be provisioned when the application is deployed.
-
To add static resources to an environment template:
-
Click the Add tier button to create a new tier.
A new environment tier appears in the Environment Templates Visual Editor.
-
Rename the new environment tier.
-
Click the + button in the new tier to add resources to it.
The New dialog box opens.
-
Click Add resources to add static resources to the environment tier.
A list of static resources opens.
You cannot override the setting for the number of static resources when deploying the application with an environment template -
Select one or more resources in the list, and click OK.
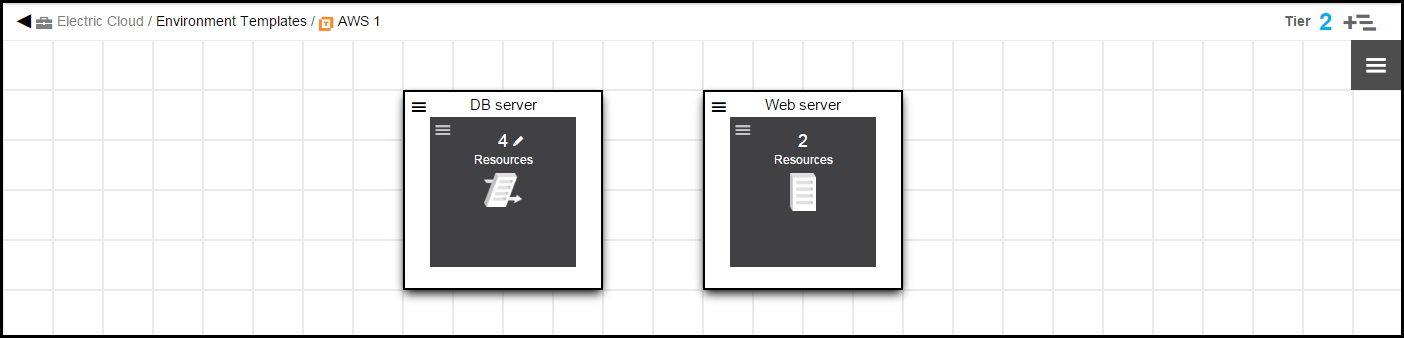
The Environment Templates Visual Editor now shows that the "Web server" tier has two static resources.
-
Creating an Environment Template Based on an Existing Template
Starting from the Environment Templates List, follow these steps to create an environment template that is based on an existing one:
-
Go to the Environment Templates List.
-
Add a resource template.
For detailed instructions, see link:#AddEnvTemplate[link:#AddEnvTemplate[Add an environment template .]]
-
Click Copy existing to create a template based on an existing one.
The list of existing templates opens.
It shows the list of available environment templates. The default is to show the environment templates for all projects.
If you want to see only the environment templates for a specific project, click the down arrow in the All projects field to select one or more projects one of these ways:
-
Click on the name of one or more projects.
-
Enter the search criteria in the Search field. The projects that match the criteria appear in the list.
You can also search for one or more environment templates by entering the search criteria in the Search field next to the All projects field. If there are no matches, a message appears stating that there are no environment templates in the selected projects. . Select an environment template. The New dialog box opens. . Rename the environment template, and enter an optional description of it. You can also change the project to which the environment template belongs.
+ . Click OK to save these settings.
The Environment Templates Visual Editor now shows that the same environment tiers as the original version.
+ You can now modify the environment template and its objects (resources and resource templates) for your deployments.
Viewing and Editing Environment Templates
Starting in the Environment Templates List, follow these steps to view and edit the environment template details:
-
Choose an environment template and click the View Details button. The Environment Templates for the selected template opens.
-
Click to Menu button to open the context menu for the environment template.
-
Click Details to view or edit the name and description of the environment template.
-
Click Properties to view or edit the environment template properties.
-
Click Access Control to go to the Access Control page in the automation platform.
-
Click Track Changes to open the Change History of the environment template.
-
Click Delete to delete this template.
-
-
To view and edit an environment tier with dynamic resources, click the Menu button for the resources.
The context menu opens with these options: Click Details to view and edit the resource details for the environment tier. Click Remove to remove the resources from the environment tier.
-
To change the resource template used by the environment tier, click Details and select a different resource template. The list of available resource templates opens.
-
Select a different environment template. A message appears; select Yes if you want to continue. The Edit dialog box number box opens and shows the number of provisioned dynamic resources.
-
To change the number of provisioned dynamic resources, enter a new number or use the up/down arrows.
-
Click OK.
The Environment Templates visual editor now shows the changes that you made.