Use a Workflow to design and manage processes at a higher level than individual jobs. Workflows allow you to combine procedures into processes to create build-test-deploy lifecycles (for example). A workflow contains states and transitions you define to provide complete control over your workflow process. The CloudBees CD/RO Workflow feature allows you to define an unlimited range of large or small lifecycle combinations to meet your needs.
Some benefits of defining a workflow include
-
Manual intervention —Workflows make it easy to introduce manual decision points into your process. With workflows, you can enable specific users or groups to choose how the workflow should proceed. Using an email notification, you can notify one or more users about the workflow status. If the workflow is waiting for someone to manually intervene, an email (including a screen link) can provide immediate attention and access to choices for how the workflow should proceed.
-
Aggregation —Workflows allow you to collect information from a set of related jobs into a single location. A workflow can act as a central place to monitor the full lifecycle of your build, test, and deploy process.
-
Looping —Workflows provide the native ability to run a job more than once. You have full control over the loop condition—you can re-run the job any number of times, only re-run the job if it did not succeed, or make this decision based on a custom job property.
-
Branching —Workflows allow you to run multiple jobs in parallel and wait for them to complete before moving to the next state in the workflow. If you combine branching with looping, you can re-run these jobs based on a condition you defined (for example, only re-run jobs that failed).
-
Multipathed —Design a workflow to take multiple paths automatically, depending on the outcome of each state’s action, and the pre- and post-triggers you defined for each state.
Basic workflow concepts
Workflows contain states—One or more states can be designated as "starting" states to provide multiple entry points into the workflow. When a workflow is launched, a starting state is specified. You may prefer to design a complex or multi-purpose workflow so you can start the workflow at a different state to complete only a portion of the workflow for a particular outcome. For example, you might choose to run only the test suite workflow section.
As each state in a workflow becomes active, it performs an action . The state’s action can be to create a job from a procedure or to start a workflow from a workflow definition. When the job or called workflow completes, "On Completion" transitions are evaluated to see if the workflow should change to a different state, possibly based on the outcome of the action.
You can create as many state definitions as you need. For example, you might have a small workflow definition with only 5 states, calling 5 procedures, or you might create 50-100 or more states to process a like-number of procedures from multiple projects.
A state can send email notifications before or after an action to notify interested users about workflow progress or to request manual user intervention to move the workflow to the next state.
Transitions are used to move workflow progress from one state to another state. Four types of transitions are available to move a workflow to the next state:
-
On Enter —Evaluates before sending email notifiers or starting the action
-
On Start —Evaluates immediately after starting the action. These transitions are ignored if no action is specified for the source state.
-
On Completion —Evaluates when the action completes. These transitions are ignored if no action is specified for the source state.
-
On Completion transitions are taken only if the state is still active when the action completes. These transitions are ignored if the workflow has transitioned to another state.
-
Manual —Evaluates when a user selects the transition in the UI and specifies parameters. The same action can occur using ectool or the Perl API by calling
transitionWorkflow. Only users who have “execute” permission on the transition are allowed to use the manual transition.
Similar to other objects in the CloudBees CD/RO system, workflow objects can contain access control privileges, properties, and parameters.
Workflow objects
Workflow objects are split into two types: Definition objects and Instance objects. Definition objects provide the template for a running workflow instance. You create a new workflow by defining a Workflow Definition along with its State Definition and Transition Definition objects.
When you run the workflow definition, the system creates a new Workflow object with an equivalent set of State and Transition objects that represent the run-time instances of the workflow definition.
| We omit the "Instance" qualifier for brevity in the API and the UI. |
Workflow Definition
This is the top-level workflow object, which is a container for states, and transitions, and other information defining your workflow. In the same way a procedure defines the behavior of a job, the workflow definition defines the behavior of a workflow.
Create a project to get started:
-
Select the Projects tab, then click the Create Project link. After creating a project, its name will appear in the table on the Projects page.
-
Select your project name to go to its Project Details page, select the Workflow Definitions subtab, then select the Create Workflow Definition link.
-
On the New Workflow Definition page, name your workflow definition. Access the Help link on that page if you need help creating the Workflow Name Template (similar to the Job Name Template). Click Save.
-
Now, on the Workflow Definition Details page (Graph view), you are ready to create the first state for your workflow.
For an example of how this page might look as you add states and transitions to your workflow definition, see Workflow Definition Details for details about the Workflow Definition Details page. Notice also that you can add properties to the workflow definition at this point.
State Definition
Each workflow can contain one or more states. Defining states for a workflow is analogous to defining steps for a procedure.
You might choose to name your states for their intended purpose (for example: waiting for user, building, testing, or test1, test2, and so on) just as you might name steps for your procedure. You can define multiple states as "startable" so you can choose different starting points when you begin using the workflow. By default, the first defined state is always "startable".
As you create states, they will be displayed in the graph on the Workflow Definition Details page. Selecting a state in the Graph view opens the State Definition panel to define:
-
Action to perform
-
Parameters required by the action
-
Transitions
-
Parameters
-
Email notifiers
-
Properties that you want to assign
Transition Definition
Each state can contain one or more transitions. The transition definition requires a name for the transition. This transition name will appear on the Workflow Definition Details graph and the Workflow Definition Details List view.
You can define one or more transitions for each state. When defining a transition, you can:
-
Add a text description for your reference
-
Select the "target" state
-
Select the type of transition trigger you want to use (On Enter, On Start, On Completion, or Manual) See the Workflow Definition Details Help topic for trigger type definitions and other information for defining a transition
-
Select (or enter) a Condition to specify when the transition is allowed to trigger
-
Assign parameters to a transition. These parameters are passed to the target state
Workflow
While we generically refer to or think of a "workflow" as an automated process to perform multiple tasks, it is actually the end result of running a Workflow Definition. Running a Workflow Definition produces a Workflow, which is analogous to running a Procedure, which produces a Job.
After you start running Workflow Definitions, select the main Workflow tab to see all workflows that ran (or are still running) listed in a table, each linked to its own Workflow Details page. The Workflow Details page main view is a graphical representation of the workflow, and also provides links to stop the workflow process, run the workflow again, see the workflow log, and so on.
A Workflow contains a pointer to:
-
Its workflow definition
-
Sets of states and their transitions
-
The current and initial state
-
Parameters to the initial state
-
A "complete" value to specify whether or not the workflow is complete
-
A log containing transitions taken and user events
State
The run-time instance of a State Definition is a State. The state is part of a workflow and contains information about actual parameter values specified by the user when the workflow was run or from transitions taken to enter the state.
If the state has an action , then the state contains information about the most recently created job or workflow. Because a state may be entered multiple times, the state contains a copy of the state definition properties needed to launch the action again.
After the state is created, it no longer depends on the state definition, so any changes made to the definition will not affect workflows already running. Changes do not take effect until the next time the workflow runs.
Transition
The run-time instance of a Transition Definition is a Transition. The transition is part of a state and contains a copy of information from the transition definition. Each transition object corresponds to a transition definition, but once defined, each transition is recognized by its unique name. A transition contains unexpanded actual parameters cloned from definition, expanded and passed to the target state on entry, the Javascript condition, and the trigger type instructing the transition when to occur.
After the transition is created, it no longer depends on the transition definition, so any changes made to the definition will not affect workflows already running. Changes do not take effect until the next time the workflow runs.
A transition moves the workflow from its state to a target state.
Access Control for Running Workflows or Executing Manual Transitions
Setting access control privileges for those persons who can or cannot run a workflow or execute a manual transition may relate to security policies in your organization.
Specific workflow access control notes:
-
All workflow, state, and transition ACLs are copied from the definition object to their corresponding instance when the workflow is run initially.
-
To run a workflow, you must have execute permission on the state definition you are using to start the workflow.
-
To take a manual transition, you need execute permission on that transition.
-
To strictly control who can take a manual transition: Grant read and modify privileges to anyone who can view or edit the workflow, but only give execute permission to those users or groups who can take the manual transition.
-
You can control who can start each of the startable states by setting ACLs on state definitions accordingly.
For more information about access control, including examples you might use, see the Access Control Help topic.
Property Search Paths
A workflow serves as a hub of information that can be shared between states, transitions, jobs, and other workflows. Depending on the context, an implicit search path is used to reference a property by name. Using a simple property name like $[someCustomProperty] “walks” down the following paths until it finds a property by that name. If the search fails to find a property, an error is produced.
The search path followed to resolve a simple property name depends on where the reference occurs.
Transition context
-
Transition property sheet
-
State property sheet—Includes parameter values passed to that state and any custom properties. Because a state can be entered multiple times, parameter values are available for the most recent entry only.
-
Starting state property sheet—Used to get to parameter values for the initial entry into the workflow.
-
Workflow property sheet—Used to access information shared across the workflow.
State context
-
State property sheet—Includes parameter values passed to that state and any custom properties. Because a state can be entered multiple times, parameter values are available only for the most recent entry.
-
Starting state property sheet—Used to get to parameter values for the initial entry into the workflow.
-
Workflow property sheet—Used to access information shared across the workflow.
For information on context-relative property path shortcuts that allow passing information from one object to another or accessing a property from different parts of the workflow, review the Properties Help topic. The Properties Help topic also includes all intrinsic workflow-related properties.
Parameters
States may use formal parameters to determine what information to provide when the workflow enters that state. Parameter values can come from the initial run workflow call or from a subsequent transition into the state.
An automatic transition must specify all values required by the target state. A manual transition may omit some values to be passed to its target state. If a manual transition does not specify all values needed by the target state, then any missing values are collected from the user when the transition is taken.
Parameters to the starting state for the workflow are collected when the workflow is launched. These parameters are accessible throughout the workflow and act like global workflow parameters. See Property Search Paths .
It is important to distinguish between formal parameters on a state and formal parameters on the action the state calls (procedure or workflow starting state). The procedure (or workflow) may have its own parameters, so the state is responsible for entering required actual parameter values. In some cases, values may be static values, in other cases the values may come from the state’s parameters or those of the starting state (for example, global workflow parameters).
Parameters on the calling state do not need to be the same as the parameters on the action:
-
A state parameter value can be passed as the value for an action’s parameter by specifying a property reference in the value field on the Action tab for the state definition.
-
All parameters on workflow current and starting states are accessible with a simple property reference (for example,
'$[param1]') -
Parameters on a workflow starting state act like global workflow parameters because they are available everywhere within the workflow.
Sending Notifications
A state can be defined to send email notifications when it is entered, when it starts its action, or when the action completes. Notifiers are created by visiting the Notifications tab on the State Definition panel. See Email Notifier for details on defining email notifiers. Sample notifier templates are provided also.
Workflow Logs
Each workflow keeps a log of events that relate to the workflow. The log contains information about the evaluation of transition conditions, transitions taken, actions started, and other information that might prove useful when debugging a workflow. Access the log by clicking the View Log link on the Workflow Details page. For more information, click here to go to the Workflow Log Help topic, which contains a screen example of the Workflow Log page.
Visualizing a Workflow
Two Workflow web pages, Workflow Definition Details and Workflow Details, open to the Graph view.
-
Workflow Definition Details page—As you build your workflow, you can see a visual representation of state and transition definitions you define.
-
Workflow Details page—Displays a graph, updated in real-time, for your running or completed workflow.
Your workflow Graph (on either page) contains context-sensitive links to various options. Options are different depending on whether or not you are building or running your workflow. Workflow Definition Details and Workflow Details Help topics include information about the context-sensitive link options provided within the workflow graph.
The next section, Building a Workflow—a Tutorial , begins with a "sketched" representation of the workflow the tutorial will create. At the end of the tutorial, see the actual workflow graph created by the CloudBees CD/RO workflow process.
Building a Workflow—a Tutorial
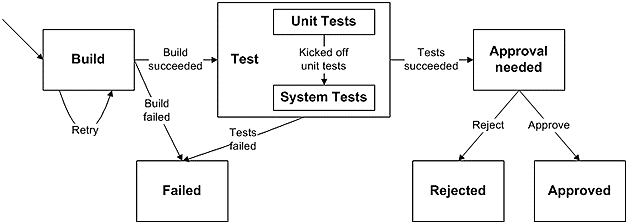
This overview tutorial is an example of how to create a "build-test-approve" workflow, building each state and transition we want the workflow to include, and building the workflow in the order we need to use to achieve our purpose. The diagram below outlines our workflow process.
You can read through the tutorial or actually recreate this example workflow on your machine. If you want to use this tutorial as a real, working example, you must do some initial setup first:
-
Create a project named "Sample"
-
Create a procedure name "BuildProduct"
-
On the "BuildProduct" procedure, add a parameter named "branch"
The following diagram shows the workflow that you will build:
-
The starting state is Build , which could transition to the Test state or the Failed state
-
Two test states— Unit Tests and System Tests, which could transition to a Failed state or an Approval needed state
-
The Approval needed state could transition to one of two states— Rejected or Approved
-
All transitions are represented by the lines between the states, which include "arrows" to show the possible workflow directions (depending on the outcome of each state’s action
Best Practice tip
Designing your workflow on paper or whiteboard, creating your own state and transition diagram, is a great way to organize your thoughts and map your workflow process.
Calling a job from within a workflow
Or, running a job by calling its procedure from a workflow state.
-
Select the Projects tab, select the Sample project to go to the Project Details page, then select the Workflow Definitions subtab.
-
Click the Create Workflow Definition link to go to the New Workflow Definition page.
-
Create a new Workflow Definition named Lifecycle.
Because the workflow definition, Lifecycle , is a new definition and does not have any state or transition definitions, the State Definition panel opens, ready for you to create a new state definition for your workflow.
You can use the DSL Export (
 ) button to download the objects as a DSL file.
 -
Change the system-generated state Name to Build and click OK. The State Definition panel is displayed.
-
Specify the Action for this state, which is Procedure. In this example, the procedure BuildProduct already exists with a single parameter named branch .
-
Set the value of this parameter to "
3.0".The Build state now has an Action associated with it.
-
Click OK. Note the shape of this state in the graph. The state shape will be different depending on the state Action selected.
-
Click Run to launch the workflow.
-
Running the workflow shows a Job was launched by the Build state. The workflow job completed successfully, indicated by the "check mark" on the state.
-
You can get more details about the job by clicking on the Build state, which opens the State Details panel, and clicking on the Job link displays the Job Details page.
-
Alternately, clicking on the Show History button opens the History panel to show what ran and the workflow outcome
-
Collecting a parameter when a workflow is launched and passing its value to a job
Or, "prompting" for a parameter value when a workflow is launched and passing its value to a procedure.
-
Return to the Workflow Definition page for the Lifecycle workflow.
-
Click the Build state (from the graph) to open the State Definition panel, then select the Parameters tab.
-
Click the Create Parameter link to display the New Parameter page.
-
Create a parameter called "branch".
-
Add a description and make sure the Required? box is "checked" and click OK.
-
On the Workflow Definition Details page again, change the value passed to the job from 3.0 to
$[branch]. -
Now, when the workflow is launched, you will be prompted for the value of branch and you can specify a different value if necessary.
Retrying a state
If a State fails (technically, the job started by the workflow state), you may choose to retry it a few times before giving up.
-
Right-click on the Build state and select the Create Transition link to create a new transition from the Build state back to itself.
-
Create a new On Completion transition named "retry" from the Build state that returns to the same state when the job fails.
-
Add a limit of 3 retries by using the following JavaScript condition:
$[/javascript mySubjob.outcome == "error" && myState.getProperty('/increment numberOfRetries')< 3; ]The new transition is displayed on the Workflow Definition Details page.
-
When we run the workflow, we see only the last job that was run.
-
Clicking the States tab and then the Show All link displays all jobs that were invoked by the Build state.
Also, you can see the number of times a state was visited and which transitions were taken by clicking the Show History button.
Automatically transitioning to different states based on the outcome of a job
If the Build job fails, we might want to end the workflow. If the job succeeds, we might want to continue to the next stages of the workflow. In this section, you add new states to transition to, depending on the outcome of the job.
-
Create the Test state where the workflow will transition to when the build state succeeds.
-
Create a Failed state.
-
Create an On Completion transition from Build to Test when the job succeeds.
Notice that the Condition dropdown menu provides a template condition called Job success that can be used here.
-
Create an On Completion transition from Build to Failed when the job fails.
Notice that the Condition field remains blank. Because transitions are evaluated in order, if the workflow gets to this transition, we will know that the "success" case will be false. Leaving the Condition field "Always" allows us to handle all "non-successful" outcomes (error or warning).
When you run the workflow, if the build succeeds the workflow will end up in the Test state.
The workflow will end up in the Failed state if the build fails after trying three times.
Invoking another workflow
Just as a state can invoke a job as its “Action”, it can invoke another workflow, which then becomes its subworkflow.
-
From the Workflow Definition Details page for Lifecycle , click on the Test state in the graph.
-
Specify the “Action” for the Test state, which is a Workflow.
The Test state now has an Action associated with it. Because the Test state Action is Workflow, the object shape in the graph has changed.
Running the workflow shows another workflow was launched by the Test state.
-
Click on the workflow link in the History panel to see more details about that workflow.
Running jobs in parallel
Run multiple jobs at the same time.
-
Look at the AutomaticTests workflow that was invoked (in the previous example) by the Test state in our main Lifecycle workflow.
The first state in this workflow runs unit tests, and when the tests complete, the state automatically transitions to the second state that runs system tests.
Now we will change the behavior of the transition to move from the Unit tests state to the System tests state as soon as the first job is launched.
-
Edit the existing transition by renaming it to Kicked off unit tests and changing it to an On Start trigger type.
Now, when the AutomaticTests workflow is launched, both jobs will run in parallel. The workflow completes automatically when both jobs complete.
Automatic transition to different states
If the jobs in the Test workflow fail, we will want the workflow to end. If the jobs succeed, we will want to continue to the next stages of a calling workflow.
-
Click the Create State link.
-
Create the Approval needed state that the workflow will transition to when tests succeed.
-
Create a transition named "Tests succeeded" from Test to Approval needed when all jobs in the workflow succeed.
(Right-click on the Test state to create the transition.) The following JavaScript condition checks the outcome of all subjobs for a subworkflow and evaluates to "true" only if they all succeeded:
$[/javascript var success = "1"; for (var stateName in mySubworkflow.states) { var subjob = mySubworkflow.states[stateName].subjob; if (subjob !=null && subjob.outcome != "success") { success = "0"; break; } } success; ]Note that we created the Approval needed state first, then we created the Tests succeeded transition to connect the two states.
-
Create a transition from the Test to the Failed state when either of the jobs in the workflow fails.
Notice the Condition field remains blank. Because transitions are evaluated in order, if the workflow gets to this transition we know the success case was "false".
When you run the workflow, if the test jobs succeed, the workflow will end up in the Approval needed state.
Waiting for manual intervention
Allow users to choose how to progress the workflow.
-
From the Workflow Definition Details page for Lifecycle , create an Approved state and a Rejected state for the workflow to transition to when a user approves or rejects the build.
-
For the Approval needed state, we create a manual transition called Approve that the user can select to progress the workflow to the Approved state.
-
Next, we create a manual transition called Reject that the user can select to progress the workflow to the Rejected state.
When you run the workflow and the build and test phases succeed, the new manual transitions are made available to users on the Workflow Details page.
If a user does not have execute permission for manual transitions, the Manual Transitions section will not be included in the summary section at the top of the Workflow Details page.
If you choose the Approve transition, the workflow will end up in the Approved state. If you choose the Reject transition, the workflow will end up in the Rejected state.
Restricting manual transitions
Only allow certain users to take manual transitions. From the Workflow Definition Details page for Lifecycle :
-
When the workflow is created, access control entries from the Transition Definition are copied to the corresponding transition. These are the access control entries for the Approve transition before we edit them (see below).
-
To add access control to a transition, select the transition or transition name.
-
When the Transition Definition panel opens, click the Access Control link.
-
When the Access Control page is displayed, click the Add Group link to add privileges for a group that can take this transition.
If you already have groups created, you can use them here or create two groups now: Lifecycle Approvers and Lifecycle Modifiers . -
Allow read and execute access for a group named Lifecycle Approvers .
These users can see and take a manual transition in a workflow.
-
Allow read, modify, and change permission access for a group named Lifecycle Modifiers .
These users can edit the Transition Definition, but will not have access to take a manual transition in a workflow.
-
"Break the inheritance" so only specified groups have access to this transition.
-
Duplicate this access control configuration for the Reject transition.
When a workflow is launched and reaches the Approval needed state, a user who is not a member of the Lifecycle Approvers group will not be allowed to execute any manual transitions. A user who is a member of the Lifecycle Approvers group can execute manual transitions.
The Workflow Details page updates in real-time, which means you will see changes at the top of the page pertaining to the current state in the running workflow, and current changes in the graph also. For example, if the previous state had a manual transition, but the current state now processing does not have a manual transition, the Manual Transition section will not be displayed.
Sending email notifiers
Send email notifications so a user or group knows they need to take an action on a workflow.
-
From the Notifications tab for the Approval needed state definition, click the Notifiers tab.
-
Click the Create Notifier link.
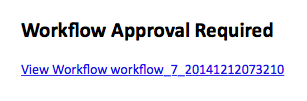
We want to create an On Enter email notifier. When a workflow enters the Approval needed state, this email notifier will be sent out.
In this example, we want to send an email notification to the "approvers". The email will contain a link to the Workflow Details page and links to all available transitions.
-
Use the following formatting template for the email notifier.
It includes a link to the CloudBees CD/RO workflow, embeds a block of JavaScript that cycles through all the manual transitions from the active state, and has a link to go directly to those transitions. To ensure that the script works properly, use the script as is and make sure there are no white spaces before
<!DOCTYPE…>,<html>, and</html>.Subject: Workflow $[workflowName] is ready for approval <!DOCTYPE html PUBLIC "-//W3C//DTD XHTML 1.0 Strict//EN" "https://www.w3.org/TR/xhtml1/DTD/xhtml1-strict.dtd"><html> <body> <h2>Workflow Approval Required</h2> <a href="https://$[/server/hostName]/commander/link/workflowDetails/projects/$[/myProject]/workflows/$[/myWorkflow/workflowName]/s=Projects">View Workflow $[workflowName]</a> <br /><br /> $[/javascript var links = new String(""); for (var tName in myWorkflow.activeState.transitions) { var transition = myWorkflow.activeState.transitions[tName]; if (transition.trigger == "manual") { links += "<a href=\"https://$[/server/hostName]/commander/link/transitionWorkflow/projects/$[/myProject]/workflows/$[/myWorkflow/workflowName]/transitions/" + tName + "\">" + tName + "</a><br />"; } } links; ] </body></html>This script is a sample of the type of script you can insert into the Formatting Template field illustrated in the following screen example. When a workflow is run and it reaches the Approval needed state, an email similar to the following example can be sent to specified destinations. Only users who have execute permission on these transitions will be able to approve them by clicking the link.
Adding a global parameter
Prompt for a parameter when the workflow is launched, and use its value later in the workflow.
-
Currently, there is one parameter for the starting state Build .
-
Click on the Build state in the graph and select the Parameters tab.
-
Click the Create Parameter link to create a second parameter.
-
Add a checkbox-type parameter named skipTests which, if selected, should skip the test suite after the build is completed.
-
Create an On Enter transition from Test to Approval needed if the skipTests parameter evaluates to "true". Because this is an On Enter transition, it will be taken before the automated tests workflow is started.
-
When the workflow is launched, you will see the skipTests checkbox.
-
If the parameter is checked, and after the Build state is completed, the workflow will immediately transition from Test to Approval needed , without starting the subworkflow.
Looking at the workflow history, we see the test state was entered, but the subworkflow (and subjobs) was not executed.
Setting the name of your workflow
Choose appropriate names for workflows so they are easy to identify.
-
If the Workflow Name Template was not set, workflows are created with a default name (
workflow <jobId> <timestamp>orworkflow_239_201012091208, for example).However, because you may have many different workflow definitions, you might want to create a distinguishing name for workflows launched from each definition.
-
From the Workflow Definition page for Lifecycle , click the Edit link at the top of the page.
-
Setting the Workflow Name Template to
lifecycle-$[branch]-workflow-$[/increment /myProject/lifecycle-counter]achieves this goal.-
$[branch]refers to the value of the branch parameter as specified when the workflow is launched. -
$[/increment /myProject/lifecycle-counter]creates a property calledlifecycle-counteron the project and increments the property every time a new workflow is launched so the names are unique.
-
-
Now, when the workflow is launched, its name is much more descriptive than the default workflow name.
Workflow List
Most of the time, you will want to interact with your workflow from the default Graph view. However, if you want to see your workflow in a list or table view, click the List button. See the Workflow Definition Details Help topic for detailed information about this page.
The transition order is important because transitions are evaluated in order and the first one with a condition that evaluates to true is taken.
Another workflow example
An advanced sample Workflow Definition is pre-defined for you in the EC-Examples project. This is a "working" example, also modeling the workflow process, with which you can interact. To navigate to this example: Select the Projects tab > EC-Examples > Workflow Definitions subtab > then select Build Workflow With Approvals.