CloudBees CD/RO brings the release automation practices of modeling, automation, and coordination microservices. This model-based solution avoids cloud provider or container lock-in by separating application models from environment models that are platform specific.
Microservice concepts
CloudBees CD/RO lets enterprises safely deploy microservices at scale in large, enterprise environments. DevOps teams can streamline and simplify processes to get microservice applications up and running, easily promote applications to Kubernetes clusters, and gain visibility into application pipelines. Microservices architecture provide the speed, flexibility, predictability to let teams build functionality quickly and deliver it instantly across multiple clouds and environments.
Microservices in complex, large-scale, hybrid environments present operations, governance, and orchestration challenges. CloudBees CD/RO lets teams coordinate software releases when deploying microservices throughout the software delivery lifecycle. CloudBees CD/RO lets teams coordinate and manage three types of releases:
-
Large, monolithic application releases
-
Microservices application releases
CloudBees CD/RO supports legacy or traditional monolithic applications, hybrid data centers and clouds, and large-scale infrastructure.
CloudBees CD/RO lets developer, QA, and operations teams deploy microservices to Kubernetes clusters without knowledge of the underlying integrations. This lets them coordinate and manage a mix of monolithic application and microservice releases across legacy or continuous delivery pipelines in both on-premises and cloud environments. Also, the model-based approach is agnostic of container environments or cluster orchestration solutions and enables easy portability among providers.
Implementing Containers and Microservices for Use with Your Runtime Environment
CloudBees CD/RO containers and microservices are runtime-agnostic. This means that you use CloudBees CD/RO to set them up independent of any runtime environment details and then deploy them to the runtime environment of your choice. CloudBees CD/RO supports the GCE and ECS runtime environments.
CloudBees CD/RO supports three types of applications: monolithic applications, microservices applications backed by containers, and hybrid applications, which are a combination of the first two. You can create all three types independent of where they will be deployed.
-
Monolithic applications—These are typically a set of applications that point to traditional build artifacts such as .war files, .jar files, database scripts, and database components.
-
Microservices applications backed by containers—A microservices-based containerized application is one that is composed of smaller, focused services, each of which is in a container. Microservices let you scale your development teams and enable higher deployment frequency. Although you can take advantage of the benefits of a microservices architecture without containers, using containers lets you remove configuration challenges across environments by creating lightweight, standalone, deployable packages that contain everything that your software requires.
-
Hybrid applications—A hybrid application is a combination of monolithic, traditional components such as . war files, .jar files, and databases and other components that are backed by containers. Using hybrid applications lets you re-architect monolithic applications into microservice applications backed by containers in phases rather than all at once.
Comparison of Modeling Among GCE, ECS, and CloudBees CD/RO
The following figure compares how containers are modeled and deployed in ECS, GCE, and CloudBees CD/RO. In ECS, tasks are used to represent a microservice that is made up of one or more containers. The same microservice in GCE is modeled as pods. These tasks and pods can then be deployed to appropriate cluster nodes that were created in their respective platforms.
With CloudBees CD/RO, each microservice is modeled as an independent microservice or an application microservice. Each microservice is made up of one or more containers.
In addition, if you are using application microservices, you can use application tiers that represent monolithic application components to support a hybrid model. This makes the application model agnostic to the deployment platform. Then you create environments using the clusters and optionally the tiers that correspond to each platform that you want to support. And through the application tier mapping, you associate the application model with the environment model for deployment. You can create multiple tier mappings that correspond to each of the platforms to which you want to deploy.

The following table shows a comparison of the key terms used by the container management service supported by CloudBees CD/RO and the equivalent terms used in the CloudBees CD/RO user interface.
| Amazon EC2 Container Service (ECS) | Google Container Engine (GCE) | CloudBees CD/RO |
|---|---|---|
Application |
Application |
Application |
Cluster |
Cluster |
Cluster |
Task definition |
Pod |
Microservice/container |
Load balancer |
Service/replication controller |
Container ports and service port |
Implementing Containers and Microservices in CloudBees CD/RO
Using Independent Microservices
Following is the high-level process for setting up containers and microservices using CloudBees CD/RO and then integrating them with the runtime environment of your choice:
-
Create independent microservices. You complete this step independent of the environment(s) that you will use. Each microservice can have one or more containers.
In this step, you group the containers into a cluster. Also, in this step, you enter the metadata for each container to specify the location of the container image, the CPU requirement, the scaling criteria, the memory requirement, and so on.
At the time of deployment, CloudBees CD/RO ensures that the microservice calls the correct APIs.
-
Create one or more environment models.
You complete this step independent of the independent microservice that you will deploy. In each environment, you create a cluster of nodes, each of which has a set of containers that hold microservices. You enter the metadata to point each environment to a specific provider (a runtime engine such as GCE or ECS). You can create an environment in a hybrid manner in which some pieces are clustered and others are traditional physical resources or static VMs.
-
Map the microservice model to one or more environment models.
This lets you deploy the same microservice to any container runtime platform of your choice.
Using Application Microservices
Following is the high-level process for setting up containers and microservices using CloudBees CD/RO and then integrating them with the runtime environment of your choice:
-
Create an application model that is composed of microservices.
You complete this step independent of the environment(s) that you will use. Each microservice can have one or more containers.
In this step, you group the containers into a cluster. Also, in this step, you enter the metadata for each container to specify the location of the container image, the CPU requirement, the scaling criteria, the memory requirement, and so on.
At the time of deployment, CloudBees CD/RO ensures that the application calls the correct APIs.
You can create an application in a hybrid manner in which some pieces point to traditional build artifacts such as .war files, .jar files, database scripts, and database components and others are containerized microservices.
-
Create one or more environment models.
You complete this step independent of the application that you will deploy. In each environment, you create a cluster of nodes, each of which has a set of containers that hold microservices. You enter the metadata to point each environment to a specific provider (a runtime engine such as GCE or ECS). You can create an environment in a hybrid manner in which some pieces are clustered and others are traditional physical resources or static VMs.
-
Map the application model to one or more environment models.
This lets you deploy the same application to any container runtime platform of your choice.
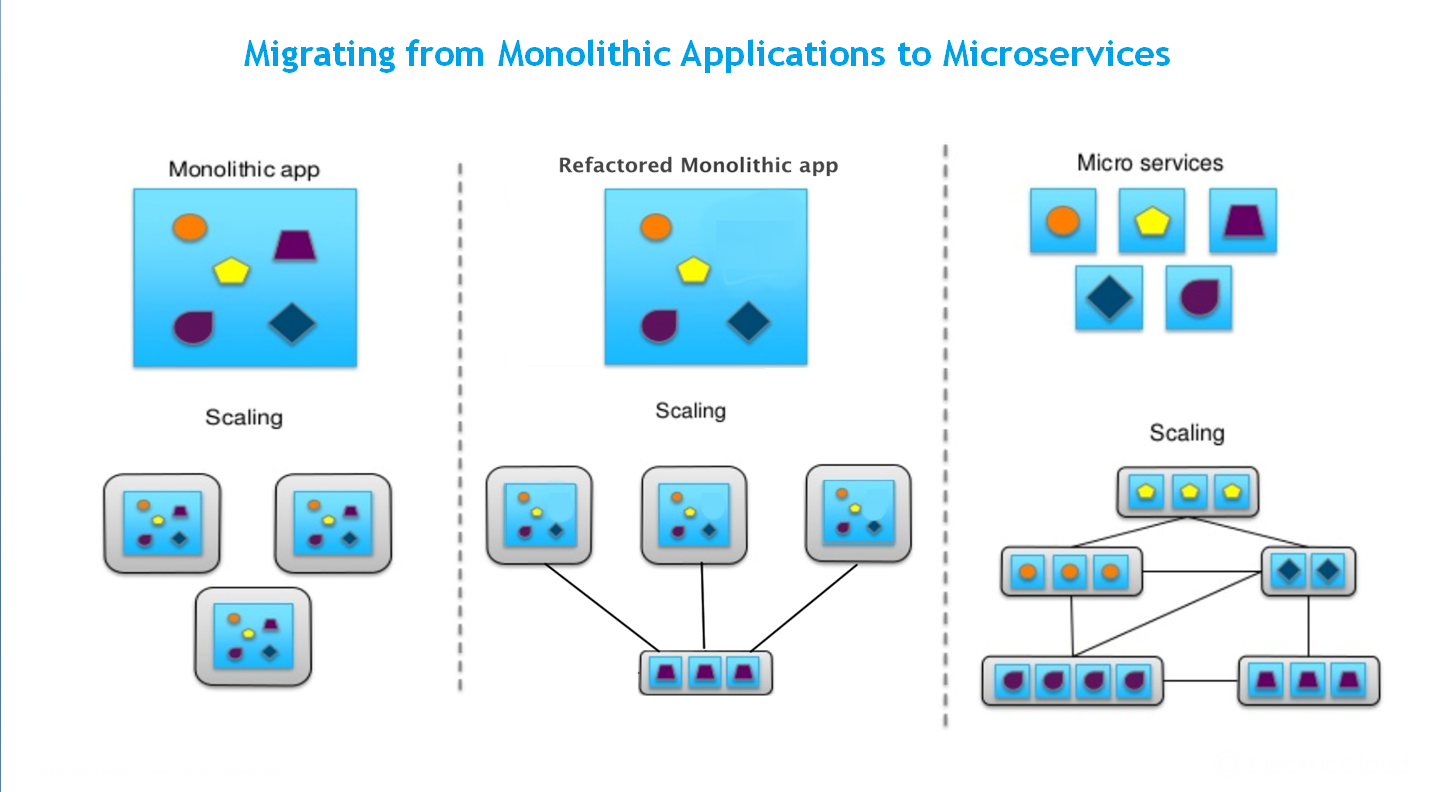
Migrating from Monolithic Applications to Microservices
The following figure shows how CloudBees CD/RO supports a hybrid model, which means that you do not need to convert an entire monolithic application to containers all at once. That is, you can continue to deploy part of the application, and you can convert other parts to containers and deploy them alongside the remaining monolithic functionality using the same process. This lets you adopt containers over time without converting the entire application at once (without losing the overall visibility of the entire application definition/model). This also lets you test parts of the application to lower risk.
Volume Support
To be able to save (persist) data and share data between containers, Docker uses volumes. Volumes are directories (or files) that are outside of the default Union File System and exist as normal directories and files on the host file system. CloudBees CD/RO lets you specify the volume pointing to a storage device or a partition that can be mounted by a container.
Private and Public Registries and the Use of Credentials
| Container infrastructure | Docker public registry | Docker or Docker certified private registry | Google Container Registry (GCR) | Amazon EC2 Container Registry (ECR) |
|---|---|---|---|---|
Amazon ECS |
Supported natively |
Requires preconfiguration of images (VMs) |
Requires preconfiguration of images (VMs) |
Requires preconfiguration of images (VMs) |
Google Container Engine |
Supported natively |
Supported via secrets. (Uses registry URL/credential) |
Supported via secrets. (Uses registry URL/credential) |
Supported via secrets. (Uses registry URL/credential) |
Object Naming Guidelines
Following are the restrictions in CloudBees CD/RO for naming microservices, containers, clusters, microservice ports, and environment variables. (These restrictions also apply to values that you use with the newName argument.)
Restrictions
CloudBees CD/RO has restrictions for naming the following objects: microservices, containers, container and microservice ports, and environment variables. Object names must contain:
-
Between 1 and 253 characters
-
Only alphanumerics, commas, underscores, and hyphens. Spaces are not allowed.
Kubernetes has length restrictions for fields. CloudBees CD/RO does not limit or truncate the lengths in the CloudBees CD/RO plugins for GCE and ECS, and the API reports an error if the length restrictions are violated.
Because ECS and GCE have their own naming restrictions for microservices and containers, these restrictions let you use your model across those platforms.
The CloudBees CD/RO plugins for ECS and GCE do not use the CloudBees CD/RO cluster name. The platform cluster name is passed in as a procedure-specific parameter and is separate from the Deploy cluster name, so these naming restrictions do not apply.
Conversion of Characters in Object Names by ECS and GCE
-
The CloudBees CD/RO plugin for GCE converts spaces and underscores to dashes and converts uppercase characters to lowercase.
-
The CloudBees CD/RO plugin for ECS converts spaces to dashes.
-
The CloudBees CD/RO plugins for GCE and ECS remove leading and trailing dashes.
Guidelines for Using Clusters
Creating clusters in GCE requires more time than creating clusters in ECS. The Provision Cluster procedure in the GCE and ECS container plugins creates the cluster on the container platform if it does not already exist. Google Container clusters take time to spin up, so the Provision Cluster procedure waits (five minutes by default) for the cluster creation to finish before continuing.
Limitations
-
Amazon ECS does not support providing the private registry credentials at the microservice deployment time. The registry credentials must be available on the EC2 container instances when the ECS agent starts. You must ensure that the registry credentials are available on the instance by following the guidelines in the Private Registry Authentication page at https://docs.aws.amazon.com/AmazonECS/latest/developerguide/private-auth.html. Deploy users can provide the required information (using these guidelines) through the User Data parameter value provided with the Provision Cluster procedure.
-
Rollback of containers is not supported.
Independent or Project-Level Deployable Microservices
You can create microservices that can be independently managed and deployed. You create these microservices at the CloudBees CD/RO project level. This provides you the autonomy for the deployment of the microservices for which you and your team are responsible by allowing you to create microservices under a CloudBees CD/RO project without creating applications. This means that separate teams can develop microservices without being involved in the applications.
Similarities Between Independent Microservices and Applications
Independent microservices provide capabilities that are very similar to those of applications. For example, you can:
-
Create a microservice under a project
-
Map a project-level microservice to an environment cluster
-
Create and modify a process under the microservice
-
Run the microservice process and view its inventory
-
Create a snapshot for the microservice—from the definition as well as from an environment where the microservice is deployed
-
Define dependencies between microservices or their versions
-
Define dependencies between a microservice and an application
-
Create schedules for microservice deployment
-
Create an environment reservation for a microservice
-
Create a pipeline task for microservice deployment
-
Add microservices to a release and configure microservices in a release
The following table describes the similarities between independent microservices and applications :
| Item or Task | Description |
|---|---|
User interface |
The independent microservices UI is similar to the applications UI. This means that if you are familiar with using the applications UI to create and manage applications, you can easily learn how to use the microservices UI to create and manage microservices. |
Mapping to environments |
You can map a microservice to an environment just as you can with an application. |
Calling processes from pipelines |
Pipeline stage tasks can call microservice processes in addition to application processes. |
Process UIs |
The UIs for microservice processes and application processes are very similar. |
Snapshots |
You can take a snapshot of a microservice just as you can with an application (although the dialog boxes differ slightly). A microservice snapshot is similar to an application snapshot. You can take a snapshot from a service definition or from an environment inventory. |
Scheduling |
Microservice scheduling is similar to application scheduling. |
Environment inventory after deployment |
As with an application, once you create a microservice and deploy it, you can see it in the environment inventory. |
Releases |
You add microservices to a release in the same way that you add applications to a release (the lists of applications and microservices appear alongside each other for convenient selection). You can select the process, snapshot runtime settings, error handling settings, and order of deployment. For every service, you can do the following in different stages: select the environment, configure process parameters, and select deployer tasks. |
Environment reservation |
You can create environment reservations and blackouts for a microservice just as you can with an application. |
Environment locking |
A microservice or application process can configure exclusive access to the environment. At runtime, if the environment is not available, the process waits until it becomes so and then locks it for use from other processes. |
Runtime settings |
These settings are same as for applications, except that Smart Deploy and Stage Artifact are not available. |
On-Error settings |
The available settings for microservice error handling are similar to those in applications. |
Release dashboard |
The CloudBees Analytics Release dashboard displays microservices as well as applications. |
Path to Production view |
The Path to Production view displays the list of microservices and applications. |
Dependencies |
You can mix and match microservice and application dependencies. Configuration for these dependencies uses the same UI. |
Hierarchy Menu |
The Hierarchy Menu works for microservices as well as for applications (and environments). |
Automated Microservice Discovery and Onboarding
From existing container-based microservices, you can automatically create microservice models based on common microservice-definition file formats supported by container platforms such as Docker and Kubernetes. This modeling automation is done via CloudBees CD/RO’s discovery and onboarding functionality. With automated discovery and onboarding, you can quickly translate your existing assets to start leveraging CloudBees CD/RO’s native support for managing and deploying microservices.
You perform discovery and onboarding via items that are bundled in the CloudBees CD/RO Self-Service Catalog. These items rely on underlying plugins that are bundled with CloudBees CD/RO. When using these catalog items, you enter the details about your Kubernetes cluster or your Kubernetes YAML or Docker Compose files.
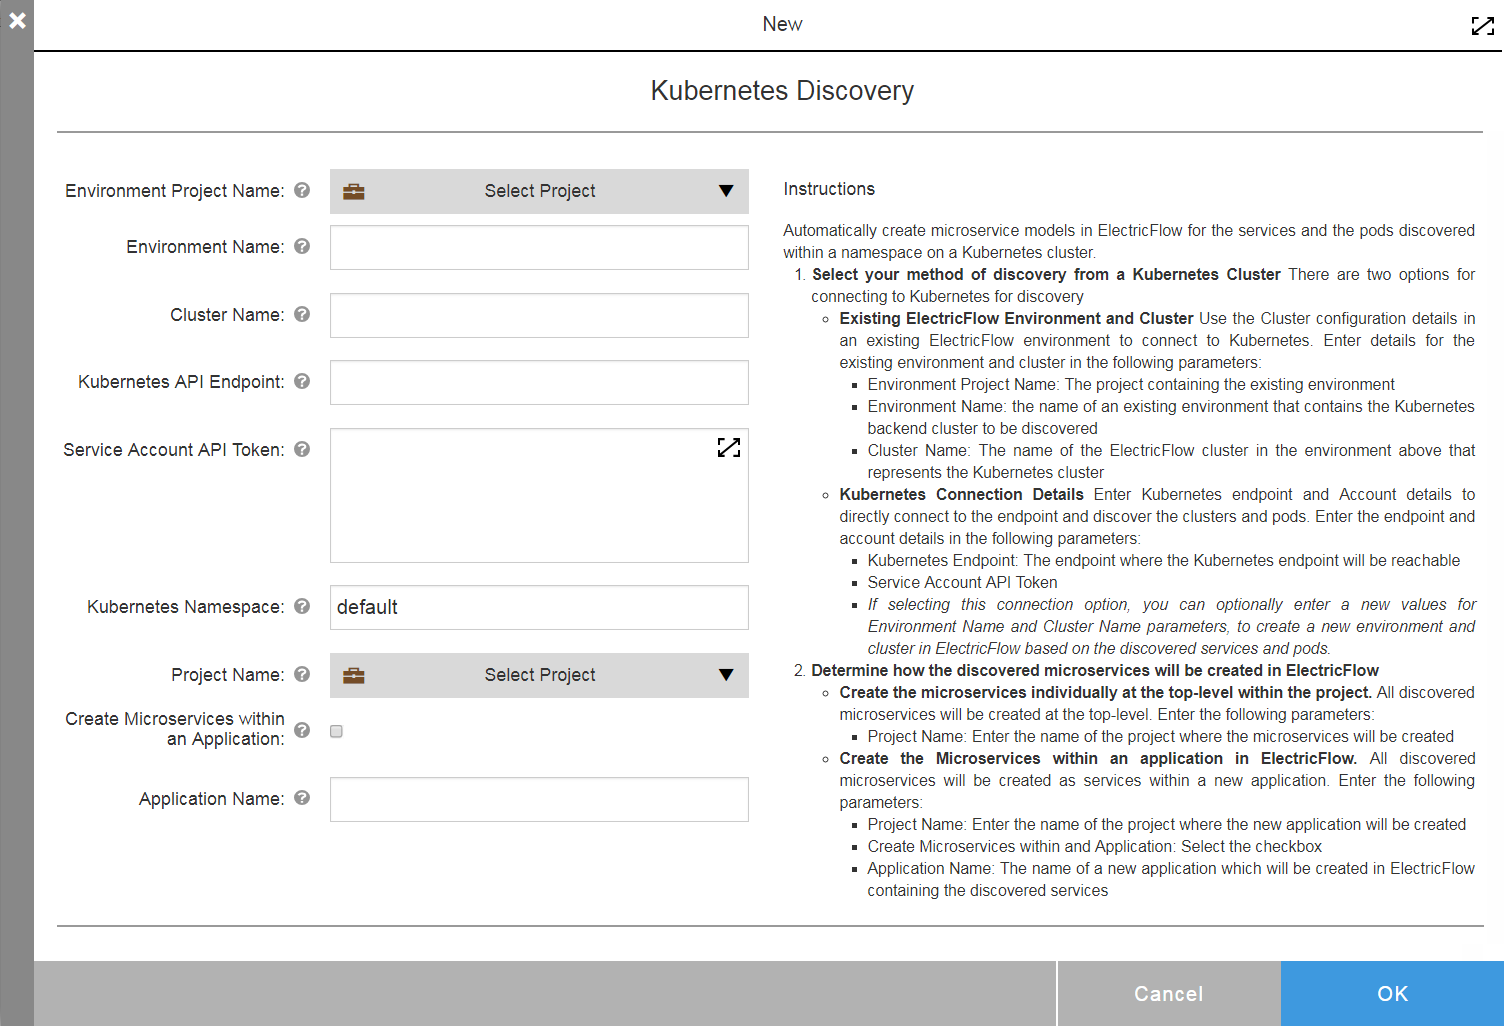
Microservice Discovery Using Kubernetes Discovery
You can create microservice models automatically in CloudBees CD/RO for the microservices and the pods discovered within a namespace on a Kubernetes cluster. You connect to Kubernetes for discovery by specifying an existing CloudBees CD/RO environment and cluster or by specifying details to connect directly to a Kubernetes endpoint.
Choosing the Discovery Method
You have two choices:
-
Existing CloudBees CD/RO cluster—You specify the CloudBees CD/RO cluster representing the Kubernetes backend cluster to be discovered and its environment and parent project.
-
Kubernetes endpoint—You enter the endpoint and microservice account API token to connect directly to the endpoint to discover the clusters and pods. You can enter names to create a new environment and cluster in CloudBees CD/RO based on the discovered microservices and pods.
Discovered Microservices location
You have two choices:
-
Individually at the project top level—You simply enter the project name (as described in the procedure below).
-
Within a new application—You enter the project name and application name and also enable CloudBees CD/RO to create microservices within the application.
Running a Kubernetes Discovery
-
Click the Service Catalog button in the banner bar. The service catalog opens.
This page shows all available catalog items by default. You can narrow down the list by choosing Containers from the catalogs menu. -
Click the Discover button on the Kubernetes Discovery catalog item. The Kubernetes Discovery dialog box appears:
-
Enter the connection details of your existing cluster in Kubernetes as follows:
Field or Option |
Description |
Environment Project Name |
Project containing the existing environment or where the new environment will be created. |
Environment Name |
Name of an existing environment that contains the Kubernetes backend cluster to be discovered. If the environment does not yet exist, provide the Kubernetes connection details below, and a new environment will be created. |
Cluster Name |
Name of the CloudBees CD/RO cluster in the environment above that represents the Kubernetes cluster whose deployed microservices are to be discovered. If the environment does not exist, provide the name of the cluster to be created in the new environment. |
Kubernetes API Endpoint |
Endpoint where the Kubernetes API is reachable. This must be an IP address or a resolvable DNS name. This field is required only if you are not providing an existing environment above for discovery. |
Service Account API Token |
Bearer token for a service account that has permissions to create resources in the Kubernetes cluster. This field is required only if you are not providing an existing environment above for discovery. |
Kubernetes Namespace |
Name of the Kubernetes namespace within which the deployed microservices should be discovered. The default is the “default” namespace. |
Project Name |
Name of the project in which discovered microservices will be created. |
Create Microservices within an Application |
(Optional) Select this checkbox to create all discovered microservices in the Kubernetes namespace within one application in CloudBees CD/RO. If selected, then you must enter the application name. If unselected, microservices are created at the top level in the project. |
Application Name |
Name of the new application to contain the microservices. This is required only if Create Microservices within an Application is selected. |
-
Click OK to save your changes.
CloudBees CD/RO automatically discovers the microservices and creates the associated microservice models and environments in CloudBees CD/RO that are ready to deploy.
Microservice onboarding via a Kubernetes YAML file
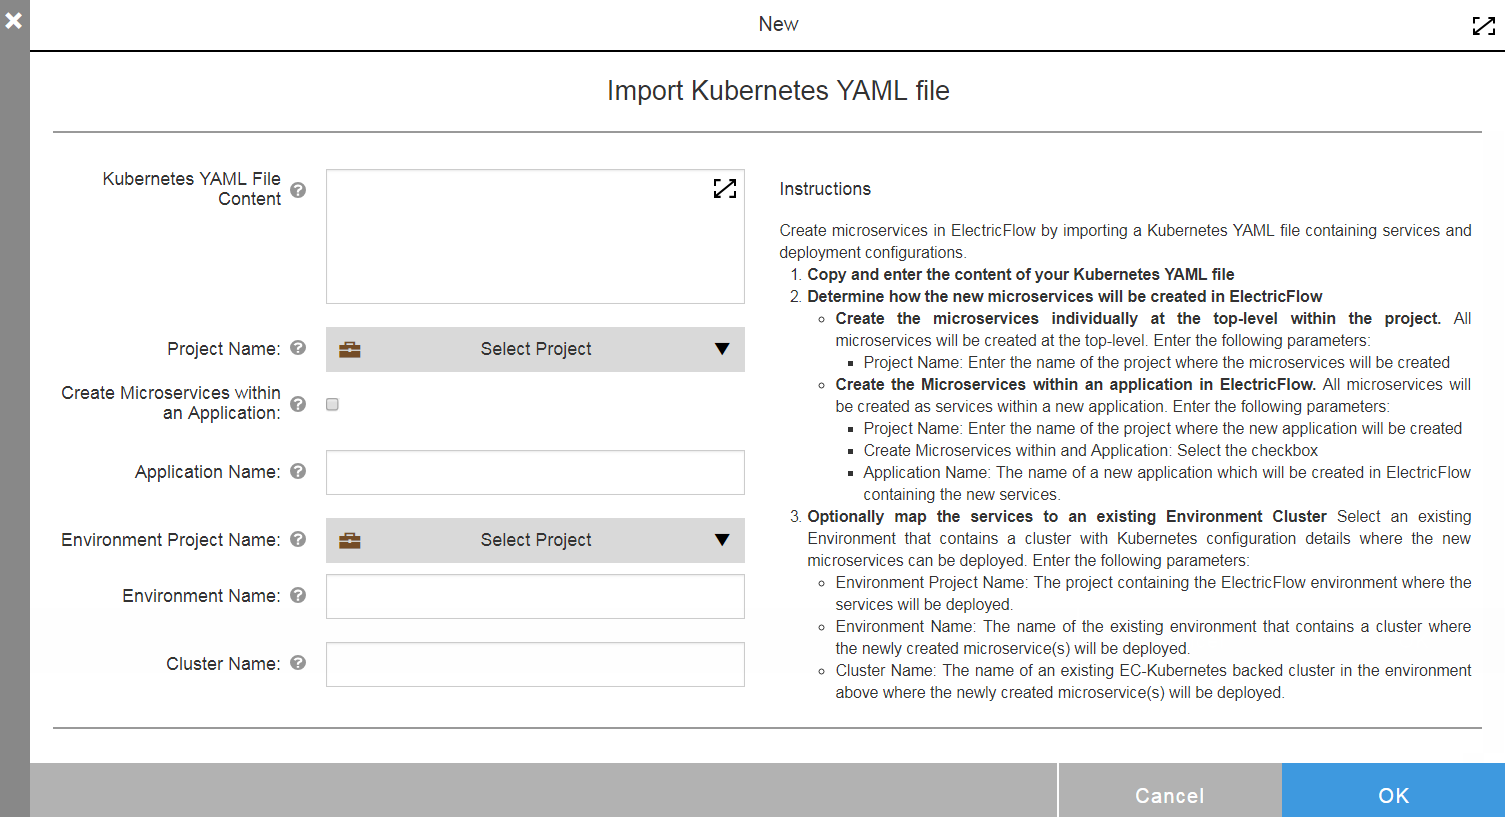
Kubernetes objects are persistent entities in the Kubernetes system. Kubernetes uses these entities to represent the state of your cluster. A microservice in CloudBees CD/RO is represented through two such Kubernetes objects—a Kubernetes service and a deployment configuration.
You can create microservices in CloudBees CD/RO by importing a Kubernetes YAML file containing microservice and deployment configurations. You enter your Kubernetes YAML file detailing your microservice definitions and dependencies to automatically create deployable microservice models in CloudBees CD/RO.
Specifying microservices create location
You have two choices:
-
Individually at the project top level—You simply enter the project name (as described in the procedure below).
-
Within a new application—You enter the project name and application name and also enable CloudBees CD/RO to create microservices within the application.
(Optional) Mapping microservices
You can select an environment that contains a cluster with Kubernetes configuration details where the new microservices will be deployed. To do so, you enter an environment name and its project name and the name of an EC-Kubernetes backed cluster in the environment.
-
Click the Service Catalog button in the banner bar. The Service Catalog opens.
-
Click the Import button on the Import Kubernetes YAML File catalog item. The Import Kubernetes YAML File dialog box appears.
-
Enter the details about your Kubernetes YAML file detailing your microservice definitions and dependencies as follows:
| Field or Option | Description |
|---|---|
Kubernetes YAML File Content |
Content of a Kubernetes YAML file containing related microservice and deployment definitions. |
Project Name |
Name of the project in which the application or microservices will be created. |
Create Microservices within an Application |
(Optional) Select this checkbox to create all microservices defined in the Kubernetes YAML file within one application in CloudBees CD/RO. If selected, then you must enter the application name. If unselected, microservices are created at the top level in the project. |
Application Name |
Name of the new application to contain the microservices. This is required only if Create Microservices within an Application is selected. |
Environment Project Name |
Project containing the environment where the microservices will be deployed. |
Environment Name |
(Optional) Name of an existing environment containing a cluster where the new microservices will be deployed. |
Cluster Name |
Name of the existing CloudBees CD/RO cluster representing a Kubernetes cluster in the environment above where the new microservices will be deployed. If the environment does not exist, provide the name of the cluster to be created in the new environment. |
-
Click OK to save your changes.
CloudBees CD/RO creates the associated microservice models and environments in CloudBees CD/RO that are ready to deploy.
Microservice onboarding via a Docker compose file
Docker Compose is a tool for defining and running multicontainer Docker applications. With Compose, you use a YAML file to configure all of the application’s services.
You can create microservices in CloudBees CD/RO by importing a Docker Compose file (version 3.0 or newer). The Compose file can contain configuration details for one or more microservices.
Specifying microservices create location
You have two choices:
-
Individually at the project top level—You simply enter the project name (as described in the procedure below).
-
Within a new application—You enter the project name and application name and also enable CloudBees CD/RO to create microservices within the application.
(Optional) Mapping microservices
You can select an environment that contains a cluster with EC-Docker configuration details where the new microservices can be deployed. To do so, you enter an environment name and its project name and the name of an EC-Docker backed cluster in the environment.
-
Click the Service Catalog button in the banner bar to open the Service Catalog.
-
Click the Import button on the Import Docker Compose File catalog item. The Import Docker Compose File dialog box appears:
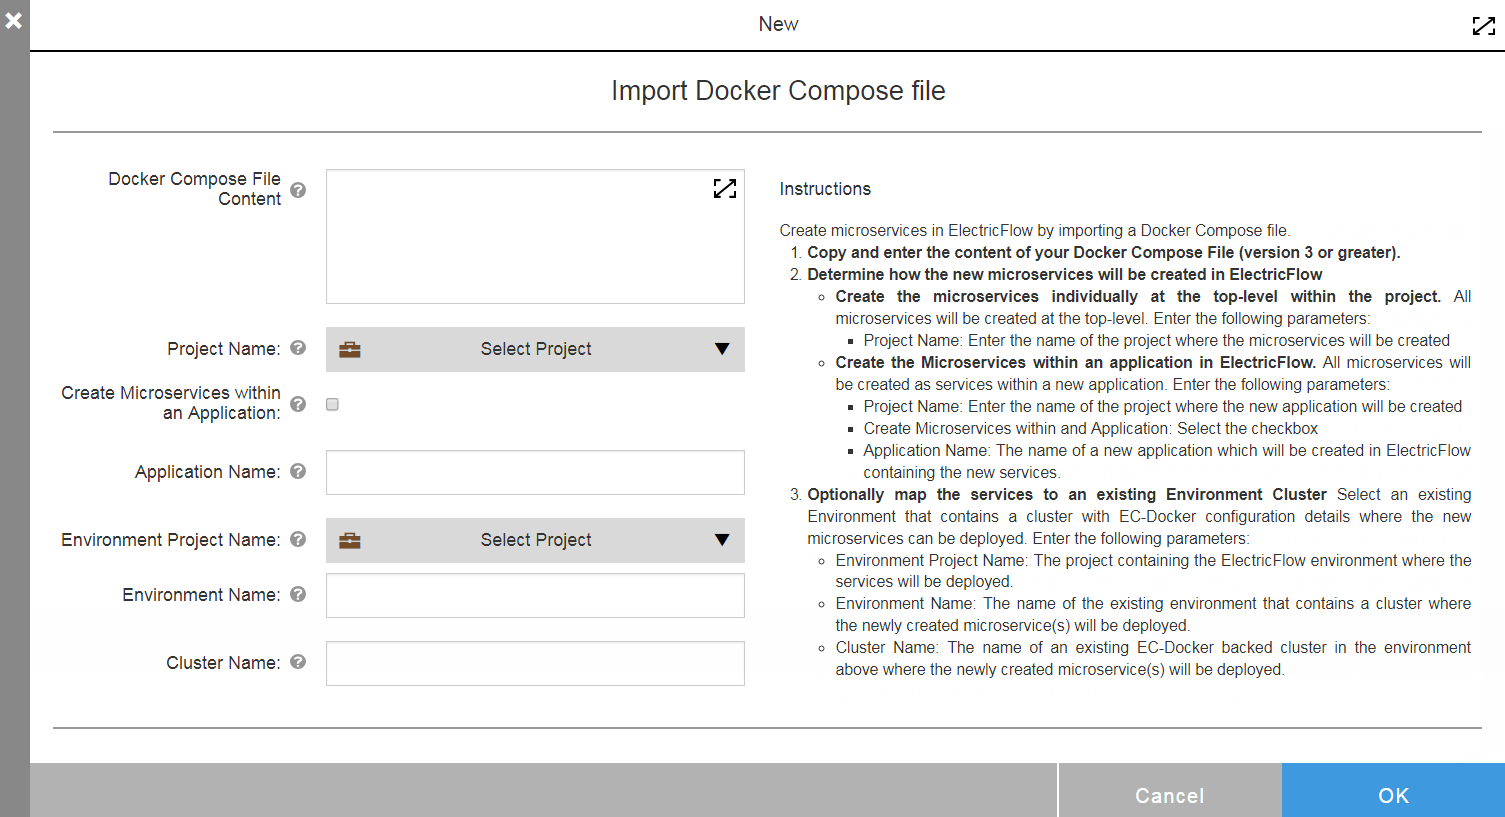
-
Enter the details about your Docker Compose file detailing your microservices definitions and dependencies as follows:
Field or Option Description Docker Compose File Content
Content of a Docker Compose file containing related microservice and deployments definitions.
Project Name
Name of the project in which the application or microservices will be created.
Create Microservices within an Application
(Optional) Select this checkbox to create all microservices defined in the Docker Compose file within one application in CloudBees CD/RO. If selected, then you must enter the application name. If unselected, microservices are created at the top level in the project.
Application Name
Name of the new application to contain the microservices. This is required only if Create Microservices within an Application is selected.
Environment Project Name
Project containing the environment where the microservices will be deployed.
Environment Name
(Optional) Name of an existing environment containing a cluster where the new microservices will be deployed.
Cluster Name
Name of the existing EC-Docker backed cluster in the environment above where the new microservices will be deployed. If the environment does not exist, provide the name of the cluster to be created in the new environment.
-
Click OK to save your changes.
CloudBees CD/RO creates the associated microservice models and environments in CloudBees CD/RO that are ready to deploy.
Using Lift-and-Shift to Migrate Applications to Containers
The CloudBees CD/RO Lift and Shift functionality for microservices lets you quickly start realizing the benefits of running applications inside containers by “lifting and shifting” your existing monolithic artifacts without the effort required to decompose and rewrite them. This capability significantly accelerates container adoption and quickly provides benefits such as code portability, simplified deployments, and easy scaling to cater to the increased demand that containers bring.
You use Lift and Shift to quickly move monolithic or other applications to containers. Lift and Shift begins where your existing Continuous Integration processes end. It takes traditional build output and uses built-in templates to build and publish Docker images automatically that are ready to deploy to your container runtime. Lift and Shift lets you start from existing artifacts for container deployments rather than starting after containers are in the registry. This functionality allows a pragmatic organization to shift their existing artifacts as-is, and then over time, re-architect monolithic applications into smaller services.
Usage Scenario Example
An ideal usage scenario is one where your organization uses a well-established Continuous Integration process and is creating artifact files supported by CloudBees CD/RO Lift and Shift such as .jar or .war files. This feature lets you use CloudBees CD/RO to take the build output, create a container, store it to a Docker registry, and then even deploy it at the right time in the pipeline.
Using the EC-Docker Plugin for Lift-and-Shift
You use the EC-Docker plugin (bundled with CloudBees CD/RO) to perform lift-and-shift. This plugin contains the Artifact2Image procedure, which builds and publishes a container image using an artifact published to an artifact repository as follows:
-
Generates a Dockerfile using the artifact repository details.
-
Uses a built-in Dockerfile template for the supported artifact type to build the Docker container image using the generated Dockerfile.
-
Publishes the image to the specified Docker registry.
The plugin uses a registry of Dockerfile file templates for the artifact types supported by this feature. The supported types are:
*.war *.jar *.NET *.csproj
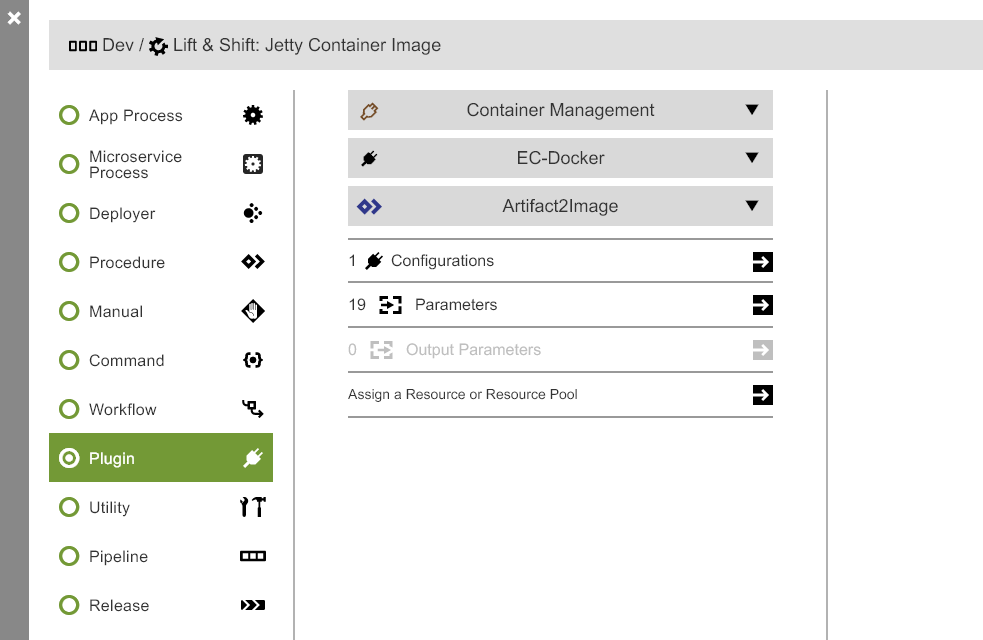
For details about using the Artifact2Image procedure, click Administration > Plugins in the Automation Platform and then click the Help link next to the EC-Docker plugin name. This plugin procedure can be used in various ways to model lift-and-shift as in the following examples.
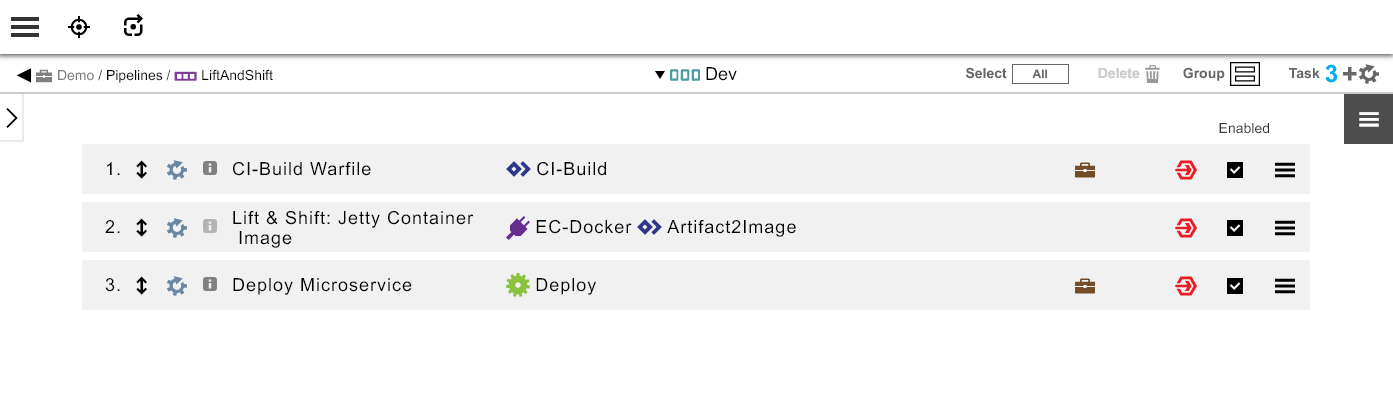
Modeling Lift and Shift within a Microservice Model
You use a microservice in CloudBees CD/RO as always. You simply point the microservice definition to a container image name that you want to automatically generate and publish in a registry using lift-and-shift.
To model lift-and-shift within a microservice model, use the Artifact2Image procedure in the microservice process as described above. You configure where the traditional artifact resides and use the same image name described in the previous paragraph. For example, see the step named Build Image below:
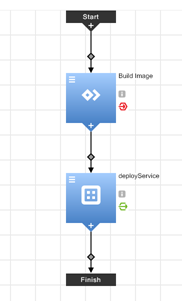
You can also include a step to “deploy” the container as in the deployService step above.
When this process is run, CloudBees CD/RO automatically gets the monolithic artifact from the artifact repository, creates an appropriate Docker image based on the type of artifact and existing templates, and publishes it a Docker-certified registry.
Using SmartMap to Visualize Running Microservices
The SmartMap Topology View provides a 3-D view into container platform clusters. The SmartMap Topology View lets you visualize running microservices with their dependencies and connections to applications.
Container runtime environments can include numerous services deployed across clusters with detailed interdependencies between them. It can be challenging to understand the complex mesh of clusters, namespaces, services, nodes, and so on and how they are related, especially as the numbers grow. It is also not easy for DevOps and development teams to know where their service is deployed and how well is it doing or to access logs for troubleshooting without talking with the Kubernetes administrators.
While microservices simplify the deployment problem and allows parts to be managed independently, it creates another problem of management downstream. Applications made up of a few monolithic artifacts are decomposed into lots of small microservices, which can be deployed independently. Also, even though deployment time dependencies are removed, there are runtime dependencies among microservices. In other words, a version of a microservice needs specific versions of other microservices to be present.
The SmartMap Topology View helps you visualize and manage your container cluster environments. The interactive 3-D visualization displays the interdependent services, clusters, and pods deployed in Kubernetes as well as the connections to the microservice and environment models in CloudBees CD/RO. With capabilities to interactively rotate and zoom in on focus areas, view live status of deployments, and drill down into details, SmartMap makes it easy to quickly understand and “touch” your complex microservice topology. It also helps with troubleshooting and impact analysis.
SmartMap Topology View Example
The SmartMap Topology View retrieves application and service dependencies along with cluster and environment information. For a given application or service, SmartMap Topology View retrieves
-
All services and applications it is dependent on (including dependencies among dependent services)
-
All environments and clusters it is deployed to
For a given environment or cluster, SmartMap Topology View retrieves
-
All services or applications deployed to it
-
Dependencies between services
SmartMap Topology View then renders the topology view from this information. For example:
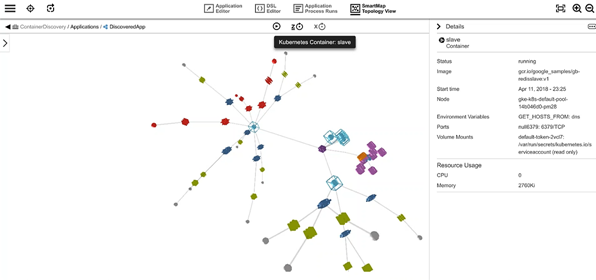
Clicking an object opens a details panel for that object as shown in the screenshot above.
Benefits of SmartMap Topology View
Because of this increased granularity and resolution, more pieces need to be managed together to provide the service to end users. This problem is more difficult if users have multiple container runtime platforms. As you move from the experimental phase of microservices to starting to manage production load, you can use the SmartMap Topology View to
-
Visualize which microservices are deployed and how are they connected to each other
-
Understand which application your running microservices are supporting and which applications will be impacted if these microservices go down
-
See whether all the required version dependencies are fulfilled
SmartMap Topology View Usage Scenario
The SmartMap Topology View is useful for an application support person or a DevOps team member responsible for production who needs to understand which microservices are running in their cluster and how are they connected to each other. They might have tried to deploy microservices and have modeled them with a version dependency graph. They want to start with a top-level microservice and ensure that all the required dependent versions are deployed automatically.
Without the SmartMap Topology View, they would need to use visualization solutions from other vendors and open-source solutions , but those solutions lack the connection to applications. Or they would need to use visualizations from application performance management (APM) vendors, which lack connection to the release process.
Configuring a Database for Containers and Microservices
Following are the recommended sources of information that describe how to connect to a database for containers and microservices.
Connecting to Kubernetes
See Connecting from Google Container Engine and Connecting MySQL Client Using IP Addresses at https://cloud.google.com/.
Connecting to Amazon
Configuring the CIDR Range of Containers Allowed to Connect
Another option is configure the CIDR range of containers that are allowed to connect to a database. See Amazon - Creating a DB Cluster and Connecting to a Database on an Amazon Aurora DB Instance.