Multiple environments are crucial in software development for pre-deployment testing. Environments represent your deployment pipeline, and you can create an unlimited number of environments in CloudBees Feature Management. CloudBees Feature Management also allows you to clone feature flag configurations between environments, so you can easily move a flag configuration set up in one environment to another.
Environments share the following:
-
Flags
-
Target groups
-
Custom properties
Environments do not share the following:
-
Configuration
-
Audit logs
-
Permissions
Accessing flags in an environment
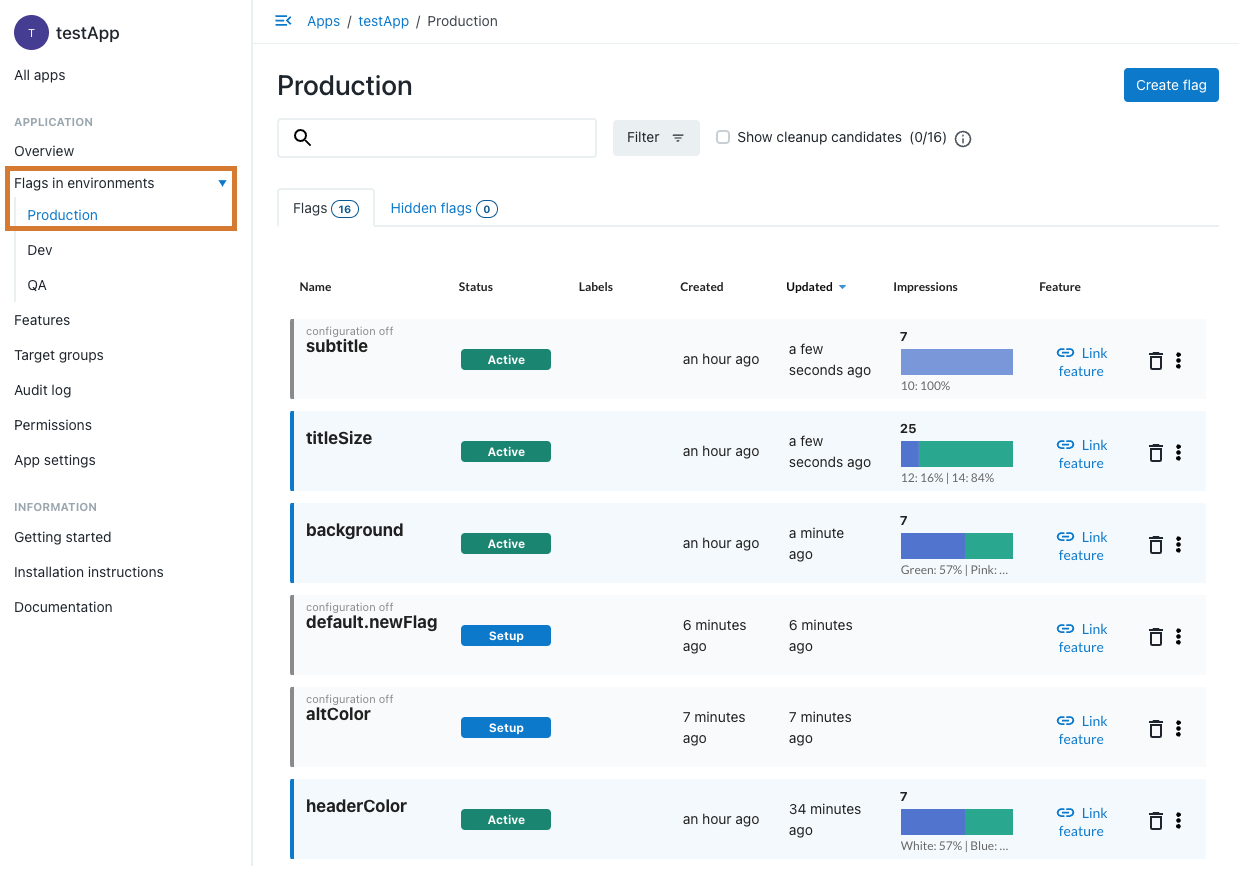
You can access any environment from the CloudBees Feature Management Home page, in the left pane. From the environment screen, you can perform a range of actions, as listed in Table 1.
| Action | Description |
|---|---|
Search for flags |
Enter an entire flag name or some part of a flag name next to |
Filter flags |
Refer to Filtering flags for more information. |
Create new flags |
Refer to Creating feature flags for more information. |
Hide flags |
Refer to Hiding a flag for more information. |
Clone flag configurations |
Refer to Cloning a flag configuration for more information. |
Group flags |
Refer to Managing flag groups for more information. |
Impressions |
Impressions are the number of browser visitors in a specific time frame for each configured value. Select the impression summary to access the detailed impression data. Refer to Flag impressions for more information. |
Delete flags |
Refer to Deleting feature flags for more information. |
Each environment screen lists the flags, and displays:
-
If the flag has Configuration off.
-
The flag status. Flag status is derived from the flags' impression data. Each flag can be in 5 possible states. Refer to Flag status for more information.
-
Any labels. Refer to Working with labels for more information.
-
The created date/time | How long since the flag was created.
-
The updated date/time | How long since the flag was updated.

Filtering flags
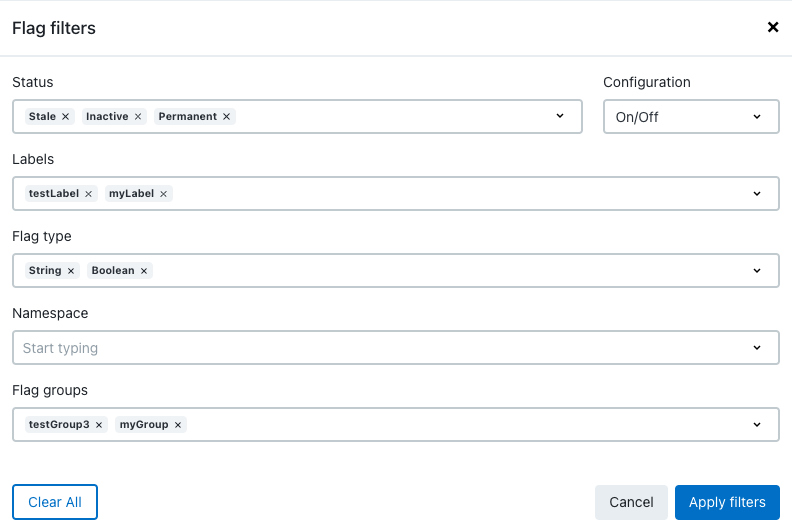
The Filter option allows you to filter flags by:
-
Status
-
Configuration
-
Label
-
Flag type
-
Namespace
-
Feature

To filter flags:
-
From the CloudBees Feature Management Home page, in the left pane, select the environment.
-
Select Filter, located to the right of the search box.
-
Select any filtering options you want. You can start typing to use autocomplete if desired.
-
Select Apply filters.
The filtered flag list is displayed.
| If you use the format <namespace>.<flagname>, you can filter flags by <namespace>. |
Sorting flags
You can sort feature flags in an environment, as listed in the following table. Flags cannot be sorted by their labels or flag group, and flags can only be sorted by one column at a time.
| Column heading | Sorting method |
|---|---|
Name |
Alphabetically |
Status |
Alphabetically |
Created |
Timestamp |
Updated |
Timestamp |
Impressions |
Total impressions |
To sort flags:
-
From the CloudBees Feature Management Home page, in the left pane, select the environment.
-
Select the column heading you want to sort.
-
Select the column heading again to change the sort order from ascending to descending, or vice versa.
An arrow to the right of the column heading indicates how the flags are sorted.
Flag status
For each environment we report a status for each feature flag. The feature flag status is there to help you understand where this feature flag is in its lifecycle. The flag status should help with questions such as:
-
Has the flag been deployed?
-
Is the flag unused?
-
Is the flag serving the same value to all target groups?
The flag status is derived from impression data.
Each Flag can be in one of five possible states:
-
Active - Received impressions with different values over the last seven days
-
Stale - Received impressions over the last seven days, but with all the same value
-
Inactive - Received no impressions over the last seven days
-
Setup - No impressions received yet
-
Permanent - A permanent (long-lived) flag, so impression data is not counted/available
When creating a flag, you can set it to Permanent status and ignore impression data. This is usually done when the flag is a configuration / "long-lived" flag (such as timeout, URLs). From the flag’s Settings tab, you can set a flag to permanent status after it has been created.
| CloudBees Feature Management time-to-live of impression data is 45 days. Flags created before this capability was released that had had no impression data in the last 45 days would be labeled as Inactive, although they may never have had impression data (Setup status). This is a temporary state which only applies to older flags as described above. |
Hiding a flag
You can hide a flag to remove it from the list of flags on the Flags tab. The hidden flag is listed on the Hidden flags tab. Hiding a flag is a convenient way to filter out unused flags, or you can also delete a flag if it is no longer used.
You must have Full access permission to the environment to hide a flag.
-
 Hidden on a flag indicates that the flag is hidden.
 -
 Visible on a flag indicates that the flag is present on the Flags tab.
To hide a flag:
-
From the CloudBees Feature Management Home page, in the left pane, select the environment.
-
Locate the name of the flag in the list.
-
Select the three vertical dots menu and choose Hide flag.
The flag is now located on the Hidden flags tab in the environment overview page.
|
You can also hide/unhide a flag by selecting a flag, and then selecting |
Cloning a flag configuration
| Cloning a flag configuration overrides the destination flag configuration. |
Cloning a flag configuration copies a feature flag’s rules, targeting state, and hidden/visible state to override the flag configuration in another environment. Cloning enables you to efficiently set up a flag configuration in a different environment.
You must have Full access permission to the destination environment to clone a flag configuration.
| A flag configuration can only be cloned to the flag of the same name in the destination environment. Cloning a flag configuration does not create a new flag. |
To clone a flag configuration to another environment:
-
From the CloudBees Feature Management Home page, select Flags in environments, and then select an environment.
-
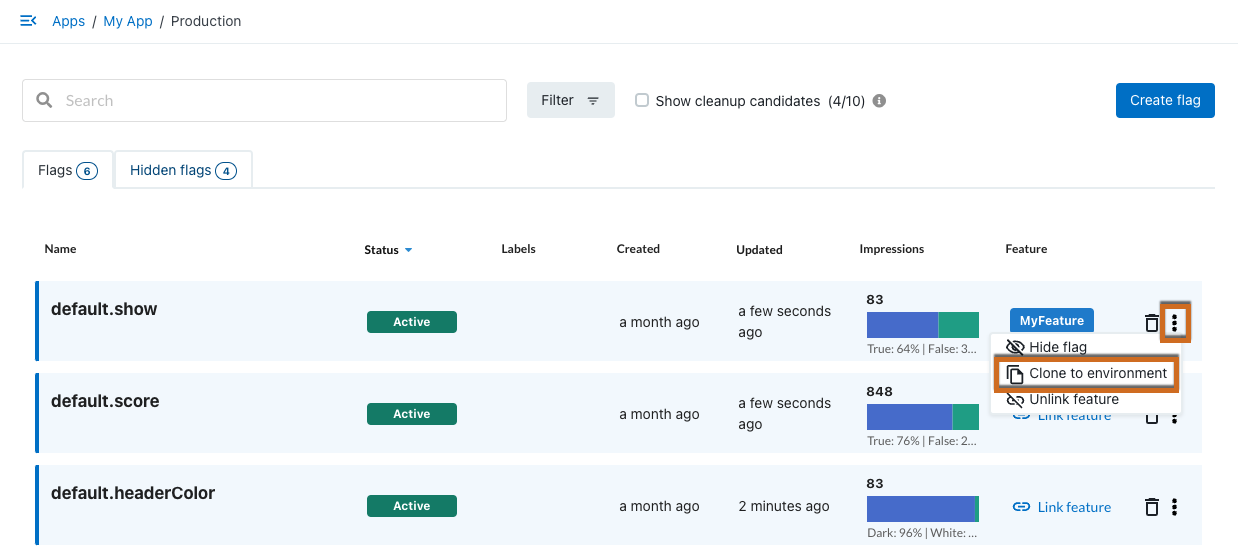
Select the three vertical dots to the right of the flag you want to clone, and then select Clone to environment.
 Figure 3. Cloning a flag configuration from the environment
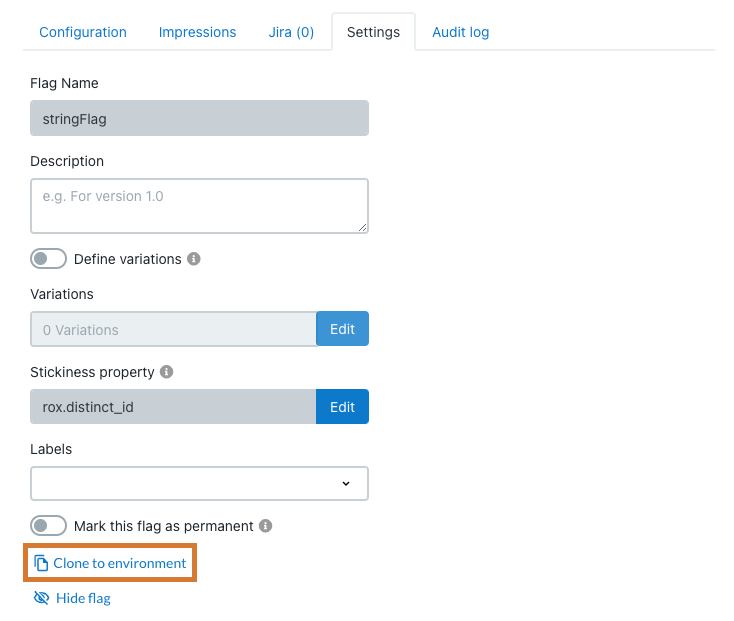
You can also access Clone to environment by selecting a flag, and then selecting  Clone to environment.
 Figure 4. Cloning a flag configuration from the flag Settings tab
 -
Select the destination environment.
-
Select Override flag.
The flag configuration is cloned, and opens on Configuration in the destination environment. The destination environment configuration is overridden.
Creating an environment
| The Production environment is the default environment. You cannot modify nor delete the Production environment. |
You can create unlimited environments in each app.
To create a new environment:
-
From the CloudBees Feature Management Home page, select , then select Add New Environment.
-
Enter a name for the environment and an optional description.
-
Select Create.
-
Your SDK key is displayed for this environment. If desired, select Copy (or highlight the text and copy manually) to copy the key to your clipboard.
For enterprise usage, we recommend assigning each environment key to a build variable, so that your continuous integration engine can handle key selection. -
Select Close.
The new environment is now listed in Environments and in the left pane.
Rearranging the environment listing order
You can rearrange the listing order of environments, including the Production environment.
To rearrange the environment order:
-
From the CloudBees Feature Management Home page, select the tab.
-
Select the six dots icon to the left of an environment name to drag and drop it to a different location in the list.
-
The updated order is reflected in list and on the left pane.
Modifying an environment
You can edit the name or description of any environment, except for the Production environment.
To change an environment name or description:
-
From the CloudBees Feature Management Home page, select , and then select the environment you want to modify.
-
Update the Name or Description as desired.
-
Select Save changes.
Your changes are reflected in Environments. Any updates to the environment name are also shown in the left pane under Flags in environments.
Deleting an environment
You can delete any environment, except for the Production environment.
To delete an environment:
-
From the CloudBees Feature Management Home page, select , and then select X in the environment row you want to delete.
-
Select Delete.
The environment is now removed from the Environments tab and from the left pane.