|
This is Rollout-legacy documentation. For Rollout customers: This (Rollout) documentation remains available through your end-of-service date. CloudBees Feature Management is now part of CloudBees Unify. Refer to CloudBees Unify Feature management documentation. |
The Jenkins plugin adds a build step that downloads flag configurations for a given CloudBees Feature Management environment, allowing you to compare the environment with previous builds, and more quickly determine if a feature flag was the cause of build failure. The step can either be added to a freestyle project, or as a declarative pipeline step.
The snippet generator allows you to generate snippets that can be added to your Jenkins declarative pipeline builds.
The Freestyle approach uses the CloudBees Feature Management Jenkins plugin as a part of build steps within the Jenkins continuous integration workflows.
Once installed, the CloudBees Feature Management Jenkins plugin is managed in the Jenkins Plugin Manager. Deleting the plugin removes the binary from your Jenkins Home.
Each approach integrates with CloudBees Feature Management via the REST API to fetch the flag configurations at build-time. For more information, refer to the REST API documentation.
Events for each approach are logged in the CloudBees Feature Management Audit log. For more information, refer to the CloudBees Feature Management Audit log documentation.
This page describes how to do the following:
-
(Required step) Install the CloudBees Feature Management Jenkins plugin.
-
Verify the plugin is installed and enabled.
-
(Required step) Retrieve your API token from CloudBees Feature Management.
-
Create a Pipeline project.
-
Create a Freestyle project.
-
Uninstall the CloudBees Feature Management Jenkins plugin.
Installing the CloudBees Feature Management Jenkins plugin
The plugin is downloaded from within the Jenkins Plugin Manager.
To download the plugin:
-
From the Jenkins Home page, from the left pane, select Manage Jenkins.
-
Under System Configuration, select Manage Plugins.
-
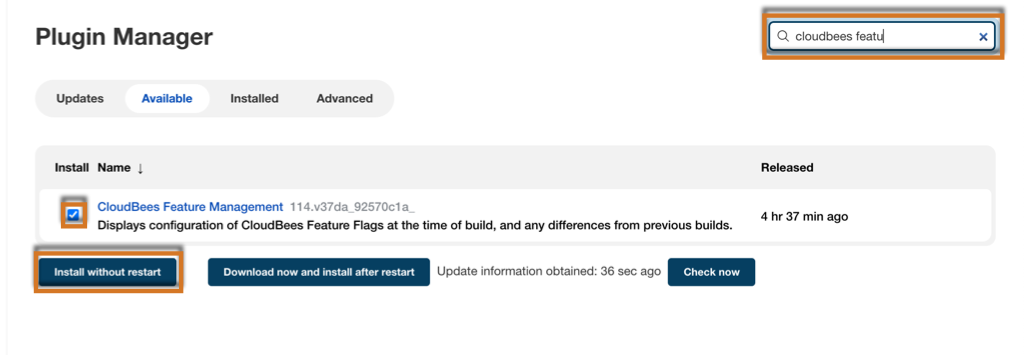
In the Plugin Manager screen, select the Available tab.
-
From the top left corner of your screen, enter CloudBees Feature Management into the Search.
-
Place a check next to the CloudBees Feature Management plugin.
-
Select Install without restart.
The installation plugins for the CloudBees Feature Management Jenkins integration is complete when marked with a circled green check and Success indicator.
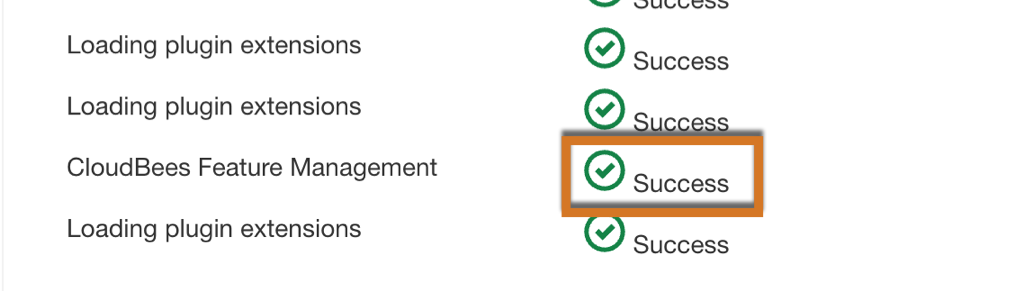
The CloudBees Feature Management Jenkins plugin is installed and enabled. You can now begin creating your Freestyle project.
Verifying the plugin is installed and enabled
You can verify the CloudBees Feature Management Jenkins plugin is installed using the Jenkins Plugin Manager.
To verify the plugin is installed:
-
From the Jenkins Home page, from the left pane, select Manage Jenkins.
-
For System Configuration, select Manage Plugins.
-
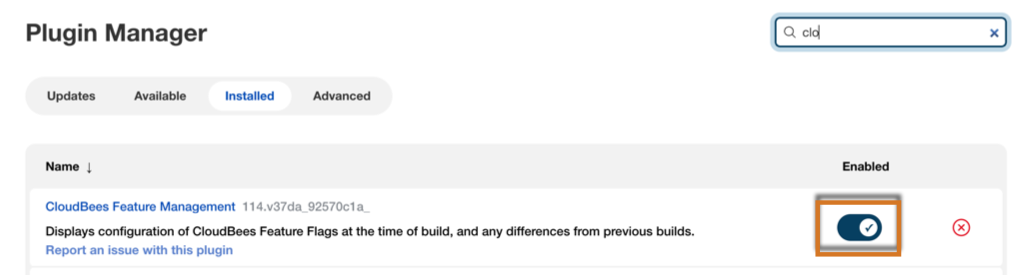
In the Plugin Manager screen, select the Installed tab.
-
From the top right corner of your screen, enter CloudBees Feature Management into the Search.
-
To the right of the CloudBees Feature Management plugin, verify that the Enabled switch is toggled on.
Retrieving your API token from CloudBees Feature Management
| The CloudBees Feature Management API token is required to connect Pipeline and Freestyle projects to CloudBees Feature Management. |
The User token creates the secret text credential which Jenkins will use to download the configuration from the CloudBees REST API .
To retrieve your User token from CloudBees Feature Management:
-
From the CloudBees Feature Management Home page, on the left pane, select App settings.
-
In the Integrations tab under API, select Show to display the User token, then select Copy.
You are now ready to add your User token to your Jenkins projects.
Creating a Pipeline project
Integrating CloudBees Feature Management within a Jenkins Pipeline project requires a pipeline step to be added to your code within the continuous integration environment.
To create a Pipeline project:
-
From the Jenkins Home page, from the left pane, select New Item.
-
From the center of your screen, below Enter an item name, enter a project name.
-
Select Pipeline
-
Select OK.
The Project Configuration screen opens.
-
Scroll to the bottom of the page, and select the Pipeline Syntax link.
The Snippet Generator screen opens.
-
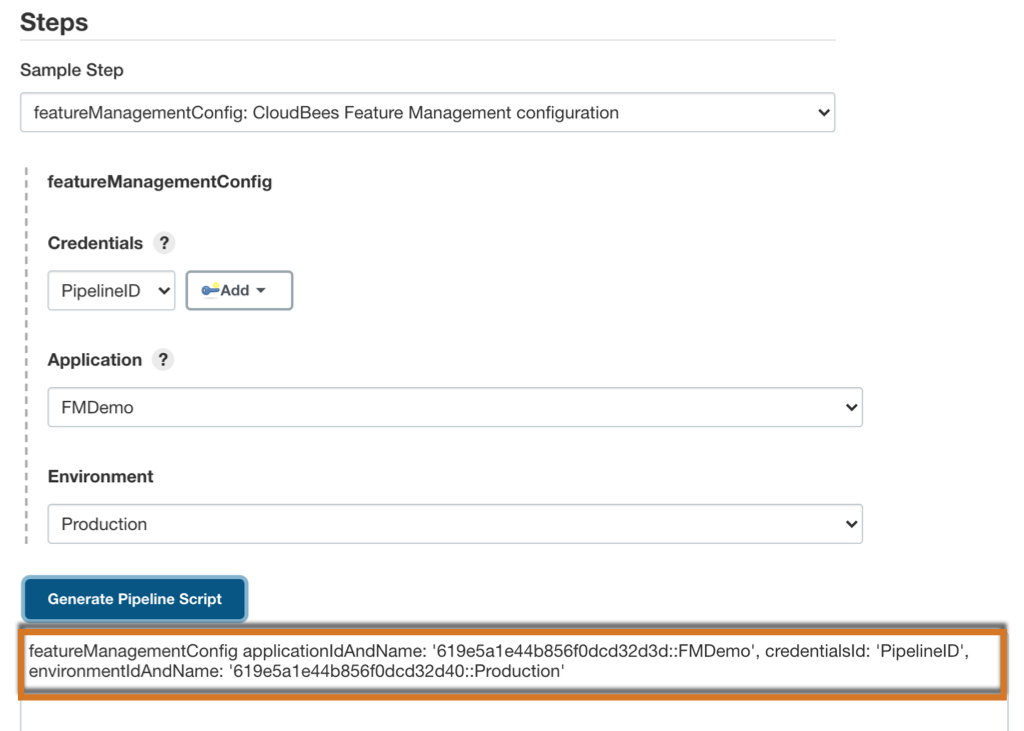
In Steps, for Sample Step, select featureMangementConfig: CloudBees Feature Management configuration to generate the code snippet that is required to run that the code plugin runs.
Use the F shortcut key to jump to the configuration. -
For Credentials, select .
The Jenkins Credentials Provider screen is displayed.
To configure credentials:
-
For Kind, select Secret text.
-
For Secret, paste the User token.
-
For ID, enter an ID.
All other fields are optional. -
Select Add to add the credential and return to your project.
You can now select the User token as a Credential.
-
For Credentials, select your newly created ID from the dropdown.
An API Token invalid warning message is displayed if an invalid User token is selected. -
For Application select the application.
-
For Environment choose the environment.
-
Select Generate Pipeline Script to generate the script.
-
Copy the script to your clipboard.
-
From the left pane, select to return to the Project Configuration screen.
-
In the Pipeline tab, for select Pipeline script.
-
For Script, add your application code, and paste the Pipeline script into the code.
You can optionally select Try Sample Pipeline and select an option to use example application code.  Figure 1. Adding the Pipeline script to example Hello World code.
 -
Select Save.
The new project can be accessed from the Jenkins > Dashboard. The new flag can be accessed from CloudBees Feature Management.
Creating a Freestyle project
After your CloudBees Feature Management Jenkins plugin has been installed, you can begin creating a Freestyle project. After you create the Freestyle project, you must configure credentials for it.
To create a Freestyle project:
-
From the Jenkins Home page, from the left pane, select New Item.
-
From the center of your screen, enter a name below Enter an item name.
-
Select Freestyle project.
-
Select OK.
The project configuration screen opens.
-
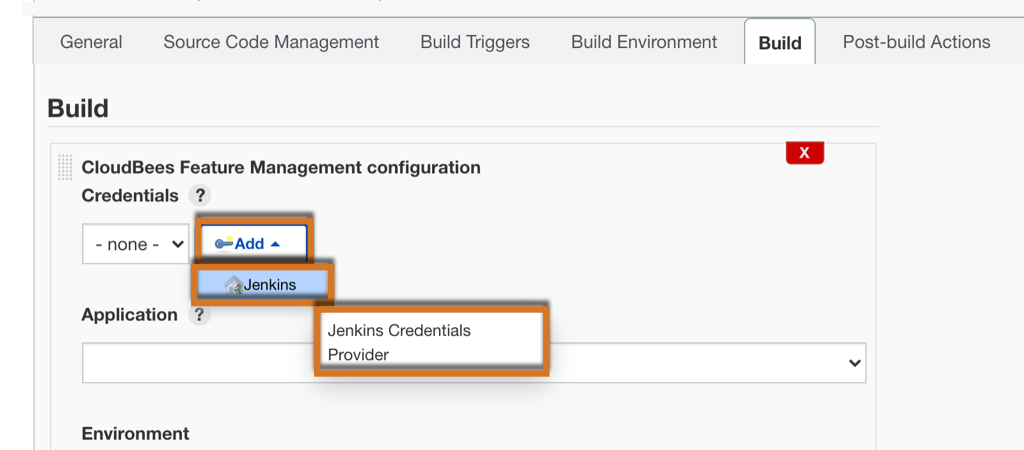
For Build, select Add build step > CloudBees Feature Management configuration.
-
For Credentials select .
The Add Credentials screen is displayed.
To configure credentials:
-
For Kind, select Secret text.
-
For Secret, paste the User token.
-
For ID, enter an ID.
All other fields are optional. -
Select Add to add the credential and return to your project.
You can now select the User token as a Credential.
-
For Credentials, select your newly created ID from the dropdown.
An API Token invalid warning message is displayed if an invalid User token is selected. -
For Application, select the application you would like to connect to.
-
For Environment, choose the environment.
-
(Optionally) Select Add build step and repeat the steps to configure an additional build step.
-
Select Save.
The new project can be accessed from the Jenkins > Dashboard.
Uninstalling the CloudBees Feature Management Jenkins plugin
| Deleting CloudBees Feature Management Jenkins plugin removes the plugin binary from your Jenkins Home. |
The CloudBees Feature Management Jenkins plugin can be removed from the controller using the Plugin Manager.
To remove the CloudBees Feature Management Jenkins plugin:
-
From the Jenkins Home page, from the left pane, select Manage Jenkins.
-
Under System Configuration, select Manage Plugins.
-
In the Plugin Manager screen, select the Installed tab.
-
From the top left corner of your screen, enter CloudBees Feature Management into the Search.
-
To the right of the CloudBees Feature Management plugin, select (X) Uninstall CloudBees Feature Management.

-
If you agree to the information on the screen, select Yes to uninstall the CloudBees Feature Management Jenkins plugin.