Webhooks in CloudBees Feature Management are real-time notifications that are triggered when an event happens in the system. Webhooks can be configured to listen to events within a specific environment or all environments.
The event listener triggers a custom HTTP callback. The callback pushes an HTTP POST payload to the user-defined URL.
Your webhook endpoint should respond within 5 seconds with a success HTTP status code (200-299).
If longer processing is required, your webhook endpoint should respond to the webhook POST, then handle the notification asynchronously by switching to a different thread, or by placing the notification on a queue to be processed elsewhere.
|
{ "channel": { "name": "test", "url": "https://example.net/api/webhook" }, "flag": "E2E Test Flag 1613570517455", "user": { "email": "example@email.com", "name": "Samuel Exampleton" }, "applicationName": "My Example App", "environmentName": "Production", "action": "changed flag visibility", "message": "Flag 'E2E Test Flag 1613570517455' visibility set to hidden" }
export interface IWebhookPayload { channel: { name: string url: string } flag: string user: { email: string name: string } | { externalUserUrl: string externalUserName: string } applicationName: string environmentName: string targetGroup: string action: string message: string }
Creating a webhook
To create a webhook:
-
Sign in to CloudBees Feature Management as an administrator.
-
Navigate to App Settings in the left-hand column.
-
On the Integrations tab in the Webhooks section, select Create.
-
Configure each field in the New webhook dialog as follows:
-
Webhook name: Enter a name for the webhook.
-
Webhook events: Select the type of events to report on; All changes per application or Changes in specific environments.
-
Environments: Specify one or more environments from the Environments dropdown. Note: This field is only required if Changes in specific environments is selected in Webhook events.
-
Payload example: Optionally, you can copy the payload by selecting Copy.
-
URL: Enter the URL that the webook will POST to, then select Test.
The test verifies whether the URL is valid. If the test is successful, a green banner will display the HTTP status code that the endpoint responded with, for example: API returned 200 response successfully. -
-
Select Create.
You will be returned to the Integrations tab.
If you have created more than one webhook, you will see it listed on the Integrations tab. -
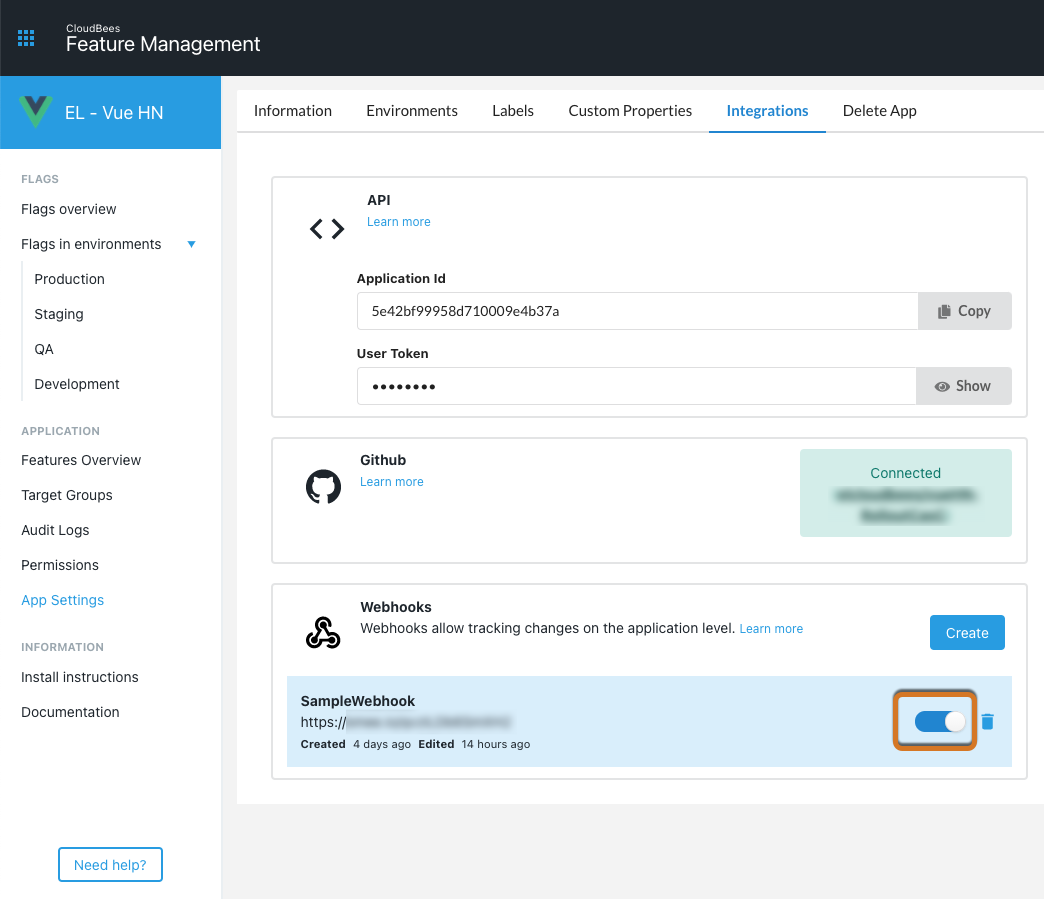
Turn on the toggle in the Webhooks section to enable the webhook.
The webhook will not work unless you enable it.  Figure 1. Enabling a webhook
Modifying a webhook
To modify a webhook:
-
Sign in to CloudBees Feature Management as an administrator.
-
Navigate to App Settings in the left-hand column.
-
On the Integrations tab, select the webhook. It will appear in the Webhooks section.
-
Update each field as needed.
-
Select Update.
Deleting a webhook
| Deleting a webhook may result in errors for an app that still uses it. Be sure that no apps are using a webhook before you delete it. Deleting a webhook cannot be undone. |
To delete a webhook:
-
Sign in to CloudBees Feature Management as an administrator.
-
Navigate to App Settings in the left-hand column.
-
On the Integrations tab, locate the webhook in the Webhooks section.
-
Select the delete trashcan icon.
-
Note the warning text. If you agree, select Yes, I understand the risks associated with this action.
-
Select Yes, Delete.