|
This is Rollout-legacy documentation. For Rollout customers: This (Rollout) documentation remains available through your end-of-service date. CloudBees Feature Management is now part of CloudBees Unify. Refer to CloudBees Unify Feature management documentation. |
In many cases, feature flags change the production environment or other regulated environments.
Any user with write access can make changes to flag configurations without receiving a review request. While a request is not required, users can request a review before their changes are applied.
Users with read only access can make changes to a flag configuration and submit the changes for review before they are applied.
| Users with read only access cannot make changes to a flag without a review request. |
Review requests can only be approved by a colleague with write permissions.
Submitting requests for flag configurations allows companies that require a higher level of governance to enforce change management policies and to stay compliant with SOC and SOX requirements.
Review requests allow companies to ensure internal processes are followed for training purposes or for an additional layer of administrative awareness.
Changes to flag configurations are captured in the Audit log for each individual flag as well as the main audit log for all flags.
Submitting a configuration approval request
| When an approval requests is submitted, and a request is pending, the Configuration page is disabled for other users. |
To request a review and approval for a feature flag:
-
From the CloudBees Feature Management Home page, select the app.
-
From the left pane, navigate to Flags in environments and select the environment.
-
From the top left corner of the screen, select Create flag, or select an existing flag to make changes.
-
Configure the flag.
-
From the top right corner of the main screen, in the Save Configuration dropdown list, select Request Changes to send the approval request to the administrators on your team.
 Figure 1. Request Changes
If your submission for approval is successful you will see the requested changes on your screen, you will receive an email notifying you that the change has been submitted, and an email will be sent to your administrator and colleagues with write permissions. An alert will briefly appear at the top of the page with the following message:
 Figure 2. Approval requested
If your submission is unsuccessful, an alert is briefly displayed notifying you that the request failed and the possible causes. A second persistent alert is also displayed in the middle of your screen with a link to request support.
Withdrawing an approval change request
When an approval request is pending, the Configuration tab is locked to other users. You can withdraw an approval request to unlock the tab and cancel the flag configuration change.
To withdraw a pending change request that you created:
-
From the CloudBees Feature Management Home page, select the application.
-
From the left pane select the environment.
-
From the top left corner, select the flag that changes were requested for.
-
On the Configuration tab, from the top right of the main screen, select the Save Configuration dropdown, and then select Withdraw Changes to cancel the update to the feature flag configuration and unlock the Configuration page.
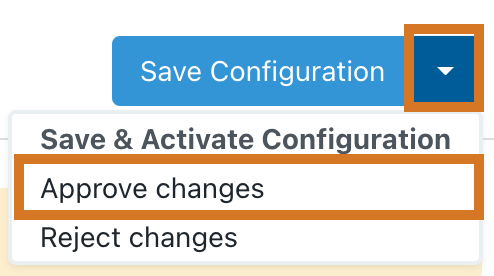
Approving an approval request
| Flag configurations that are submitted for approval can only be approved by an administrator. |
To approve a pending feature flag approval request:
-
From within the email requesting a review, select Approve or reject to open the flag configuration.
If you are already within CloudBees Feature Management you can access the flag as follows:
-
Select the CloudBees Feature Management Home page, select the application.
-
From the left pane, navigate to Flags in environments and select the environment.
-
From the top left corner of the screen, select the flag that changes were requested for.
-
-
On the Configuration tab, select the Save Configuration dropdown, and then select Approve changes to approve the request and unlock the Configuration page.
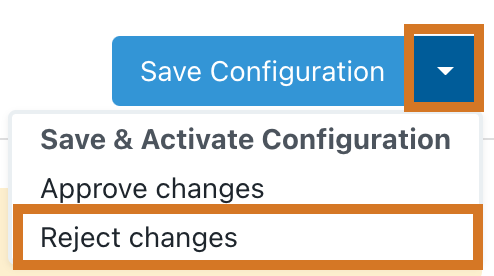
Rejecting an approval request
To reject a pending feature flag approval request:
-
From within the email requesting a review, select Approve or reject to open the flag configuration.
If you are already within CloudBees Feature Management you can access the flag as follows:
-
Select the CloudBees Feature Management Home page, select the application.
-
From the left pane, navigate to Flags in environments and select the environment.
-
From the top left corner of the screen, select the flag that changes were requested for.
-
-
On the Configuration tab, select to reject the request and unlock the Configuration page.
The Configuration page is unlocked to allow new feature flag creation, and an email is sent to the feature flag author with the name of the reviewer and the status of the request.
Reviewing the feature flag audit log
Flag changes are recorded in the main audit log for all flag configurations, as well as the individual audit log for each flag.
This section describes how to view the audit log for an individual flag.
Refer to Audit log for more information about the main audit log for all flags.
The audit log tracks the following information:
-
The administrator that approved the change (if requested)
-
The type of change that was requested or implemented
-
The date and time the change was made
-
The flag configuration
-
The author of the change
To view previous changes to a feature flag and approval request information:
-
From the CloudBees Feature Management Home page, select the application.
-
From the left pane, navigate to Flags in environments and select the environment.
-
Select the feature flag to open it.
-
Select the Audit Log tab.
The log defaults to display the last 30 days of activity.
-
To view a different range of dates, select Last 30 days and then choose a display option, or select Date range and then select a date for the Start Date and End Date.
 Figure 3. Selecting the audit log date range
The audit log displays all changes within the selected dates.