Security Assertion Markup Language (SAML) is a standard for exchanging authentication and authorization data between an identity provider (IdP) and a service provider. SAML is a common single sign-on (SSO) configuration that allows users to sign in to multiple software applications using the same credentials. CloudBees Feature Management uses the SAML 2.0 protocol to implement SSO.
CloudBees Feature Management SAML authentication is service provider (SP)-initiated. CloudBees Feature Management integrates with an IdP provider by linking a CloudBees Feature Management user with an IdP user. The connection is made using the SAML’s NameIdFormat, which is required. The default Active Directory setting usually does not include NameIdFormat, so you may have to add it manually.
|
CloudBees Feature Management SAML supports the following IdPs:
|
Enabling and configuring SAML
| You must be an organization administrator to enable SAML. |
CloudBees Feature Management SAML provides a streamlined user experience, as it lets you sign in to CloudBees Feature Management with your existing credentials from another system.
To enable SAML in CloudBees Feature Management:
-
Go to the upper-right corner of the CloudBees Feature Management Home page, and select your email and avatar.
-
Select the organization where you want to enable SAML. If you are a member of only one organization, disregard this step.
-
Select Organization management.
-
Select the toggle next to Disabled.
-
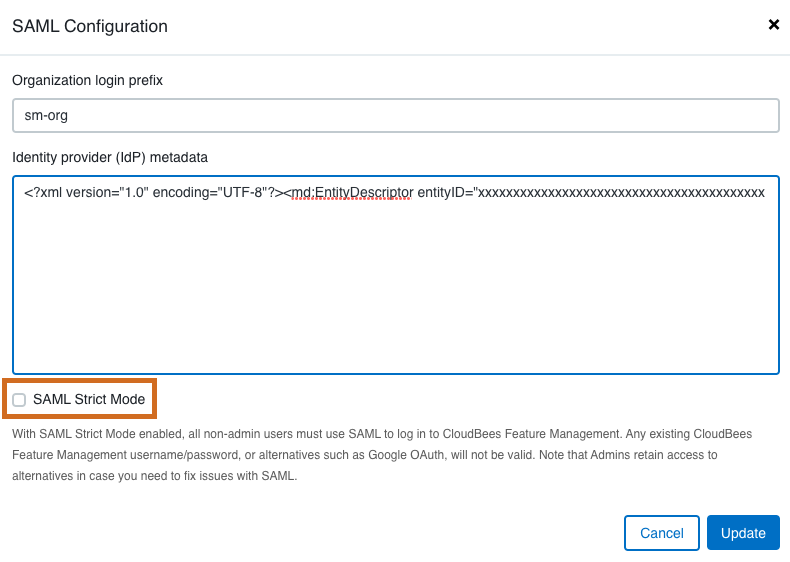
Enter your Organization login prefix. Choose a name with alphanumeric characters and hyphens only.
-
Configure your IdP. Refer to instructions specific for your IdP for more information. In general:
-
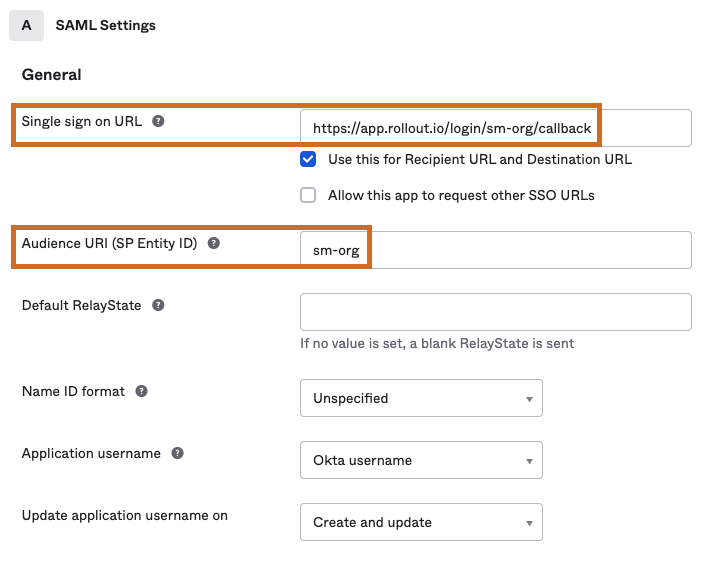
Enter the CloudBees Feature Management endpoint URL
https://app.rollout.io/login/<organization-login-prefix>/callbackin your IdP configuration, substituting your Organization login prefix for<organization-login-prefix>. The endpoint URL is also known as the assertion consumer service (ACS) URL or the single sign on URL. -
Enter the CloudBees Feature Management Organization login prefix into your IdP configuration. This is also known as the SP entity ID or the audience URI.
The Organization login prefix must be entered into the IdP configuration exactly as it appears in CloudBees Feature Management. The IdP configuration is case-sensitive.  Figure 1. Example of IdP configuration
 -
Copy the Identity Provider metadata from your IdP. You may need to select a link to the IdP metadata in your IdP configuration to access the XML file.
-
-
In your CloudBees Feature Management organization, enter the IdP metadata by pasting in the XML file contents.
-
You can select the checkbox to enable SAML Strict Mode. Refer to Enabling and disabling SAML Strict Mode for more information.
-
Select Update.
SAML is enabled for your CloudBees Feature Management organization and Enabled is listed next to the toggle. You are now ready to connect user accounts with SAML.
Connecting users via SAML
A user must first be invited to CloudBees Feature Management in order to use SAML. If SAML is disabled, users can sign in to CloudBees Feature Management using their email and password.
| After enabling SAML in your organization, existing users must connect SAML within their CloudBees Feature Management account in order to sign in via SAML. For more information, refer to Connecting and reconnecting existing user accounts via SAML. New users are connected via SAML through their invitation email. For more information, refer to Connecting invited users via SAML. |
Checking if users are connected via SAML
After enabling SAML, you may need to check if all existing users are connected via SAML.
To check if a user is connected via SAML:
-
Go to the upper-right corner of the CloudBees Feature Management Home page, select your email and avatar, and then select Account.
-
Below the user email is SAML status. The SAML status displays Connected if the user is connected and Please authenticate with your IdP if the user is not connected.
 Figure 2. SAML status
If the SAML status is not showing below the user email, SAML is not enabled for the organization.
Connecting invited users via SAML
Invited users are those who have received an email invitation but have yet to join CloudBees Feature Management.
Users who are invited when the SAML configuration is disabled must select Join in the invitation email to join the CloudBees Feature Management organization, and then connect SAML within CloudBees Feature Management.
Users who are invited when the SAML configuration is enabled must select Login in the invitation email to complete their SAML connection to the CloudBees Feature Management organization.
If the invited user did not receive their invitation, or the SAML IdP metadata has changed, organization administrators can resend the invitation email. This is especially useful if SAML Strict Mode is enabled.
To resend a SAML invitation email:
-
Go to the upper-right corner of the CloudBees Feature Management Home page, and select your email and avatar.
-
Select the organization where SAML is enabled. If you are a member of only one organization, disregard this step.
-
Select Organization management.
-
Select the user.
-
Select Resend SAML invite.
-
Select Close.
The user receives an email invitation to sign in to CloudBees Feature Management using SAML.
Connecting and reconnecting existing user accounts via SAML
Existing users have accounts listed on the Organization management screen.
To connect or reconnect existing organization accounts via SAML:
-
Go to the upper-right corner of the CloudBees Feature Management Home page, select your email and avatar, and then select Account.
-
To the right of SAML status, select Connect SAML to connect (or Reconnect SAML to reconnect).
-
On Connect to your IdP, select Ok to receive a password reset email, and then select Ok.
-
Check your email inbox for the password reset email to complete your SAML configuration.
-
Open the password reset email and select Login. You are taken back to CloudBees Feature Management through SAML.
The user account is connected via SAML, and the SAML status on Account has changed to Connected. The user can sign in to CloudBees Feature Management via their SAML credentials.
|
You may need to reconnect SAML for your CloudBees Feature Management account due to changes in the IdP configuration. For example, reconnection is required when:
|
Enabling and disabling SAML Strict Mode
When SAML Strict Mode is enabled for an organization, all organization users who are not administrators must use SAML to sign in to that organization. Any existing CloudBees Feature Management sign-in credentials, including alternatives such as Google OAuth, are not valid. Organization administrators retain access to these alternatives.
| Both the Organization login prefix and the IdP metadata fields must be valid to enable or disable SAML Strict Mode. |
To enable/disable SAML Strict Mode:
-
Go to the upper-right corner of the CloudBees Feature Management Home page, and select your email and avatar.
-
Select the organization where you want to enable/disable SAML Strict Mode. If you are a member of only one organization, disregard this step.
-
Select Organization management.
-
Select Edit SAML settings.
-
Next to SAML Strict Mode, select the checkbox to enable, and clear the checkbox to disable.
-
Select Update.
SAML Strict Mode is updated accordingly for your organization.

Signing in with SAML
Once your CloudBees Feature Management account is connected via SAML, you can sign in to CloudBees Feature Management with your SAML credentials.
| With SAML Strict Mode enabled, all organization users who are not administrators must use SAML to sign in to CloudBees Feature Management. Any existing CloudBees Feature Management sign-in credentials, or alternatives such as Google OAuth, are not valid. Admins do retain access to alternative sign-in modes for troubleshooting purposes. |
To sign on with SAML Strict Mode enabled, if you are not an organization administrator:
-
Go to
app.rollout.io/login/<org prefix>, which then redirects to your IdP.
To sign on with SAML Strict Mode disabled, or if you are an organization administrator, select one of the following two options:
-
Go to
app.rollout.io/login/<org prefix>, which then redirects to your IdP. -
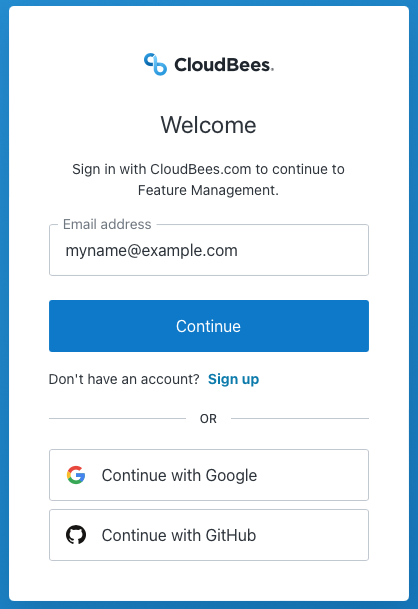
Use the CloudBees Feature Management sign-in screen. Note that this option is always available to organization administrators, regardless of SAML Strict Mode status.
 Figure 5. Organization users who are not administrators can use the CloudBees Feature Management sign-in screen only if SAML Strict Mode is disabled.
Editing SAML settings
You can change your SAML settings if you are an organization administrator.
To edit SAML settings:
-
Go to the upper-right corner of the CloudBees Feature Management Home page, and select your email and avatar.
-
Select the organization where you want to edit SAML. If you are a member of only one organization, disregard this step.
-
Select Organization management.
-
Select Edit SAML settings to update the Organization login prefix, the IdP metadata, and/or SAML Strict Mode.
-
Select Update.
Your SAML settings are updated.
Disabling SAML
You can disable SAML for your CloudBees Feature Management organization. Your SAML settings are saved in CloudBees Feature Management if you want to enable SAML in future.
To disable SAML:
-
Go to the upper-right corner of the CloudBees Feature Management Home page, select your email and avatar, and then select the organization where you want to disable SAML. Disregard this step if you are a member of only one organization.
-
Select Organization management.
-
Select the toggle next to Enabled.
SAML is disabled for your CloudBees Feature Management organization and Disabled is listed next to the toggle. Your SAML settings are saved for future use.
