Scenario requirements: For this scenario, you must set up an Email Configuration to use the email notification feature.
To set up an email configuration:
-
Click Administration>Email Configurations.
-
Click the Add Configuration link.
Enter information in the fields to define your mail system.
| Name | New version | Status |
|---|---|---|
Name |
Enter a unique name for your email configuration. |
|
Description |
Optional) Enter a text description for your reference. |
|
Mail Protocol |
Use the drop-down arrow to make a selection. |
|
Mail Host |
Enter the name of your mail host. |
Enter information in the remaining fields according to the specifications you need. Your New Email Configuration page should look similar to the following example:
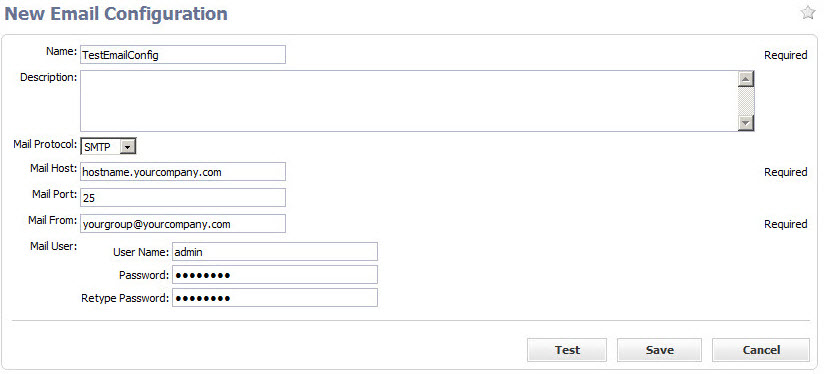
Click Save after filling in the fields or click the Test button first if you want to make sure your email configuration works. Enter an email address in the pop-up box and click Send.
| For additional help with this CloudBees CD page, click the Help link in the topright corner of the page. |
Overview
This scenario guides you through creating an email notification, invoking your build process with a timed (standard) schedule, and invoking your build process using a continuous build integration trigger.
At the end of this scenario, you will be familiar with the following CloudBees CD concepts and features:
-
Creating an email configuration
-
Creating an email notifier
-
Creating schedules
Begin scenario 3
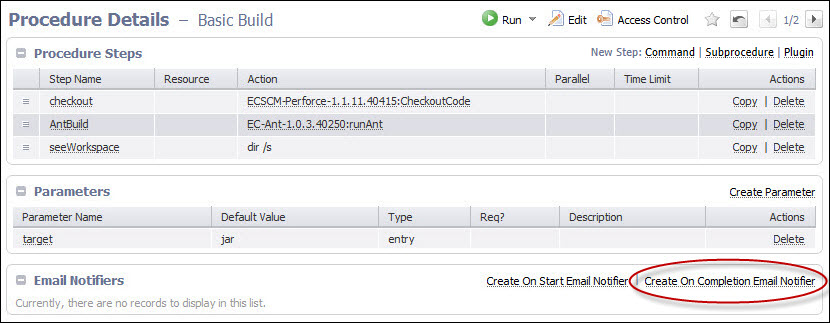
Step 1. Creating an email notifier
On the Procedure Details page for the Basic Build procedure, click the Create On Completion Email Notifier link to begin. This link takes you to the New On Completion Email Notifier page.
Two email notifier types for jobs or job steps:
-
On Start Notifier–Sends an email when a job or job step starts.
-
On Completion Notifier–Sends an email when a job or job step completes.
The fields for each of these notifiers are similar, but we chose the On Completion notifier because you may find you use this one more frequently.
On the New On Completion Email Notifier page:
Enter information into the fields as follows:
| Field Name | Description |
|---|---|
Name |
For this example, we use |
Description |
(Optional) Enter a text description for your reference. CloudBees CD does not use or interpret this information. |
Condition |
Use the pull-down menu to select the type of condition you need for this email notifier. Edit the auto-supplied condition in the text box or add a completely new script for your purpose. The condition specifies whether the notifier should send a message depending on the result of a property expansion. If the result is empty, non-zero, or "true", the message is sent. If the result is "0" or "false", the message is not sent. |
Formatting Template |
For this example, choose the "Job summary HTML" notification template, or you can use the drop-down menu to select from a list of global, ready-to-use formatting templates. Depending on the type of email notifier you are creating, the available template choices in the drop-down menu will be different. To customize your template, edit the auto-supplied text in the Formatting Template text box, or you can add a completely new template for your purpose. Note: Any edits made in this text box will not be saved to the global template, and the template will appear as a Custom template when you return to this notifier definition. Additionally, make sure the content is formatted correctly, i.e., no illegal characters or spacing. |
Email Configuration |
Use |
Destinations |
This is a space-separated list of valid email addresses, email aliases, or CloudBees CD user names, or a property reference that expands into such a list. |
After filling in the fields, your page may look similar to the following example:
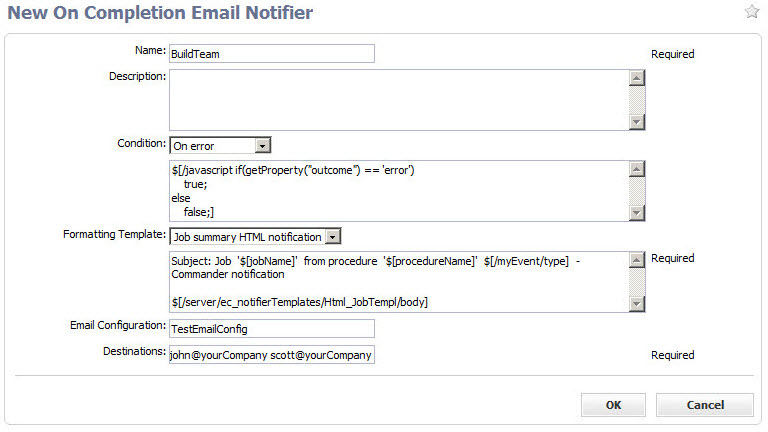
Click OK to create your email notifier and to return to the Procedure Details page, where you can now see the Email Notifier you created. For more information, see the Email Notifiers Help topic.
Step 2. Creating a standard schedule
To create a standard timed schedule:
-
Select the Projects tab.
-
Select your project name to go to the Project Details page.
-
Select the Schedules subtab, then select the down-arrow to the right of the Schedule link, and choose
Standard Scheduleto go to the New Schedule page.

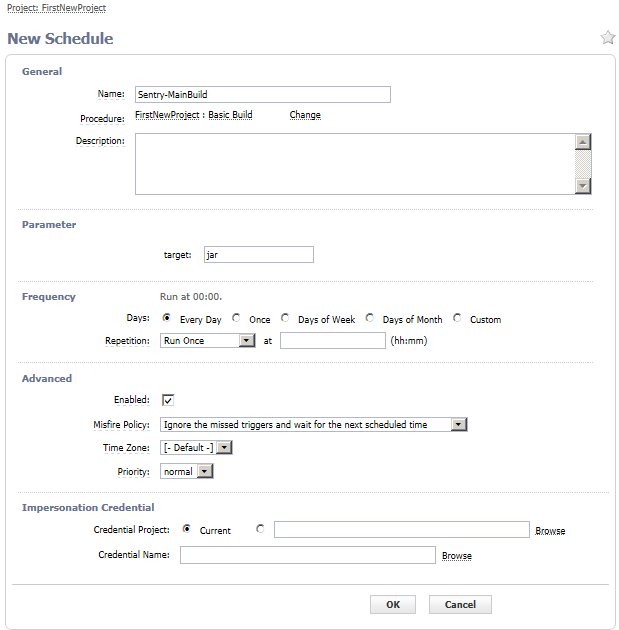
On the New Schedule page:
The following is an example of the New Schedule page.
-
Notice the breadcrumb above the New Schedule page title—this entry displays the name of the project that contains this schedule.
-
After entering a name (unique within your project) for your schedule (we chose
Sentry-MainBuild), choose the procedure your schedule will run. -
Click the Change link adjacent to the Procedure field.
-
In the pop-up menu, leave the Current project selected.
-
Place your cursor in the Procedure field to see a list of procedures in your project.
-
Select the procedure you want this schedule to run. We chose
Basic Build.
Enter information in the remaining fields as follows:
| Field | Description |
|---|---|
Description |
(Optional) Plain text or HTML description for this object. If using HTML, you must surround your text with For example, the following HTML: <p>
<span style="font-family: Arial;">
<i>Note:</i> For more information about the <b>abc</b> object, see
<a href="https://www.google.com/">\https://www.google.com</a>.
</span>
</p>
renders as follows:
|
Parameters section: If the procedure has parameters, enter their values in this section. The procedure cannot execute unless all required parameters are provided. |
|
Frequency section: Run at is a summary section. As you make selections for the following Days and Repetition sections, a summary of what you selected appears here. |
|
Days |
Select weekdays, month days, or create a custom frequency when you want the schedule to run. The day applies to the start time if the time range spans two days, that is, if the time range crosses the midnight boundary. |
Repetition |
|
Advanced section |
|
Enabled |
If this box is "checked," the schedule will run. You can disable this schedule. |
| For this scenario, you do not need to enter information for any remaining fields. Later, when creating an actual timed schedule for one of your procedures, refer to the Help topic for this page for more information. |
Click OK to create this schedule.
At any time, you can return to the Project Details page for this project, select the Schedules subtab, and then select the Schedule Name from the table to go to the Edit Schedule page to modify this schedule.
Step 2a. Creating a continuous integration build trigger
At a later time when you have procedures and steps created to do the work you need, you may prefer implementing continuous integration build configurations for your software builds. Unlike a standard schedule that runs on days and times you specify, a continuous integration build can be triggered to run each time code is checked into your source code management (SCM) system.
Adding a project to the Continuous Integration Dashboard is quick and easy. Each project can have one or more CI configurations, depending on the number of source branches you want to monitor. After the simple configuration process, you can visually see status and other information about your continuous integration jobs as builds are triggered to run.
To find the Continuous Integration Dashboard, select the Home tab, then select the Continuous Integration subtab. The dashboard will be empty until you start adding projects. For help using the Continuous Integration Manager and Dashboard, click the Help link in the upper-right corner of the dashboard web page.
Summary
This scenario demonstrated how to create an Email Configuration so you could use an email notifier and how to create a continuous integration schedule.
Go to Scenario 4