You can set Run if conditions and Wait until preconditions in pipelines through the UI or via API commands.
Pipeline Conditions
A pipeline condition, also known as a Run if condition, allows a stage, gate, or task to run only if the condition is satisfied. If not, the stage, gate, or task is skipped. For example:
-
A quality gate has these Run if conditions:
-
If 90% or more of the test cases pass, the pipeline continues running.
-
If 70% to 90% of the test cases pass, human intervention is required.
-
If less than 70% of the test cases pass, the error handling condition of the gate ( Stop running (the default) or Continue running ) determines what happens next.
-
-
The performance testing task can be skipped if it was executed in a specific environment.
| For examples of Javascript expressions for Run if and Wait until pipeline conditions, see the KBEC-00360 - Using Context-Relative Shortcuts to Properties on Pipelines and related objects KB article. |
Pipeline Preconditions
A pipeline precondition, also know as a Wait until precondition, restricts a stage, gate, or task from running until the condition is satisfied. For example, a stage, gate, or task cannot be run until approval from an external ticketing system or change management system is received.
You cannot use timestamps in preconditions on any object that supports preconditions. This includes stages, gates, and tasks as well as procedures and process steps.
Using Pipeline Objects and Conditions
You can set Run if and Wait until conditions for pipeline stages, gates, and tasks. Following are the overall steps for using pipeline objects and conditions in the Release Kanban View:
-
Modeling the Pipeline
-
Setting the "Run If" and "Wait until" Conditions for the Stage
-
Setting the "Run If" and "Wait until" Conditions for a Task
-
Setting the "Run If" and "Wait until" Conditions for a Gate
-
Running the Pipeline
Setting Conditions for a Stage
-
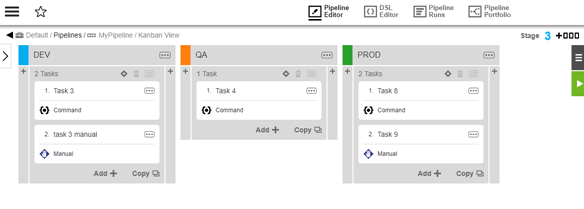
In the PROD stage, click the Stage Conditions button in the top right corner of the stage. The Conditions dialog box opens.
-
Enter Run if and Wait until conditions as properties, appropriate to your needs. Set up conditions that return a boolean. For example:
-
Run only if DEV stage, Task 3 completes successfully:
$[/javascript myPipelineRuntime.stages["DEV"].tasks["Task 3"].outcome = "success"] -
Wait until DEV stage, Task 3 manual completes successfully:
$[/javascript myPipelineRuntime.stages["DEV"].tasks["Task 3 manual"].outcome = "success"]
-
-
Click OK to save the conditions.
Setting Conditions for a Task
-
Click the task’s Actions button for the desired task and choose Conditions. The Conditions dialog box appears.
-
Enter Run if and Wait until conditions as properties, appropriate to your needs. Set up conditions that return a boolean. For example:
-
Run only if DEV stage, Task 3 was skipped:
$[/javascript myStageRuntime.stages["dev"]tasks["Task 3"].outcome =="skipped"] -
Wait until DEV Stage, Task 3 manual completes successfully: ` $[/javascript myStageRuntime.stages["dev"]tasks["Task 3 manual"].outcome =="success"]`
-
-
Click OK to save your entries.
Setting Conditions for a Gate
Conditions can be set for both the PRE and POST gates and the gate rule objects contained in the gates.
Setting PRE and POST Gate Conditions
-
Expand the entry gate to the PROD stage and click the Gate Conditions button. The Conditions dialog box for the PRE gate opens.
-
Enter Run if and Wait until conditions as properties, appropriate to your needs. Set up conditions that return a boolean. For example:
-
Run only if PRE gate for stage DEV, Task 3 was skipped:
$[/javascript myGateRuntime.tasks["Task 3"].outcome =="skipped"] -
Wait until autoTest successfully completes:
$[/myGate/autoTestCompleted]
-
-
Click OK to save your entries.
Setting Gate Rule Conditions
-
Click to expand the PRE gate to the PROD stage. Click the rule’s Actions button for a gate rule, and select Conditions. The Conditions dialog box opens.
-
Enter Run if and Wait until conditions as properties, appropriate to your needs. Set up conditions that return a boolean. For example:
-
Run only if DEV stage, Task 3 ` ` completes successfully:
$[/javascript myPipelineRuntime.stages["DEV"].tasks["Task 3"].outcome = "success"] -
Wait until DEV Stage, Task 3 manual complete successfully:
$[/javascript myPipelineRuntime.stages["DEV"].tasks["Task 3 manual"].outcome = "success"]
-
-
Click OK to save your entries.
Running the Pipeline
When the pipeline runs, it waits until the Run if and Wait until conditions are met before the pipeline can progress to the PROD stage. Before the first task in the PROD stage starts, the pipeline again waits until the Run if and Wait until conditions are met before starting the task.
Using Pipeline Objects and Conditions with API Commands
You can set the Run if and Wait until conditions using the API commands through the ectool command-line interface or through a DSL script on pipeline stages, tasks, and gates.
Stages
Create
-
Run if:
ectool createStage <projectName> <stageName> [<condition>] -
Wait until:
ectool createStage <projectName> <stageName> [<precondition>]
Examples:
-
Create a stage `QA ` with a Run if condition to run only if `DEV.task1 ` completes successfully:
ectool createStage "Default" "QA" --condition "$[/javascript myPipelineRuntime.stages["DEV"].tasks["task1"].outcome = "success"]"
-
Create stage `QA ` with a Wait until condition to wait until `DEV.task2 ` completes successfully:
ectool createStage "Default" "QA" --precondition "$[/javascript myPipelineRuntime.stages["DEV"].tasks["task2"].outcome == "success"]"
Modify
-
Run if: ` ectool modifyStage <projectName> <stageName> [<condition>]`
-
Wait until:
ectool modifyStage <projectName> <stageName> [<precondition>]
Examples:
-
Modify stage
QARun if condition to run only if `DEV.task1 ` fails:
ectool createStage "Default" "QA" --condition "$[/javascript myPipelineRuntime.stages["DEV"].tasks["task1"].outcome = "error"]"
-
Modify stage
QAWait until condition to wait until `DEV.task2 ` fails:
ectool createStage "Default" "QA" --precondition "$[/javascript myPipelineRuntime.stages["DEV"].tasks["task2"].outcome == "error"]"
DSL script
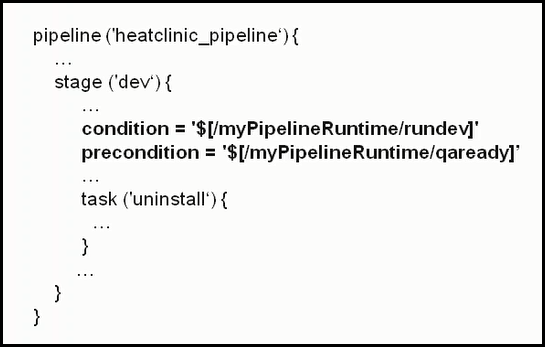
When you use DSL to model the pipeline, the DSL script includes this content. The Run if and Wait until conditions are defined in the stage object. This example shows that the dev stage has a Run if conditon and a Wait until condition. The Run if condition is that $[/myPipelineRuntime/rundev] is TRUE for the dev stage to start. The Wait until condition is that $[/myPipelineRuntime/qaready] is TRUE for the pipeline to progress to the next stage.
Tasks
Create
-
Run if:
ectool createTask <projectName> <taskName> [<condition>] -
Wait until: ` ectool createTask <projectName> <taskName> [<precondition>]`
Examples:
-
Create task
Deploy WAR filewith a Run if condition to run if `dev.task1 ` was skipped:
ectool createTask "Default" "Deploy WAR file" --condition "$[/javascript myStageRuntime.stages["dev"]tasks["task1"].outcome =="skipped"]"
-
Create task
Deploy WAR filewith a Wait until condition to wait until taskdev.task2was skipped:
ectool createTask "Default" "Deploy WAR file" --precondition "$[/javascript myStageRuntime.stages["dev"]tasks["task2"].outcome =="skipped"]"
Modify
-
Run if:
ectool modifyTask <projectName> <taskName> [<condition>] -
Wait until:
ectool modifyTask <projectName> <taskName> [<precondition>]
Examples:
-
Modify task
Deploy WAR fileRun if condition:
ectool createTask "Default" "Deploy WAR file" --condition "$[/javascript myStageRuntime.stages["dev"]tasks["task1"].outcome =="skipped"]"
-
Modify task
Deploy WAR fileWait until condition for taskDeploy WAR file:
ectool createTask "Default" "Deploy WAR file" --precondition "$[/javascript myStageRuntime.stages["dev"]tasks["task2"].outcome =="skipped"]"
DSL script
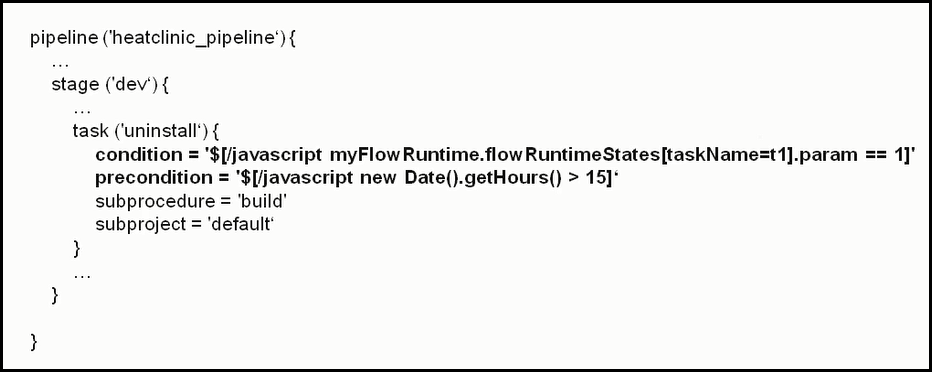
When you use DSL to author the pipeline, the DSL script includes this content. The Run if and Wait until conditions are defined in the task object.
This example shows that the task uninstall has a Run if condition and a Wait until condition defined within the `dev ` stage task:
Gates
Create
-
Run if:
ectool createGate <projectName> <stageName> <gateType> [<condition>] -
Wait until:
ectool createGate <projectName> <stageName> <gateType> [<precondition>]
Example:
To create an exit gate including both Run if and Wait until conditions. The example below sets both the --condition and --precondition in the same `ectool ` command.
ectool createGate "Default" "dev" "POST" --condition "$[/javascript myGateRuntime.tasks["auto task"].outcome =="skipped"]" --precondition "$[/myGate/autoTestCompleted]"
Modify
-
Run if:
ectool createGate <projectName> <stageName> <gateType> [<condition>] -
Wait until:
ectool createGate <projectName> <stageName <gateType> [<precondition>]
Example:
Modify both Run if and Wait until conditions on the entry gate of stage dev. The example below sets both the --condition and --precondition in the same `ectool ` command.
ectool modifyGate "Default" "dev" "PRE" --condition "$[/javascript myGateRuntime.tasks["auto task"].outcome =="success"] --precondition "$[/myGate/autoTestCompleted]"
DSL script
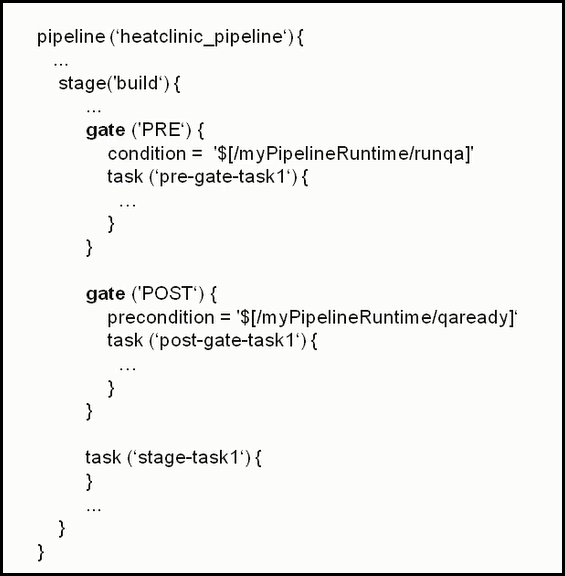
When you use DSL to author the pipeline, the DSL script includes this content. The Run if and Wait until conditions are defined in the gate object. This example shows that the build stage has two gates, an entry gate (PRE) and an exit gate (POST). The tasks for each gate are embedded within each one.
Before CloudBees CD 6.5, gates are implicitly created when you create a stage. You can define tasks for a stage. If you want to define an approval task for a gate, you must define a task with a gate type ( PRE or POST ) and a task type of APPROVAL. DSL scripts created before CloudBees CD 6.5 work, but Run if and Wait until conditions cannot be applied to them.
|