Introduction
This tutorial provides instructions for the four step process to create a functional plugin called SampleAWSCloudFront, which has one procedure called InvalidateCaches.
The four step plugin creation process
-
Create plugin workspace.
-
Define plugin specifications and generate plugin.
-
Implement additional logic.
-
Build plugin and test.
Prerequisites
These are assumptions for this tutorial.
-
An active CloudBees CD instance.
-
pdkinstalled and set up.
In addition, you should have the AWS Access key ID and Secret access key pair to use the plugin, but for getting an overall experience it is not required.
Step 1 : Create plugin workspace
After making sure pdk is available in your PATH, you can create a plugin workspace.
-
Change to your working directory.
cd ~/work -
Call
pdkas followspdk generate workspace -
In the interactive prompt type SampleAWSCloudFront as plugin name. The rest of the options (except the plugin language) are all optional; choose defaults if available or provide your own values. Specify 'groovy' as the plugin language.
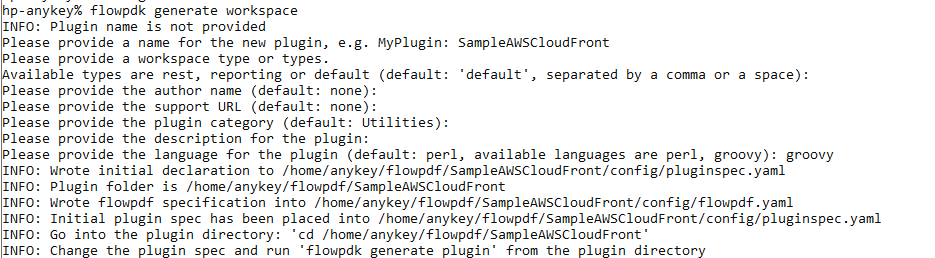
The generated workspace contains the following two files:

Step 2: Define plugin spec and generate plugin
The pluginspec.yaml has two sections one for configuration and the other for procedures.
Update config section of YAML
To interact with AWS REST API we need the following config values:
-
Usernamefor authorization (Access key ID). -
Passwordfor authorization (Secret access key).
Fill up the configuration section as follows.
# Plugin configuration description configuration: # A set of fields will be added to process debug level in the configuration hasDebugLevel: true parameters: - name: config type: entry label: Configuration Name required: true documentation: The name for the created configuration. - name: desc type: entry label: Description required: false documentation: Description for the configuration. - name: credential type: credential label: Credential userNameLabel: Access key ID required: true passwordLabel: Secret access key
Update procedure section
Now, implement a procedure called Invalidate Cache with interface
specification as follows.
procedures: - name: Invalidate Cache shell: 'ec-groovy' description: This procedure creates CloudFront cache invalidation for the specified distribution. hasConfig: true # configuration field will be generated automatically parameters: - name: distributionId documentation: The distribution ID associated with the invalidation. required: true type: entry label: Distribution ID - name: objectPaths documentation: Objects paths, newline-separated. required: true type: textarea label: Object Paths - name: uniqueCallerReference documentation: If checked, unique caller reference will be generated automatically. required: false type: checkbox label: Generate Unique Caller Reference initiallyChecked: true checkedValue: true uncheckedValue: false - name: callerReference documentation: Caller reference to identify invalidation request. required: false type: entry label: Caller Reference dependsOn: uniqueCallerReference condition: ${uniqueCallerReference} == 'false' outputParameters: invalidationId: Id of the created invalidation
Generate the plugin
Execute the following command from the root level directory of the plugin workspace.
pdk generate plugin
After execution, it should look as follows.
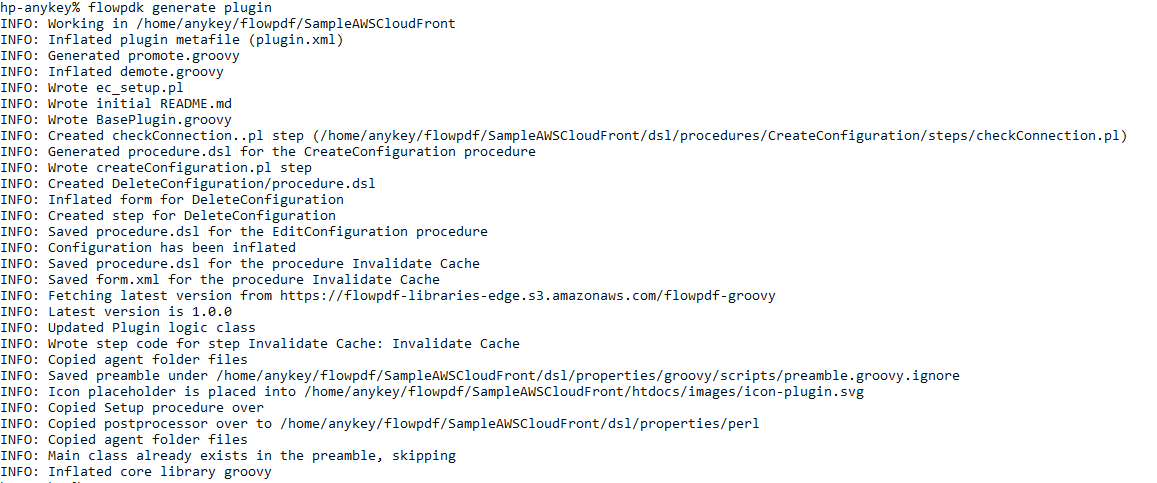
With this step, plugin generation is complete.
Review the auto-generated code
This section is provided to give a perspective on how the boiler plate generated code looks like and what it means.
The dsl/properties folder has the following structure:
-
groovy/lib -
groovy/scripts -
perl/core
| Do not modify any file under core folders. Core folders has plugin-related internal code, which should not be edited by plugin developer.* |
The only folder that could be modified is the groovy/lib folder.
Notice that dsl/properties/groovy/lib/SampleAWSCloudFront.groovy has
been auto-generated and contains the following code.
import com.cloudbees.flowpdf.* /** * SampleAWSCloudFront */ class SampleAWSCloudFront extends FlowPlugin { @Override Map<String, Object> pluginInfo() { return [ pluginName : '@PLUGIN_KEY@', pluginVersion : '@PLUGIN_VERSION@', configFields : ['config'], configLocations: ['ec_plugin_cfgs'], defaultConfigValues: [:] ] } /** * invalidateCache - Invalidate Cache/Invalidate Cache * Add your code into this method and it will be called when the step runs * @param config (required: true) * @param distributionId (required: true) * @param objectPaths (required: true) * @param uniqueCallerReference (required: false) * @param callerReference (required: false) */ def invalidateCache(StepParameters p, StepResult sr) { /* Log is automatically available from the parent class */ log.info( "invalidateCache was invoked with StepParameters", /* runtimeParameters contains both configuration and procedure parameters */ p.toString() ) Context context = getContext() // Setting job step summary to the config name sr.setJobStepSummary(p.getParameter('config').getValue() ?: 'null') sr.setReportUrl("Sample Report", 'https://www.cloudbees.com/') sr.apply() log.info("step Invalidate Cache has been finished") } // === step ends === }%
Each plugin procedure has one or more steps. The auto-generated code for the step Invalidate Cache is located in dsl/procedures/InvalidateCache/steps/InvalidateCache.groovy and contains following:
$[/myProject/groovy/scripts/preamble.groovy.ignore] SampleAWSCloudFront plugin = new SampleAWSCloudFront() plugin.runStep('Invalidate Cache', 'Invalidate Cache', 'invalidateCache')
Class SampleAWSCloudFront is populated by the property expansion in the preamble.groovy.ignore that contains:
$[/myProject/groovy/lib/SampleAWSCloudFront.groovy]
Step 3: Implement additional logic
Add necessary libraries
The power of groovy is an ability to use third-party Java libraries to simplify the development. You can use grapes to get the dependencies in runtime, but having packaged dependencies is more reliable. Groovy plugin procedures use a special step 'flowpdkSetup' to transfer libraries to an agent.
Let’s add the aws-java-sdk-cloudfront jar to plugin.
In this case we useGradle, but you can choose any preferred
method to get the jars into agent/deps/libs folder.
|
-
Open the generated
build.gradle. You should see the following content:apply plugin: 'groovy' repositories{ mavenCentral() flatDir { dirs 'agent/deps/libs' } } dependencies { implementation 'org.codehaus.groovy:groovy-all:2.4.13' // Change the version if you have upgraded the groovy library implementation 'com.electriccloud.plugins:flowpdf-groovy-lib:1.0.0.0' } sourceSets { main { groovy { srcDirs = ['dsl/properties/groovy/lib'] } } } // Use this task to include third-party dependencies into to agent folder task copyDependencies(type: Copy) { outputs.upToDateWhen { false } from configurations.runtimeClasspath { // Dependencies already included into the COMMANDER_HOME/utils/langs exclude group: 'org.codehaus.groovy', module: 'groovy-all' exclude group: "org.apache.commons", module: 'commons-lang' exclude group: "commons-collections", module: 'commons-collections' exclude group: "com.electriccloud.plugins", module: 'flowpdf-groovy-lib' } into 'agent/deps/libs' } -
Add the
com.amazonaws:aws-java-sdk-cloudfrontto the end of the dependencies block:dependencies { implementation 'org.codehaus.groovy:groovy-all:2.4.13' // Change the version if you have upgraded the groovy library implementation 'com.electriccloud.plugins:flowpdf-groovy-lib:1.0.0.0' // Adding the Amazon AWS CloudFront Java SDK libraries implementation 'com.amazonaws:aws-java-sdk-cloudfront:1.11.688' } -
RunGradletask to download the dependencies:gradle copyDependencies -
Assure that your
/agent/deps/libsfolder contains the jars: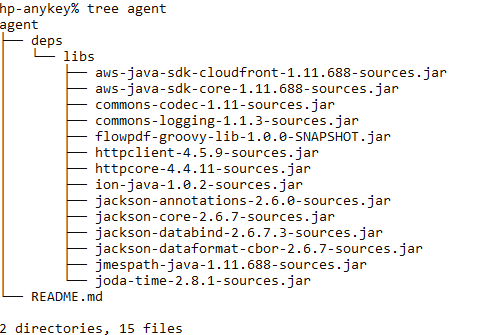
Implementing AWS CloudFront API call
Add the following code that uses AWS Java SDK CloudFront library to
perform the request to the end of SampleAWSCloudFront.groovy:
class CloudFrontPlugin { AmazonCloudFront client CloudFrontPlugin(String username, String password) { def credential = new BasicAWSCredentials(username, password) AWSCredentialsProvider credentialProvider = new AWSStaticCredentialsProvider(credential) client = AmazonCloudFrontClientBuilder .standard() .withRegion(Regions.DEFAULT_REGION) .withCredentials(credentialProvider) .build() } def invalidateCache(String distributionId, List paths, String callerReference) { Paths p = new Paths().withItems(paths).withQuantity(paths.size()) InvalidationBatch batch = new InvalidationBatch().withPaths(p).withCallerReference(callerReference) CreateInvalidationResult result = client.createInvalidation( new CreateInvalidationRequest() .withDistributionId(distributionId) .withInvalidationBatch(batch) ) Invalidation invalidation = result.invalidation println "Invalidation ID: ${invalidation.id}" println "Invalidation Status: ${invalidation.status}" if ('Completed' != invalidation.status) { print "Waiting for the invalidation to complete" } while ('Completed' != invalidation.status) { sleep(1000 * 5) invalidation = getInvalidation(distributionId, invalidation.id) print "." } } Invalidation getInvalidation(String distributionId, String invalidationId) { GetInvalidationResult result = client.getInvalidation( new GetInvalidationRequest() .withDistributionId(distributionId) .withId(invalidationId) ) return result.invalidation } }
Modify step code
The auto-generated function in step looks as follows:
/** * invalidateCache - Invalidate Cache/Invalidate Cache * Add your code into this method and it will be called when the step runs * @param config (required: true) * @param distributionId (required: true) * @param objectPaths (required: true) * @param uniqueCallerReference (required: false) * @param callerReference (required: false) */ def invalidateCache(StepParameters p, StepResult sr) { /* Log is automatically available from the parent class */ log.info( "invalidateCache was invoked with StepParameters", /* runtimeParameters contains both configuration and procedure parameters */ p.toString() ) Context context = getContext() // Setting job step summary to the config name sr.setJobStepSummary(p.getParameter('config').getValue() ?: 'null') sr.setReportUrl("Sample Report", 'https://www.cloudbees.com/') sr.apply() log.info("step Invalidate Cache has been finished") } // === step ends ===
Modify the logic as follows using the class you’ve added:
/** * invalidateCache - Invalidate Cache/Invalidate Cache * Add your code into this method and it will be called when the step runs * @param config (required: true) * @param distributionId (required: true) * @param objectPaths (required: true) * @param uniqueCallerReference (required: false) * @param callerReference (required: false) */ def invalidateCache(StepParameters p, StepResult sr) { /** Retrieve the credential and initialize the client */ def credential = p.getRequiredCredential('credential') CloudFrontPlugin cfPlugin = new CloudFrontPlugin(credential.getUserName(), credential.getSecretValue()) /** Get and process the parameters */ String distributionId = p.getRequiredParameter('distributionId').getValue() List paths = p.getRequiredParameter('objectPaths').getValue().split(/\n+/).collect { it } String callerReference = p.getParameter('callerReference').getValue() as String if (!callerReference) { if (p.getParameter('uniqueCallerReference').getValue().toString() == 'true') { callerReference = "Auto Generated Reference at " + new Date() } else { /** Raising exception */ throw new UnexpectedMissingValue("Either 'Caller Reference' or 'Generate Unique Caller Reference' should be specified.") } } /** Call the client method to create and wait for the invalidation */ def invalidation = cfPlugin.invalidateCache(distributionId, paths, callerReference) /** StepResult code will go here */ sr.apply() log.info("step Invalidate Cache has been finished") }
Set output parameters
An output parameter is set as part of the StepResult object. Add the following code inside of the step function in SampleAWSCloudFront.groovy before the sr.apply() call.
sr.setOutputParameter('invalidationId', invalidation.id)
Set pipeline, job, and jobStep summary
Set all the three summaries: pipeline summary, job summary, and jobStep summary. Add the following code inside the step function in SampleAWSCloudFront.groovy before the sr.apply() call.
sr.setPipelineSummary("Invalidation Id", invalidation.id) sr.setJobSummary("Created invalidation Id is : ${invalidation.id}") sr.setJobStepSummary("Created invalidation Id is : ${invalidation.id}")
Review SampleAWSCloudFront.groovy
This is a summary of how SampleAWSCloudFront.groovy looks after you make the
changes.
import com.amazonaws.auth.* import com.amazonaws.regions.Regions import com.amazonaws.services.cloudfront.* import com.amazonaws.services.cloudfront.model.* import com.cloudbees.flowpdf.* import com.cloudbees.flowpdf.exceptions.UnexpectedMissingValue /** * SampleAWSCloudFront */ class SampleAWSCloudFront extends FlowPlugin { @Override Map<String, Object> pluginInfo() { return [ pluginName : '@PLUGIN_KEY@', pluginVersion : '@PLUGIN_VERSION@', configFields : ['config'], configLocations : ['ec_plugin_cfgs'], defaultConfigValues: [:] ] } /** * invalidateCache - Invalidate Cache/Invalidate Cache * Add your code into this method and it will be called when the step runs * @param config (required: true) * @param distributionId (required: true) * @param objectPaths (required: true) * @param uniqueCallerReference (required: false) * @param callerReference (required: false) */ def invalidateCache(StepParameters p, StepResult sr) { /** Retrieve the credential and initialize the client */ def credential = p.getRequiredCredential('credential') CloudFrontPlugin cfPlugin = new CloudFrontPlugin(credential.getUserName(), credential.getSecretValue()) /** Get and process the parameters */ String distributionId = p.getRequiredParameter('distributionId').getValue() List paths = p.getRequiredParameter('objectPaths').getValue().split(/\n+/).collect { it } String callerReference = p.getParameter('callerReference').getValue() as String if (!callerReference) { if (p.getParameter('uniqueCallerReference').getValue().toString() == 'true') { callerReference = "Auto Generated Reference at " + new Date() } else { /** Raising exception */ throw new UnexpectedMissingValue("Either 'Caller Reference' or 'Generate Unique Caller Reference' should be specified.") } } /** Call the client method to make the invalidation */ def invalidation = cfPlugin.invalidateCache(distributionId, paths, callerReference) sr.setOutputParameter('invalidationId', invalidation.id) sr.setPipelineSummary("Invalidation Id", invalidation.id) sr.setJobSummary("Created invalidation Id is : ${invalidation.id}") sr.setJobStepSummary("Created invalidation Id is : ${invalidation.id}") sr.apply() log.info("step Invalidate Cache has been finished") } // === step ends === } class CloudFrontPlugin { AmazonCloudFront client CloudFrontPlugin(String username, String password) { def credential = new BasicAWSCredentials(username, password) AWSCredentialsProvider credentialProvider = new AWSStaticCredentialsProvider(credential) client = AmazonCloudFrontClientBuilder .standard() .withRegion(Regions.DEFAULT_REGION) .withCredentials(credentialProvider) .build() } def invalidateCache(String distributionId, List paths, String callerReference) { Paths p = new Paths().withItems(paths).withQuantity(paths.size()) InvalidationBatch batch = new InvalidationBatch().withPaths(p).withCallerReference(callerReference) CreateInvalidationResult result = client.createInvalidation( new CreateInvalidationRequest() .withDistributionId(distributionId) .withInvalidationBatch(batch) ) Invalidation invalidation = result.invalidation println "Invalidation ID: ${invalidation.id}" println "Invalidation Status: ${invalidation.status}" if ('Completed' != invalidation.status) { print "Waiting for the invalidation to complete" } while ('Completed' != invalidation.status) { sleep(1000 * 5) invalidation = getInvalidation(distributionId, invalidation.id) print "." } return invalidation } Invalidation getInvalidation(String distributionId, String invalidationId) { GetInvalidationResult result = client.getInvalidation( new GetInvalidationRequest() .withDistributionId(distributionId) .withId(invalidationId) ) return result.invalidation } }
Step 4: Build, install, and test
Build the plugin from the root directory of the SampleAWSCloudFront plugin workspace.
pdk build
It should look something like this:
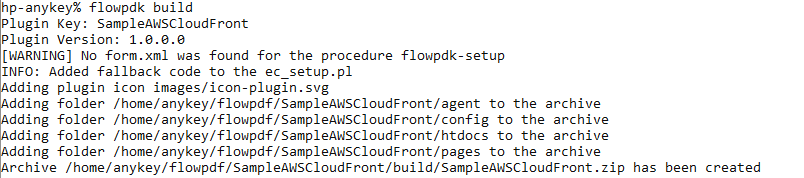
Congratulations! You have now created a functional plugin.
Install and promote the plugin
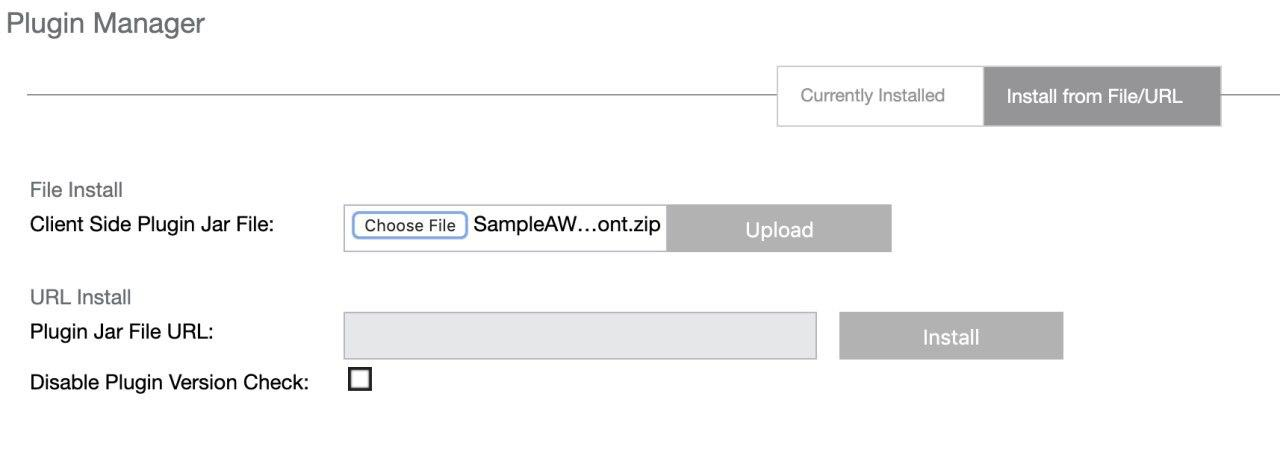
Go to your CloudBees CD instance, login and navigate to the Plugin Manager page that lists all plugins.

Select the Install from File/URL tab, click Choose File, select your build/SampleAWSCloudFront.zip file, and click upload:
You are redirected to the plugin manager page. Find your plugin, SampleAWSCloudFront, and select Promote.
After promotion the page is automatically refreshed.
Create a pipeline and configure the plugin
After your plugin is installed, navigate to the Pipelines page and click New in the top right corner of the web page.
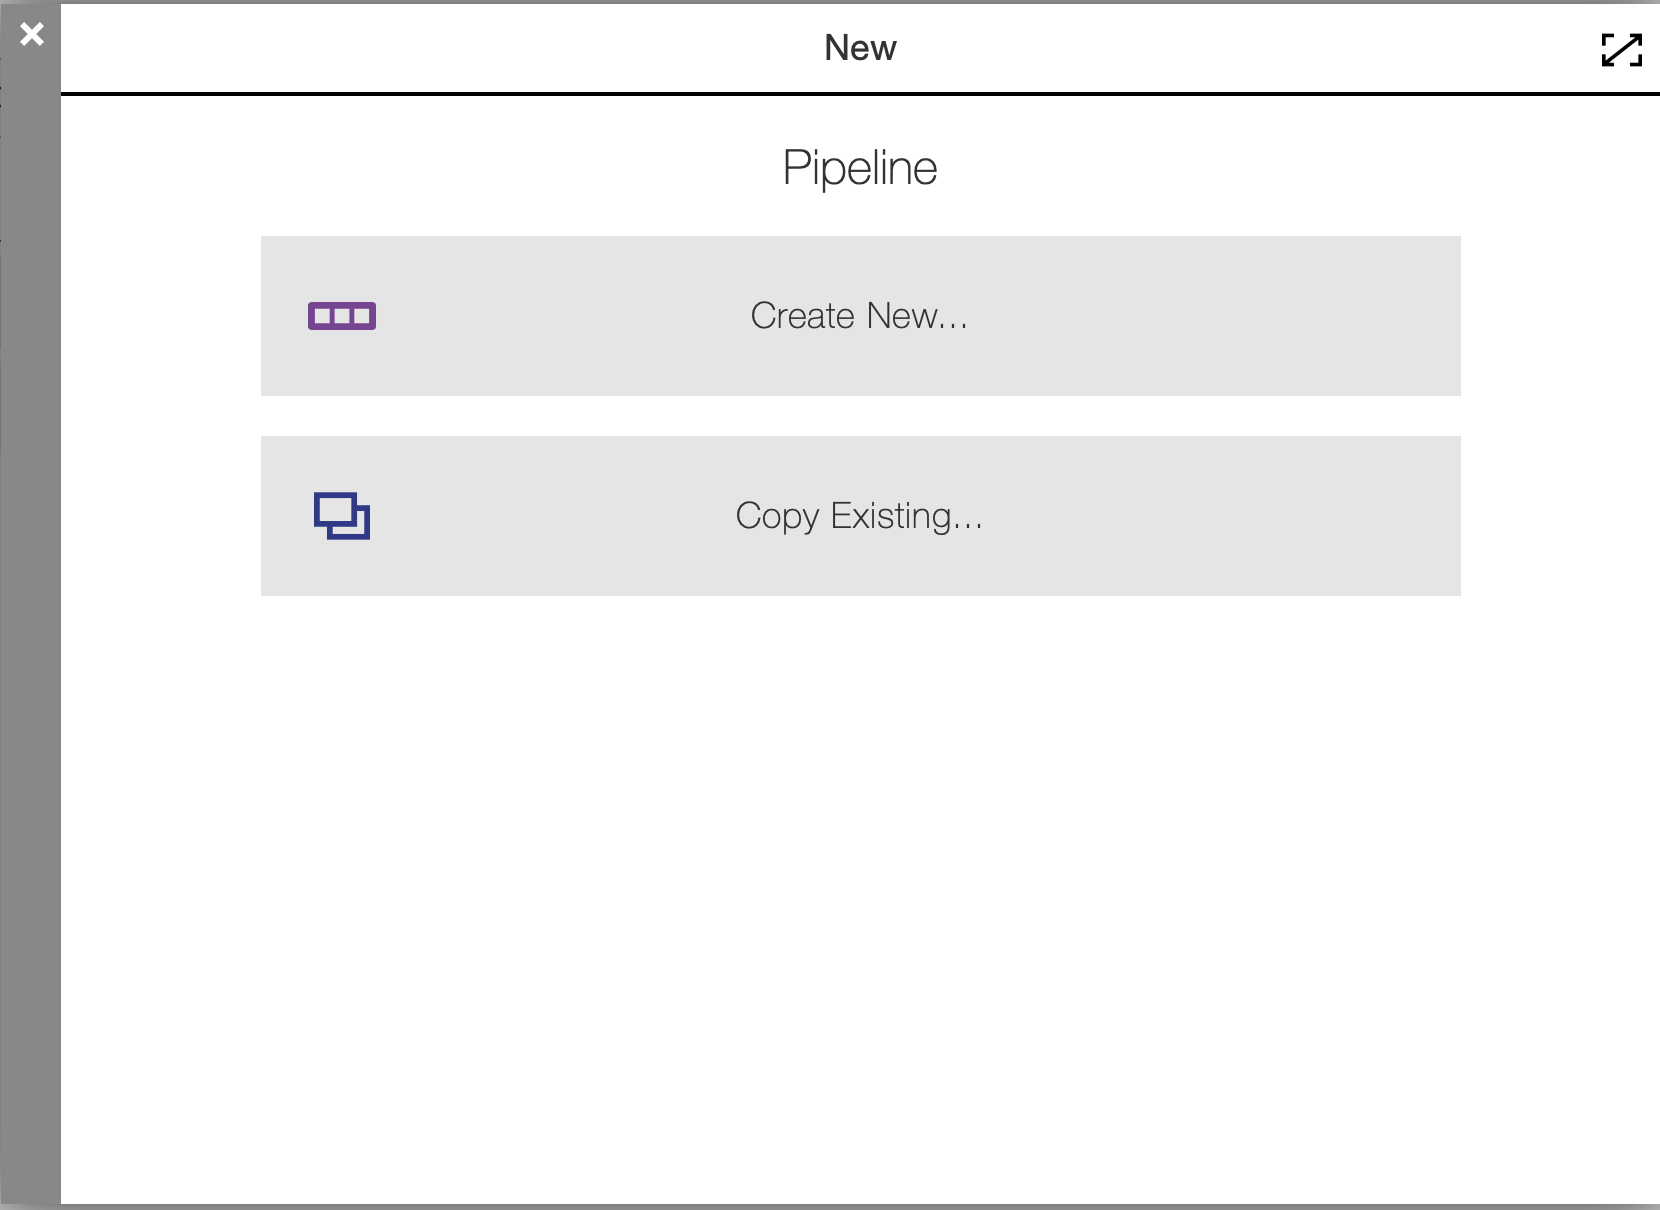
Select Create New, enter SampleAWSCloudFront Showcase, choose your project and click Ok.
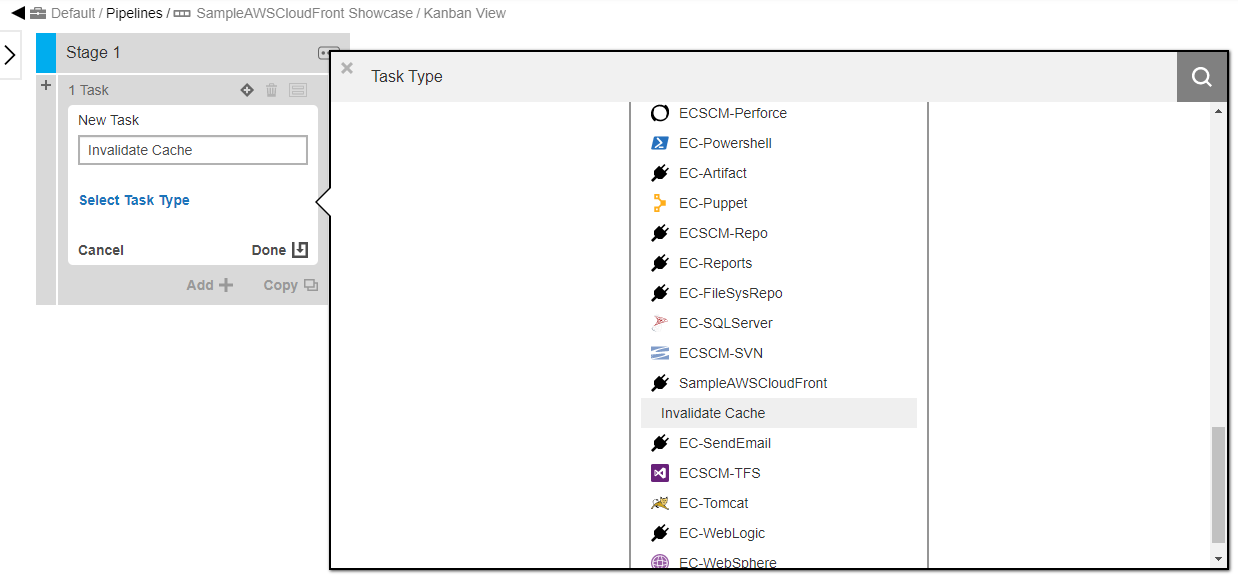
Now you’re in your pipeline editor. Click Add + on the task explorer, enter Invalidate Cache, click Select Task Type, scroll down the plugin list and click on your Invalidate Cache procedure below the plugin name:
Now, select on your procedure name and Define link. You see:
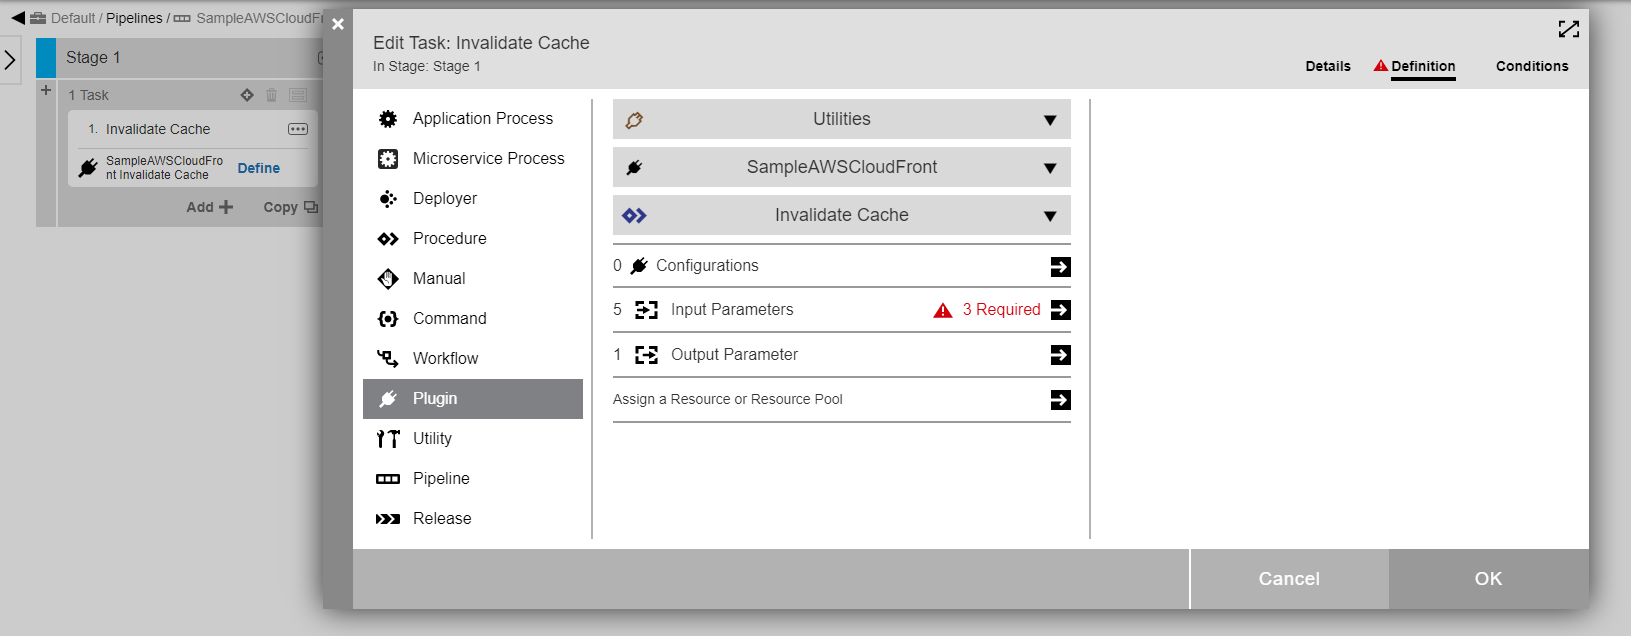
Click on input parameters to confirm that this procedure sees all the parameters as per the YAML spec.
Enter the values that correspond to the invalidation.
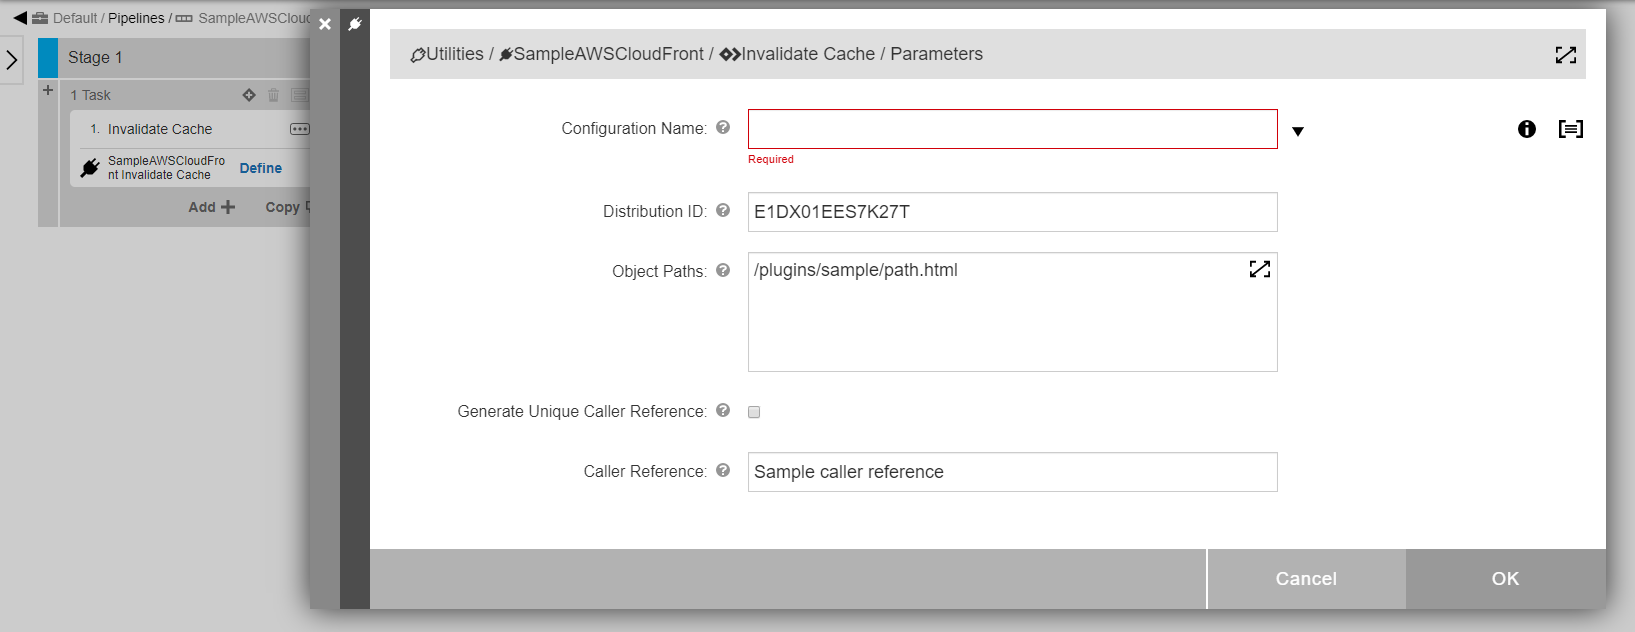
Click on the triangle at the right of Configuration Name parameter input field and choose the New Configuration item.
Enter values relevant for your configuration now.
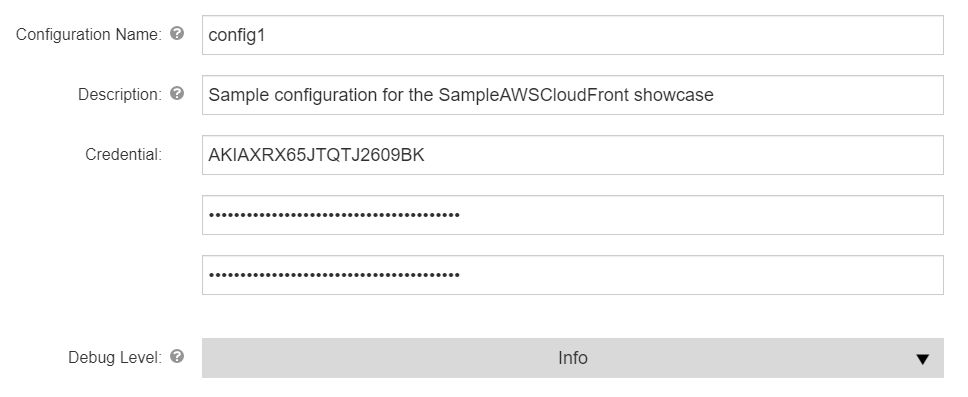
Save configuration and select it on the Input Parameters form.
This concludes the plugin as well as the pipeline setup.
Running the pipeline
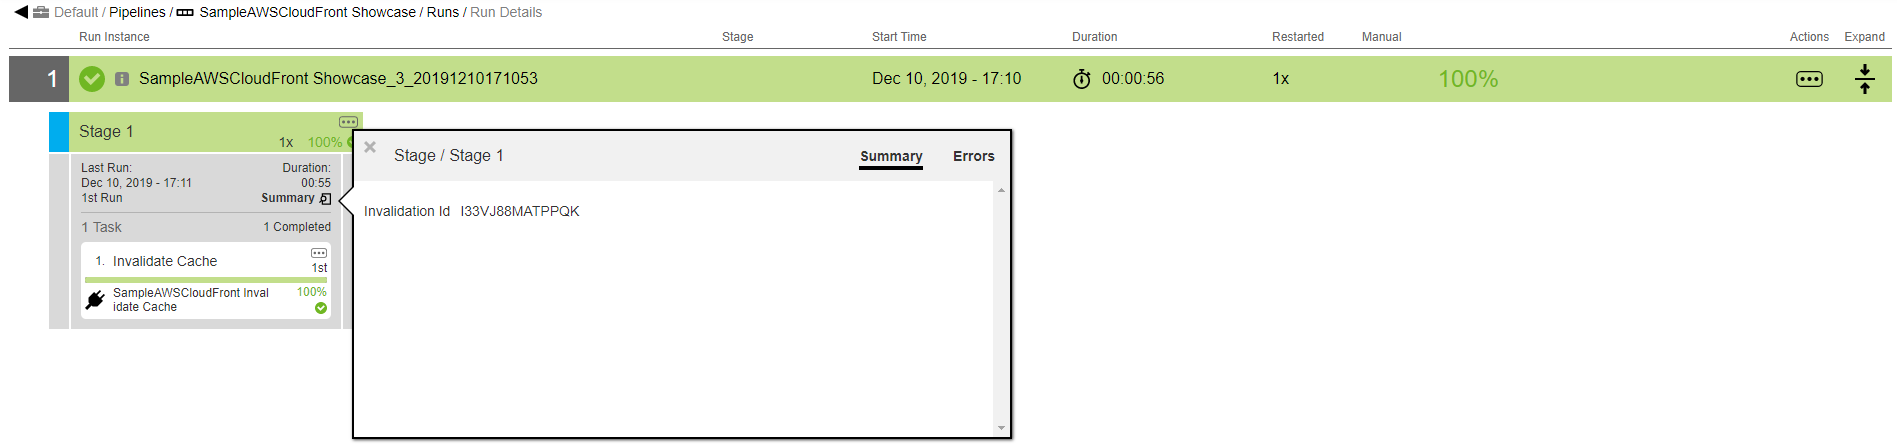
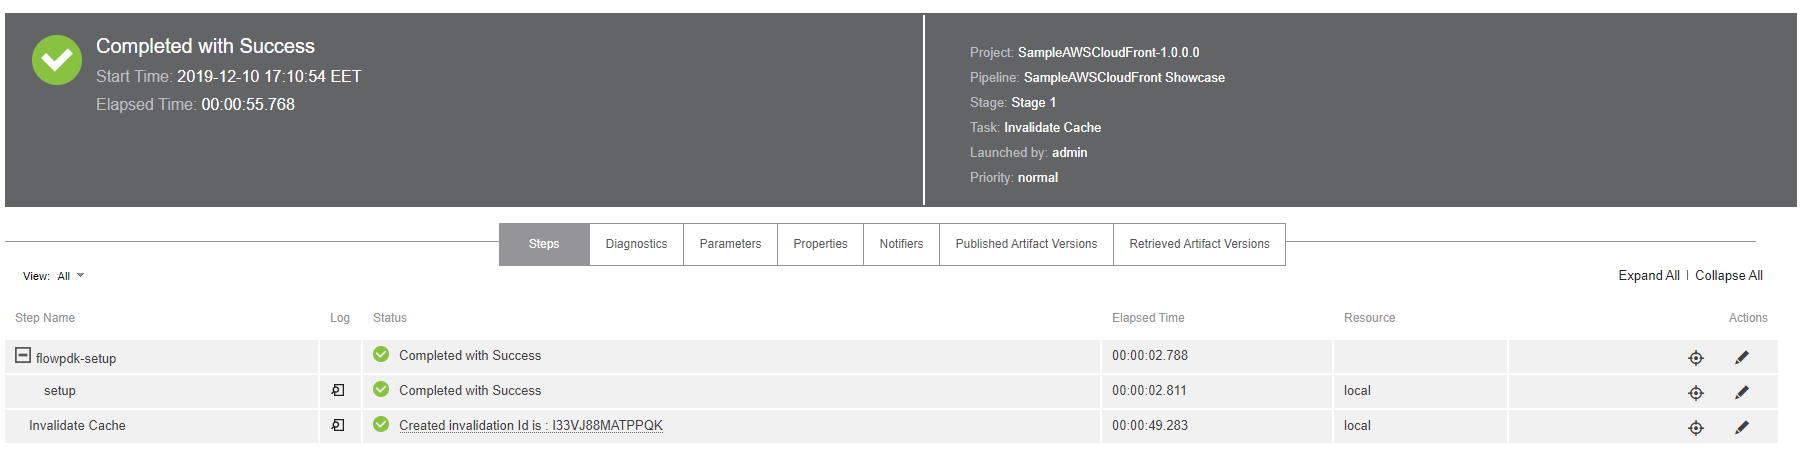
In the flow pipeline page click Run on the pipeline you have created. In the Popup dialog, click New Run and in the modal dialog that shows up, click Run again. You now see the following:

Click on the summary link:
Select 1. Invalidate Cache. You can see that the special step flowpdk-setup is performed to transfer the dependencies.
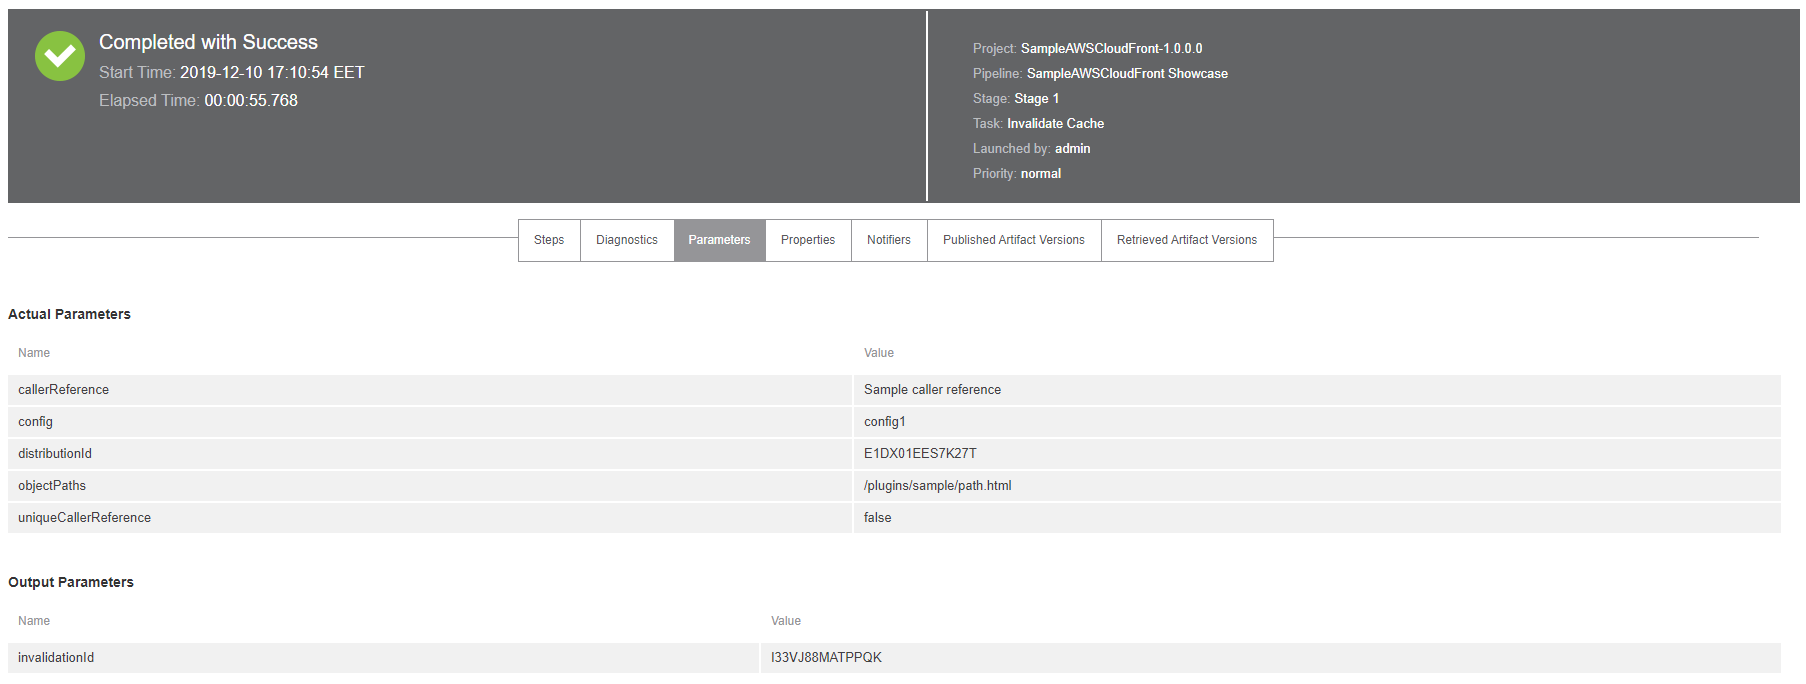
Click on the Parameters tab:
Click back on the Steps link and open the log link:
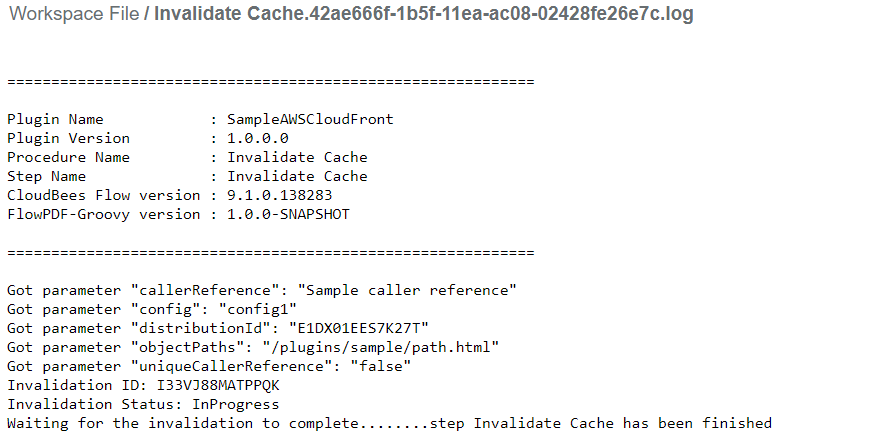
We now have a minimal working plugin for AWS CloudFront.