To begin, select the Projects tab, then the Create Project link at the top of the table. You need to create a project to contain the procedures you create.
On the New Project page, enter information in the fields as follows:
| Field Name | Description |
|---|---|
Name |
Type a unique project name. You may want your project names to reflect the work groups or teams that will be using them. For example, you might set project names based on the products they support. For our scenario examples, we will use "FirstNewProject" for our project name. |
Description |
Enter a text description for your reference if you choose. CloudBees Flow does not use or interpret this information. |
Default Resource |
(optional) For the purpose of "getting started", leave this field blank to use the Default resource already created during the CloudBees Flow installation. |
Default Workspace |
(optional) For the purpose of "getting started", leave this field blank to use the Default workspace already created during the CloudBees Flow installation. |
Click OK to save the information you entered.
After clicking OK, you see the Project Details page and the name of the new project adjacent to the page title.
-
For our scenarios, the project name is
FirstNewProject. -
Your new project name will appear on the Projects page also.

Scenario requirement: No additional requirements for this scenario. This scenario uses the local agent (resource) that was included on your local machine when CloudBees Flow was installed.
Overview
This scenario establishes that CloudBees Flow and its components were installed successfully and guides you through creating a simple procedure with a parameter that will echo Hello World. After you create this procedure, you will run the procedure and review the results.
At the end of this scenario, you will be familiar with the following CloudBees Flow concepts and features:
-
Projects
-
Procedures
-
Steps
-
Parameters
-
Jobs
-
Navigating the Job Details web page
Begin Scenario 1
Step1. Select the Projects tab
On the Projects page, you can see the default projects installed during the CloudBees Flow installation and the new project you just created.
Select your new project name to go to its Project Details page, then click the Create Procedure link.

Step 2. Create a procedure
On the New Procedure page, you need to be concerned with the section of the page illustrated below only.
Enter the following information:
| Field Name | Description |
|---|---|
Name |
For this scenario, |
Description |
(optional) Enter a text description for your procedure if you choose to do so. |
Default Resource |
Use the Browse link and choose |
Before leaving this page, notice the breadcrumb in the top-left corner. Most CloudBees Flow web pages contain a breadcrumb for easy return to the previous page.
Click OK to continue.
After clicking OK, CloudBees Flow takes you to the Procedure Details page—this is the page you use to add important information to your procedure. When your procedure contains steps, parameters, or email notifiers, and so on, those objects will be displayed here for your reference.
Step 3. Create a parameter
A CloudBees Flow procedure can define one or more parameters. These parameters are similar to the parameters of a subroutine in a programming language. Parameters allow you to define a reusable procedure by using symbolic variable names in place of a single, fixed value. When you run the procedure, you can type in a value to use for that particular job. You can refer to the parameter in a step for a procedure, using the standard CloudBees Flow property reference syntax— $[…]. For example, see Step 4, specifically the text in the Command(s) text box.
On the Procedure Details page, click the Create Parameter link to go to the New Parameter page.
Enter the following information:
| Field Name | Description |
|---|---|
Name |
Enter the parameter name |
Type |
Use the default |
Default Value |
Type-in |
Click OK after filling in the fields and CloudBees Flow returns you to the Procedure Details page.
On the Procedure Details page:
Notice the Parameters table is populated with your parameter entry.
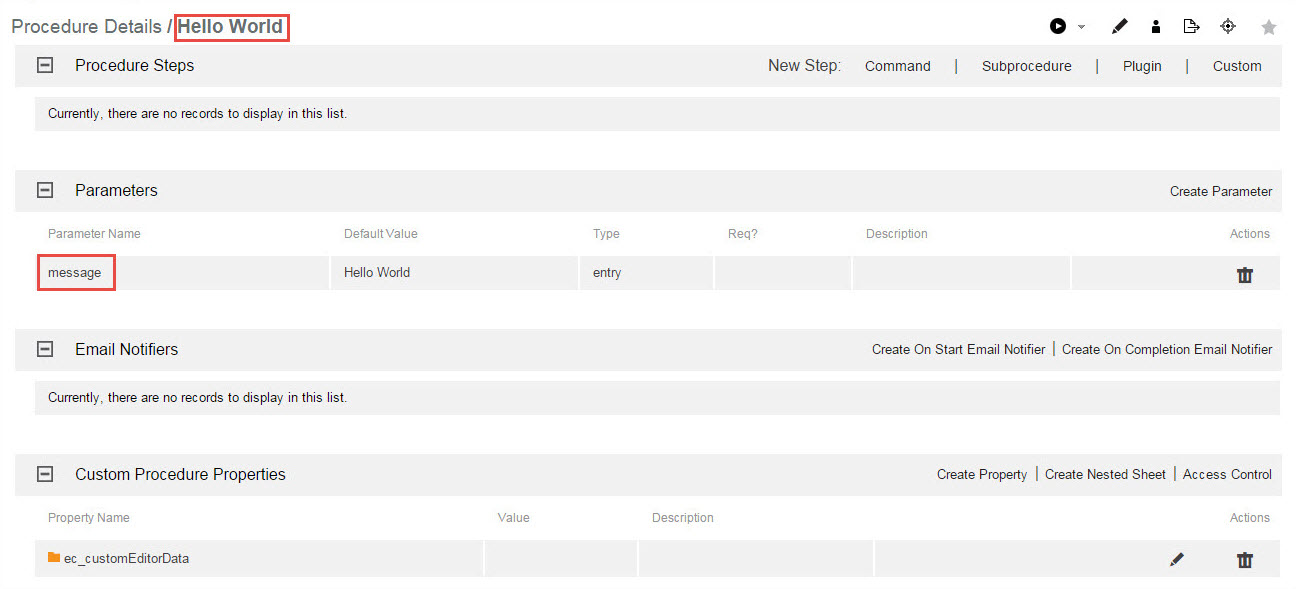
Also notice the name of the procedure we created, Hello World, is shown adjacent to the page title for your reference.
You can use the DSL Export ( ![]() ) button to download the objects as a DSL file.
) button to download the objects as a DSL file.
Step 4. Create a step
Now we can create a step on this procedure. On the Procedure Details page, click the Command link to go to the New Step page.
On the New Step page:
The following screen displays the portion of the New Step page you need for this scenario.
Notice this version of the New Step page contains a Command text box to enter the information you need. At a later time, when you choose to create a different step type, the New Step page will be populated with the appropriate fields required for that step type.
Enter the following information:
| Field Name | Description |
|---|---|
Step Name |
Use |
Description |
(optional) Add a text description about this step if you need one. |
Command(s) box |
Type |
Resource(s) |
For this scenario, leave this field blank to use the default resource you set on the procedure. If multiple resources are configured, you have the option to change the resource for each step if you prefer. |
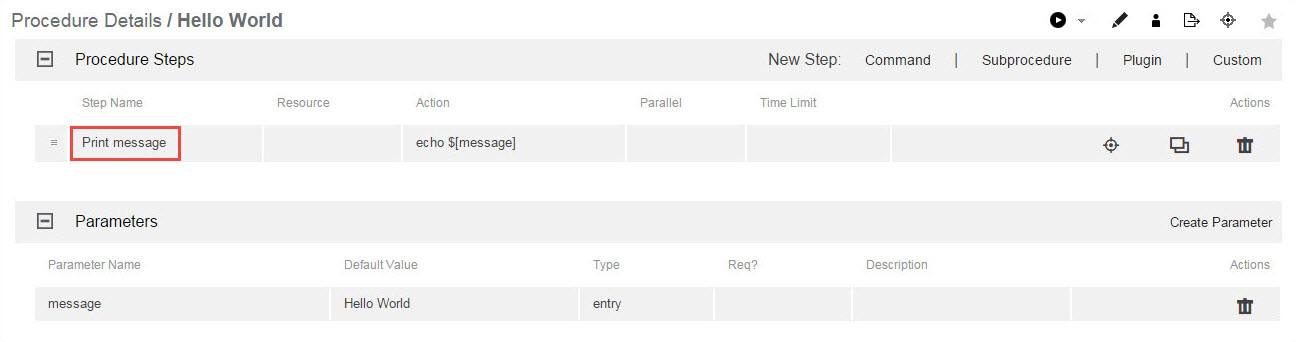
Click OK to create the step and CloudBees Flow returns you to the Procedure Details page to see its entry as displayed in the next screen example.
Step 5. Run the procedure
Notice the Run-arrow icon among the links at the top of the tables. If you click the Run link, the procedure will run as-is immediately.
For this scenario, hover your mouse over the adjacent down-arrow and select the Run… option.
Selecting this option provides the Run Procedure page where you can add or modify the parameter values as necessary. The Run Procedure page has the information we want for this scenario, so click the Run button.
When a procedure runs, it creates a job.
After clicking Run, CloudBees Flow takes you to the Job Details page to see the status of the job and watch its running progress. This web page supplies a wealth of other information.
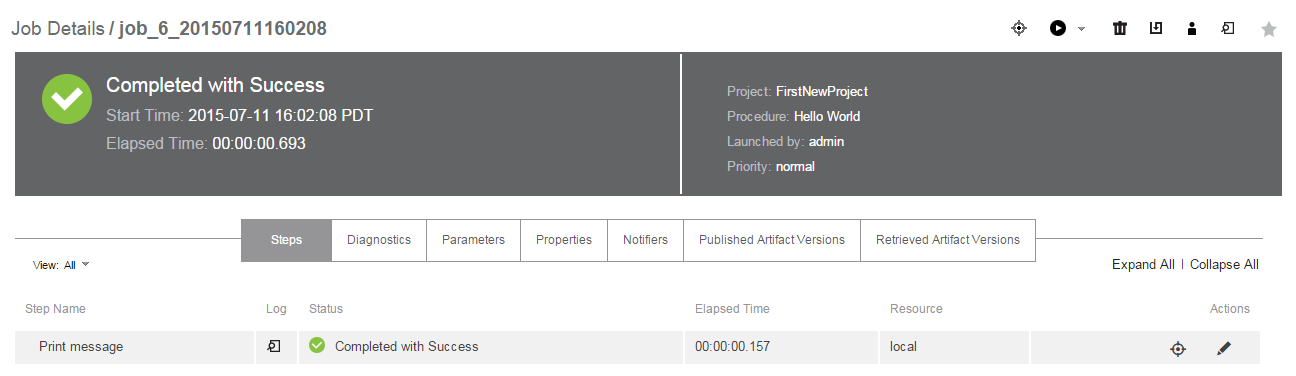
The Job Details page contains two sections. The section at the top of the page is the job’s summary, displaying the job’s status and other general information:
-
The green check icon is displayed to show the job completed successfully.
-
The Completed with Success section displays the result of the procedure that ran.
-
The general information section displays the project and procedure names and who launched the job.
The section below the summary area displays detailed job information, including tabs to expand information and links to access various other CloudBees Flow web pages.
-
Notice the success entry in the Status column—this is the step result.
-
In the Log column, click the icon in the Print message row to see the outcome/result of your Hello World Print message step. Your file looks similar to the following:

-
Select the Parameters tab to see the parameter you created and its value.
For complete information about the Job Details page functions and available information, click the Help link in the top-right corner of this CloudBees Flow web page.
Scenario Extension—Adding Another Step
Each procedure you create can contain as many steps as you need. We created only one step in this scenario. This example shows how to modify a procedure by adding additional steps. You can always add more steps or edit an existing step before you run a procedure again.
To add a step to an existing procedure:
-
On the Job Details page, select your procedure name (at the top of the page) to go to the Procedure Details page.
-
On the Procedure Details page, click the Command New Step link again.
-
On the New Step page, enter information in the fields as follows:
-
Name–
Print Step Info -
Command(s)–Enter the following text:
print "This step was launched by $[launchedByUser] on the resource$[/myResource/resourceName].\n"; -
Shell–
ec-perl -
Click OK to save the step and return to the Procedure Details page.
-
| You can move this new step to the top of the procedure by hovering your mouse over the icon next to the step name, then drag-and-drop the step to the top of the list. This is a useful function particularly if you find you have created steps in a different order in which you need them. |
Click Run (from the Procedure Details page).
Finding a CloudBees Flow Automation Platform Web Page
If you "lose" the Job Details page or any other CloudBees Flow web page, several navigation methods are available:
-
Use your browser’s Back button if you were recently on a page you want to revisit.
-
Use CloudBees Flow "breadcrumbs." On some pages you see breadcrumbs on the left-side of the page that note your current position/level within the project.
-
Use the tabs at the top of the page to drill-down to the page you need. For example:
-
To find the Job Details page: Select the Jobs tab and notice that your procedure name is now listed in the Job column, accompanied by a date, job number, and other related job information on the same row. When you run a procedure, it becomes a job. Select the job you want to see and you will go to the Job Details page for that job.
-
To find the Procedure Details page: Select the Projects tab, then select your project to go to the Project Details page to see a list of procedures in that project. Click on a procedure to go to the Procedure Details page for that procedure.
| A "project" is a container for all related procedures you create. You can create as many projects as you need, using the Create Projects link on the Projects page. |
As you use CloudBees Flow, you will quickly learn other navigation paths for your particular interests. In addition, most CloudBees Flow web pages contain a "star" icon in the upper-right corner. Click this icon to add that page to your Home page for quick "one-click" access in the future.
Summary
This simple Hello World procedure demonstrated how to quickly create a procedure and how any command can be wrapped and parameterized using a CloudBees Flow procedure. If you have an existing script you want to automate, you can call that script within a step command block. This scenario also introduced you to running a job, entering parameters for the job, and viewing results for the job you ran.
Go to Scenario 2