Event-based triggers provide the ability to automatically run pipelines and releases based on external events, supporting continuous integration models. Trigger support in CloudBees Flow allows users to integrate with external tools such as source control management systems. For example, a Git repository can be configured to automatically trigger a release upon code check-in.
CloudBees Flow supports these event-based triggers:
-
Webhook Triggers —An inbound, asynchronous event from a GitHub repository triggers an action such as run a pipeline or start a release.
-
Polling Triggers —An internal trigger is periodically sent to an external tool to determine if an event has happened such as a code check-in. And, if so, an action is initiated such as run a pipeline or start a release.
Webhook Triggers
The GitHub repository sends a post call to CloudBees Flow at a preconfigured endpoint, where the payload is processed and schedules are configured to run the target pipeline, release, or procedure.
In summary, here is what you need in order to trigger on webhooks:
-
One-time setup:
-
Create a Service Account —CloudBees Flow account to broker webhook interactions.
-
Create a Session Id —best practice is a separate session id for each release.
-
Create Source Control Configuration —Only GitHub is supported at this time. You need webhook secret from this configuration for use in event trigger configuration
-
-
For each event trigger:
-
Configure a Webhook Trigger —Configure the CloudBees Flow-side of the event trigger on the desired object.
-
Create a GitHub Repository Webhook —Configure the GitHub-side of the event trigger for the desired asset.
-
Configure a Webhook Trigger
You configure a webhook trigger at the time you initiate a pipeline or release run. Once configured, it is armed and ready to receive the webhook payload from GitHub.
-
Navigate to the Pipeline or Release object on which you want to set the trigger and click the green Run button. Select Triggers ; the object’s trigger list displays.
-
From here, add a new trigger by clicking the Add + button or edit an existing trigger by clicking the Edit button.
-
For new triggers:
-
Enter the Name.
-
Select the Git plugin from the Select Plugin drop down.
-
Select the desired source control configuration from the Configuration drop down, previously created.
-
Select the Webhook radio button and the New Trigger dialog continues.
-
-
Enter other configuration details. Click the plugin Help button for information about configuration details.
-
Click Next to continue.
-
Click Select Webhook Session ID arrow: the Service Account for Webhooks Trigger dialog displays.
-
Select Service Account and Session ID. Click Next.
-
Make any other configurations for this trigger and click OK : a confirmation dialog displays with the webhook endpoint. Note this URL; you use it when you Create a GitHub Repository Webhook.
Create a GitHub Repository Webhook
The steps in this section take place in your GitHub repository—you mush have write privileges on the repository. Before starting, make sure you have these items handy:
-
The CloudBees Flow webhook endpoint, created in Configuring a Webhook Trigger above.
-
Your webhook secret, defined in Create Source Control Configuration above.
To begin, go to the settings page of your repository or organization. From there, click Webhooks, then Add Webhook.
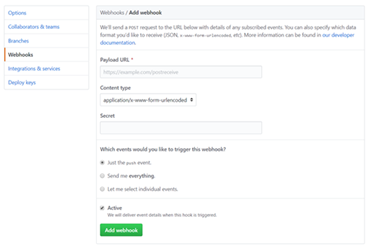
-
Payload URL —The webhook endpoint you generated during Configure a Webhook Trigger above.
-
Content type —Select
application/json -
Secret —This is the secret used to validate the webhook payload from GitHub and is defined during Create Source Control Configuration above.
-
Choose Which events you would like to trigger this webhook? —Select Just the push event. CloudBees Flow only honors push events.
-
Select Active and click Add webhook.
Confirm the repository webhook is correctly configured.
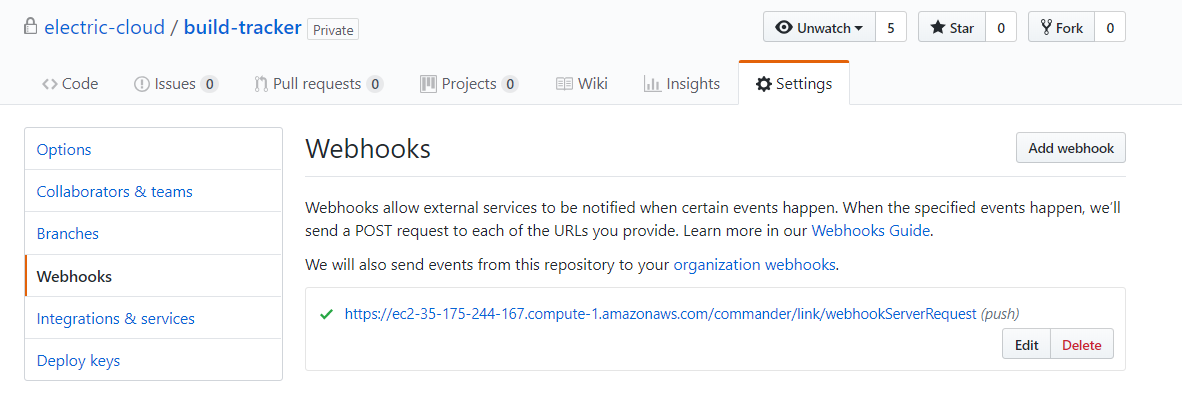
GitHub sends an initial ping request to the registered payload URL. These are listed under Recent Deliveries.
Polling Triggers
Configure CloudBees Flow to poll the specified source control repository for updates at a preconfigured schedule. If an update is detected, the pipeline or release object is run.
In summary, here is what you need in order to configure a polling trigger:
-
One time setup:
-
Create Source Control Configuration —The list of supported source control systems. You can also set up a configuration to poll a file or property.
-
-
For each event trigger:
-
Configure a Polling Trigger —Configure the CloudBees Flow-side of the event trigger on the desired object.
-
You configure a polling trigger at the time you initiate a pipeline or release run. Once configured, it is armed and ready to poll for the specified event.
Configure a Polling Trigger
-
Navigate to the Pipeline or Release object on which you want to set the trigger and click the Run button. Select Triggers; the trigger list for the object displays.
-
From here, add a new trigger by clicking the Add + button or edit an existing trigger by clicking the
 button.
 -
For new triggers:
-
Enter the Name.
-
Select a plugin from the Select Plugin drop down.
-
Select the desired source control configuration from the Configuration drop down, previously created.
-
Select the Polling radio button and the New Trigger dialog continues.
-
-
Enter other configuration details. Click the plugin Help button for information about configuration details specific to the source control configuration you chose in the last step. After details are entered, click Next to continue.
-
Continue with configuration details for this pipeline or release run and click OK : a confirmation dialog displays.
One-time Setup
You must have access rights to create a service account, a session Id, and a source control configuration. Contact your CloudBees Flow site administrator for assistance.
Create a Service Account—Webhook Triggers Only
A service account brokers all the webhook interactions between the GitHub repo and the pipeline webhook trigger. It’s principle purpose is to hold the webhook session Id . A session associated with the service account is valid up to six months, by default, so it is an ideal way to manage a long lasting webhook session.
-
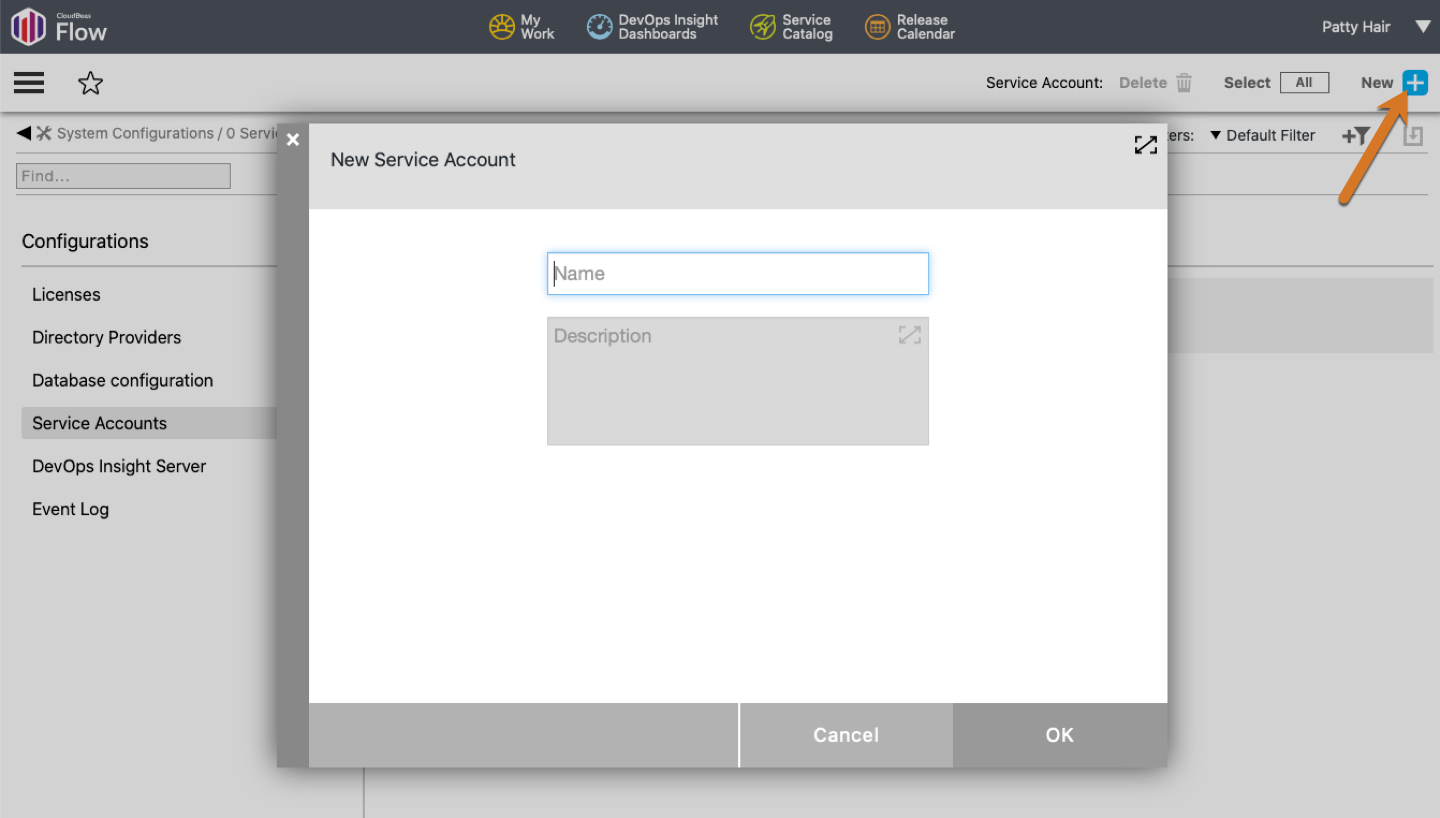
Navigate to Service Accounts list: Click the User Menu button and select System Configurations under the Administration category. Then, select Service Accounts from the left-side menu.
-
Click the New button: the New Service Account dialog displays.
-
Enter the service account name in the Name field. Best practice is to choose a name that represents the connection, such as
GitHub. Click OK to save the new account.
API access: To programatically create and manage service accounts, see Webhooks Management.
Create a Session Id—Webhook Triggers Only
A session is the container for the interactions between the GitHub repo and the triggering object and resides within a service account object. See Create a Service Account, as needed, before proceeding.
-
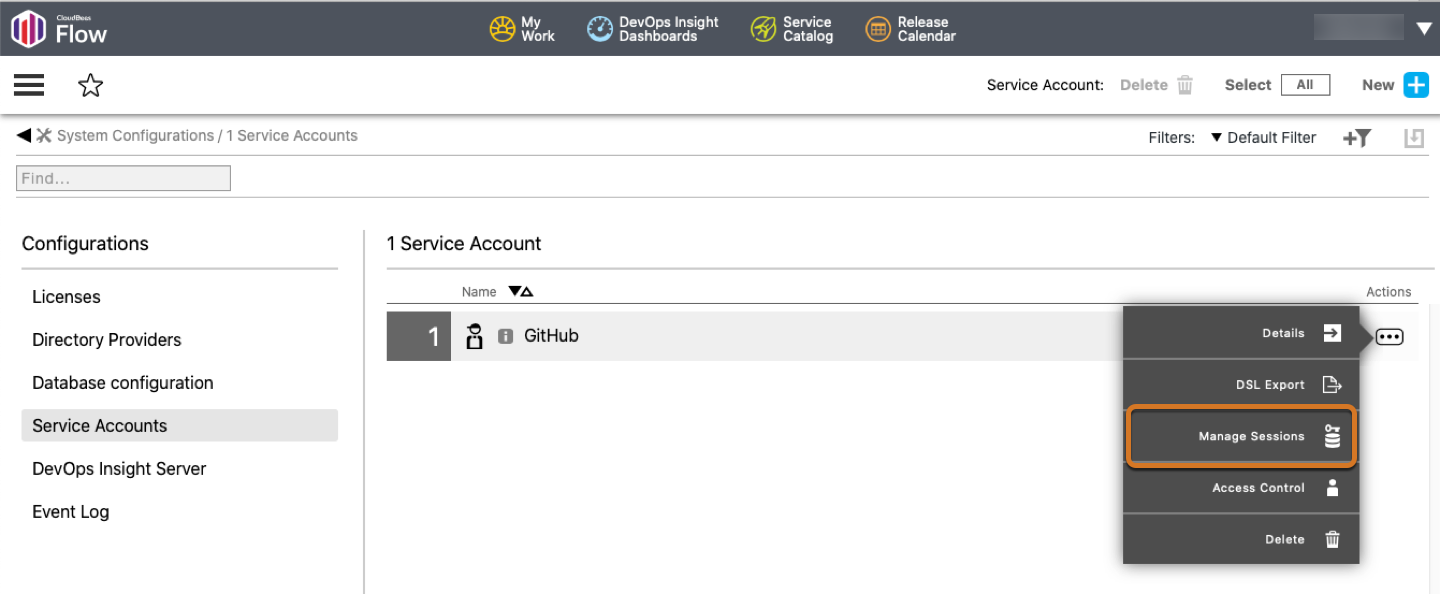
Navigate to Service Accounts list: Click the User Menu button and select System Configurations under the Administration category. Then, select Service Accounts from the left-side menu.
-
Click the Actions menu for the service account of interest and select Manage Sessions. This example uses the GitHub service account.
-
Click Add +: the New Session dialog displays.
-
If you haven’t already done for your CloudBees Flow server, you are asked to select your timezone.
-
Check the expiration date. The current six month expiration date is configured for you—update as needed. Best practice is to consider your release schedule; session Ids should not linger beyond the time period they are needed. Click OK when to proceed. Information about the session displays.
-
-
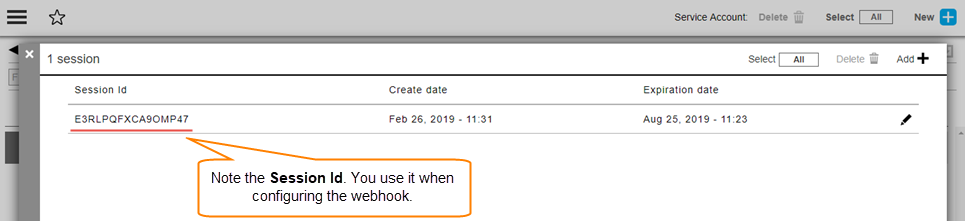
Note the Session Id; you need it when you Configure a Webhook Trigger .
API access: To programatically create and manage session Ids, see <Webhooks Management.
Create Source Control Configuration
Applicable for both webhook and polling triggers. A source control configuration contains the specific details needed to access your source control repositiory. If not already defined at your CloudBees Flow site, use the steps below to create a configuration.
-
Navigate to the Source Control object list: Click the User Menu button and select Platform Home page under DevOps Essentials. The platform landing page displays.
-
Select the Administration tab and then the Source control tab: The Source Control Configurations list displays.
-
Click the Create Configuration link: the New Source Control Configuration dialog displays.
-
Select the source control type from the SCM Type dropdown and fill out fields as applicable for your SCM type. The following is for Git source control configurations. Note: this is the only type supported by webhook triggers.
Field Name Description Configuration Name:
User-defined configuration name to identify this configuration. Use to distinguish between multiple configurations.
Description:
User-defined definition.
Login As:
User Name:
GitHub repo user name
Password:
or
Private Key:
Provide either a password or private key.
WebHook Secret:
(For Webhook triggers) A user-defined string used to encode and decode messages between the Git repo and CloudBees Flow. Keep this string handy; you need it when you Create a GitHub Repository Webhook .
-
Click OK to save the configuration.