This page displays detailed information about a job step.
Links and actions at the top of the table
-
Access Control —Use this link to set privileges for this job step. For more information, see the Access Control Help topic.
-
"Star" icon—Click this icon to add this page to your Home for quick one-click access in the future.
Summary section (at the top of the page)
Notice in the screen example below that the name of the job step you are viewing is adjacent to the page title, Job Step Details.
The Summary section provides:
-
The job’s Start, Wait (waiting for a resource), and Elapsed times
-
Wait times specified if your job steps were restricted by resource, workspace, a precondition, or license availability. For example, you will see the license wait time if a job step could not run because your license-allowed maximum concurrent step limit was met or exceeded, meaning no steps will run until the number of concurrent steps is reduced.
-
A General Information section with links to get you to the job step’s Job Details, Project Details, Procedure Details, or Edit Step pages.
-
Any custom reports in the summary area to the right of General Information. Reports on this page are for command steps only.
Reports
To create a special-purpose HTML report for a job: In the top-level of any of the job’s workspaces, add a file that contains the word "report" or "Report" and ends in the .html file extension. The link is automatically created when the Job Details page is displayed. The job’s workspace must be accessible to the web server. The link will be in the Reports section, within the Summary section.
Links
This page can include a Links section also, which will appear on the far right-side of the Summary section.
To add a link to this section:
-
Create a link to any file: To add a link, run a command in any job’s job step using this format (this works for both local [disconnected] and non-local workspaces):
ectool setProperty "/myJobStep/report-urls/<myReportName>" "/commander/jobSteps/<jobStepId>/<artifactDirectoryName>/<file-path>"Example command:
ectool setProperty "/myJobStep/report-urls/Test Report" "/commander/jobSteps/ $[/myJobStep/jobStepId]/testreport/index.html" -
Create a link to any directory: To add a link, run the following style command in any job’s job step:
ectool setProperty "/myJobStep/report-urls/Main Job Workspace" "file:////WinStor2/scratch/chron55build/$[/myJob/jobName]"
The tabbed sections
The next section of tabs allows you to select the type of information you want to see. You may see six or fewer tabs, depending on the type of job step you are viewing.
Child Steps table
The Child Steps table is available for subprocedure and broadcast steps only.
-
Click on a Step Name to go to that step’s Job Step Details page.
-
Click the Log "icon" to see that job step’s log information.
-
Status—This column provides the job’s step status.
-
Aborted—The step or job was aborted.
-
Canceled—The step did not run because the job was aborted or a previous step was aborted.
-
Error—The command failed or
postpdetected an error in the output. -
Running—The step is currently running or a step inside the subprocedure call is running.
-
Skipped—The step did not run because the run condition evaluated to "false".
-
Success—The step completed with no errors or warnings.
-
Waiting for Resource or Workspace—The step is waiting to run as soon as a resource or workspace is available.
-
Warning—
postpdetected a warning message.
The Status field can be over-ridden by postp to include more specific information. postp information may be linked directly to diagnostic information—also available by selecting the Diagnostics tab.
-
Click on a Resource name to go to the Edit Resource page.
-
Click the Edit link in the Action column to go to the Edit Step page.
General table
This section displays basic information including the step ID, step name, create and end times, and whether the step invoked a subprocedure or ran a command.
Diagnostics table
If the job step or child step (for subprocedure and broadcast steps) generated warning or error messages, you will see those messages here. This section contains one or more diagnostics, each of which is a portion of a step’s log file that was identified as "interesting" by the step’s postprocessor. Typically, each diagnostic relates to an error or warning detected by the postprocessor. All diagnostics for a particular job step appear together.
Parameters table
This section displays parameter values supplied to the top-level procedure when the job step was invoked and has these columns:
-
Name
-
Value
This table is available for steps with child steps only.
Properties table
This section displays information computed or used by the job step while it is running. After the job step completes, these properties are normally read-only.
-
Click a Property Name to edit that property.
-
If a "folder icon" precedes a property name, it denotes a Nested Property Sheet.
-
This section also provides Create Property, Create Nested Property, and Access Control links to update or enter additional information for the next time this job step is run. For more information on properties, see the Properties Help topic.
Notifiers table
If you have designated certain persons or groups to be notified of details for specific job steps, this section displays who receives an email notification, the type of notification, any condition, and a description [if supplied]. If a notifier is available, you can click on its name to view details or make modifications.
Job Step Time and waitTime Properties Explained
-
start—The time when this job step began executing.
When the CloudBees Flow server assigns a resource to run the step, it issues a <runcommand> request containing the expanded command body to that resource’s agent. The "start" time is when that <runcommand> is sent to the agent.
-
finish—The time when this job step completed.
When a command finishes executing, the CloudBees Flow agent issues a <finishcommand> request containing the exit code and other metadata back to the CloudBees Flow server. The "finish" time is when the <finishcommand> is received by the server.
-
elapsedTime—The number of milliseconds between the start and end times for the job.
This is exactly "finish"—"start".
-
totalWaitTime—The sum of resource, workspace, and license wait times for this job step.
The sum of resourceWaitTime, licenseWaitTime, and workspaceWaitTime.
-
waitTime—The number of milliseconds the step spent between runnable and running (for example, waiting for a resource).
Covers known reasons why a step couldn’t run as soon as it became runnable (same as totalWaitTime), plus any other possible reason (slow transaction commits, system paging, etc).
-
resourceWaitTime—The length of time this job step stalled because it could not get a resource. This could indicate that eligible resources for the step have reached their step limit, are in-use but the step requires a resource exclusively, or resources are down.
For subprocedure steps, this is the sum of all child steps.
-
licenseWaitTime—The length of time this job step had to wait to process because the license limit was reached or exceeded.
For subprocedure steps, this is the sum of all child steps.
-
workspaceWaitTime—The time this job step had to wait because no workspace was found or available.
For subprocedure steps, this is the sum of all child steps.
When it is time to schedule the step, CloudBees Flow checks the license and starts counting time against licenseWaitTime until the license is satisfied (e.g., running this step would not exceed the maximum number of licensed hosts). After the step is scheduled, CloudBees Flow sends a runCommand message to the agent. If it fails because CloudBees Flow cannot talk to the agent, CloudBees Flow accrues time against resourceWaitTime. If CloudBees Flow can talk to the agent, but it has trouble manipulating the workspace (for example, it cannot create the workspace dir, map the drive [on Windows], or create files), CloudBees Flow accrues time against workspaceWaitTime.
It is possible for the following to occur:
-
A job step becomes stalled due to a license issue.
-
The license limit is no longer exceeded and CloudBees Flow tries to run the step but hits a bad resource.
-
When the resource is good, the step stall because of a license again (adding more time to the licenseWaitTime),
-
When the license is satisfied, CloudBees Flow reaches the resource, and everything runs.
This is why CloudBees Flow continues cycling through these states until everything is satisfied.
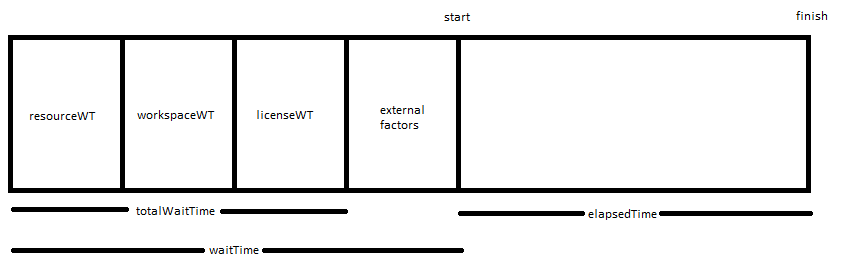
The first 4 blocks (resourceWaitTime, workspaceWaitTime, licenseWaitTime, and external factors) can occur in any order. External factors could include things such as system paging, slow transaction commits, etc.